Abstract
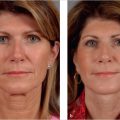
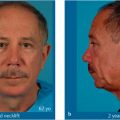
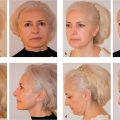
Much of facial aging can be attributed to volume deflation and tissue laxity. Successful surgical rejuvenation can be achieved through volume restoration with autologous fat grafting of the facial fat compartments. In conjunction with volume restoration, correction of tissue laxity and recontouring of the face and neck can be achieved. Current strategies for surgical correction of the face and neck involve superficial musculoaponeurotic system (SMAS) manipulation, medial platysma plication, and lateral platysma tightening through the lateral platysma window. These combined techniques facilitate optimal results in facial rejuvenation.
9 The Lift and Fill Facelift: Autologous Fat Grafting
Key Points
Much of facial aging can be attributed to volume deflation and soft tissue laxity.
Surgical rejuvenation aims to address tissue laxity and volume restoration.
9.1 Preoperative Steps
9.1.1 Analysis
The facial rejuvenation procedure begins with a thorough preoperative analysis to identify areas of volume deflation, rhytides, and tissue laxity.
Areas of volume deflation as well as deep rhytides are marked preoperatively in the dependent position to facilitate intraoperative accuracy.
9.2 Operative Steps
See Video 9.1.
9.2.1 Fat Harvest and Facial Fat Compartment Augmentation
Fat is typically harvested from the medial thighs with manual, low-pressure aspiration using a 10-cc syringe and a 3-mm multihole cannula.
To optimize cell viability, no local anesthetic or epinephrine is used before aspiration.
The aspirate is centrifuged for 1 minute at 2,250 rpm to remove cellular debris.
Fat is then isolated and transferred to 1-cc syringes.
Autologous fat transfer is performed at the beginning of the procedure to facilitate accurate volume restoration.
Just lateral to the alar–cheek junction, a 14-gauge needle is used to introduce the Coleman cannula into the deep compartments.
Fat is injected into the deep malar compartments bilaterally using 1-cc syringes.
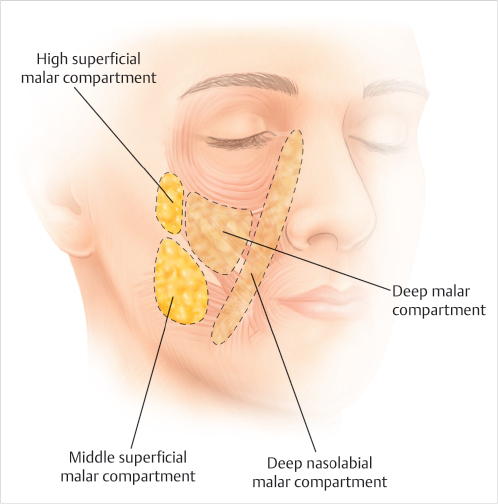
Approximately 10 to 12 cc of healthy yellow fat is distributed into the deep central facial compartments.
This includes 2 cc into the deep nasolabial compartment and 2 to 4 cc in the deep malar compartments (Fig. 9.1).
Depending on the desired malar contour, the high superficial malar and middle superficial malar compartments are augmented with 1 to 2 cc of fat (Fig. 9.1).
9.2.2 Skin Elevation
Each hemiface is injected in the subcutaneous plane with 100 cc of a solution of 1:400,000 epinephrine.
A curvilinear intratragal and preauricular incision is designed. Superiorly, the incision travels preauricularly, and at the level of the helical root, the incision extends anteriorly along the infratemporal hairline.
The inferior incision extends along the root of the lobule and around the contour of the conchal cartilage.
The postauricular incision is carried superiorly along the hairline, and depending on the extent of skin removal, the incision is carried into the hair-bearing scalp, or along the posterior hairline.
Skin elevation is carried out strategically in zones 1, 2, and 3.
The borders of zone 1 include a line drawn from the alar base to the tragus superiorly, and the anterior border of the sternocleidomastoid muscle inferolaterally.
Zone 2 is the region posterior to the sternocleidomastoid toward the posterior hairline.
Zone 3 is the region from the superior border of zone 2 extending superiorly to the lateral canthus.
The submental incision is made approximately 3 to 4 mm posterior to the submental crease.
Skin is elevated from the underlying platysma.
9.2.3 Neck Contouring
Following elevation of skin from platysma through the submental incision, the medial borders of the platysma are identified.
Medial platysma banding and diastasis are corrected with medial platysma plication.
Beginning as inferiorly as possible and traveling superiorly, the medial borders of the platysma are plicated with buried, interrupted sutures.
To prevent bowstringing of the medial platysma, and to accentuate the cervicomental angle, a wedge of platysma is excised inferiorly at the medial border.
Care is taken to break through the posterior cervical fascia to ensure proper release and accentuation of the cervicomental angle.
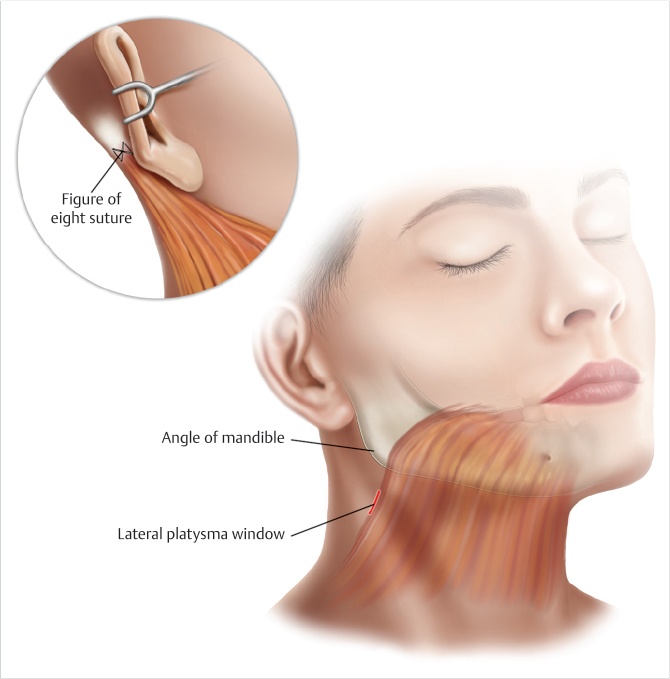
The lateral platysma window is initiated one fingerbreadth below the angle of the mandible and one fingerbreadth in front of the sternocleidomastoid muscle (Fig. 9.2).
The platysma is elevated carefully in a medial and inferior direction for 2 to 3 cm (Fig. 9.2).
The lateral platysma is tightened and secured to the mastoid fascia with two or three figure-of-eight sutures (Fig. 9.2).
Related posts:
Stay updated, free articles. Join our Telegram channel

Full access? Get Clinical Tree


