Abstract
Modern-day facial rejuvenation surgery has evolved significantly from simplistic lifting to advanced contouring techniques that re-establish a youthful, three-dimensional shape to the face and neck. Proper treatment of sagging facial tissue requires emphasis on superficial musculoaponeurotic system (SMAS) repositioning which allows only redundant skin to be excised and wound closure under no tension. This averts a tight, “pulled” appearance and produces high-quality scars. A high SMAS has the advantage of achieving a simultaneous lifting of the midface, lower cheek, and jowl. With the addition of volume, facial fat grafting allows surgeons to work in a different dimension of facial rejuvenation. This significantly amplifies the outcomes that can be obtained in comparison to traditional facelifting techniques alone. In the neck, the key principle is a reduction in volume. This is achieved by focusing on subplatysmal problems, which will allow precious subcutaneous fat to be preserved. This chapter will present analysis and technical considerations for performing a high SMAS flap, subplatysmal neck contouring, and comprehensive facial fat grafting.
12 High SMAS Facelift and Necklift with Fat Grafting
Key Points
Proper treatment of sagging facial tissue requires emphasis on superficial musculoaponeurotic system (SMAS) repositioning which allows only redundant skin to be excised and wound closure under no tension. This averts a tight, “pulled” appearance and produces high-quality scars.
A high SMAS flap planned along the upper border of the zygomatic arch has the advantage of achieving a simultaneous lifting of the midface, lower cheek, and jowl.
In the neck, subplatysmal problems will contribute significantly to aging and require treatment in most cases if optimal results are to be obtained. Focus on the subplatysmal layer will allow precious subcutaneous fat to be preserved.
With the addition of volume, fat grafting allows surgeons to work in a different dimension of facial rejuvenation which significantly amplifies the outcomes that can be obtained in comparison to traditional facelifting techniques alone.
12.1 Preoperative Steps
12.1.1 Analysis
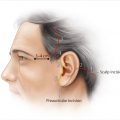
For the temporal portion of the facelift incision, each patient’s cheek skin redundancy must be examined along with the location of temple and sideburn hair. If cheek skin redundancy is small and ample temple and sideburn hair is present, a temple incision can be placed within the temple scalp, otherwise a temple hairline incision should be used as is the case for most patients.
Similar planning is performed for the occipital incision. If minimal excess neck skin is present, the incision can be placed transversely, high on the occipital scalp into the hair, otherwise the incision should be placed along the occipital hairline as is the case for most patients.
The neck of each patient should be examined, noting the amount of preplatysmal and subplatysmal fat, size of submandibular glands, presence of static and dynamic platysmal bands, and visibility of prominent digastric muscles.
Careful preoperative markings must be made in the sitting position to guide the precise location for fat grafting. These markings should be photographed and used intraoperatively to help guide treatment.
12.2 Operative Steps
See Video 12.1.
12.2.1 Fat Harvest and Facial Fat Grafting
Fat is typically harvested from the hip or lateral thigh from both sides with the patient turned into a semilateral decubitus position with a limited prep and drape.
Approximately 1 cc of a dilute 0.1% lidocaine with 1:1,000,000 epinephrine solution is injected into the harvest site for every 3 cc of anticipated fat removal. At least 120 cc of total fat is harvested for a typical case.
Fat is harvested with manual, low-pressure aspiration using a 10-cc syringe and a 2.1 to 2.4 mm harvesting cannula.
The unprocessed fat is then centrifuged for 1 to 3 minutes at 2,500 rpm.
After discarding the oil and water components, fat is then transferred to 1-cc Luer lock syringes.
The higher density fat or fat at the bottom of the syringe is considered better quality and used preferentially in the procedure.
Fat grafting is performed at the beginning of the procedure as we believe it allows for more accurate placement of fat and overall improved outcomes.
Injections are made using fine cannulas (0.7–1.2 mm) with multiple stab incisions throughout the face using a 20-gauge needle.
Infiltration is made in a “spray painting” type fashion versus bolus injections to optimize the chance of graft viability. This requires rapid movement of a fine cannula with very slow movement of the plunger to disperse the fat in tiny aliquots.
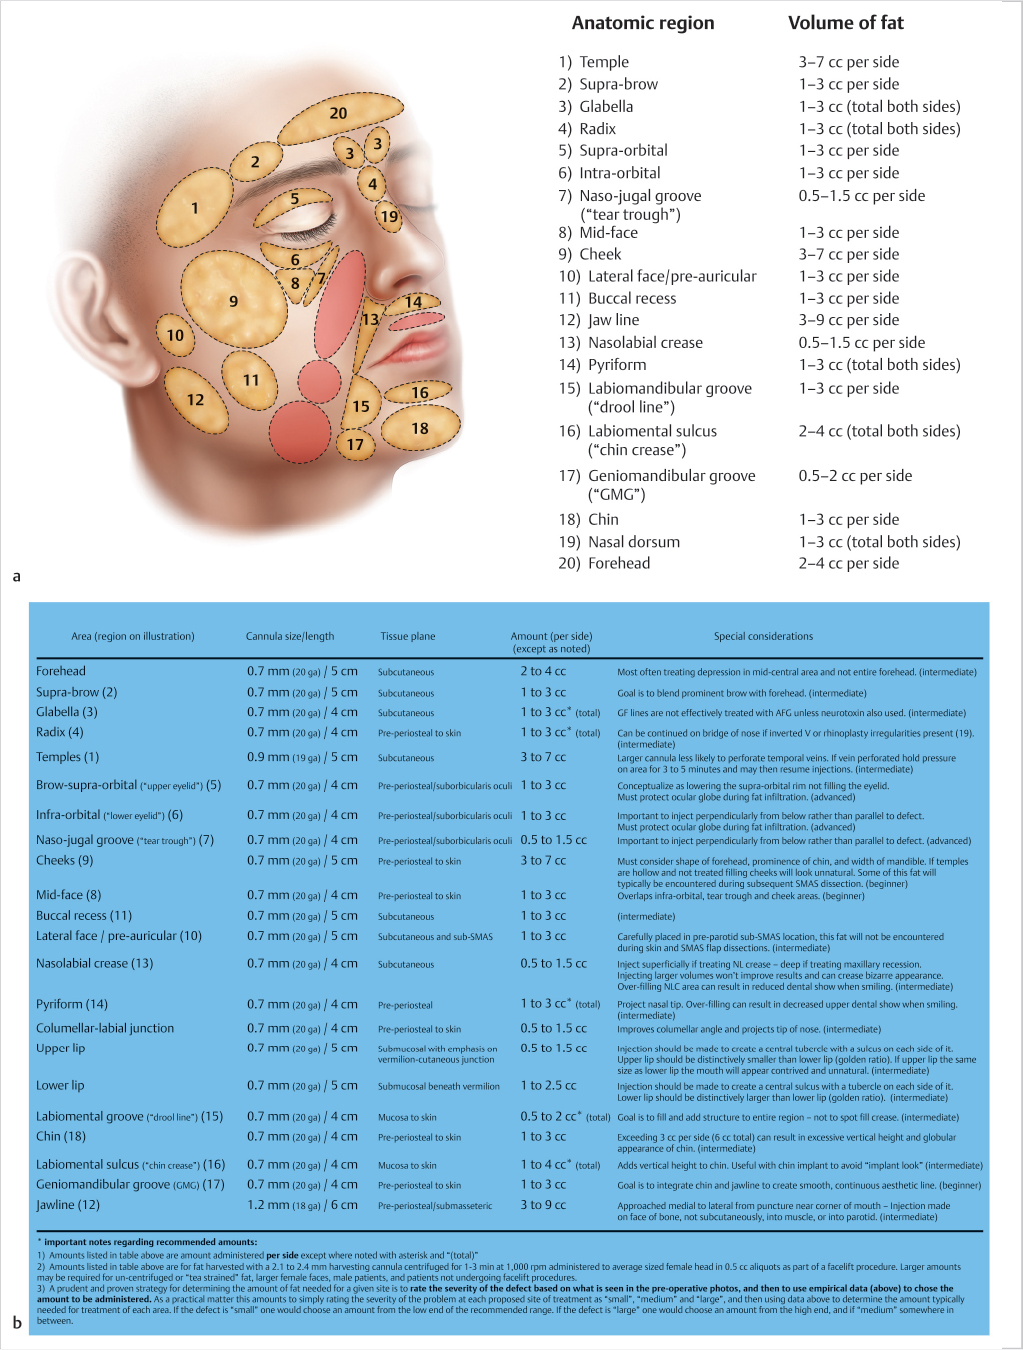
In most cases volume loss has occurred globally in the face and thus fat grafting must be performed in a fairly comprehensive manner as opposed to only treating a few limited regions.
Ultimately this technique should be viewed as an artistic endeavor in terms of the volume and distribution of fat placement; however with time, a systematic approach to the face is developed, which requires separating the face into regions with a range of volumes used for each region (Fig. 12.1).
For most regions, multiple planes of injection are used. The major exception is around the eyes where one should adhere to a deep pre-periosteal plane.
12.2.2 Skin Elevation
For sensory nerve blocks and for infiltrating the area marked for incision, 0.25% bupivacaine with epinephrine 1:200,000 is used.
Areas of subcutaneous dissection are infiltrated with 0.1% lidocaine with epinephrine 1:1,000,000. A total of approximately 400 to 500 cc is used.
In most cases, a temple hairline incision is used to prevent excessive hairline displacement.
The prehelical portion of the preauricular incision should be made as a soft curve paralleling the curve of the anterior border of the helix. As the tragus is approached, the incision is carried into the depression superior to it and then into a retrotragal position.
At the inferior portion of the tragus the incision must turn anteriorly and then again inferiorly into the crease between the anterior lobule and cheek. The incision will then continue around the lobule and precisely within the auriculomastoid crease.
In most cases, the incision should be placed along the occipital hairline but then turned into the scalp at the junction of the thick and thin hair at the nape of the neck. This design will avoid notching of the occipital hairline.
All skin flap elevation is carried out using a medium Metzenbaum scissors.
Skin elevation begins with the postauricular skin flap at the most inferior point of the occipital hairline incision. At this point more subcutaneous fat is present and the proper plane is easier to identify. The dissection then continues anteriorly to release the postauricular skin and then over the lateral neck.
In the cheek, it is easiest to begin skin flap elevation in front of the lobule.
In order to avoid thinning of the SMAS, the cheek skin flap must be elevated in a slightly more superficial plane compared to the neck. If dissection is in the proper plane, transilluminated flaps will have a rough “cobblestone” appearance.
A submental incision is made approximately 1 to 2 cm posterior to the submental crease and the crease along with the mandibular ligaments is released. The dissection of the anterior neck skin flap will be more easily performed through it rather than the postauricular incisions.
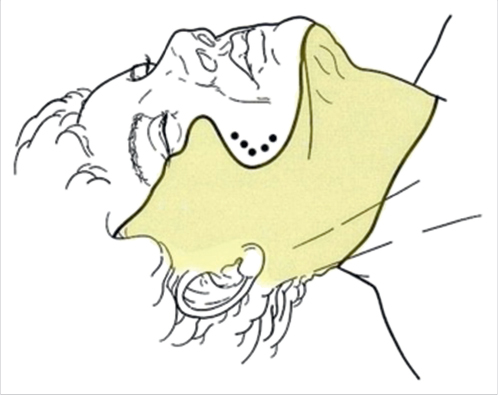
The neck should be undermined completely in most cases. However, it should not arbitrarily include the entire face (Fig. 12.2). Preservation of the anterior platysma-cutaneous ligaments in the perioral cheek will allow a better SMAS effect in this area that would otherwise be lost with wide undermining.
Related posts:


Stay updated, free articles. Join our Telegram channel

Full access? Get Clinical Tree


