Abstract
The face can be broken down into two distinct aesthetic units: the central oval and the peripheral hemicircle. The central oval is composed of the loose, dynamic structures that fall prey to the gravitational forces of nature. Combined with loss of bone volume, it becomes evident that the deflation and gravitational migration of the soft tissues lead to “earlier aging” of the central oval of the face.
The authors favor a comprehensive approach for rejuvenation of both the central oval and peripheral hemicircle of the face. Basic tenets to this approach include (1) a direct approach to the central oval of the face; (2) an interconnected subperiosteal plane of dissection in the upper and midface; (3) use of small hidden slit incisions; (4) absence of visible incisions on the central oval; (5) use of endoscopic techniques; (6) absence of traction with the skin or SMAS (superficial musculoaponeurotic system) from the peripheral hemicircle; (7) ability to modify the skeletal framework in the same operative plane; and (8) ability to correct the deficit of soft tissue volume.
Keywords
Tridimensional endoscopic mid-facelift, Mentopexy, Skin-only blepharoplasty, Bichat’s fat pad excision, Mandibular matrix, Fat grafting, Cervicoplasty, Cervicofacial rhytidectomy
History
The tridimensional endoscopic facelift is based upon the construct of the subperiosteal facelift technique initially described by Tessier .Tessier conceived that this “orthomorphic” subperiosteal facelift would be an innovative way to provide facial rejuvenation in young and middle-age patients . Subsequently, Psillakis et al. published their modifications to the subperiosteal approach, demonstrating that extensive lateral periorbital dissection could provide improved rejuvenation of the cheek region. Soon after, several authors demonstrated their experience with the subperiosteal techniques . The extended subperiosteal facelift, described in 1991, introduced several innovative concepts including extensive midface dissection, improved suspension techniques, and a safer method of access across the zygomatic arch . Further refinements in the extended subperiosteal technique ushered in the era of endoscopy. In the mid-1990s, techniques adapted from the open subperiosteal rhytidectomy approach proved that endoscopic methods could be developed to perform facial rejuvenation .
Over the past decade, the senior author has dedicated his practice to facial rejuvenation using the tridimensional endoscopic facelift technique. The knowledge and experience developed from this approach are presented in this chapter. The authors hope to provide insight into their comprehensive approach to endoscopic facial rejuvenation.
Personal Philosophy
The aging face is characterized by volumetric change caused by a reduction of the soft tissues and resorption of bone . The volumetric changes affect the central part of the face earlier than the peripheral areas of the face. The central portion of the face comprises the mimetic and sphincter muscles allowing facial expressions. The peripheral portion of the face is more static and thus more resistant to the aging process. Thus, the face can be broken down into two distinct aesthetic units: the central oval and the peripheral hemicircle . The central oval is composed of the loose, dynamic structures that fall prey to the gravitational forces of nature. Combined with loss of bone volume, it becomes evident that the deflation and gravitational migration of the soft tissues lead to “earlier aging” of the central oval of the face.
The authors favor a comprehensive approach for rejuvenation of both the central oval and peripheral hemicircle of the face. Basic tenets to this approach include (1) a direct approach to the central oval of the face, (2) an interconnected subperiosteal plane of dissection in the upper and midface, (3) use of small hidden slit incisions, (4) absence of visible incisions on the central oval, (5) use of endoscopic techniques, (6) absence of traction with the skin or superficial musculoaponeurotic system (SMAS) from the peripheral hemicircle, (7) ability to modify the skeletal framework in the same operative plane, and (8) ability to correct the deficit of soft tissue volume.
Rejuvenation of the central oval of the face can be accomplished with endoscopic forehead lift , endoscopic midface lift , and mentopexy procedures. The endoscopic forehead lift and midface lift procedures can be used for all degrees of facial rejuvenation. Mentopexy is performed in selective cases. Rejuvenation in the peripheral hemicircle focuses upon the neck and jawline and can be accomplished through a variety of techniques. Younger patients with good skin tone and moderate submandibular fat accumulation benefit from the nonexcisional cervicoplasty . The suture suspension method described is based upon the techniques developed by Giampapa and DiBernardo and Guerro-Santos , in which important modifications have been made by the senior author. Patients with severe laxity of the skin are treated with a traditional excisional cervicoplasty through submental and periauricular incisions. In select patients, skeletal augmentation of the jawline is necessary to achieve harmony between the aesthetic units of the face. The mandibular matrix system has been developed to correct skeletal deficiencies of the jawline, give more angularity to the jawline, and to provide support for the soft tissues.
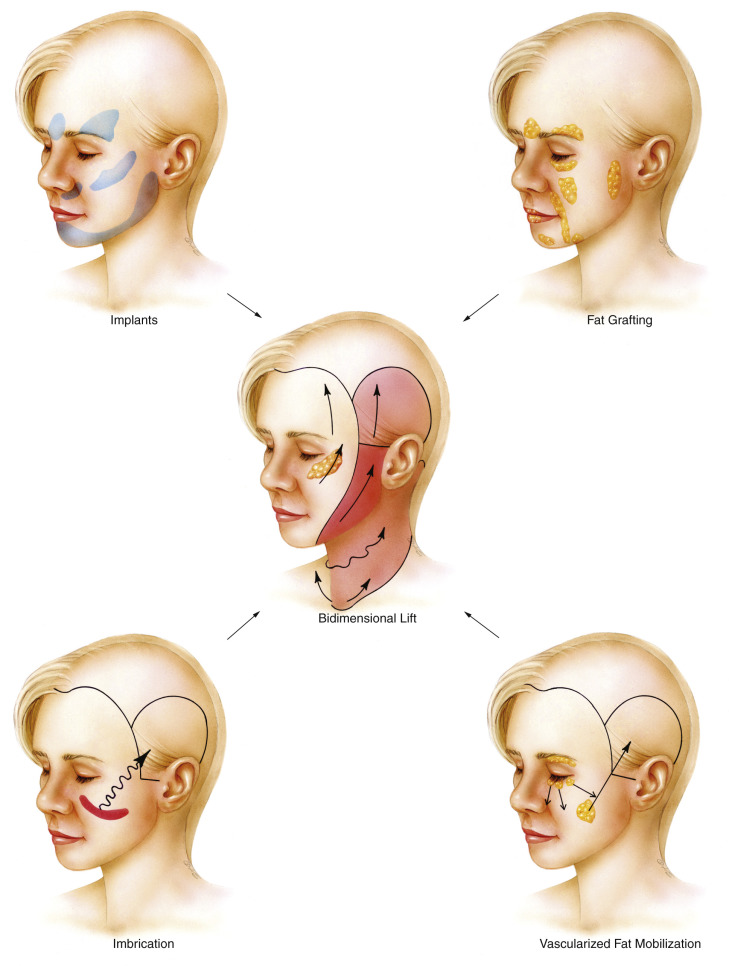
Because of the individual nature of the aging process, facial rejuvenation can be provided through the use of soft tissue manipulation, soft tissue augmentation, and alloplastic augmentation ( Fig. 20.1 ). The goal of this chapter is to provide the authors’ approach toward the treatment of the aging face. The techniques described form the components of the tridimensional endoscopic facelift procedure.
Anatomy of Facial Aging
Successful rejuvenation of the face requires a thorough understanding of the anatomic changes associated with aging. Characteristic features in the frontal region include visible spasm of the corrugator muscles, deep-set eyes, and the appearance of deflated brows with hooding and upper eyelid skin excess. The temporal region becomes hollowed. The lower eyelids demonstrate orbital fat herniation, and in advanced stages, exposure of the lower orbital rim leads to creation of a “tear-trough” deformity. The malar area is characterized by loss of thickness and ptosis of Bichat’s fat pad. Reduction in mandibular volume through bone resorption results in loss of projection at the mandibular border and hollowness around the jowls. The mandibular bone loss is accentuated in edentulous patients . The chin is subjected to loss of tissue bulk and ptosis leading to the “witch’s chin” deformity, as coined by Gonzales-Ulloa . Facial expression lines become accentuated owing to collagen damage and loss of elastic fibers. Significant skin laxity, horizontal neck creases, accumulation of fat in the submental and submandibular regions, platysmal banding, and development of an obtuse cervicomental angle are characteristic.
Preoperative Assessment
Patients are all examined in a well-lit room, in a seated position. An initial assessment is performed, noting medical history, surgical history, current medications including herbal supplements, and allergies. Social and family history is noted. A detailed history of previous cosmetic procedures is obtained. Patients are then given the opportunity to express their concerns. We find it extremely helpful to provide the patient with a handheld mirror during this part of the examination. Understanding the patient’s desires allows the proper surgical plan to be developed. Finally, a directed physical examination is performed, noting the stigmata of the aging process.
Access to photographs of the patient at a younger age can be quite helpful in the creation of a surgical plan. Patients are encouraged to provide them when possible. We keep a book of beautiful faces cut from magazines in each examination room as an aid to explain aesthetic principles and features. If alloplastic implantation is considered, skeletal models and sample implants are available to assist in the explanation of proposed surgical procedures. A comprehensive collection of preoperative and postoperative patient results is available to the patients for perusal. In our opinion, these visual aids are essential to attain the desired aesthetic outcome and patient satisfaction.
Photographic Documentation
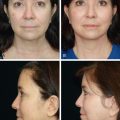
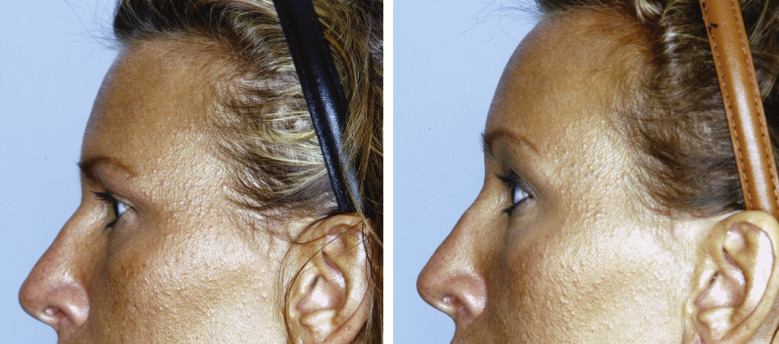
Using a standardized photography studio setup, a series of photographs are compiled prior to surgery. A full-face (anteroposterior, AP) frontal view, right and left three-quarter (oblique) views, right and left lateral views, and a 45-degree down-tilted frontal (AP) view are the minimum images acquired. Ancillary images are acquired based upon the developed surgical plan. The images are printed prior to the operative procedure and are posted in the operating room for intraoperative reference. Similar postoperative photographs are acquired at 3, 6, and 12 months, respectively, and on a yearly basis thereafter. By maintaining a detailed photographic record of the preoperative and postoperative results, careful analysis of the three-dimensional contour changes can be performed.
Addressing the Central Oval of the Face
Heeding the anatomic principles of facial aging, one can see that a comprehensive approach to facial rejuvenation is required to maximize the aesthetic results (see Fig. 20.1 ). The tridimensional facelift technique embraces this concept. The comprehensive approach developed focuses on both the central oval and peripheral hemicircle of the face. The endoscopic forehead lift and endoscopic midface lift procedures provide the foundation for treating the central oval of the face, bolstered by the mentopexy procedure in select patients.
Surgical Technique
Endoscopic Forehead Lift Procedure
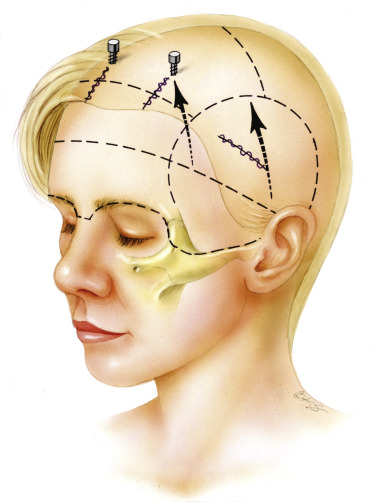
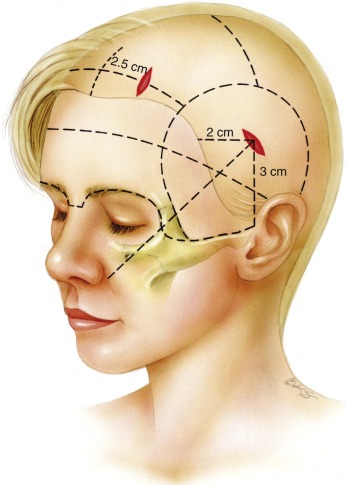
The endoscopic forehead lift procedure begins with careful placement of four incisions in the scalp. The first two incisions are located approximately 2 cm on either side of the midline, 1 to 2 cm posterior to the hairline. For patients with excessively long foreheads (>8 cm) these paramedian incisions are placed directly at the hairline. It is important to keep the forehead incisions as anterior as possible. Otherwise, visualization and dissection in the glabellar region will be compromised. The next set of incisions is located in the temple region, bilaterally, 2 cm posterior to the hairline. The incisions should be directed parallel to the hair follicles to prevent unnecessary alopecia postoperatively. Each incision should measure 1.5 cm in length ( Fig. 20.2 ).
Prior to surgical dissection, local anesthesia using 50 mL of 0.5% lidocaine with 1 : 200,000 epinephrine is diffusely distributed in both the subcutaneous and subperiosteal planes. Early administration of the anesthetic will provide maximal hemostasis, which is required during endoscopic visualization.
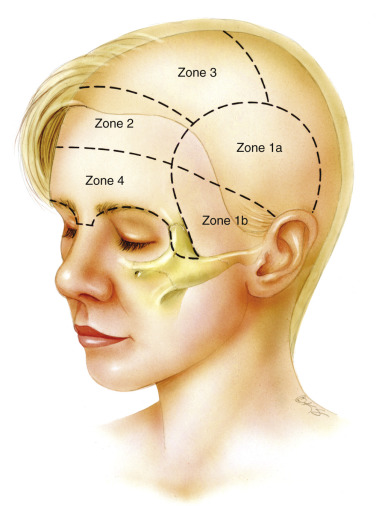
For optimization of the operative procedure, the forehead is methodically divided into four zones that correspond with the sequence of facial dissection ( Fig. 20.3 ). Zone 1 corresponds to the lateral region bounded by the temporalis musculature and zygomatic arch. The upper portion of zone 1 (zone 1a) can be safely dissected in a “blind” fashion. The lower portion of zone 1 (zone 1b) requires dissection under strict endoscopic guidance. Important neurovascular structures, including the frontal branch of the facial nerve, pass through this zone. Zone 2 extends from the hairline to the middle of the forehead. Zone 3 begins at the hairline and extends posteriorly to the vertex of the scalp. Zone 4 corresponds to the area bounded by the superior orbital rims and nasal root inferiorly and the middle of the forehead superiorly. Vital structures, such as the supraorbital and supratrochlear nerves, are located in this zone.
The endoscopic procedure begins with the incision in the temporal area (the upper portion of zone 1). This incision is located perpendicular to a tangent drawn from the nasal ala to the lateral canthal tendon and is 2 cm inside the temporal scalp (see Fig. 20.2 ). A 1.5- to 1.8-cm incision is made through the skin and subcutaneous tissue, deep through the superficial temporal fascia until the temporal fascia proper is reached. Dissection is initiated to clear all the soft tissues from the temporal fascia proper. Dissection continues inferiorly, remaining above the intermediate temporal fascia. As mentioned previously, the initial dissection (upper portion of zone 1) can be performed blindly in a circumferential fashion for approximately a 2-cm radius. With the tissues elevated, a Silastic port protector is inserted and the remainder of the dissection is performed under endoscopic control.
Elevator No. 8 of the Ramirez endoscopic instrument set (Snowden-Pencer, Inc., Tucker, GA, USA) is used to dissect to the temporal line of fusion superiorly. The elevator is then used to score and elevate the periosteum 1 cm medial to the temporal line of fusion. This is continued superiorly through the lateral portions of zones 4, 2, and 3, respectively. This dissection will aid in the connection of the temporal and frontal pockets, later in the case. Dissection continues from the temporal incision in an inferior and medial direction around the lateral orbital rim. During the course of this dissection, several temporal veins will come into view. Temporal vein 1, situated in the region of the zygomaticofrontal suture, is usually sacrificed. Temporal vein 2 (also referred to as the “sentinel vein”) is encountered while dissecting toward the zygomatic arch. Branches of the zygomaticotemporal nerve may be identified during this dissection. Temporal vein 3 lies just above the zygomatic arch at the junction of its middle and posterior thirds. This is usually not exposed. Temporal vein 2, temporal vein 3, and the branches of the zygomaticotemporal nerve should be preserved when possible. Preservation of these structures is facilitated with a blunt rounded tip elevator. As the procedure progresses inferiorly, the dissection plane moves from temporal fascia proper to the intermediate temporal fascia. The intermediate temporal fat pad will be visualized through the thin intermediate temporal fascia. Dissection along the lateral orbital wall progresses inferiorly to the level of the lateral canthus. This completes the lateral dissection of the endoscopic forehead procedure.
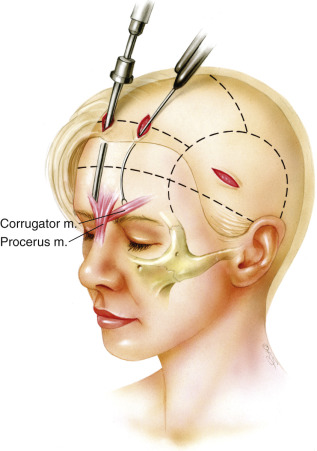
The paramedian incisions are then made as previously described and are carried down through the periosteum. Dissection in zones 2 and 3 can be performed with a blind sweeping technique, as long as the dissection remains in a subperiosteal plane. The endoscope is inserted during dissection in zone 4. In general, zone 4 begins about 3 cm from the superior orbital rims. Endoscopically assisted dissection should always be performed in zone 4 ( Fig. 20.4 ). The initial dissection proceeds toward the lateral aspect of the superior orbital rim. Further dissection laterally toward the temporal line of fusion will allow connection of zones 1 and 4. The dissection then proceeds in a medial direction along the superior orbital rim. Cautious dissection in this area is mandatory. The authors have noted variations in the supraorbital nerve anatomy. Occasionally, an accessory branch of the supraorbital nerve can be identified as far as 3 cm superior and lateral to the supraorbital nerve proper. Every effort should be made to preserve any accessory nerve branch. After identification of the supraorbital nerve, dissection continues medially, exposing the origins of the corrugator muscles. The supratrochlear nerve travels in the substance of the corrugator muscles, so careful elevation of the corrugators is required. Typically, three fascicles of the supratrochlear nerve are identified and preserved. Prior to resection of the corrugator muscle, the periosteum of the superior orbital rim is released with a curved elevator. The periosteum should be released from the zygomaticofrontal suture line laterally, moving medially toward the glabella. In patients with heavy tissues, especially males, the periosteum is released by cutting it with endoscopic scissors. With the periosteum cut medially, the supratrochlear nerve and corrugator muscles are clearly delineated.
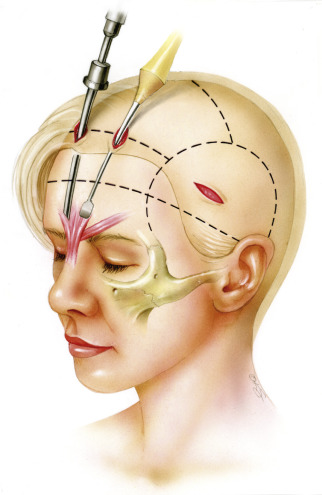
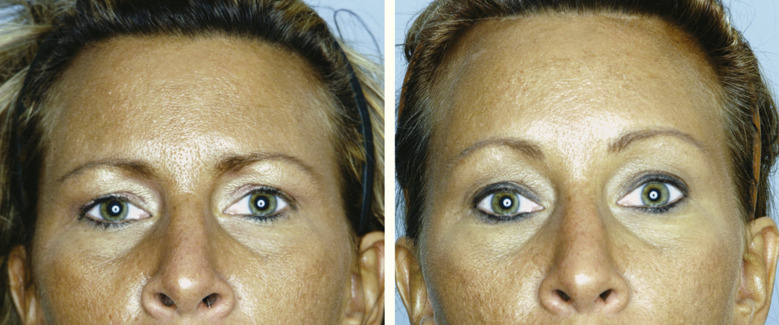
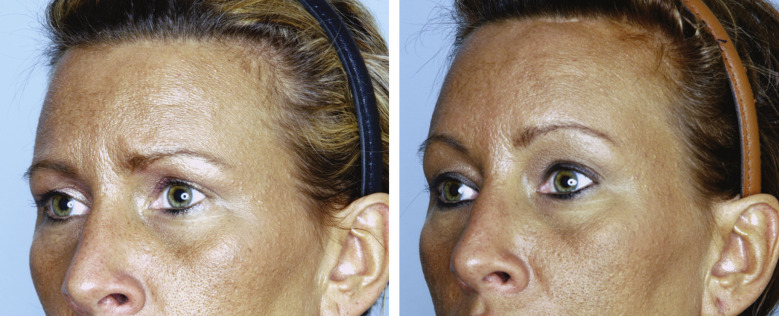
The corrugator muscle is extensively resected from its point of origin to just beyond the supraorbital nerve ( Fig. 20.5 ). We prefer to resect approximately 80% of the corrugator muscle to assure that glabellar frown lines are eliminated. Once the corrugator has been removed, the depressor supercilii muscle can occasionally be identified. Resection of the depressor supercilii muscle is indicated if medial brow ptosis is present. An endoscopic scissors is then used to divide the periosteum deep to the procerus muscle. The procerus muscle is resected after being thoroughly exposed. Resection of the procerus muscle should proceed down to the level of the nasoglabellar angle. Occasionally, bleeding will occur during procerus resection. Given the superficial location of the dissection, care must be taken when using cautery in this area. Overzealous cauterization in this location can lead to disastrous consequences (burning of the skin). When the muscle resection is complete, the area is packed with epinephrine-soaked pledgets. Attention is then directed back to the temporal region where the endoscopic midface lift is started at this point. Completion of the endoscopic forehead lift procedure with elevation and fixation of the brow typically follows completion of the endoscopic midface suspension. An example of a pure endoscopic forehead lift can be seen in Figs. 20.6 through 20.8 .
Endoscopic Midface Lift Procedure
The endoscopic midface lift procedure begins with the temporal dissection in zone 1, as outlined in the previous section. The temporal vein 2 (sentinel vein), temporal vein 3, and the zygomaticotemporal nerves are preserved when possible. The dissection continues in an anterior and inferior direction, remaining above the intermediate temporal fascia. Dissection along the intermediate temporal fascia continues down to the level of the zygomatic arch. The zygomatic arch is entered 2 to 3 mm above the superior border of the arch. This requires division of the intermediate temporal fascia, thus exposing the periosteum of the zygomatic arch. The anterior two thirds of the zygomatic arch periosteum are typically elevated. We find that greater lifting and redistribution of the midface soft tissues occurs with this approach. The periosteum of the entire zygomatic arch is elevated only when soft tissues lateral to the cheek need to be lifted.
A word of caution is necessary at this point. Comfort with the endoscopic dissection over the zygomatic arch from the temporal area is associated with a significant learning curve. Moving from the plane of intermediate temporal fascia to zygomatic arch periosteum, although conceptually simple, can be difficult in practice. Therefore we advocate that surgeons pre-elevate the zygomatic arch or at least elevate to the superior border of the arch from an intraoral approach during the learning process. Pre-elevation in this manner will allow safe communication of both the temporal and lower midface dissection pockets, later in the case. As skill and comfort with the technique increase, dissection can be performed as originally outlined.
The midface dissection at this point continues through an intraoral (upper buccal sulcus) incision. The authors’ preferred incision is perpendicular to the alveolar ridge (vertical) at the level of the first premolar. We find that the vertically oriented incision preserves the mucosal integrity at the alveolar ridge, allowing a rapid, watertight closure that is associated with fewer complications. Under direct visualization, the initial subperiosteal dissection of the maxilla and malar area is performed. The endoscope is used for the upper malar dissection. The use of the endoscope minimizes trauma to the midface structures caused by excessive traction. The endoscope is most useful during periosteal elevation along the lateral half of the zygoma body, its extension underneath the fascia of the masseter muscle, and the anterior two thirds of the zygomatic arch. The fascia covering the upper (medial) portion of the masseter tendon is also elevated from the zygoma. A few longitudinal fibers can be included in the elevated flap as necessary. Endoscopic visualization assists in the preservation of the zygomaticofacial nerve.
Dissection continues along the inferior and lateral orbital rim and continues toward the superior border of the zygomatic arch. Skeletonization of the infraorbital nerve is not necessary under most circumstances.
With the initial midface dissection now complete, the endoscope is returned to the temporal area. An assistant elevates the soft tissue of the midface, thus allowing the surgeon to safely connect the temporal and midface dissection pockets under endoscopic control. Gentle elevation during this step protects the frontal branch of the facial nerve from injury. With wide communication of the temporal and midface pockets, the endoscope is returned through the upper buccal sulcus incision.
The inferior orbital rim is dissected further by elevating the inferior arcus marginalis. A 4-0 polydioxanone (PDS) suture (Ethicon, Somerville, NJ, USA), introduced endoscopically is used to imbricate the medial suborbicularis oculi fat (SOOF) to the lateral aspect of the inferior arcus marginalis. It is important to check eye globe mobility at this point with a forced duction test because improper placement of this imbricating suture can indirectly trap or place traction upon the inferior rectus muscle.
The lateral aspect of the SOOF is then grasped with a 3-0 PDS suture, providing the first of three suspension sutures ( Fig. 20.9 ). Both ends of this suture are then passed through the temporal incision, under endoscopic guidance. We find it helpful to tag the suture ends of each suspension suture with a labeled needle driver. This allows the surgeon to keep track of each suspension suture without confusion. The second suspension suture is the lower cheek imbrication, or “modiolus” suture. This suture is placed into the tenuous periosteal/fascia/fat of the inferior maxillary soft tissue near the upper buccal sulcus incision. Both ends of this suture are then directed through the temporal incision and tagged, as previously described.
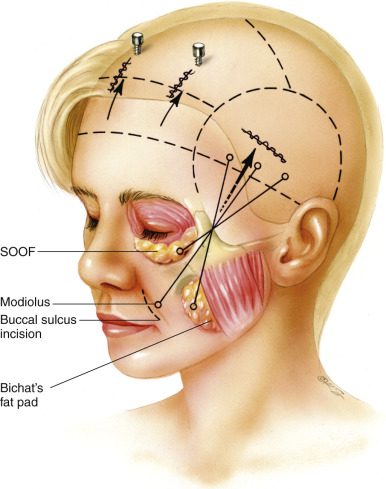
Exposure of Bichat’s fat pad follows the placement of the first two suspension sutures. Bichat’s fat pad is approached through the superomedial wall of the buccal space. The periosteum and buccinator muscle are spread with the use of a blunt dissector. This allows Bichat’s fat pad to herniate through, maintaining an intact capsular fascia. The fat pad should be carefully dissected free from the wall of the buccal space. The fat pad should be easily movable for repositioning as a pedicle flap. A 4-0 PDS suture is then woven into the fat pad and the suture ends are delivered to the temporal area, similar to the previous suspension sutures. The endoscope should be used to visualize the delivery of the pedicled fat flap over the zygomatic arch. The endoscope can also assess the trajectory of the suspensions sutures. It is important to avoid crisscrossing the suspension sutures as they are passed temporally.
Each of the suspension sutures is then secured to the temporal fascia proper, in an ordered fashion. The sutures should be placed in the temporal fascia proper, below the level of the temporal incision. The first suture, the Bichat’s pad fat suspension, should be placed most medially. The inferior malar periosteum/fascia/fat or modiolus suture is placed next, in a more lateral location of the temporal fascia proper. The most lateral suture, the SOOF suture, is the last to be anchored to the temporal fascia proper. This completes the suspension of the midface.
Butterfly drains are placed bilaterally through separate stab incisions in the temporal scalp. Each drain is carefully directed into the midface and secured to the temporal scalp with a suture. The superficial temporal fascia is then anchored to the temporal fascia proper with two 4-0 PDS sutures, while an assistant provides superomedial traction to the advanced scalp. This maneuver will provide additional support to the suspended soft tissues. The intraoral incisions are then closed with interrupted 4-0 chromic catgut sutures, to provide a watertight closure.
Attention, at this point, is directed back to the forehead region where drain placement, closure of the paramedian incisions, and brow elevation is performed.
Briefly, two suction drains are placed through separate stab incisions in the scalp, adjacent to the paramedian access ports. An endoscopic biter is used to direct the tips of the drains to the level of the glabella and the anterior forehead. Each drain is secured with a heavy drain stitch. The paramedian incisions are closed in two layers. A blunt traction hook is then used to elevate the scalp and to position the brow. When proper brow position is obtained, a small stab incision is made in the scalp, with a No. 11 scalpel. A 1.1-mm drill bit with a 4-mm stop is inserted through the stab incision and a unicortical hole in the calvarium is drilled. A 1.5-mm titanium post (Synthes, Paoli, PA, USA) is then placed in the drill hole. In most cases, two paramedian posts (one on each side) are sufficient to maintain the proper brow position ( Fig. 20.10 ). Location of the posts will have a significant impact on brow position. Under most circumstances, post placement corresponds to a superomedial axis from the lateral brow. This will provide maximal elevation of the lateral brow. More central post placement is chosen for patients requiring greater elevation of the central and medial brow. Patient examples of full endoscopic forehead and midface procedures are shown in Figs. 20.11 through 20.16 .