Abstract
This chapter discusses the range of injuries and remedies involved in a fracture to the hand. Practical guidelines are offered for imaging modalities to assess injuries, regional anesthetic techniques, and the procedures of reduction, immobilization, and fixation. Each structure of the hand commonly involved in a fracture—distal phalanx, middle and proximal phalanx, metacarpal, thumb, carpus—is individually treated. Discussions of postoperative care, therapy, and outcomes conclude the chapter.
24 Hand Fractures
24.1 Goals and Objectives
Know the key components of the history and physical exam to perform when evaluating a patient who has sustained a hand injury.
Understand which imaging modalities best evaluate various hand fractures.
Be able to accurately diagnose and describe the type and pattern of fracture.
Appreciate the various regional block techniques that can be utilized when performing the hand exam, fracture reduction and splinting in the emergency room, or operative fixation.
Understand the options for surgical approaches to the fingers, thumb, and hand and fixation techniques for various fracture types.
24.2 Patient Presentation
Fractures of the long bones of the hand are among the most common fractures sustained by patients of all ages. Patients who have sustained a traumatic injury to their hand most often present to the emergency department or urgent care facility for treatment; however, some may present to the office as their initial contact. As the treating physician, the plastic surgeon should be able to evaluate and treat fractures of the phalanges, metacarpals, thumb, and carpus. The goal of appropriate hand fracture treatment is ideally to achieve clinical union with anatomic alignment and articular congruity with rapid mobilization to minimize postinjury stiffness and associated comorbidities.
24.3 History and Physical Exam
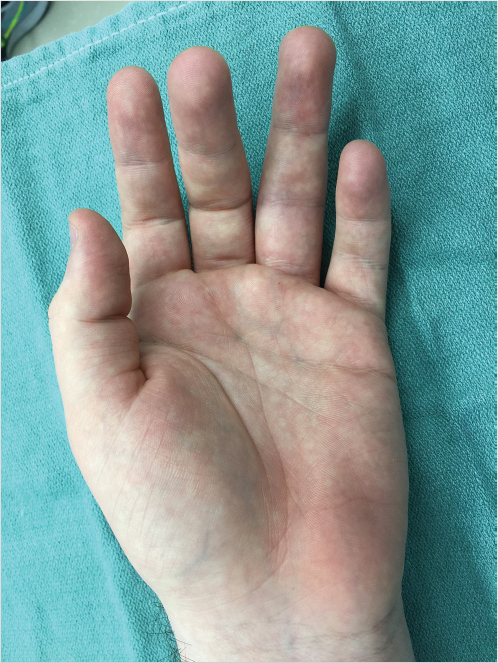
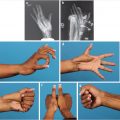
When taking a patient’s history who has sustained a hand injury, the physician should always document the patient’s age, sex, hand dominance, injury laterality, occupation, and hand-specific hobbies, as well as specific details of the mechanism of injury and the timing of the injury. The initial physical exam should take place before any regional or local anesthetic is applied, in order to accurately determine sensation. Oral or intravenous (IV) analgesia may be given to minimize discomfort during examination. All dressings should be removed, and the wound thoroughly irrigated to clear away blood and debris for a clear view of the injury and structures involved. Physical exam should start with observation of the injured hand, and any associated bony and soft-tissue deformity. The examiner should note how the hand is held at rest, whether there is any significant hematoma or active bleeding, whether there is any bone exposed, whether the fingers are all appropriate length, and whether there is any malrotation of the fingers. Gentle palpation of the hand and fingers may elicit focal areas of tenderness, prompting focal examination of individual digits as the survey progresses. Finger length and rotation should be examined both with the fingers extended and with the fingers flexed into the palm. Any scissoring of the fingertips indicates that there is likely a metacarpal or phalangeal fracture with malrotation (Fig. 24‑1). Comparison to the unaffected hand is key in differentiating between normal anatomic variations and new pathology. Exposed structures should be noted as well as any soft-tissue deficits. Perfusion to all fingertips should be assessed by observing fingertip temperature, color, and capillary refill; hand-held Doppler exam of involved digital arteries may be warranted if observation and palpation alone is unable to confidently determine perfusion to the involved structures. Sensation should be first grossly assessed by determining whether or not light touch can be perceived, then evaluated and documented specifically by performing two-point discrimination on the radial and ulnar sides of each fingertip. Finally, first passive then active range of motion of the wrist and all fingers should be assessed and recorded.
24.4 Imaging
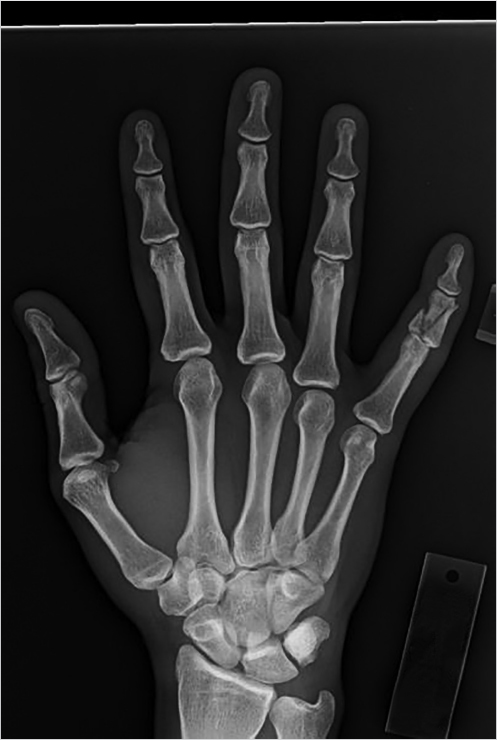
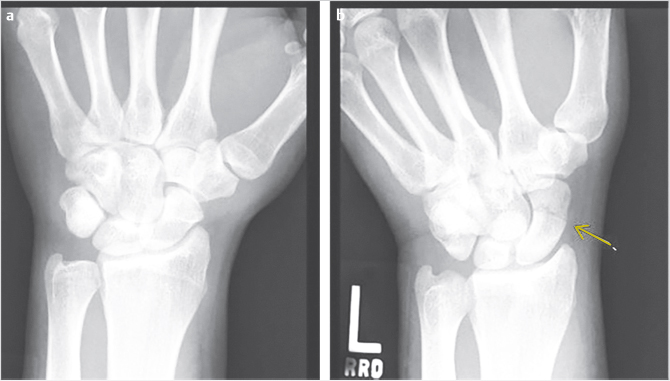
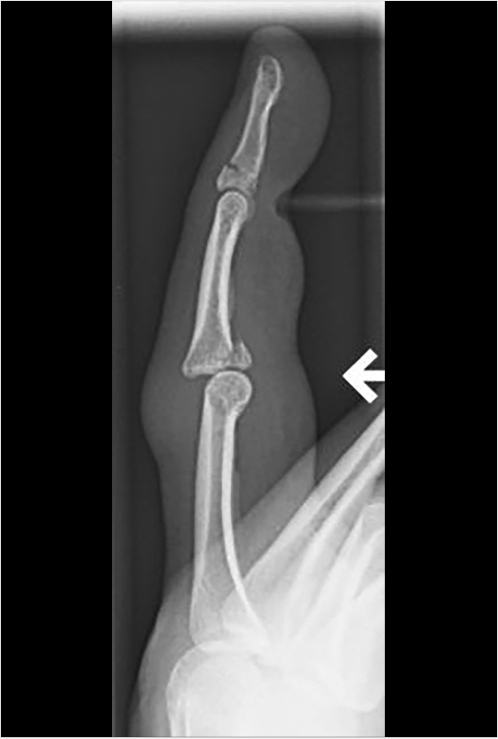
In the radiographic evaluation of hand fractures, plain radiographs are the mainstay of diagnosis. All hand injuries should be evaluated with anteroposterior (AP), lateral, and oblique radiographs. These three views are essential for visualizing the small bones in the hand to best characterize, and avoid missing, any fractures. In addition, it is best to order radiographs as specific to the injury as possible for the best view. For example, if the small finger has a deformity and a fracture is suspected, a three-view series of the small finger will yield higher quality images than a three-view series of the hand. This is because the sharpest images are obtained when the X-ray beam is centered over the area of interest; for example, hand series X-rays center the beam over the middle finger metacarpal which contrasts with dedicated finger series which center over the proximal phalanx. As a result, the AP image of a hand will capture the small finger slightly supinated potentially obscuring subtle fractures (Fig. 24‑2). In some injury patterns, additional radiograph views are useful, such as hook of the hamate view, navicular view, Robert’s view for a true AP view of the thumb, and dynamic studies such as the clenched fist view (Fig. 24‑3). 1 , 2 Computed tomography (CT) imaging is required only occasionally for fracture evaluation. Indications for CT imaging are primarily for operative planning in highly comminuted, intra-articular fractures. Magnetic resonance imaging is likewise rarely required for hand fractures, indicated mainly for detecting occult scaphoid fractures or early avascular necrosis such as in Kienbock’s disease. 2 While ultrasound imaging can be useful for soft-tissue hand injuries, it does not have utility in evaluating fractures.
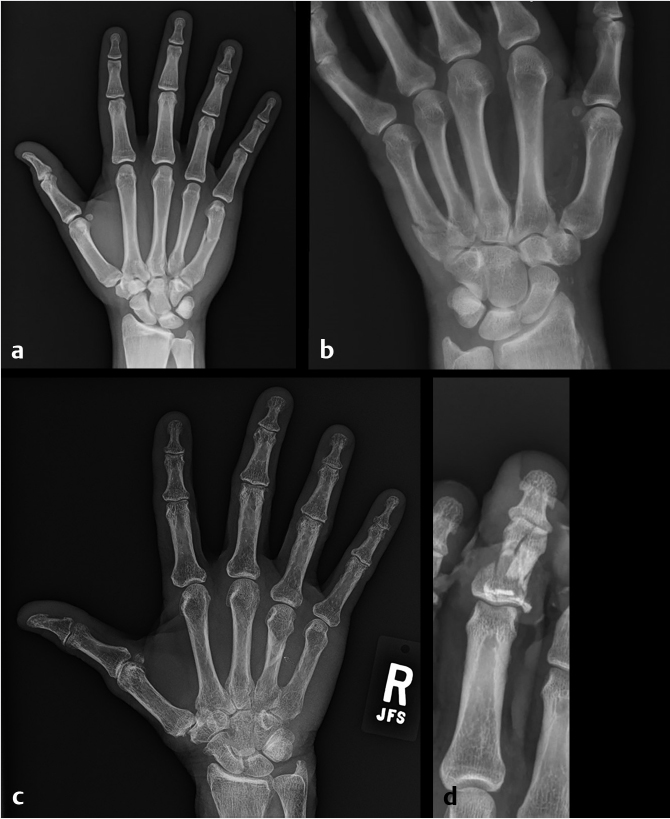
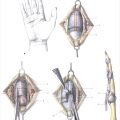
When reading the radiographs, the treating physician should be able to accurately diagnose and describe the type of fracture sustained. This not only allows for determination of appropriate treatment but also ensures accurate and efficient communication with other physicians. Possible fracture patterns include transverse, oblique, spiral, and comminuted (Fig. 24‑4). Fractures are described by identifying the type of fracture, whether it is open or closed, commenting on the degree of comminution if present, the presence and direction of fracture fragment angulation, whether the fracture is apex-volar or apex-dorsal, whether there is any shortening or segmental loss of the overall bone length, measurement of any step-off of the fracture fragments, description of any rotational deformity, quantifying any articular surface involvement, and whether there is any associated joint dislocation (Fig. 24‑5).
24.5 Preparation for Surgery
If surgical treatment is indicated for a patient with a hand fracture, additional workup may be required. Whether the patient is currently an operative candidate is the first consideration; if the patient has significant polytrauma involving other major injuries, or if they are in poor health with significant comorbidities, they may require either initial or ultimate nonoperative management. Determination of general versus regional anesthesia with or without sedation should be made together with the patient. Generally, all hand fractures requiring surgical treatment can be done under regional or local anesthesia with sedation; however, some patients strongly prefer general anesthesia. If the patient has an appropriate safety profile for general anesthesia, American Society of Anesthesiologists class I or II, this may be accommodated. However, the risks and complications of general anesthesia should be fully considered. Prior to undergoing anesthesia, a heart and lung exam should be performed, as well as an ECG if indicated, and any laboratory tests as indicated, such as checking coagulation factors in patients who are taking anticoagulation medications.
After the fracture is fully evaluated through history, physical exam, and radiographic imaging, the treating physician must determine appropriate treatment. Most hand fractures can be managed nonoperatively, but there are clear indications for surgical intervention. These include open fracture, displaced intra-articular fractures, fractures with associated soft-tissue injury requiring repair or reconstruction, malrotation, segmental bone loss, multiple contiguous fractures, or an irreducible or highly unstable fracture. 3 , 4 However, the surgeon must bear in mind that any surgical intervention, even when carried out with delicate and precise tissue handling, creates additional trauma to the surrounding soft tissue and increases the risk of adhesions and stiffness.
24.5.1 Treatment
Unless a patient has a clear indication for surgical intervention, closed reduction and immobilization should be attempted. This can be done in the emergency room, urgent care, or in the office, provided appropriate imaging and splinting materials are available. One of the primary determinants in achieving a good reduction is satisfactory pain control for the patient so appropriate manipulation of the fracture fragments can be performed. Regional anesthetic techniques prove very useful in this setting to avoid dangerously large volumes of local anesthetic, and to achieve good pain control with lower doses of opiate pain medication. Mastering the following regional anesthetic techniques will allow for the surgeon to perform reduction maneuvers on the full range of hand fractures: ring block, digital nerve block, flexor tendon sheath block, wrist block, hematoma block, and Bier block.
24.6 Regional Anesthetic Techniques
When choosing the anesthetic for a regional block, the onset and duration of action should be considered. In general, when performing a regional block for fracture examination and reduction, a rapid onset is preferred to expedite the procedure and 1% lidocaine is the usual choice. When performing a regional block for postoperative pain control, a longer duration is preferred and 0.25% bupivacaine, which lasts twice as long as lidocaine, is the preferred agent. 5 A 1:1 mixture is an additional option when performing regional blocks in which both rapid onset and longer duration are desired. The following principles apply to all regional block techniques in order to avoid complications: never administer a block in an area of soft-tissue infection, always withdraw the syringe prior to injecting to avoid intravascular injection, use a small-gauge needle and slow injection speed to minimize discomfort, use a short needle to control the location of the tip, and calculate the maximum dose of the chosen local anesthetic prior to drawing up the medication to avoid using a toxic dose. The use of epinephrine in concentrations of 1:100,000 to 1:200,000 is a common adjunct to local anesthetics in order to limit systemic absorption and increase the maximum safe dose of administration. Despite historic concern regarding the safety of epinephrine use in the fingers with a theoretic risk of skin or tissue loss, current evidence has clearly shown that the use of epinephrine with local anesthetic injection into the finger or hand is very safe, with no incidence of digital tissue loss recorded in more than 3,000 cases in the literature. 6
Regional blocks useful for reducing finger fractures include ring block, digital nerve block, and flexor tendon sheath block. The finger is innervated by four digital nerve branches: two dorsal and two volar along the radial and ulnar sides of the finger. The ring block is performed by injecting local anesthetic in a subcutaneous plane around the base of the proximal phalanx circumferentially around the finger. Large volumes of dilute anesthetic may be used; however, the volume should not be so great as to “balloon” the skin and induce pallor at the site of injection as well as the distal digit. The needle is inserted just proximal to the web space on the dorsal surface of the finger and a small subcutaneous wheal created; the needle is then advanced toward the palm and 1 mL anesthetic injected just under the skin on the palmar surface to anesthetize the volar digital nerve. The needle is then withdrawn to the level of the skin but not removed entirely, rather is redirected toward the opposite side of the finger, just proximal to the web space, and a small subcutaneous wheal created. The needle is then withdrawn completely, inserted through the new wheal created, and advanced toward the palmar surface where an additional 1 mL anesthetic is injected as previously. 5 , 7 Alternatively, a single injection to the volar surface at the level of the metacarpophalangeal (MCP) joint with instillation of approximately 5 mL of anesthetic is another accepted technique with good results and reduction of multiple needle passes (Fig. 24‑6). 5 Keep in mind that injuries to the dorsal surface of the proximal phalanx will likely be inadequately anesthetized with this technique, as the terminal innervation from either the radial sensory nerve or dorsal branch of the ulnar nerve will not be blocked.
The common digital nerve is blocked by inserting the needle at the level of the distal palmar crease, just to one side of the metacarpal neck. Two milliliters of local anesthetic is injected, blocking the common digital nerve as it travels toward the finger. The flexor sheath block is performed by inserting the needle at the level of the palmar digital crease, in the center of the long axis of the finger. The needle is inserted until it touches the bone, then while slight pressure is put on the syringe plunger, the needle is withdrawn until the anesthetic begins flowing easily into the flexor sheath. Two milliliters is injected. While this technique does provide good pain relief, patients can experience discomfort from the pressure of the volume in the closed space of the flexor sheath. Care should be taken to avoid injecting too much volume into this potential space. 5 , 7
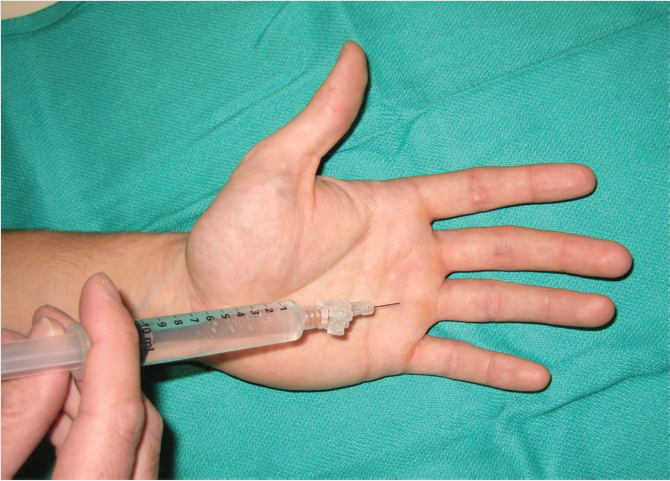
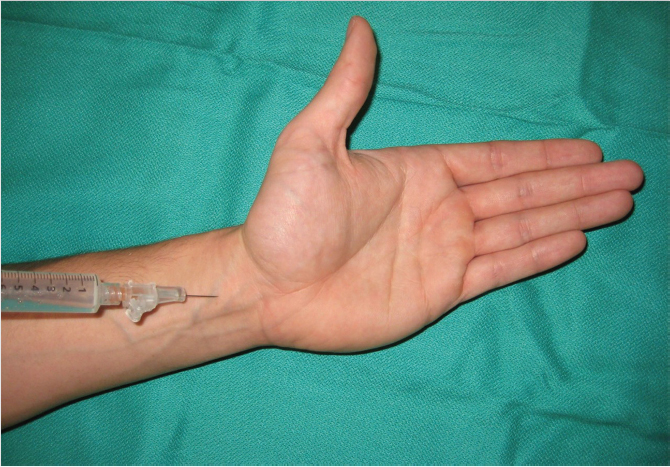
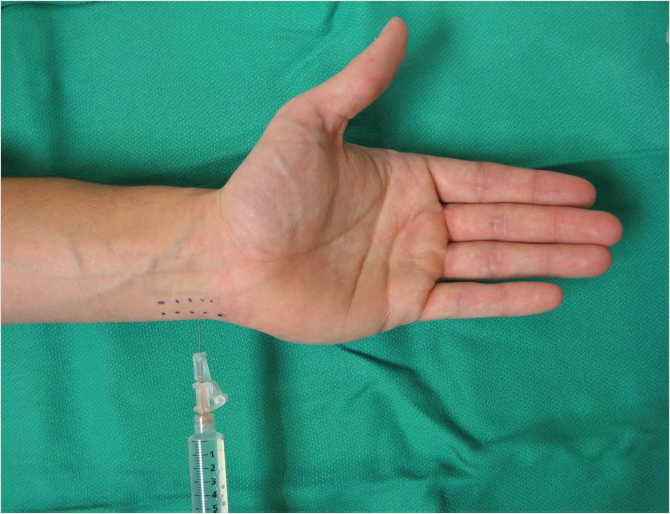
Regional blocks useful for reducing hand and wrist fractures include wrist block, hematoma block, and Bier block. The wrist block involves blocking the median, ulnar, and radial nerves at the level of the wrist, rendering the hand insensate and intrinsic muscles paralyzed; it does allow for extrinsic hand muscle movement. The median nerve is blocked by inserting the needle on either the ulnar side of the palmaris longus or, alternately, through the flexor carpi radialis at the level of the proximal wrist crease; it is inserted just until the flexor retinaculum is penetrated, approximately 1 cm deep (Fig. 24‑7). After confirming that the patient is not experiencing paresthesias from the needle near the median nerve, 5 mL of local anesthetic is injected, and an additional 1 mL injected superficial to the flexor retinaculum to block the superficial palmar branch. The ulnar nerve is blocked by inserting the needle on the dorsal ulnar side of the flexor carpi ulnaris (FCU) and injecting 5 mL of anesthetic deep to the FCU and an additional 1 mL superficial to block the dorsal cutaneous branch (Fig. 24‑8). The radial nerve has many superficial branches; these are blocked by injecting 5 to 10 mL of local anesthetic in a subcutaneous plane starting at the level of the radial styloid and proceeding dorsally. The skin should be pinched and the needle tip inserted and a wheal injected first prior to advancing; this maneuver protects the dorsal radial sensory nerve. 5 , 7
A hematoma block is performed by inserting the needle into the area of the fracture, feeling the needle tip along the fracture fragments until it falls easily into the fracture site. The plunger should be withdrawn and a flash of blood seen in the syringe, confirming the location of the needle tip in the fracture hematoma. 7 Five to 10 mL anesthetic should be infiltrated, proportional to the size and location of the fracture. A Bier block, or IV regional block, involves first placing an IV catheter into the dorsum of the hand, followed by exsanguination of the hand and forearm and inflation of a tourniquet. Next, 0.5% lidocaine at 3 mg/kg or approximately 30 to 50 mL total for an adult is injected via the IV, and the IV subsequently removed. 7 Historically, the full Bier block involved placing the tourniquet on the proximal arm to achieve complete upper extremity anesthesia. However, this involves using a higher dose of local anesthesia, which can increase the risk of systemic toxicity when the tourniquet is released at the end of the procedure. The mini-Bier block technique has thus been developed, which involves placing the tourniquet on the proximal forearm which allows for smaller volumes of anesthesia to be used. Upon releasing the tourniquet at the end of the procedure, the patient should be counseled to notify the surgeon of any metallic taste in their mouth or ringing of their ears, as this may indicate a systemic reaction to the sudden inflow of local anesthetic agent into the circulation. Hemodynamics should be monitored closely throughout this procedure with continuous telemetry and frequent blood pressure checks.
24.6.1 Reduction
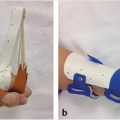
After analgesia has been achieved, reduction is performed. Utilizing fluoroscopy, if available, can significantly improve the precision of the reduction. In general, a combination of traction and apex depression is applied to the fracture fragments to achieve reduction. Several specialized maneuvers have been described for specific fracture patterns. For metacarpal neck fractures with apex–dorsal angulation, the Jahss maneuver is the technique of choice for closed reduction. This maneuver involves flexing the MCP and PIP joints to 90 degrees and then applying upward force through the PIP joint while applying downward force on the metacarpal shaft to reduce the metacarpal head into an appropriate alignment with the metacarpal shaft. Rotational deformity can be reduced by using the finger, flexed at the MCP joint, as a crank. 4 Reduction is confirmed with either fluoroscopy or plain radiographs in three views to verify satisfactory reduction in all planes. Soft-tissue integrity and perfusion are ensured by postreduction examination. Reduction is held while either a cast or a splint is applied for immobilization.
Related posts:


Stay updated, free articles. Join our Telegram channel

Full access? Get Clinical Tree


