Abstract
This chapter covers the range of issues involved in the remediation of tendon injuries. The advances that have been made in tendon repair and rehabilitation are discussed in detail. The five zones of the flexor system are delineated for the purpose of diagnosis and treatment. Surgical techniques for repair of routine tendon lacerations in each zone are reviewed and recommendations made regarding proper anesthesia (general, regional), incisions, and antibiotic regimens. The chapter concludes with information pertinent to postoperative care and possible outcomes.
26 Tendon Repair
26.1 Goals and Objectives
Understand the proper clinical evaluation of patients with tendon injuries.
Understand the technical aspects of tendon repair and the physiologic basis for effective tendon repair techniques.
Appreciate the key role of postoperative rehabilitation in the recovery of function following tendon repair.
Know the common adverse outcomes following tendon repair and the evidence-based perioperative care to maximize patient safety and quality.
26.2 Patient Presentation
Tendon injuries pose a formidable challenge to the reconstructive surgeon. The natural responses of the body to injury, inflammation, edema, and scar formation are detrimental to tendon excursion and limit the degree of function that can be regained after tendon repair. However, repair techniques have been developed to restore tendon continuity and preserve tendon glide. Likewise, rehabilitation strategies have focused on limiting edema and preventing adhesion formation through early motion. Tendon injuries are still often devastating to patients and challenging to surgeons, but with modern techniques, an acceptable return of function can be anticipated in the majority of cases.
The patient with a tendon injury will present with loss of flexor or extensor function. However, the deficit may be subtle and may escape the notice of the patient, especially in the setting of multiple or complex injuries. A careful assessment of tendon function should be performed in every patient with a laceration through the skin in the forearm, wrist, or hand. Tendon injuries can occur in the absence of a laceration, as well. Patients with traumatic or attritional tendon ruptures may present with pain, ecchymosis, sudden loss of function, and tenderness at the rupture site, usually at the tendon insertion or the musculotendinous junction.
26.2.1 Flexor Tendon Injuries
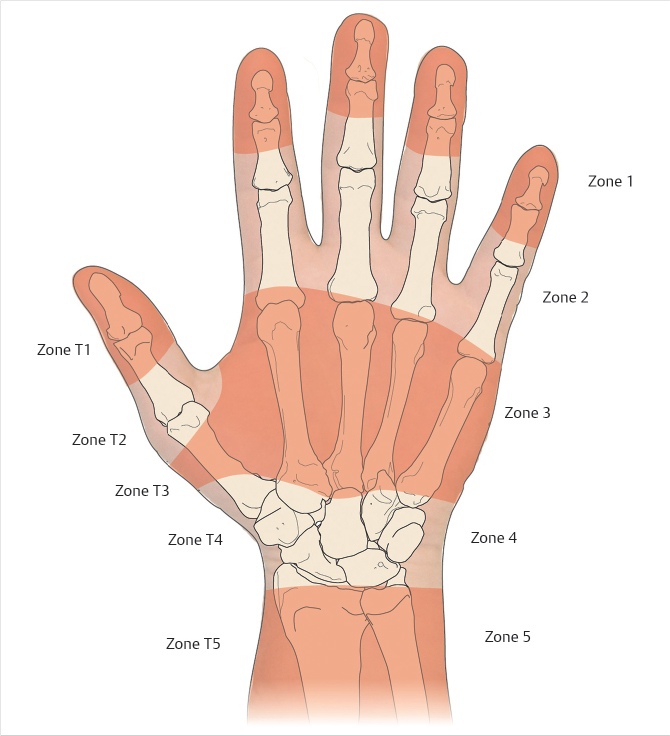
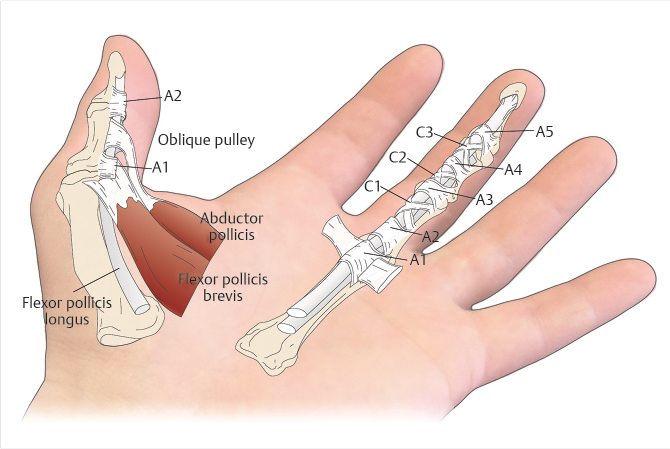
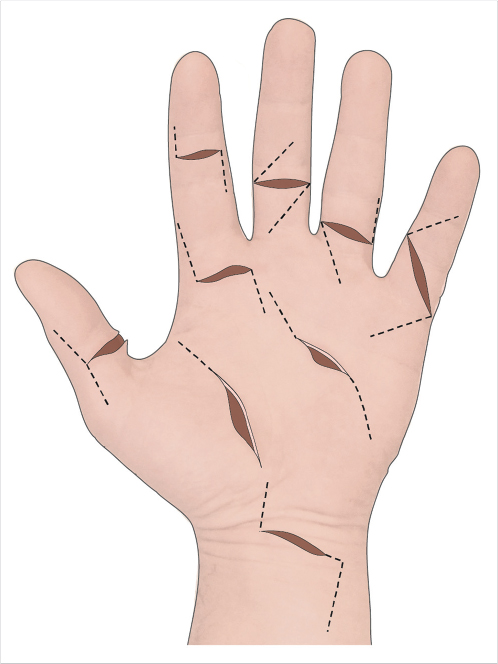
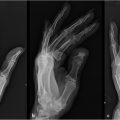
The flexor system has been divided into five zones for the purpose of diagnosis and treatment (Fig. 26‑1). 1 , 2 Zones 1 and 2 are characterized by the presence of the fibro-osseus digital sheath and a flattened layer of fibroblasts on the surface of the tendons, termed the “epitenon,” which must be restored in order for tendon repair to be successful. The pulley system of the flexor tendon sheath consists of thick annular pulleys which provide a gliding surface for the tendon and resist palmar translation, and cruciform pulleys which are collapsible, allowing digital flexion to occur without buckling of the tendon sheath (Fig. 26‑2). The A2 and A4 annular pulleys, which arise from the proximal and middle phalanges, respectively, are the key pulleys which must be preserved or restored in tendon repair to prevent tendon “bowstringing.” 3
On inspection, the patient with a flexor tendon injury may have a loss of the normal finger cascade. A digit will display loss of active distal interphalangeal (DIP) and proximal interphalangeal (PIP) joint flexion if the flexor digitorum superficialis (FDS) and flexor digitorum profundus (FDP) tendons are both divided, or loss of only DIP flexion if the FDP alone has been divided. As only the FDP tendon traverses the DIP joint, the FDP function can be assessed by asking the patient to actively flex the DIP joint of the affected finger. The FDS function is tested by holding the DIP joints of the adjacent fingers in extension, stabilizing the proximal phalanx of the affected finger to eliminate intrinsic muscle action, and asking the patient to flex the PIP joint of the affected finger. This takes advantage of the fact that the FDP tendons to the long, ring, and small fingers share a common muscle belly and function as a single unit. As the FDP to the index finger is usually an independent musculotendinous unit, this test is unreliable for the index finger. Additionally, the FDS to the small finger may be dependent on the FDS to the ring finger, or it may be absent altogether. 4 Weakness, pain, or triggering of the digit may be indicative of a partial tendon laceration.
Patients with flexor tendon injuries in the digits or palm should be carefully examined for concomitant injuries of the arteries and nerves due to the close anatomic relationship between the digital bundles and flexor tendon sheath.
26.2.2 Extensor Tendon Injuries
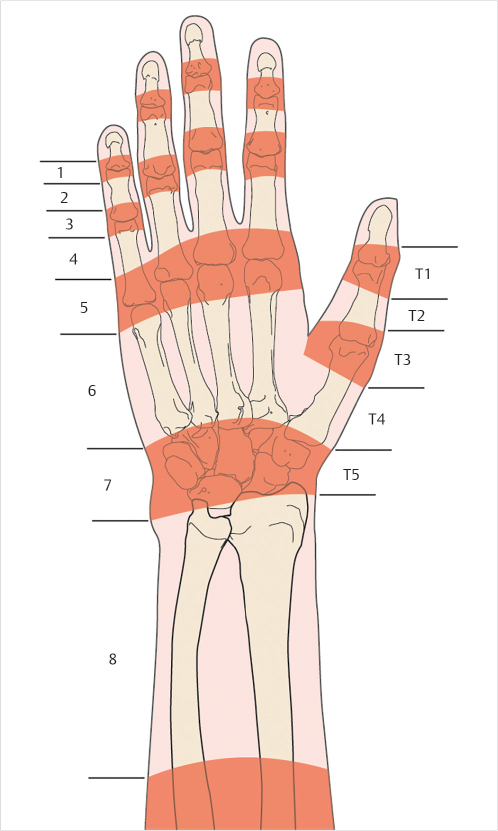
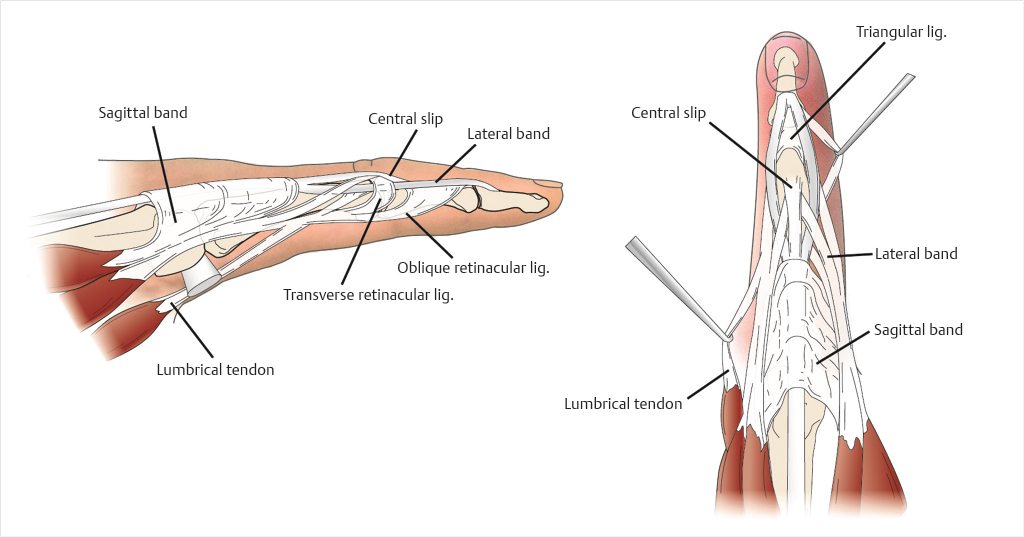
Extensor tendon injuries should be suspected with any laceration of the extensor surface. Extensor tendon injuries are categorized into eight zones, with odd zones corresponding to injuries occurring over joints and even zones referring to injuries occurring between joints (Fig. 26‑3). Due to the vulnerable superficial location of the extensor tendons, they are injured more commonly than flexor tendons, 5 and functional deficits may be subtle due to the numerous interconnections between the extensor tendons. Injuries in zones 1 and 2 present with extensor lag and inability to extend at the DIP joint. In zones 3 and 4, the extensor mechanism is broad and flat and covers up to three-fourths of the surface area of the phalanx; therefore, partial injuries are common. Patients may not present with extensor lag at the PIP joint, even with complete rupture or severance of the central slip, due to the action of the lateral bands (Fig. 26‑4). A subtle extensor lag may be detected by examining the PIP extension with the wrist and metacarpophalangeal (MP) joints in full flexion. Tendon lacerations in zones 5 and 6 are common, and may result in minimal MP extensor lag due to the presence of the juncturae tendinum. However, its effects can be eliminated by holding all of the MP joints in flexion and having the patient individually extend the proximal phalanx of the affected digit. Lacerations in zones 7 and 8 are often multiple due to the close relationship of the tendons at the extensor retinaculum, and present with inability to extend one or more digits. In small children or patients who are unable to cooperate with the exam, a passive wrist tenodesis test may be helpful.
26.3 Preparation for Surgery
The diagnosis of flexor tendon injuries can usually be made on the basis of physical examination alone. However, radiologic studies can be helpful in many cases. For example, extensor tendon ruptures in the digits are often associated with avulsive fractures which are best visualized on lateral radiographs. Routine radiographs should also be obtained for sharp tendon lacerations in the digits or hand, as there may be concomitant fractures or radiopaque foreign bodies. Although not generally necessary, ultrasonography can be used to diagnose flexor tendon ruptures or lacerations in questionable cases, or to determine the level of proximal tendon stump retraction. 6 , 7 This is particularly important where there has been a delay between injury and presentation, and the degree of retraction will determine the necessary treatment. Laboratory tests are not necessary on a routine basis, but are dictated by the presence of comorbidities or concomitant injuries.
Several authors have stressed the importance of early primary repair of flexor tendons; however, the repair need not be done immediately after injury unless there is a vascular injury requiring emergency revascularization. 8 , 9 , 10 , 11 Routine tendon lacerations can be treated acutely with wound irrigation and closure in the emergency department, with application of a forearm-based resting splint to prevent motion and tendon retraction. Flexor tendons should be repaired within 5 to 7 days following injury to avoid myostatic retraction of the musculotendinous unit which may preclude a primary repair. Extensor tendons, with the exception of the extensor pollicis longus tendon, do not retract significantly after laceration, and the timing of repair can safely be delayed up to 14 days, if necessary. However, there are little objective data evaluating the effect of timing on outcomes in tendon repair.
26.4 Treatment
Surgical exploration and repair are indicated for all patients with a diagnosis of an acute tendon laceration, with the exception of patients whose medical conditions or life-threatening injuries render the risk of surgery unacceptably high. Tendon repair surgery can be performed under general or regional anesthesia, as dictated by patient and surgeon preference. Recently, there has been an increased interest in wide-awake flexor tendon repair, with local infiltration of lidocaine with epinephrine. This technique allows the patient to follow commands, so that active tendon glide can be assessed on the table immediately following the repair. 12 , 13 However, the technique may not be appropriate for patients with a nervous temperament or who have difficulty lying still for extended periods.
Prophylactic antibiotics, usually consisting of a first-generation cephalosporin, are administered prior to tourniquet elevation. The upper arm tourniquet is used to provide a bloodless surgical field. The wounds are irrigated and any devitalized tissue is excised. Flexor tendons are exposed through zigzag (Bruner’s) incisions on the volar digits, or through extensions of the laceration along the midlateral line (Bunnell’s incisions; Fig. 26‑5). 14 , 15 Flaps should be elevated in as deep a plane as possible to avoid devitalizing the skin, but care must be taken to identify and protect the digital arteries and nerves. Extensor tendons are exposed through curvilinear extensions of the lacerations, avoiding incisions over the apex of joints when possible.
26.4.1 Flexor Tendon Repair—Zone 1
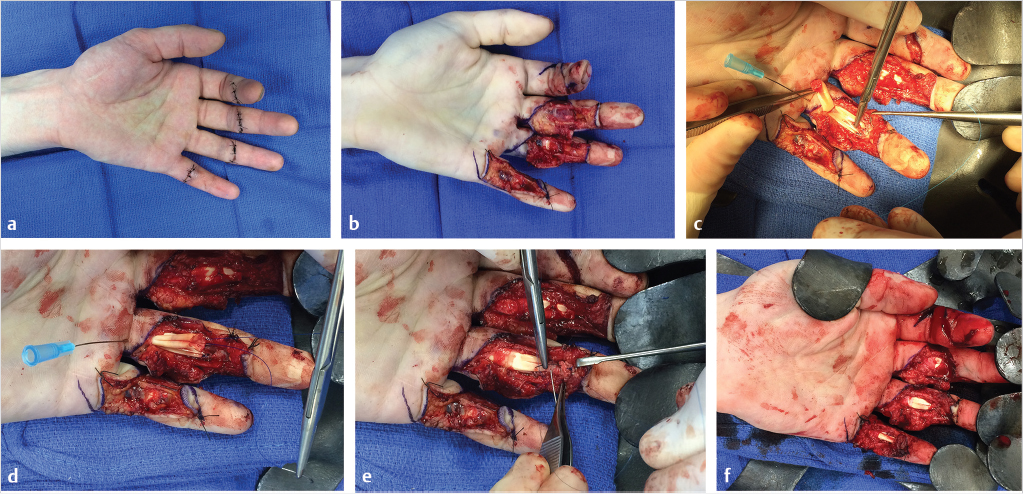
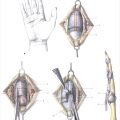
In zone 1, only the FDP tendon is present. The proximal end of the tendon is often held by a vinculum and readily visualized beneath the sheath. If so, it is grasped gently by the epitenon with forceps, retrieved into the wound, and held in place with a hypodermic needle passed through the skin. Occasionally, the tendon retracts into the proximal finger or palm. If so, the Bruner’s incisions must be extended proximally until the tendon is visualized. A small opening is made in the tendon sheath to access the proximal cut end of the tendon. It can be sutured to a fine pediatric feeding tube, which is used to draw the tendon distally through the fibro-osseous sheath to the repair site (Fig. 26‑6). Blindly instrumenting or otherwise traumatizing the tendons and sheath must be avoided. Any frayed tendon ends are sharply debrided with a scalpel using a tongue depressor as a “cutting board.” Excessive trimming must be avoided, as shortening a lacerated FDP tendon by more than 1 cm may result in a “quadrigia” effect on the intact FDP tendons, limiting their excursion.
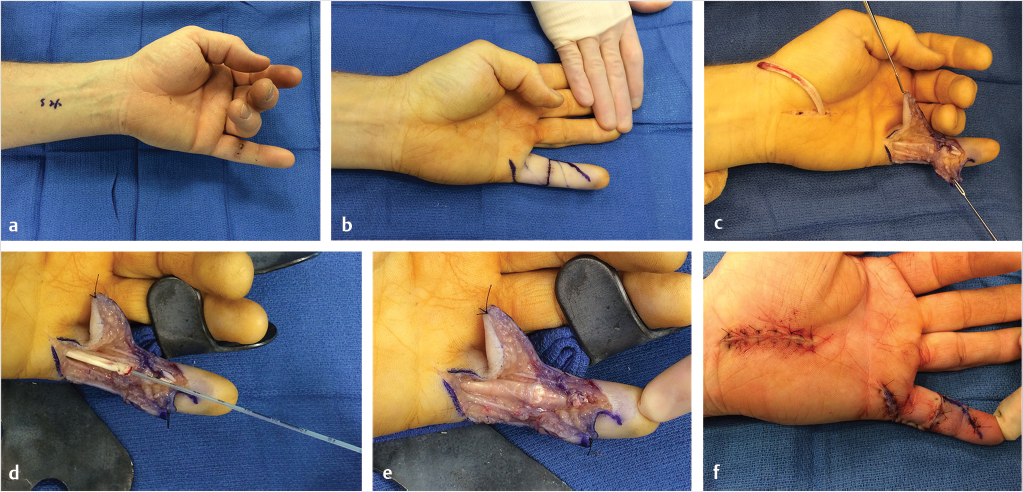
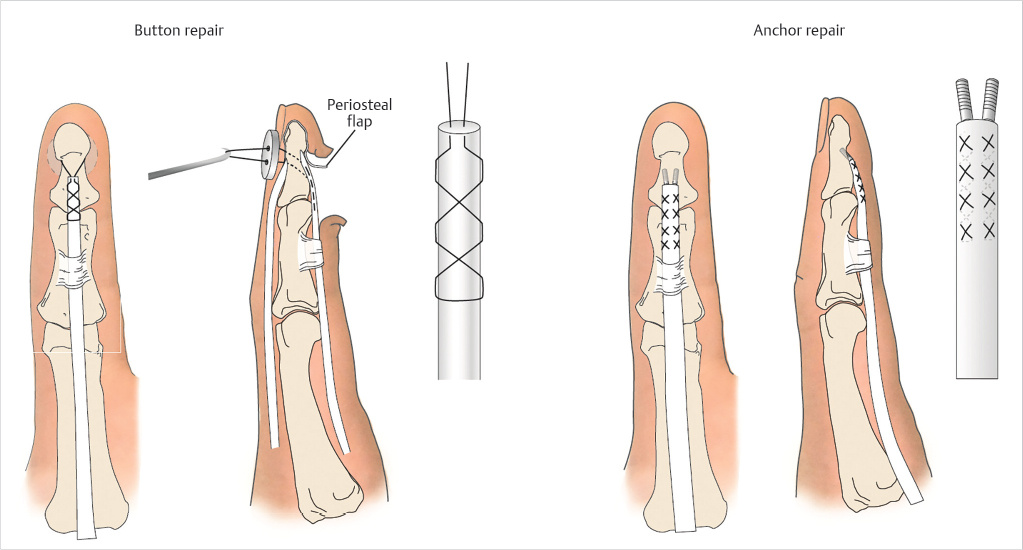
The distal cut end of the tendon is assessed. If 1 cm or more of tendon remains, repair by primary suture can be performed, similar to treatment in zone 2. If less than 1 cm of distal tendon remains, the proximal cut tendon must be reattached directly to the distal phalanx. The insertion site is prepared by elevating a distally based flap of periosteum and residual tendon and roughening the volar cortex with a rongeur. In the traditional method for reinserting an FDP tendon to the distal phalanx, a core suture is placed in the tendon and used to secure it to the insertion site. The free ends of the suture are passed either around the distal phalanx or through a drill hole in the distal phalanx and secured over the fingernail with a button. Alternatively, one or two miniature suture anchors can be used to secure the tendon to the phalanx (Fig. 26‑7). Both techniques have been shown to provide equivalent repair strength, sufficient to allow early motion. 16
Distal tendon ruptures are managed in a similar fashion as lacerations. If a small avulsive bone fragment is present, it can be excised to facilitate tendon repair. If the fragment is large, it should be secured to the distal phalanx with a small lag screw or Kirschner wire.
26.4.2 Flexor Tendon Repair—Zone 2
The challenges inherent to zone 2 flexor tendon repair stem from the need to preserve differential gliding of two flexor tendons within a tight fibro-osseous sheath. The wounds are extended proximally and distally as needed to expose the tendon ends and to permit repair (Fig. 26‑5). Knowledge of the mechanism of injury can determine whether to extend the laceration proximally or distally. If the finger was lacerated while in a flexed position, as when grasping a knife blade, the distal end of the tendon will likely be found distal to the skin laceration. The distal end of a tendon cut while the digit was extended will be found close to the skin laceration.
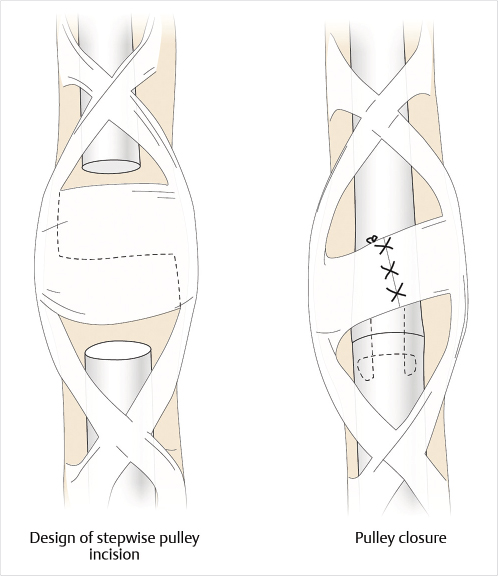
If the cut tendon ends are visible, they can be gently grasped with a forceps or hemostat by the epineurium and retrieved. If not, flexing the wrist and MP joints while gently “milking” the tendon sheath from proximal to distal will often deliver the cut proximal ends into the wound. If this maneuver fails, the tendon sheath should not be instrumented blindly, but rather opened proximally to retrieve the tendons. Occasionally, an FDS tendon will retract to the carpal tunnel level, but the FDP tendons are prevented from migrating proximally by the lumbrical muscle. The tendon can then be passed down the sheath with a feeding tube as described earlier. The tendon sheath should be preserved as much as possible, but the pulleys may need to be opened slightly to access the tendon for repair and to permit gliding. An annular pulley can be cut in a stepwise fashion and repaired as a Z-plasty to increase the volume in the sheath to accommodate the repair site (Fig. 26‑8).
Repair techniques vary greatly among surgeons but are guided by some basic underlying principles. The tendons are generally repaired with core sutures consisting of 3–0 or 4–0 polypropylene or nylon. A number of techniques have been described for the application of core sutures (Fig. 26‑9), but studies have shown that a four-strand repair (such as the Becker, modified Savage, or Strickland’s repair) or greater provides enough early repair strength to permit early motion rehabilitation protocols. 17 , 18 The author’s preference is to use the Strickland’s four-core repair with 4–0 polypropylene followed by a 6–0 polypropylene running epitendinous suture.
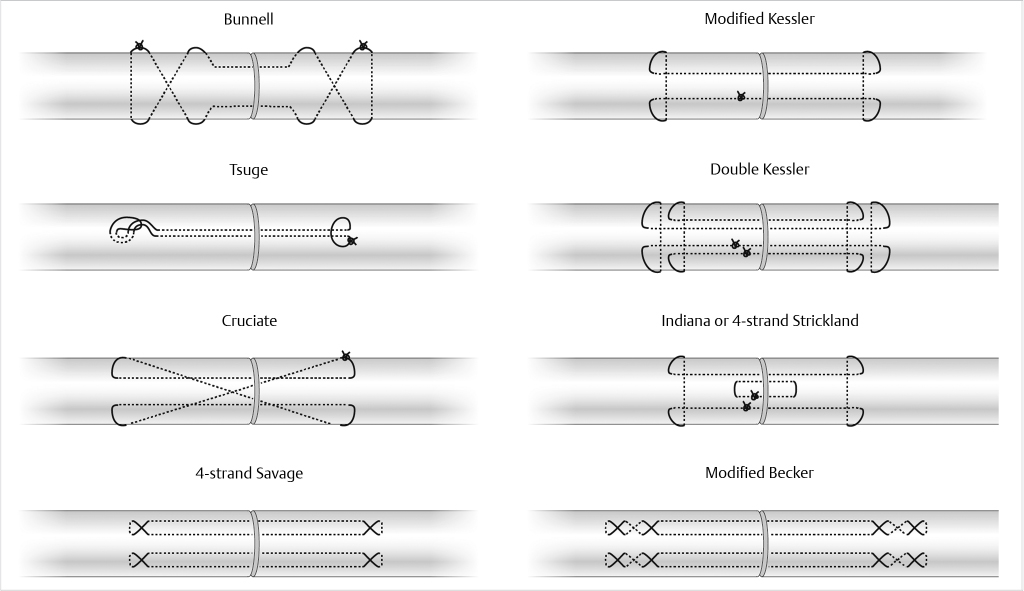
Principles of Successful Zone 2 Flexor Tendon Repair
Extensile exposure.
Adequate lighting and magnification.
Atraumatic handling of tendons and sheath.
Use at least a four-core suture technique (with 3–0 or 4–0 suture).
Avoid bulky repair.
Running circumferential epitendinous suture to resist gapping and add strength.
Repair the sheath only if it improves tendon glide.
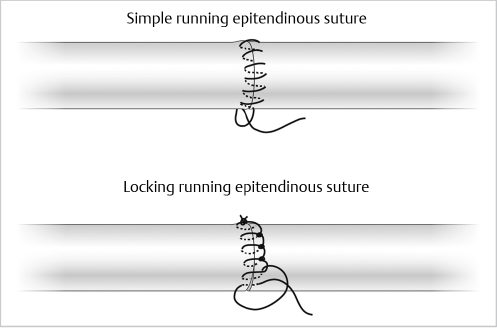
The FDS tendon is repaired first. Near its insertion, where the tendon divides and flattens, it can be approximated with one figure-of-eight or horizontal mattress suture in each tendon slip, followed by a 6–0 running epitendinous suture. FDS tendon lacerations which are proximal to the insertion and FDP tendons are then repaired (Fig. 26‑10). Core sutures should be placed 7 to 10 mm from the tendon ends and in the volar two-thirds of the tendon, in order to prevent injury to the longitudinal vascularity of the tendon. The epitendinous suture can be placed in a simple running or locking fashion and has been shown to augment repair strength by resisting gap formation on cyclic loading (Fig. 26‑11). 19 , 20 Closure of the tendon sheath is not necessary and may constrict the repair site. The sheath may be judiciously opened to allow the tendon repair site to glide freely throughout the range of digital motion. If the tendon sheath is too tight to accommodate repair of both tendons, as is commonly seen in the small finger, one slip of FDS may be excised.
Related posts:

Stay updated, free articles. Join our Telegram channel

Full access? Get Clinical Tree


