22 Periareolar Mastopexy
Summary
This chapter reviews the periareolar mastopexy, a technique used for correction of mild ptosis. The procedure and its outcomes are discussed including highlighting the importance of reserving this for mild ptosis corrections only.
Key Teaching Points
The procedure should be reserved for mild ptosis correction.
Nipple elevation of more than 2 cm is rarely achieved.
Periareolar mastopexy causes flattening of the front of the breast.
Areolar stretching is common and can be reduced by a purse-string permanent suture.
Introduction
Periareolar or circumareolar mastopexy involves excision of skin limited to part or all of the circumference of the areola. It is used alone or in conjunction with breast augmentation and achieves only a modest elevation of the nipple–areolar complex. It may be performed as the following:
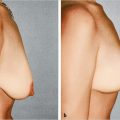
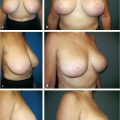
Supra-areola crescent mastopexy (▶Fig. 22.1a,b).
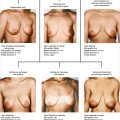
Complete circumferential periareolar mastopexy (▶Fig. 22.1c,d).
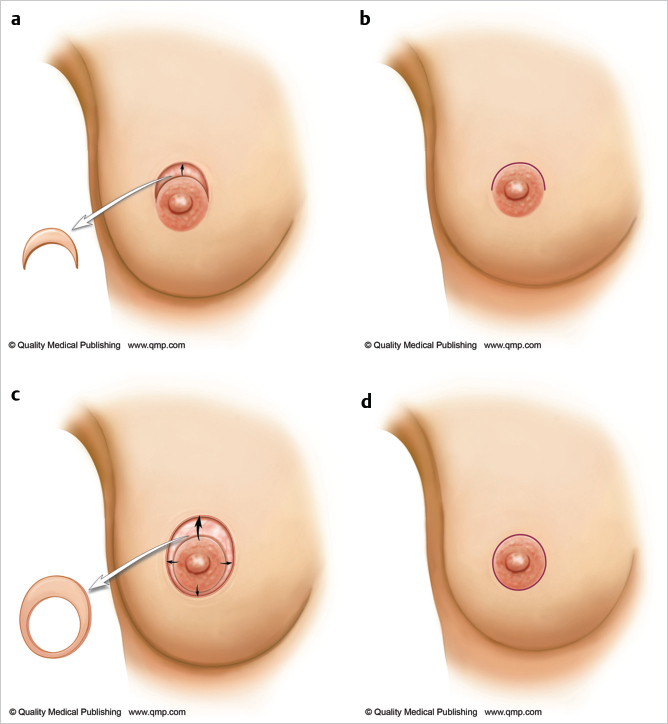
The upper periareolar excision component can elevate the areola about 1 cm and incline it upward. The circumareolar technique can provide a maximum of 2 cm elevation at the time of surgery but this tends to decrease within 12 months. It is also useful for correcting minor unilateral asymmetry of the areola. This approach provides a subtle ptosis correction. When more areolar elevation is needed, a more powerful technique should be selected. More than a modest upper areolar skin excision can noticeably deform the areolar circle. This excision is sometimes accompanied by a lateral skin excision when ptosis correction of the opposite breast is combined with a total mastectomy.
22.1 Circumareolar Scar Technique with Periareolar Purse-String Closure
By itself, a circumareolar excision does not produce an adequate mastopexy correction. It does not elevate the nipple–areola significantly and has obvious drawbacks, including the circumareolar scar and central flattening of the breast that compromise normal breast flow and projection.
I limit its use to the following patients:
Women with unusually large areolae who do not want them enlarged further by breast augmentation.
Minor corrections in nipple height associated with developmental breast asymmetry or in symmetry correction after unilateral mastectomy.
To reduce the central protrusion of a tubular breast, combining it with a breast implant to improve some of the upper pole flatness and enhance projection.
The circumareolar technique used alone without an implant can flatten the breast centrally to some extent. When combined with augmentation, the greater the pressure from within the breast, the greater the tendency to flattening and areolar stretching. Consequently, I usually prefer to use a periareolar purse-string technique that extends this approach and allows upward nipple–areolar positioning. The suture controls the diameter of the areola and minimizes postoperative widening of the areola.
Technical Pearl
I use a Gore-Tex suture rather than Prolene or nylon, because Gore-Tex is softer, less likely to be palpable, and does not stretch. Problems with knot extrusion are significant, regardless of the type of suture used.
Surgical Concept
Elevation of the nipple–areola to a higher position, tightening of the breast skin, and reduction of the areolar diameter.
Surgical Plan for Supra-Areolar Approach
Mark skin excision.
Deepithelialize skin to be removed.
Incise dermal edges and undermine conservatively.
Interrupted deep dermal closure.
Final intracuticular closure.
Operative Sequence for Supra-Areolar Mastopexy
1. Skin marking and deepithelialization:
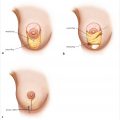
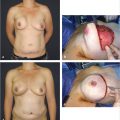
The upper border of the areola is marked, and a supra-areolar crescent of skin is marked for excision from 9 to 12 to 3 o’clock position across the upper areola. The skin excision is incised with a number 15 blade and is deepithelialized with a scalpel blade or scissors (▶Fig. 22.2a).
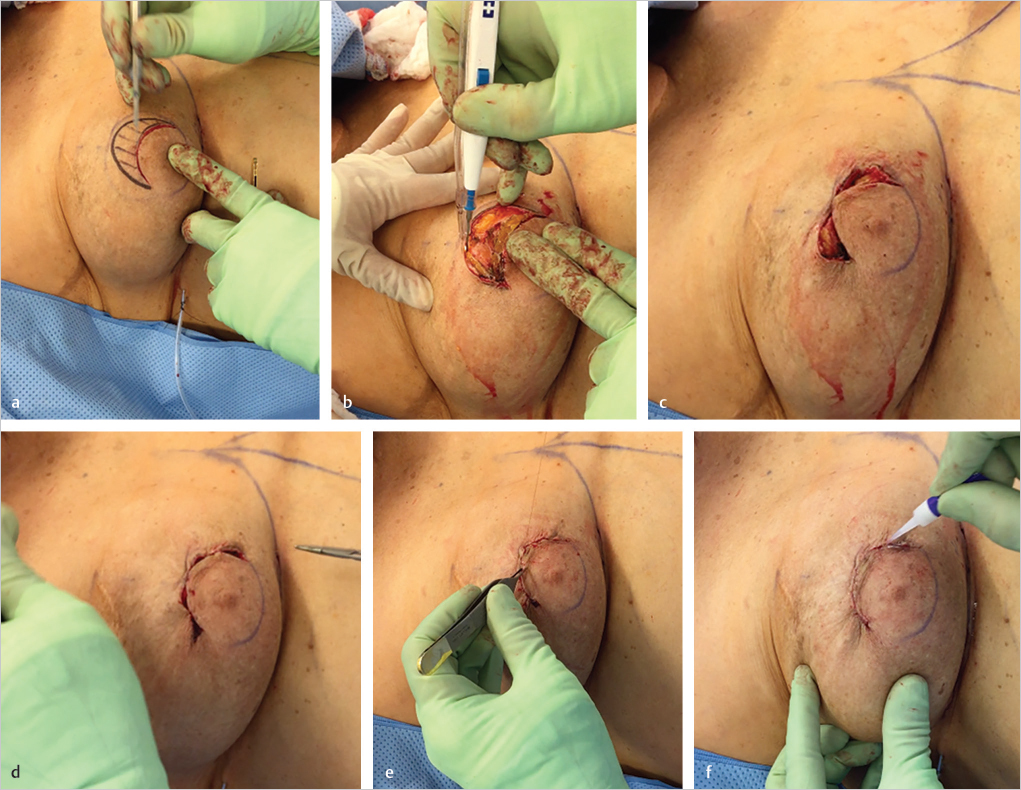
2. Dermal incision and localized undermining:
The dermal–cutaneous junction is incised with cautery to free up the skin margins for mobilization and closure. The upper skin flap can be undermined with scissors or cautery to allow for easier upward translocation of the areola (▶Fig. 22.2b).
3. Interrupted deep dermal closure:
Closure commences with a single deep dermal suture of 4–0 Monocryl or equivalent at 12 o’clock position to orient the closure correctly (▶Fig. 22.2c). The inner and outer halves of the closure are then halved progressively with deep dermal sutures to distribute the unequal longer upper outer circumference length to the shorter inner length (▶Fig. 22.2d). This sequence is important to maintain even tension distribution along the suture line to prevent distortion of the final areolar shape.
4. Intracuticular closure:
The final closure is completed with a running intracuticular suture using 4–0 Monocryl (▶Fig. 22.2e) followed by a thin layer of cyanoacrylate adhesive to seal the wound (▶Fig. 22.2f).
Surgical Plan for Full Circumferential Periareolar Approach
Preoperative markings for the future areolar diameter, with the outer circle designating the central skin excision.
Deepithelialization of the peripheral skin.
Incision of 5 mm dermal cuff.
Placement of the implant in the subpectoral position if augmentation needed.
Placement of a periareolar Gore-Tex cartwheel purse-string suture to control areolar diameter.
Final intracuticular closure.
22.1.1 Technique for Circumferential Periareolar Mastopexy
Markings: The circle for the future areola is marked at 38 to 42 mm in diameter.
Technical Pearl
Care should be taken when using a smaller diameter as there will be more tension across a 38-mm diameter areola resulting in greater tendency to postoperative stretching.
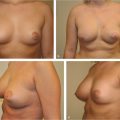
A second, outer circle or ellipse is drawn around the periphery of the areola and upward. The uppermost limit of the ellipse corresponds to the superior border of the future areola, and the inferior limit is just below the present areola. Lateral skin excision should be limited to minimize late areolar stretching (▶Fig. 22.3a).
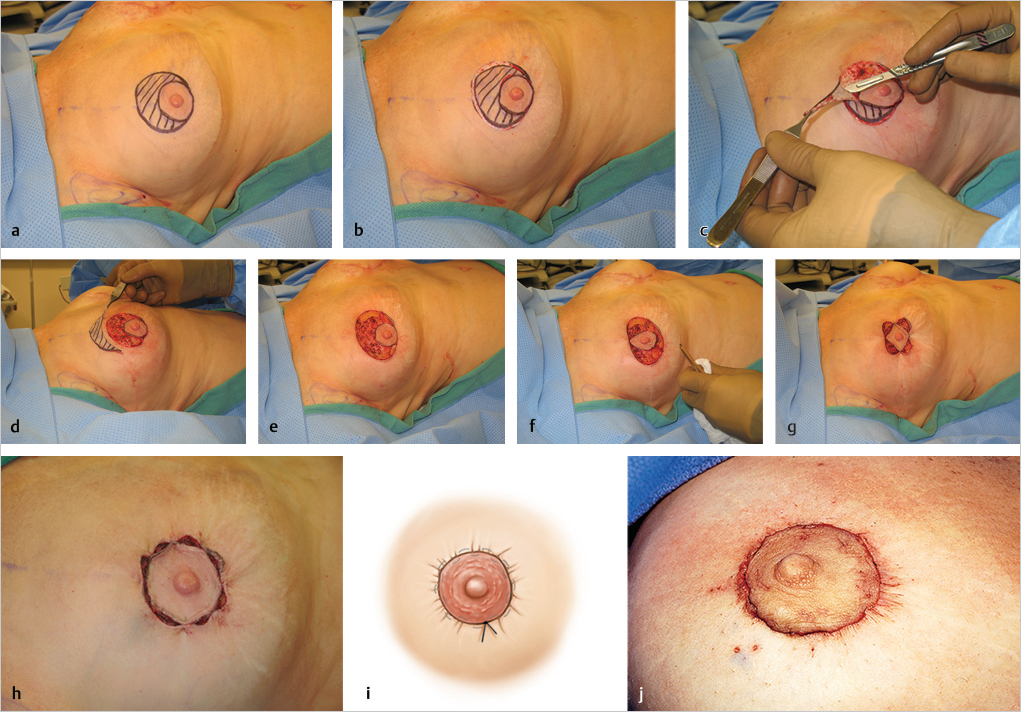
Deepithelialization: The intervening strip of areolar skin is deepithelialized using a number 20 blade (▶Fig. 22.3b) leaving a raw deepithelialized surface with punctate dermal bleeding (▶Fig. 22.3c,d).
Dermal incision and undermining: The cutaneous–dermal junction is incised with cautery and the upper skin flap is undermined in the subcutaneous plane to allow for upward mobility of the areolar complex (▶Fig. 22.3e). Failure to perform this undermining will result in less upward motion of the areola.
Orientation of closure: It is important to ensure that the areola is correctly oriented at 12 o’clock position before placing any further sutures. A single deep dermal suture of 3–0 or 4–0 monofilament absorbable suture is placed, followed by anchoring sutures at 6, 9, and 3 o’clock position to secure four-point fixation (▶Fig. 22.3f,g). With the nipple–areola complex oriented, four more deep dermal sutures are inserted to bridge the intervening gaps for even tension distribution (▶Fig. 22.3h).
Intracuticular closure: With the eight tension distributing sutures in place, intracuticular closure is performed with running 4–0 Monocryl, followed by cyanoacrylate glue to seal the wound (▶Fig. 22.3i,j).
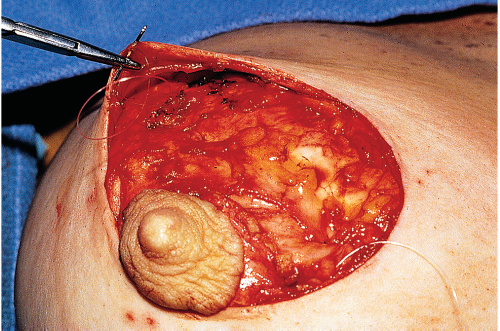
If concomitant breast augmentation is planned, the subpectoral plane should be accessed through the periareolar incision. A subcutaneous dissection down to the inframammary crease, beginning at the lower areola and continuing inferolaterally around the lower pole of the breast, allows access to the subglandular space. At this level, the dissection elevates the breast from the deeper fascia and is carried up to the lower margin of the pectoralis major muscle for an upper subpectoral dissection. The lower pectoralis major fibers are released to permit proper positioning of the implant. If the inframammary crease is constricted, radial incisions can be made in the breast parenchyma to allow it to expand. When the inframammary crease needs to be modified, particularly lowered, the subcutaneous dissection is extended down to the future level of the inframammary crease (▶Fig. 22.4). Implant volumes should be kept relatively low to prevent tension-induced areolar stretching.
Related posts:
Stay updated, free articles. Join our Telegram channel

Full access? Get Clinical Tree


