Abstract
This chapter examines the anatomy of the ear and suggests treatment options when there are significant variations or deformities in development, size, position, and shape. Each of the three major design features—axis/position, proportions, contour—are discussed. Preoperative surgical preparations are detailed, and the pioneering techniques of Radford Chapple Tanzer, Burt Brent, Satoru Nagata, and Françoise Firmin are discussed. The alternative ear reconstruction approach known as alloplastic reconstruction is covered, and paragraphs are dedicated to the ear variations/deformities known as constricted ears, prominent ears, cryptotia, Stahl’s ear, and question mark ear. Guidelines for postoperative care and outcomes concludes the chapter.
15 Ear Reconstruction and Otoplasty
15.1 Goals and Objectives
Review the anatomy of the ear in regard to normal development, size, position, and shape.
Appreciate the rationale for surgical timing and when to operate to maximize outcomes.
Review the various surgical techniques available for ear reconstruction for both microtia as well as ear deformities.
15.2 Patient Presentation
The patient with a malformed, misformed, deformed, or absent ear presents early in life. As a generality, the greater the deformity, the earlier the presentation due to parent concern. Most abnormalities of the external ear occur as a lone abnormality, but others are syndromic, such as that which occurs with Treacher Collins syndrome. Overall presentation and decisions regarding treatment will depend on multiple factors. Ear reconstruction surgery is predicated on a sound understanding of normal ear development and anatomy.
15.3 Ear Embryology and Development
Malformations of the auricle occur in approximately 1 out of 12,500 births, and these deformities can occur in isolation or in association with genetically determined syndromes. 1 The embryologic origin of the middle and external ear differs from that of the inner ear, leading to conductive but not sensorineural hearing loss in association with auricular deformities. The auricle develops from the first and second branchial arches, which form six auricular hillocks that later fuse to form the external ear. Dysmorphogenesis occurs between the fourth and twelfth weeks of embryonic life. By week 20, development is complete and there is no further development after birth. 2
Growth of the ear occurs rapidly in the early years, reaching 85% of final adult size by 3 years of age. The distance from the ear to the scalp and the ear width vary little after 10 years. The remaining 15% of vertical height will be complete by age 20 years. Further small increases with advancing age are due to elongation of the lobule. 3 , 4 , 5
15.4 Ear Anatomy
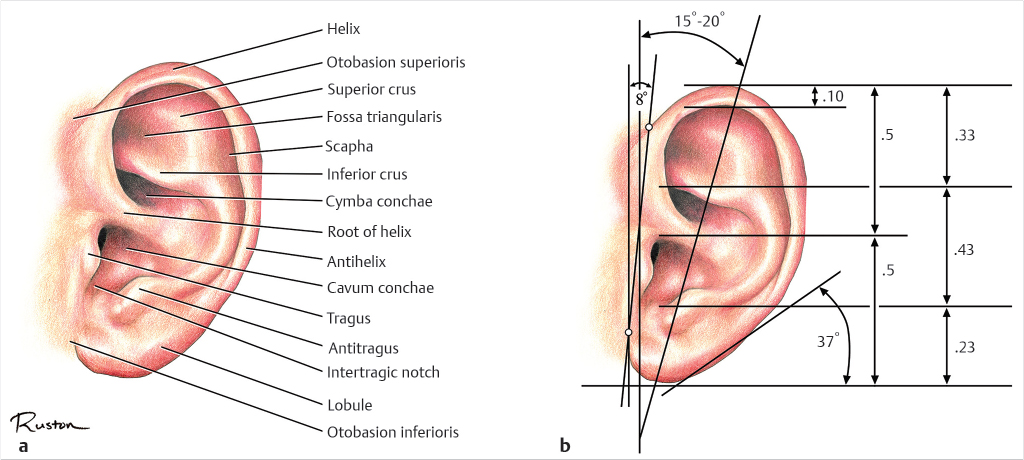
At its most basic, the ear is a multicontoured cartilage flap covered by closely adherent thin skin which protrudes from the head and is positioned within narrow limits relative to the adjacent structures. Refer to Fig. 15‑1 for a depiction of the normal ear, its parts, and its proportions as described by Tolleth. 6 , 7 When considering the basic anatomical elements of the ear, it becomes evident that there are three main design features to consider when performing an otoplasty—axis/position, proportions, and contour.
15.4.1 Axis and Position
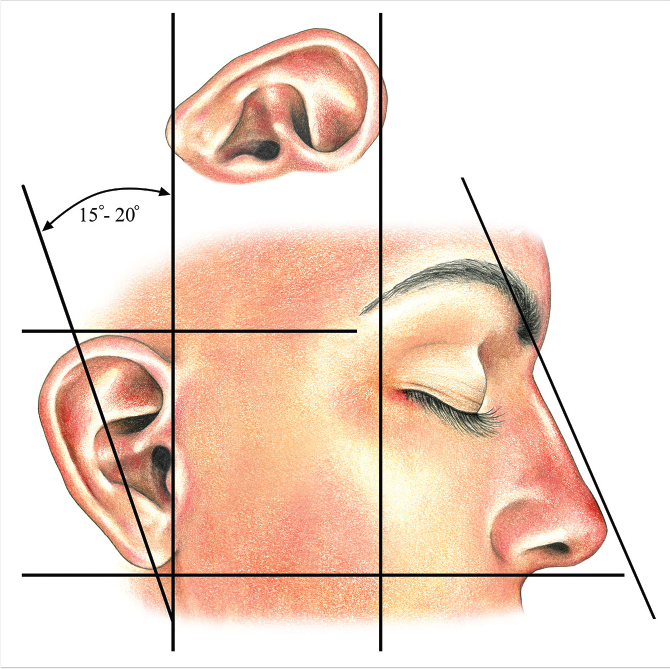
The axis of the ear is defined as the line of balance through the long dimension of the ear. An inclination of 15 to 30 degrees from the vertical is acceptable with 20 degrees being optimal. The most important aspect of this measurement is that the ear tends to incline posteriorly on visual inspection. With regard to position, the distance of the ear from the orbit should be roughly one ear length posterior from the lateral orbital rim or approximately 6.5 to 7.5 cm. The level of the superior aspect of the helix correlates with the brow, and the inferior aspect of the lobule correlates with the base of the columella. These positions are depicted in Fig. 15‑2.
15.4.2 Proportions and Protrusion
The ear varies in height from 5.5 to 6.5 cm. Width varies from 3.0 to 4.5 cm or 30 to 60% of the height. Protrusion from the scalp to the superior helix is approximately 1.5 to 2.0 cm.
15.4.3 Contour
The most noticeable portion of the external ear is the helix, which frames the pinna. The root of the helix begins in the concha, and it then travels in an arc to end at the lobule. At its origin, the helix is wide and gradually narrows as it approaches the lobule. Additionally, the helix transitions from having an overhanging curled portion to become more tubular at the midpoint of the ear. The antihelix begins as a narrow and tightly constricted structure inferiorly and then splits into a smaller, sharp-edged, inferior (anterior) crus and a broader, rounded, superior (posterior) crus. The area between the inferior and superior crus is the fossa triangularis. The scapha is directly posterior to the superior crus (Fig. 15.1).
The concha is triangular in shape and roughly measures 1.5 × 2.5 cm, with a width two-thirds its height. The tragus is a firm nodule anterior to the ear canal that is a congruent piece of cartilage which becomes the intertragic notch and antitragus, and then blends into the antihelix as it completes its inferior arc. The lobule is a flap of soft fibroadipose tissue, which has three common shapes: round, flat, and triangular. There are varying degrees of attachment of the lobule, ranging from completely free to totally adherent.
15.5 Preparation for Surgery
15.5.1 Ethics, Motivation, and Timing of Surgery
An ethical dilemma in ear reconstruction and otoplasty concerns the timing of surgery. Families typically request early surgical correction to avoid psychological and social trauma, but the child is often not disturbed by the deformity during the early childhood years. 8 Furthermore, the ear is not at its full adult size until later in childhood, making surgical correction at a later age more optimal. 9 Considerations on severity of the malformation, ear growth, patient participation, and psychological impact of the deformity all need to be discussed as a part of the decision to proceed with surgery. 10
The American Association of Plastic Surgeons were surveyed and 57% responded that they delay otoplasty until age 5 years or older due to the following reasons: near adult size of ear, greater patient cooperation, increased peer ridicule, decreased need for general anesthesia, greater patient self-image, and traditional teachings. 11 A similar survey was sent to members of the British Association of Plastic Surgeons and 79% believed that children should be older than 6 years at the time of otoplasty. 8
Gosain et al reviewed their patients undergoing otoplasty before the age of 4 years and found that there was no growth restriction when comparing the native normal ear and the reconstructed ear. 11 All of the families in this study stated that they would choose to pursue surgery before the age of 4 years again. Tanzer and Brent found that their reconstructed ears grew with their patients regardless of the age at which surgery was performed. On the other end of the spectrum, Bauer transitioned from reconstructing ears at age 5 to waiting until age 10 due to having sufficient donor cartilage and a lack of psychological impact with greater patient participation. 12
The only prospective trial to research the impact of timing on ear reconstruction was performed by Bradbury et al in 1992. 13 They found that there was a wide disparity of the age of ear self-consciousness from 4 to 13 years. Patient motivation for surgery was primarily due to psychological and social distress followed by aesthetic concerns and anticipated problems by parents. Levels of teasing were higher in otoplasty patients than control children until age 13 when the levels equalized, although all reported teasing levels were high. There were no correlations between patients, parents, or an independent panel on the degree of observed ear prominence. There was no correlation with severity of deformity and degree of satisfaction. Postoperative interviews revealed that 63% of patients were happier, but only 13% reported improved social circumstances, which led to a significant difference between social and emotional outcomes.
15.5.2 Antimicrobial Considerations and Intraoperative Preparation
While practice patterns during the perioperative period vary greatly, it is generally accepted that at a minimum, a prophylactic dose of intraoperative antibiotics should be given prior to otoplasty or ear reconstruction. 12 When considering ear reconstruction, there is a significant association with patent external auditory canals (EAC) and risk of infection. 14 For this reason, strict operative cleansing of the EAC and treatment based on swab cultures are recommended. This intervention seeks to prevent complications of infection, cartilage exposure, surgical debridement, and loss of graft. The operative field is prepared with Betadine and the head is draped in a fashion to allow visualization of both ears. This is beneficial when making corrections in position or symmetry to the contralateral ear.
15.6 Treatment
When discussing a topic as broad as ear reconstruction and otoplasty, there are many different approaches that one can take. Often, the most memorable approach is to tell the stories of those who most greatly contributed to the topic. There are four key characters in the story of otoplasty, and they all serve unique roles to fully explain the evolution of this technique. The first major character is Radford Chapple Tanzer, MD, the professor; the second is Burt Brent, MD, the artist; the third is Satoru Nagata, MD, PhD, the engineer; and the fourth is Françoise Firmin, MD, the surgeon. 15 All of these individuals have added their own contribution to the study of otoplasty and ear reconstruction, but they have also demonstrated that the fundamentals of ear embryology, anatomy, timing of surgery, and perioperative considerations must be established prior to undertaking this procedure. In this chapter, we will use the story of these four individuals to describe the basics of ear reconstruction for microtia, and will detail the use of otoplasty for the most common auricular deformities.
15.7 Microtia
15.7.1 Radford Chapple Tanzer, MD—“The Professor”
R.C. Tanzer saw his first microtia patient in 1951 and he reports, “I spent one year just thinking about the problem with paper and pencil. I finally used a 6-stage procedure on the boy, borrowing a flap of skin and bringing it up, with its own blood supply, to make a total construction of an external ear.” 16 He clearly outlined the difficulties in producing a surgical substitute for a missing ear: furnishing adequate skin of matching quality, producing a framework that will remain permanently inert, creating delicacy along with contour, and positioning the restored ear properly to furnish a symmetric counterpart. 17 , 18
His keys to success were simple. He advocated using an autologous cartilage framework, and recommended that soft tissue used to supplement integument should be a free graft. Lastly, he recommended that no visible scars should be created other than those that are completely necessary. He followed four core concepts. The first was that the ear is a structure composed of four separate planes at right angles to each other: conchal floor, conchal wall, antihelix scapha complex, and the helix. The second concept was to use a central incision in the conchal region as opposed to a peripheral helical rim incision. The third was to understand the limited supply of available cartilage in a pediatric patient in which to form a framework. The fourth concept was to form a tragus from rolling tissue from the conchal floor onto itself. 17
His initial six-stage procedure evolved into the following four-stage procedure 19 , 20 , 21 , 22 , 23 , 24 , 25 :
A contour pattern of the normal ear is made from X-ray film and reversed. The lobule is put into a transversely oriented pattern based on an inferior pedicle.
Two months later, rib cartilage is harvested from the sixth and seventh ribs en bloc and the eighth rib separately. The contour pattern is applied to the sixth and seventh ribs and a base block is carved. The helical rim is carved out of the eighth rib and secured to the block with steel wire sutures. The framework is then placed into an undermined pocket with an incision at the former vertical lobular incision. Mattress sutures are placed to enforce the entire frameworks along with the helical sulcus and conchal wall. A full-thickness skin graft may be needed for the conchal floor.
After 3 months, the posterior aspect of the framework is elevated and a thick-split thickness skin graft is placed from the thigh. A packing dressing in applied to reinforce the sulcus.
One month later, conchal and tragal reconstruction is performed. A U-shaped flap from the conchal floor is rolled onto itself to make the tragus and a full-thickness skin graft from the opposite inferior auriculocephalic sulcus is secured into the conchal floor defect.
15.7.2 Burt Brent, MD—“The Artist”
Burt Brent furthered the field of ear reconstruction by first classifying microtia into classic and atypical deformities while providing an artist’s insight into reconstruction. 26 , 27 In the classic deformity, the vestige is a sausage-shaped appendage with a relatively normal but displaced earlobe. 28 Atypical microtia deformities were diverse, and were typically addressed on an individual basis for surgical planning. 29 However, for the classic microtia deformity, he used the following stages of reconstruction 28 :
Creation and implantation of the rib cartilage graft. An X-ray pattern is made of the normal ear, reversed, and made several millimeters smaller to accommodate for thickness of the skin. The position is marked from comparing the height of the contralateral ear and in a parallel line to the nasal bridge. Cartilage is harvested as Tanzer described from the contralateral sixth to eighth ribs. An incision is made anterior to the vestige, all vestigial cartilage is removed, and a pocket is undermined just deep to the subdermal plexus. A suction drain is placed under the framework and replaces mattress sutures.
Transposition of the lobule. This can be performed on an outpatient basis as early as 6 weeks after the first stage of reconstruction.
Tragus reconstruction, conchal excavation, and simultaneous contralateral otoplasty. Taking a cartilage-containing composite graft from the contralateral auricle creates a more delicate tragus reconstruction and can often aid in reduction of the contralateral ear.
Further surgery is sought only based on patient’s desire. If auricular projection has not been achieved by exaggerating the framework’s height, the framework can be elevated and skin grafted to create an auriculocephalic sulcus. Helical definition is accomplished by excising a deep wedge of scar tissue and cartilage from an incision in the helical sulcus. The closed incision is compressed with mattress sutures and bolsters behind the ear.
Skin Coverage
Although there has been an emphasis on formation of a meticulous auricular framework, the quality and quantity of available skin is equally important to a successful ear reconstruction. This problem most commonly arises in cases where prior surgery has been performed and inelastic scars have been created, making helical projection impossible. One technique to correct this problem is to remove the former framework and place an expander. After inflation, the expander can be removed and the new framework placed. This will result in a thick capsule, which requires another procedure for sulcus deepening. 29 A second technique is the use of a temporoparietal fascial flap that can be placed over the cartilage framework and skin grafted. 30 , 31 , 32
Low hairlines are associated with previously reconstructed ears, acquired traumatic deformities, and almost always in the case of anotia. Brent dealt with this problem by excising the unwanted hair-bearing skin, immediately placing a framework, covering with a temporoparietal flap, and covering with a skin graft. Anotia, or the lack of any residual vestige, presents the challenges of a low hairline, shortage of skin, and absence of an earlobe. Anotia is treated as previously described with a temporoparietal flap and the unique addition of a lobule component to the cartilage framework. The earlobe portion is then elevated as a secondary procedure. 29
Furrowed, Pitted, or Grooved Microtic Vestige
It is tempting to incorporate a furrowed, pitted, or grooved vestige into the reconstruction. However, this produces an unnatural result with an obvious line of demarcation. These vestiges should either be discarded or modified into a classic microtia vestige prior to initial framework insertion. The remainder of reconstruction can proceed as previously described in classic cases. 29
Microtia with Conchal Remnant
A conchal remnant can sometimes be used in the reconstruction and saves a step of conchal formation. However, this remnant often causes constriction and prevents the use of the standard preauricular incision for framework insertion. This reduces the amount of skin to cover the cartilage framework. Since there is such a variety of presentation, each case must be assessed individually and parts discarded or incorporated depending on their value. 29
15.7.3 Satoru Nagata, MD, PhD—“The Engineer”
Nagata defined five types of microtia based on the surgical technique for each deformity. 33 , 34 In the anotia type, the external ear is completely absent. The lobule type presents with a variable cartilage remnant, vertically oriented lobule, no acoustic meatus, no concha, and no tragus. A third type, large conchal, is attributed with the presence of a lobule, tragus, intertragal notch, concha (with or without acoustic meatus), and with varying deformities of the upper pole of the auricle. The small conchal type is the lobule type but with a small indentation in the conchal bowl. The last classification is the atypical type, which includes all other deformities which do not fit into other categories.
Nagata’s technique for ear reconstruction involves a two-stage procedure with the first being fabrication and grafting of a three-dimensional costal cartilage framework and the second being ear elevation.
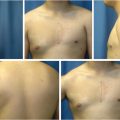
Harvest of Costal Cartilage for Auricular Reconstruction
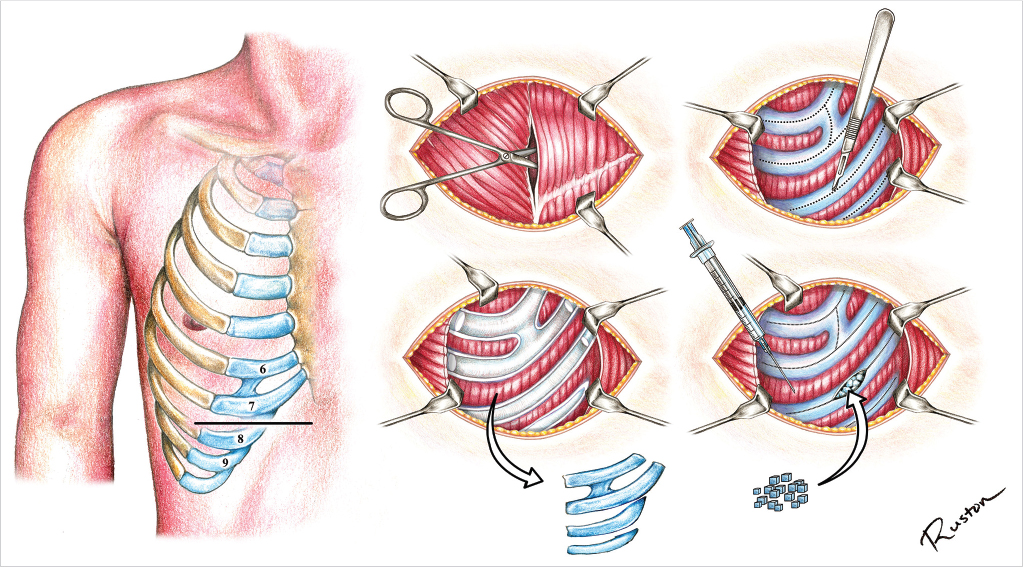
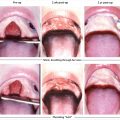
In an attempt to correct chest wall deformities, Nagata changed his practice to minimize the amount of cartilage harvested and improve the technique used in harvesting, leading to fewer deformities and complications. 33 , 35 , 36 He described an ipsilateral 9-cm transverse incision over the seventh rib. He then dissected the external oblique and rectus abdominis fascia from each other in a longitudinal fashion to expose the perichondrium of the sixth through ninth costal cartilages. A central incision is made with a scalpel over each costal cartilage to elevate the perichondrium while not incising the costal cartilage. A perichondrial elevator is then used to incise the cartilage, with a Doyen rib elevator used concurrently as an intrathoracic protector. An incision is made medial to the costochondral junction. Costal cartilages 6 and 7 are harvested en bloc with 8 and 9 harvested separately. A leak test is performed to ensure there is no pneumothorax and a layered closure is performed with 4–0 and 5–0 nylon suture. Unused cartilage is cut into 2- to 3-mm blocks and placed back into the cartilage harvest site with securing perichondral sutures. A Penrose drain is left deep to the muscle closure and intercostal nerve blocks provide anesthesia. In their review of patients, it was noted that there were no chest wall deformities and that cartilage regenerated. The steps for cartilage harvest are demonstrated in Fig. 15‑3 and the modifications of ear reconstruction based on each unique microtia type are demonstrated in Fig. 15‑4.
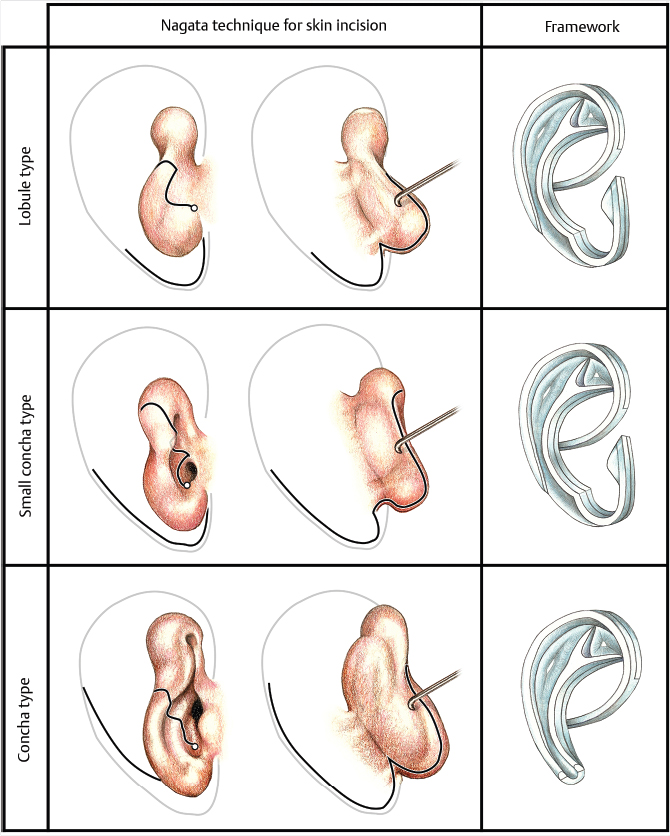
Modification of Framework for Lobule-Type Microtia
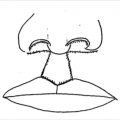
Nagata transitioned from using a V-shaped incision described by Tanzer to a large W-shaped incision over the posterior aspect of the lobule. Tanzer’s anterior lobule incision of a straight oblique line was modified to a curvilinear vertical incision with a circular component at the base. The one piece three-dimensional framework was made in two layers with a base frame and a second layer forming the crus helicis, helix, superior crus, inferior crus, antihelix, antitragus, incisura intertragica, and tragus secured on top with nonexposed wire suture. These modifications eliminated the need for skin grafting at the first stage, created better contour definition, and built in tragal reconstruction into the first stage. 37
Modification of Framework for Concha-Type Microtia
While concha-type microtia seems to be a more simple deformity to correct, it presents unique challenges by incorporating the remnant cartilage into the three-dimensional framework in a seamless fashion. A large W-shaped incision is made over the posterior surface along with curvilinear and circular incision anteriorly much like that made in lobule-type microtia. The costal cartilage framework is a two-layer frame in which a base frame is made and the antihelix, superior crus, inferior crus, and helix are then attached. The crus helicis is extended to reach the posterior aspect of the antihelix. Nagata became more aggressive with excision of the remnant ear and conchal cartilages. At his final modification, he removed portions of the posterior conchal cartilage, antihelix, anterior antitragus, and all of the remnant ear cartilage. 38
Modification of Framework for Small Concha-Type Microtia
There is only a small difference between lobule type and small type microtia, but there are major differences in their reconstructions. Incisions are made identical to that described for the previous two types of microtia. The three-dimensional cartilage framework has two layers. The helix, antihelix, superior crus, inferior crus, incisura intertragica, and tragus were all placed on top of the base layer. The crus helicis was extended to attach on the posterior surface of the antihelix. The remnant ear cartilage was removed in entirety. 39
Second Stage: Ear Elevation, Fascial Flap, and Skin Grafting
The posterior ear incision is made 5 mm from the edge of the helix. A costal cartilage graft is harvested and made into a concave block with a height of 12 mm. This block is grafted to the posterior aspect of the three-dimensional framework with 4–0 nylon sutures. A temporoparietal fascia flap is then harvested and used to cover the costal cartilage block. Three Penrose drains are placed. A full-thickness skin graft from the groin had been used to cover the fascial flap, but this was later replaced with a split-thickness skin graft. This split-thickness skin graft was elevated with a 15-blade scalpel from the posterior hair-bearing scalp up to the level of Nagata’s original release incision (at 5 mm from the helical rim), where it is transitioned to a full-thickness skin graft maintaining congruity. 40 , 41 , 42
15.7.4 Françoise Firmin, MD—“The Surgeon”
Firmin, an advocate for surgeon experience, studied with both Brent and Nagata. She performed reconstructions with both techniques and eventually blended these into her own approach. She adopted a two-stage reconstruction. The first stage is cartilage harvest, framework sculpture, and placement. Firmin harvests ipsilateral sixth to ninth rib costal cartilages from a 5-cm oblique incision. The anterior perichondrium is harvested, but the posterior perichondrium is left intact with no chest wall deformities. Intercostal blocks are performed and no drains are left. Cartilage is banked for further stage of framework elevation. 43 , 44 , 45
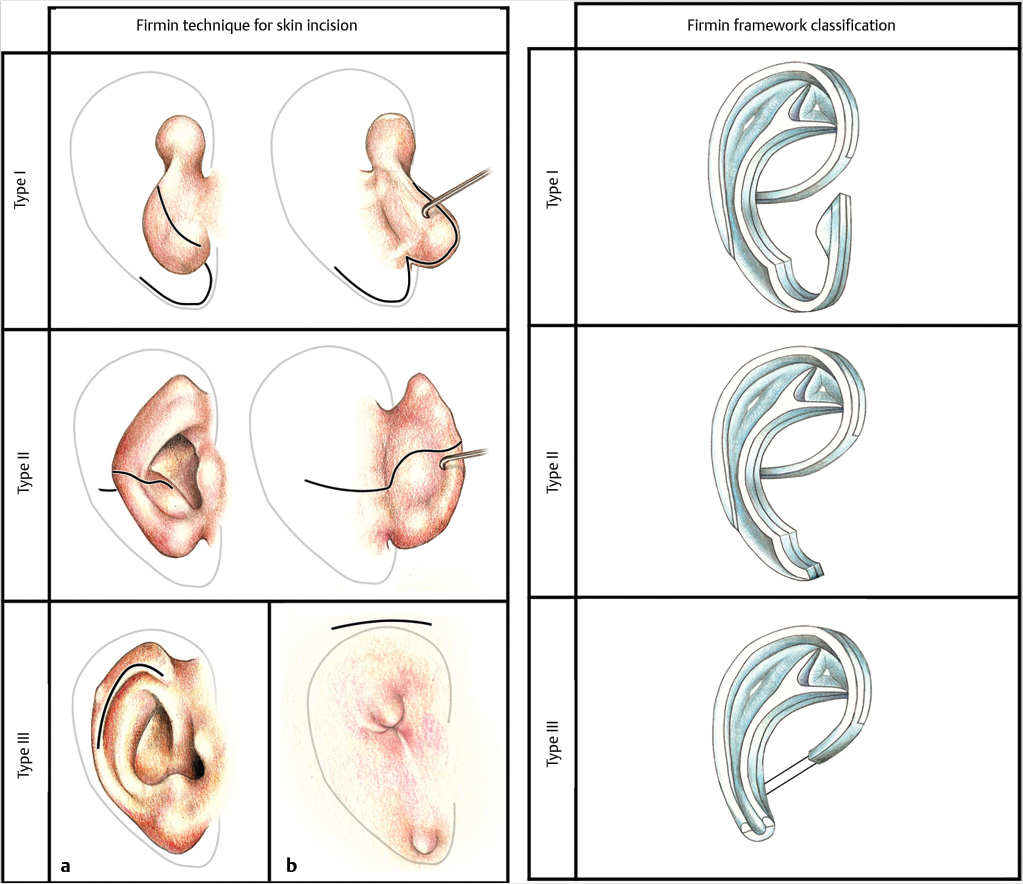
Next, a three-dimensional framework is carved with a base and pieces (antihelix, helix, and tragus–antitragus) attached with stainless steel threads. A modification was the addition of an extra piece of cartilage, behind the helix root and the tragus to enhance anterior projection. Three classifications were made based on the type of framework needed to correct the unique microtia defect: type I (complete framework), type II (no tragus), and type III (no tragus or antitragus). In addition, three skin incisions were described based on the microtic remnants and this is demonstrated in Fig. 15‑5. Type I is a Z-plasty, which allows for transposition of the lobule. Type II is a transfixion incision with a backcut that re-creates the lobule. Type III is a skin incision and only used in rare circumstances. Suction drains are placed. 43 , 44 , 45
The second stage of reconstruction involves creating a retroauricular sulcus 6 months after the initial reconstruction. A posterior incision is made along the surface of the framework and the entire posterior surface of the framework is exposed. The banked cartilage is then harvested and formed in a shape that resembles the antihelix. This is then transfixed with wire sutures in three planes. A temporoparietal fascia flap covers the cartilage and a split-thickness skin graft from the scalp is then placed. 43 , 44 , 45
Related posts:
Stay updated, free articles. Join our Telegram channel

Full access? Get Clinical Tree


