One of the significant challenges in hip revision surgery is the absence of satisfactory proximal femoral bone stock.
 Restoration of the structural integrity of the proximal femur is paramount to the success of any revision surgery.
 Impaction allografting of bone has been used successfully as a technique to repair bone loss in the proximal femur; this procedure involves retrograde filling of the femoral canal with impacted particulate graft, thereby creating a neomedullary canal into which a cemented femoral stem can be placed.
ANATOMY
 Important anatomic considerations include the proximal femoral and diaphyseal anatomy and the assessment of the loss of proximal femoral bone stock.
 The proximal femoral anatomy includes the greater and lesser trochanters and the vastus ridge, which could be a point of relatively weak bone in revisions due to osteolysis, previous trochanteric osteotomies, or previous surgery in this area.
 The femoral diaphyseal anatomy includes the attachments of the vastus musculature at the vastus ridge and posteriorly at the linea aspera.
 The femur can be accessed through an anterior, posterior, transtrochanteric, or straight lateral Hardinge approach.
PATHOGENESIS
 In revision total hip replacements, the most common causes of bony deficiencies are aseptic loosening with debris-induced periprosthetic osteolysis, implant migration, infection, and iatrogenic bone loss during implant extraction.
 There is a higher risk of creating a false passage with cortical penetration in the presence of a pedestal and “egg-shell” bone in the elderly.
 Impaction bone grafting techniques are useful when faced with a large, ectatic femoral metaphysis or diaphysis (FIG 1A–D).

NATURAL HISTORY
 The impaction grafting technique allows the surgeon to achieve a stable construct while offering the potential to restore bone stock around the arthroplasty, which is appealing especially in young patients, and would be beneficial for future reconstructions, should they be required.
 When applied properly, it can provide sufficient support for an implant that otherwise would be inadequately supported by host bone.4,10
 The graft behaves as a friable aggregate and its resistance to complex forces depends on grading, normal load, and compaction.
 Histologic studies looking at graft incorporation have been carried out by several authors.5 Ullmark and Obrant15 have described a healing process that mimics fracture healing.
 Ultimately, the quality of the impacted bone and its remodeling potency determine prosthetic stability.
PATIENT HISTORY AND PHYSICAL FINDINGS
 A detailed history of the symptomatology of a failing arthroplasty includes the nature and quality of pain, instability, decrease in mobility, and quality of life.
 Detailed history of the index arthroplasty, postoperative course, and adverse complications such as delayed wound healing or infection
 Detailed history of any significant comorbidities, medications, and allergies
 Physical examination includes assessment of gait, leg lengths, skin and scars over the hip, and muscle strength of the hip and lower extremity, particularly assessment of abductor muscle integrity and distal neurovascular examination.
IMAGING AND OTHER DIAGNOSTIC STUDIES
 The goal of diagnostic imaging studies is to confirm the presence of a failing arthroplasty, exclude the presence of any infection, and ascertain what bone stock is available for the revision reconstruction.
 Confirmation of the presence of a failing arthroplasty and evaluation of the existing bone stock is accomplished by biplanar radiographs of the entire implant and the joint above and below the prosthesis, computed tomography scanning with possible three-dimensional (3-D) reconstruction, and scintigraphy (bone scans).
 Confirmation of a noninfected arthroplasty is vital prior to any revision arthroplasty.
This is best accomplished by laboratory evaluation, including erythrocyte sedimentation rate (ESR) and C-reactive protein (CRP). A combination of a normal ESR and CRP shows that the arthroplasty has a very low (<1%) likelihood of being infected.12
If ESR and CRP are elevated, an aspiration of the hip under image intensifier is warranted, with examination of the cell count with differential and culture of the fluid.
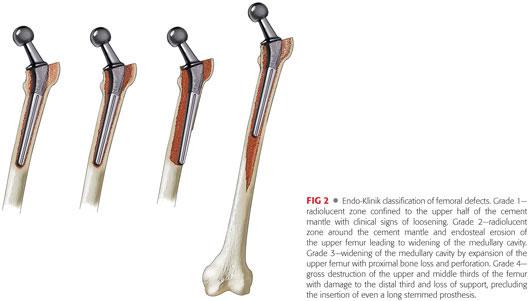
 Deficiency of proximal femoral bone stock can be assessed using the Endo-Klinik classification of femoral defects (FIG 2).
DIFFERENTIAL DIAGNOSIS
 Aseptic loosening
 Septic loosening
 Iatrogenic bone loss during implant extraction
NONOPERATIVE MANAGEMENT
 Nonoperative management of a failing hip arthroplasty with significant proximal femoral bone loss is only reserved for the patient with significant comorbidities where a complex revision procedure poses an extreme risk to limb or life.
 Nonoperative measures include optimization of analgesia and protected weight bearing with assistive walking devices or a wheel chair, as tolerated.
SURGICAL MANAGEMENT
 Femoral impaction grafting has been popularized by Gie et al2,3 and Slooff et al.11
 The primary objective for the surgeon in using impacted allografts and cement is to achieve implant stability with preservation or restoration of bone stock.
 Implant stability in impaction grafting depends on constraint for the graft, impaction of the graft, and the injection of cement into the graft surface.
 Constraint is normally provided by the surrounding bone, but where this is defective, some form of artificial constraint must be created by the surgeon before the impaction is performed.
 The most effective way found so far to create this constraint is to use a perforated mesh, fixed appropriately to the bone so as to close off the bony defect or deficiency.1,2 In simple cases, cerclage wires may suffice.
 The main purpose of the mesh is to provide constraint for the graft. Mesh has a limited effect on reinforcement of the femoral diaphysis, and if used alone to make up circumferential deficits in the femoral diaphysis, mechanical failure is more likely to occur.
 Where replacement or reinforcement of the femoral diaphysis is needed, the mesh should be supplemented by the use of strut grafts, a plate, or a combination of the two. The struts and plate must extend a sufficient distance above and below the defect to be effective mechanically (FIG 3).
 Where femoral deficiencies are sited near the tip of a standard length stem, the mesh, strut graft, and/or plate may have to be reinforced by the use of a longer stem.
Preoperative Planning
 Elimination of infection is often difficult preoperatively, although every effort should be made to do so.
 Analysis of bone deficiencies—the site(s) of major bone stock loss in the femur should be clarified from x-rays, as far as possible, before surgery starts. This will dictate the exposure that is necessary to address these deficiencies.
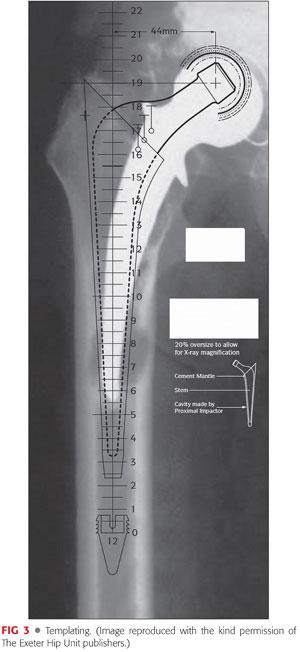
 Templating—anteroposterior (AP) and lateral films should include the whole of the femoral component and should extend distally down to the normal diaphysis beyond the femoral component (see FIG 3). From these films, the following are determined:
The position and size of the distal plug. This should be preferably two cortical diameters beyond the most distal lytic area in the femur.
The distance of the plug down the femoral canal against an appropriate anatomic landmark, for example, the tip of the greater trochanter. The distance can be measured using the plug templates and is used with the plug introducer and guidewire to position the plug at the appropriate depth.
An estimate of the size of the stem to be used, which can be done by superimposing the stem template on the plug template with the stem at the appropriate position. Final stem sizing is best delayed until the situation is clarified intraoperatively.
Positioning
 The technique of impaction bone grafting is generally more effective if the greater trochanter can be retained. Retention of the trochanter improves proximal stability of the graft and the femoral component.
 Generally, positioning the patient in the lateral decubitus position is appropriate. This will allow exposure of the posterior, lateral, and anterior aspects of the hip by suitable modifications and extensions to the usual posterior or direct lateral approaches.
 A pegboard positioner or a Montreal frame can be used along with an axillary roll to provide protection for the brachial plexus during surgery.
Approach
 The incision should be made through a preexisting scar wherever possible, although it is extremely important not to let the scar dictate the surgical approach.
 A direct lateral approach to the hip can be performed in the supine or lateral position and is extensile in both the proximal and distal directions should additional exposure be required. It involves a split in the anterior half of the gluteus medius and minimus musculature.
 For the posterior approach, a long incision extending up the lateral aspect of the femur and extending posteriorly from the tip of the greater trochanter is favored.
 Fascial incision—initially, this should be made through an area of the fascia lata that has not been involved in previous exposures of the hip. This may be very distal but allows the development of the subfascial plane that is later important in repairing the fascia. The tendinous part of the gluteus maximus at its insertion into the femur might have to be divided.
 The next important step is to identify and protect the sciatic nerve. Identification should start relatively distal, where the nerve is usually free of scar tissue, and proceed proximally. When distal exposure is not feasible, the sciatic notch may be identified proximally, with the nerve found where it enters the notch, and then traced distally. Several anatomic variations in the pattern of division of the sciatic nerve have been described; the nerve may run a very tortuous course and can be drawn up very close to the trochanteric ridge at times.
 Aspiration of the hip can be repeated at this stage to obtain fluid for microbiology.
 Dissection is then carried out through the gluteus medius and minimus if a direct lateral approach is used or through the short external rotators if a posterior approach is used.
 If the capsule is very thick and scarred, the deeper portions are excised, leaving a thinner flap that is useful for reattachment to the femur during closure. The psoas tendon might have to be released from the lesser trochanter.
 After mobilization of the capsule, the head of the prosthesis is visible. Further superior, inferior, and anterior resection continues with gradual and gentle mobilization of the femur. A large blunt hook or a long gauze swab can be passed around the neck of the prosthesis and dislocation achieved by lifting the head and neck posteriorly using the hook or the swab rather than by rotating the femur through the lower leg. With serious bone stock deficiencies, this phase of the operation carries a risk of fracture of the femur and great care is needed in achieving dislocation with generous soft tissue release as necessary, especially from the anterior aspect of the femoral neck.
TECHNIQUES
 Removal of the Femoral Component and Mobilization of the Femur
Considerable soft tissue release may be necessary to achieve this safely.
Any cement or bone lying over the shoulder of the femoral component is removed before attempts are made to extract the latter. Vigorous attempts to extract the component in the presence of obstructing proximal cement or bone may lead to a fracture of the proximal femur.
In some cases, it may be necessary to perform an extended trochanteric osteotomy to allow safe removal of an implant and protect the abductors in a straight lateral approach. If such an osteotomy is performed, the femoral canal integrity should be restored using cerclage wires or cables before commencing impaction grafting to ensure containment of the graft.
It is always essential to achieve adequate mobilization and delivery of the proximal femur. Superiorly and inferiorly, this is usually straightforward. Often, with gross capsular thickening, much of the capsule requires excision rather than incision. Anteriorly, it might be difficult, especially where scarring has been marked. It is wise to expose the anterior aspect of the femur and excise the anterior capsule under direct vision.
Anterior femoral deficiencies can be exposed by externally rotating the leg and reflecting the vastus lateralis by taking it off the anterior aspect of the femur below the trochanteric level.
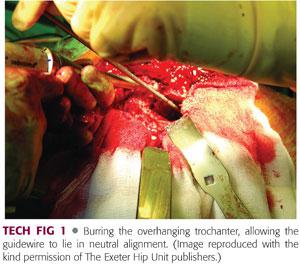
The proximal part of the greater trochanter must be exposed sufficiently to allow the insertion of the guidewire down the medullary canal, in the midline axis of the canal, and the subsequent insertion of the proximal impactor to prevent a false passage. This means that the neomedullary canal that is formed by the graft is in neutral alignment within the femur and not in varus or valgus. This often requires opening of the trochanteric overhang laterally by around 1 cm to accommodate the introduction of instruments in the correct alignment without risking fracture of the trochanter (TECH FIG 1).
 Preparation of the Graft
The optimal method of graft preparation is a subject of significant debate.
Ideally, the preparation should render the tissue safe from disease transmission without compromising its structural integrity. Proponents of fresh frozen graft site improved biologic and biomechanical characteristics relative to irradiated or other secondarily processed bone, whereas fear of bacterial or viral transmission7,8 warrants some to favor secondarily processed graft.
Fresh frozen cancellous allograft is recommended. ABO compatibility between graft donor and recipient is not necessary. Rhesus compatibility is important when the patient is a Rhesus-negative woman of child-bearing age. Autogenous cancellous chips may be mixed with the allograft if the surgeon so wishes.
Allograft chips are prepared by using a bone mill after removal of any soft tissue and sclerotic subchondral bone. The size of the chips should be large enough to give the compressed chips some body (eg, 4 to 6 mm). Bone slurry is not satisfactory because its consistency is too low. Larger chips up to 10 mm in size can be mixed with the smaller chips for packing of the proximal femoral canal around the phantom.
At least two femoral heads should be available and more if femoral bone stock loss is severe. Strut grafts might be necessary to address significant segmental bone defects.
 Preparation of the Femoral Canal
Cement removal must be complete with one exception: If the existing distal cement plug is greater than two cortical diameters beyond the most distal lytic area in the femur and is solidly fixed, and there is definitely no infection, it can be left in position to act as a distal plug.
All granulomata and fibrous membranes must be completely and thoroughly removed followed by copious irrigation of the canal. Membrane remnants can be used for frozen section and microbiologic examination.
As the success of this revision technique depends on adequate physical constraint for the graft, structural defects in the femoral diaphysis must be converted to contained defects before impacting the graft.
It is essential that the proximal femur is reconstructed up to a level that corresponds to the level of neck section preferred at a primary hip replacement. As a guide, the femoral component should never be positioned so that the lowest of the marks on the anterior and posterior aspects of the base of the neck lie above the level of the graft.
Prophylactic cerclage wiring of the femur is recommended where the femoral cortex is especially flimsy. Under such circumstances, vigorous packing of the canal can produce a split in the diaphysis. This is more easily managed if cerclage wires have been applied before the split occurs. Overtightening of the wire may crush the femur when its structure is seriously compromised.
 Repair of Femoral Cortical Defects
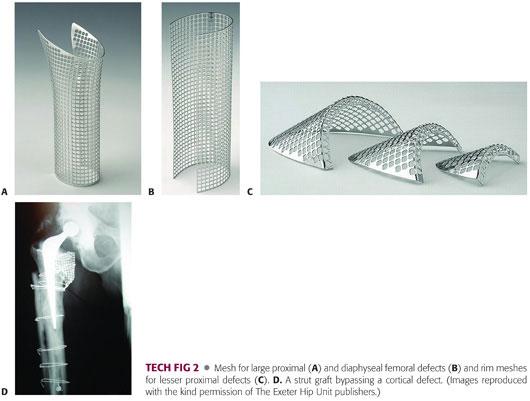
Diaphyseal defects—if these are small and completely sealed at their margins by soft tissues, they can be ignored and simply packed with chips from within. Larger defects should be exposed surgically, their margins clearly defined, and all associated granulomatous material and fibrous tissue removed. These defects are repaired using a combination of malleable stainless steel mesh (TECH FIG 2A–C) and cables or monofilament cerclage wires. Once the defects has been closed in this way, the operation proceeds as though no defect were present. Cortical healing can be anticipated. Large defects, particularly near the tip of the prosthesis, should be bridged either by a long-stem implant, a femoral plate, or strut grafts (TECH FIG 2D).
Metaphyseal defects—these are best repaired following trial reduction and performing the reconstruction with the proximal impactor in position, ensuring an adequate gap between mesh and prosthesis. The defect must be repaired in such a way that the proximal allograft chips can be fully constrained and thus able to take some load and augment rotational stability.
 Distal Occlusion of the Femur
This can be done in a variety of ways.
Where a new intramedullary (IM) plug is to be used, a threaded plug of the templated size is screwed onto an IM-guide rod and inserted into the medullary canal with a cannulated introducer sleeve, coupled with a slap hammer (TECH FIG 3A). The plug is introduced at the templated level, which should be at least two cortical diameters distal to the most distal lytic area, and the introducer removed. The guidewire remains in situ (TECH FIG 3B) for cannulated instruments to pass over during impaction grafting (TECH FIG 3C).

Where a new threaded IM plug is required beyond the isthmus, a 2-mm K-wire is drilled through both cortices at the desired level. The pointed end of the plug is cutoff to make a flat end. It is then inserted into the canal and placed on top of the K-wire. If the plug migrates during the impaction process, it can be skewered with a transverse K-wire.
Where there is a suitable cement plug that is to be left in situ, the largest impactor that will fit is placed down at the level of the plug to act as a drill centralizer. The IM drill is then passed through the impactor and the cement drilled to a depth of 6 mm. The guidewire is passed through the impactor and screwed into the predrilled hole and the impactor is removed.
 Sizing the Proximal Impactors
The plug introducer sleeve is removed and the canal sized for proximal impaction.
Starting with the largest proximal impactor and inserting progressively smaller proximal impactors, the first one that falls easily into the canal is the correct size for use.
Care should be taken that the guidewire is not driven into varus as the proximal impactor is inserted. If it is, further development of the slot into the trochanter is necessary until neutral alignment of the proximal impactor can be achieved.
 Graft Impaction
Carefully wash and suck out the distal canal to remove any debris.
Sizing the distal impactors—before using the impactors to impact the bone chips, it is important to establish the distance that each sized impactor can be passed into the femoral canal without jamming against the walls of the canal. Driving the impactors beyond this point runs the risk of splitting the femur. Take each impactor in turn and pass it over the wire, noting the depth of insertion by clipping a marker (TECH FIG 4A) onto the groove opposite the tip of the greater trochanter or equivalent mark. Subsequently, when impacting the bone chips, it is important not to drive each impactor beyond its marker clip (TECH FIG 4B).
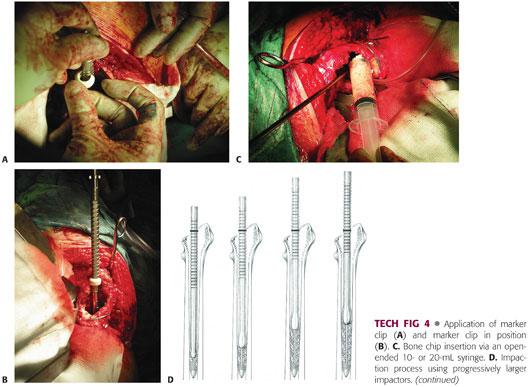
Introduce allograft chips (TECH FIG 4C) proximally around the guidewire. Push as far distally as possible using your fingers and use the large impactors to push the bone chips further down the canal. One centimeter of graft should be packed on top of the plug by using the distal impactors by hand before starting to use the slap hammer. This helps prevent distal migration of the plug. At this stage, the impactor should be carried on the handle assembly, and the slap hammer is used. Continue this process by introducing and impacting more chips using progressively larger impactors in relation to canal diameter (TECH FIG 4D). Check the depth of the guidewire after each instrument has been used to make sure the plug is not migrating. Continue this process of packing until the distal impactor cannot be introduced beyond the distal impaction line.
The distal impaction line is the depth that the tip of the stem will reach on implantation. Its distance from the eventual center of the femoral head will depend on the make and the length of the stem being used. It is important not to continue with distal impaction other than by hand beyond the distal impaction line as this might make it impossible to insert the proximal impactor at the correct depth.
Once the distal impaction line is reached, the appropriate phantom is mounted on the hand assembly and passed over the guidewire (TECH FIG 4E). Load graft into the proximal femur. Using the sliding hammer, drive the phantom distally into the chips to force them up against the walls of the canal. The handle assembly is used to control the rotational position of the phantom and ensure that the neomedullary canal formed is in the correct anteversion. The phantom should be driven vigorously into the bone chips.
Withdraw the phantom from over the guidewire, insert more chips, and impact them using the distal impactors by hand. Continue to use the distal impactors, alternating them with the proximal impactor, until the graft in the midstem region is adequately packed.
As the canal is filled from below proximally, continue to insert the phantom over the guidewire, and again drive the phantom into the chips using the slap hammer. The phantom should become progressively tighter. If not, then look for fractures.
The phantom should be driven into the desired depth as indicated by templating. If the graft is so tight that the proximal impactor cannot be introduced fully, use one size smaller for final impaction. Larger chips should be mixed with the smaller chips for final proximal packing. The proximal tamping packers are used to introduce these chips around the seated phantom, first by hand and then impacted with a mallet (TECH FIG 4F). This is continued until no further chips can be introduced. Select the stem size on the basis of the size of the phantom that is used for the final packing.
The surgeon must ensure absolute axial and rotational stability of the phantom at the conclusion of packing. Several blows with the slap hammer should result in minimal axial advancement of the phantom (<1 mm) and it should be impossible to withdraw the proximal impactor without using the slap hammer.
It is normally possible to perform a trial reduction with the guidewire in place. If not, the guidewire is unscrewed from the plug and withdrawn from the femur.
Once the reconstruction is completed, the position of the phantom is marked in relation to the bone or mesh using methylene blue.
 Trial Reduction
Trial reduction allows assessment of stability and leg length and acts as a further guide for the depth of stem insertion.
The hip is reduced with the appropriate trial head in place.
Any changes to the depth of insertion of the stem can now be estimated using the relative leg lengths of the patient. If the leg is short, impaction is continued to further build up the femur.
Carefully redislocate the hip and remove the trial head.
Once satisfied with the stem position and trial reduction, remove the guidewire and mark the depth and rotation of the trial implant.
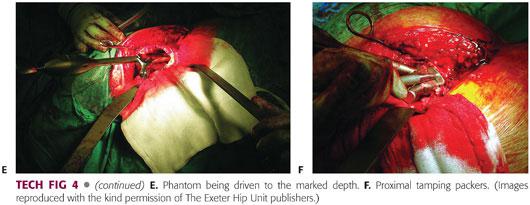
If a calcar or a proximal femoral deficiency is present, these can be reconstructed using the appropriate metal meshes, for example, acetabular rim mesh if reconstruction is required at the level of the lesser trochanter, or an anatomic calcar mesh if the lesser trochanter is involved, keeping the phantom in situ while this is done (TECH FIG 5A). The meshes are secured with cerclage wires or cables (TECH FIG 5B). Cables may be used distally but are avoided proximally because of the potential risk of intra-articular debris from fretting.
Carefully remove the stem introducer. Ensure that the connection on the shoulder of the phantom is clear of bone graft debris or soft tissue and replace the impactor connector in preparation for removal of the phantom prior to cement insertion.
 Cement and Stem Insertion
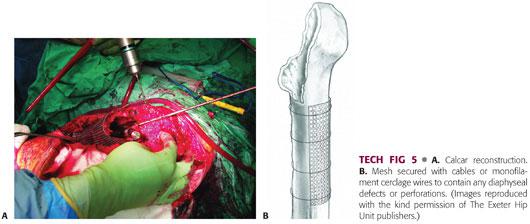
The phantom must be left in place until just before cement insertion. This keeps the graft compressed and the canal can be sucked dry by a catheter placed down the trial lumen (TECH FIG 6A).
A wingless centralizer is used on the stem tip to minimize graft disruption.
Low-viscosity cement is inserted in a retrograde fashion using a revision cement gun with a tapered or narrow nozzle to ensure that the graft is not disrupted (TECH FIG 6B,C). The timing of insertion will depend on the type of cement being used. Relatively low-viscosity cement is recommended to ensure adequate penetration of the graft. Two 40-g mixes are required to allow adequate cement for continuous pressurization prior to stem insertion.
Once the canal has been filled retrograde, apply the proximal femoral seal, cut off the nozzle at the level of the seal, and pressurize the cement into the graft (TECH FIG 6D,E).
Maintain pressurization until the viscosity of the cement is appropriate for stem insertion.
Insert the stem at its predetermined position, paying strict attention to its alignment during insertion and the previously placed methylene blue mark. It is important to obscure the medial aspect of the femoral neck throughout insertion to occlude cement and graft extrusion from the medullary canal, thus maintaining pressurization of the cement throughout insertion.
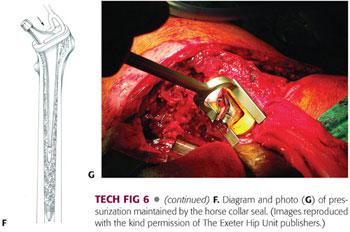
As soon as the desired insertion depth is achieved, the stem introducer is removed, and a horse collar seal is applied around the proximal femur in order to maintain pressure on the cement and graft while the cement polymerizes (TECH FIG 6F,G). Maintain a constant pressure on the stem to ensure that it does not back out during polymerization.
 Reduction and Closure
These are carried out according to the surgeon’s usual practice.
A layered closure is important along with adequate drainage.
PEARLS AND PITFALLS | |
Surgical exposure |
|
| |
Femoral canal preparation |
|
| |
| |
Repair of femoral cortical defects |
|
| |
| |
Distal occlusion of the femur |
|
| |
Graft impaction |
|
| |
| |
Prerequisite for success |
|
| |


POSTOPERATIVE CARE
 Postoperative care should be individualized according to the differing circumstances of each revision.
 AP pelvis and full-length femoral radiographs are obtained prior to mobilization, which takes place as soon as the patient is comfortable enough to do so.
 Where major reconstruction has been performed, touch or partial weight bearing on crutches is advised for the first 6 weeks.
 If at 6 to 8 weeks there is less than a millimeter of migration of the stem within the cement mantle, the patient is allowed to progress with weight-bearing mobilization, building up to full weight bearing at 12 weeks.
 In the very elderly, where mobility would be compromised by restricted weight bearing, full weight bearing is permitted at an early stage with the use of a walking frame.
 Clinical and radiographic surveillance is carried out at 6 weeks, 6 months, 1 year, 2 years, and then every 2 years indefinitely.
OUTCOMES
 Several factors influence the success of this revision technique, including patient factors (preoperative femoral defects and potency of allograft remodeling), technical factors (degree of bone impaction, allograft bone chip size, and cementing technique), and postoperative rehabilitation factors.
 The short-term clinical results of impaction grafting in 56 hips followed for a period of 1.5 to 4 years reported by Gie et al2 were encouraging. Radiologic results and histologic data demonstrated bone graft incorporation and partial reconstitution of the bone stock.
 Halliday et al4 have reported on longer term follow-up from the same center. They reported a stem survivorship of 90.5% at 10 years in 226 hips treated with femoral impaction allografting. Fourteen stems required revision: 2 for infection, 10 for femoral fractures, and 2 for loosening.
 The longest follow-up results have been published by Ornstein et al10 from the Swedish Arthroplasty Register. They reported their experience with 1188 revisions with a follow-up from 5 to 18 years. The re-revision rate was 5.9%. The survivorship at 15 years was 94.0% for women and 94.7% for men, using any reason for revision as an end point. Survivorship at 15 years was 99.1% for aseptic loosening, 98.6% for infection, 99% for subsidence, and 98.7% for fracture.
 The optimal stem design for use in impaction grafting of the femur is a subject of ongoing debate. The original proponents of the technique advocated the use of a highly polished, collarless, double-tapered cemented stem to allow for controlled subsidence.
 However, Leopold et al6 demonstrated 92% survivorship at 6 years in 29 hips treated with a precoated, collared, cemented stem, and Fetzer et al1 found no radiographic loosening in 26 collared stems at an average follow-up of 6 years.
 Several authors have reported on radiostereometric analysis9 used to study stem migration and the influence of certain factors such as the extent of femoral bone defects and the presence of cement mantle defects on stem migration (micromotion). They concluded that although femoral impaction grafting seems to yield good clinical results, migration continues to a minor degree even 2 years after the revision procedure.
 Cement mantle defects9 have been shown to be clinically relevant and caused by poor instrumentation. This stresses the importance of good instrumentation, which is absolutely vital to make this technically demanding technique effective in creating a stable stem-allograft construct in the defective femoral canal.
COMPLICATIONS
 Fracture
Intraoperative—usually technique-related and avoidable
Postoperative—usually related to the poor quality of bone that this procedure attempts to address and perhaps to the bone remodeling process. Two strategies that might help to reduce these are the use of cortical struts and longer stem lengths.
 Migration/subsidence—can be technique- or implant-related, for example, force-closed or taper slip stem designs that rely on a taper to transfer the load to the cement at the stem-cement interface; and stem migration to increase the frictional forces and balance the external forces to maintain mechanical equilibrium at the stem-cement interface. In contrast, shape-closed or composite beam designs transfer a large portion of the axial load directly to the cement, thereby contributing to the mechanical stability of the implant even after debonding of the stem-cement interface.5 The incidence of massive stem subsidence is low in most large series, suggesting that surgical technique (density of impacted bone, restoration of a cortical tube, and a longer stem) is a key factor in the success of the approach.
 Infection—one of the most serious complications of joint reconstruction with associated bone grafting. However, data to date have not demonstrated a high rate of reinfection when bone grafts are required for a subsequent reconstruction of a previously infected joint.
 Disease transmission—although the risk of disease transmission from the donor and contamination at retrieval or during processing are major concerns, the number of reported incidents of disease transmission after the implantation of allograft bone has been low, given the large number of grafts implanted worldwide.7,8,13,14
REFERENCES
1. Fetzer GB, Callaghan JJ, Templeton JE, et al. Impaction allografting with cement for extensive femoral bone loss in revision hip surgery: a 4- to 8-year follow-up study. J Arthroplasty 2001;16(8 suppl 1):195–202.
2. Gie GA, Linder L, Ling RS, et al. Impacted cancellous allografts and cement for revision total hip arthroplasty. J Bone Joint Surg Br 1993;75:14–21.
3. Gie GA, Ling RS, Timperley AJ. Stryker X-change Revision Surgical Protocol. Montreux, Switzerland: Stryker, 2004.
4. Halliday BR, English HW, Timperley AJ, et al. Femoral impaction grafting with cement in revision total hip replacement. Evolution of the technique and results. J Bone Joint Surg Br 2003;85(6):809–817.
5. Huiskes R, Verdonschot N, Nivbrant B. Migration, stem shape, and surface finish in cemented total hip arthroplasty. Clin Orthop Relat Res 1998;(355):103–112.
6. Leopold SS, Berger RA, Rosenberg AG, et al. Impaction allografting with cement for revision of the femoral component. A minimum four-year follow-up study with use of a precoated femoral stem. J Bone Joint Surg Am 1999;81:1080–1092.
7. Lord CF, Gebhardt MC, Tomford WW, et al. Infection in bone allografts. Incidence, nature, and treatment. J Bone Joint Surg Am 1988;70(3):369–376.
8. Mankin HJ, Hornicek FJ, Raskin KA. Infection in massive bone allografts. Clin Orthop Relat Res 2005;(432):210–216.
9. Nelissen RG, Valstar ER, Pöll RG, et al. Factors associated with excessive migration in bone impaction hip revision surgery: a radiostereometric study. J Arthroplasty 2002;17(7):826–833.
10. Ornstein E, Linder L, Ranstam J, et al. Femoral impaction bone grafting with the Exeter stem—the Swedish experience: survivorship analysis of 1305 revisions performed between 1989 and 2002. J Bone Joint Surg Br 2009;91(4):441–446.
11. Sloof TJ, Buma P, Schreurs BW, et al. Acetabular and femoral reconstruction with impacted graft and cement. Clin Orthop Relat Res 1996;324:108–115.
12. Spangehl MJ, Masri BA, O’Connell JX, et al. Prospective analysis of preoperative and intraoperative investigations for the diagnosis of infection at the sites of two hundred and two revision total hip arthroplasties. J Bone Joint Surg Am 1999;81(5):672–683.
13. Sutherland AG, Raafat A, Yates P, et al. Infection associated with the use of allograft bone from the north east Scotland Bone Bank. J Hosp Infect 1997;35:215–222.
14. Tomford WW. Transmission of disease through transplantation of musculoskeletal allografts. J Bone Joint Surg Am 1995;77(11):1742–1754.
15. Ullmark G, Obrant KJ. Histology of impacted bone graft incorporation. J Arthroplasty 2002;17:150–157.
< div class='tao-gold-member'>


