Hip dysplasia is the most common etiology of coxarthrosis, often leading to arthroplasty long before joint replacement can be considered a lifetime solution.3
 Surgical realignment of the congruous dysplastic acetabulum can improve or eliminate symptoms for years, sometimes indefinitely, in a majority of appropriately selected patients, even in those with some degree of preoperative arthrosis.1,3,4,6–8
 Age limits for this procedure are adolescence (closed triradiate cartilage) to an indefinite upper age limit (limited by preoperative arthrosis and other considerations that might make arthroplasty a better choice).
ANATOMY
 The acetabulum lies between the anterior and posterior columns of the pelvis.
 The most common area of acetabular deficiency in developmental dysplasia of the hip (DDH) is anterior and lateral.
 The Bernese periacetabular osteotomy (PAO) differs from the triple osteotomy primarily by maintaining the integrity of the posterior column of the pelvis.
 The Bernese PAO uses up to five steps to divide the acetabular fragment from the remainder of the pelvis, allowing multiplanar reorientation.
 Important bony landmarks include the following:
Iliopectineal eminence (which marks the medialmost extent of the acetabulum)
Infracotyloid groove (just distal to the acetabulum, where the obturator externus tendon lies; this is the site of the anterior ischial osteotomy)
Anterior superior iliac spine (ASIS)
Apex of the greater sciatic notch
Ischial spine
 The posterior column is triangular and thickest just posterior to the acetabulum; it becomes much thinner closer to the sciatic notch. For this reason, the optimal plane for the posterior column is angled obliquely to the medial cortex and perpendicular to the lateral cortex of the ischium–posterior column.
PATHOGENESIS
 Genetic and developmental causes exist for “developmental dysplasia.”
 Neuromuscular: Charcot-Marie-Tooth disease and spastic diplegia
 Posttraumatic: injuries to the triradiate cartilage and aggressive excision of the limbus in the infant hip
NATURAL HISTORY
 There is a clear correlation between acetabular dysplasia and osteoarthrosis of the hip.
 The more severe the acetabular dysplasia and any subluxation, the earlier the onset of symptoms from arthrosis.
 Murphy et al5 found that every patient with a lateral center-edge angle less than 16 degrees developed osteoarthritis by age 65 years.
PATIENT HISTORY AND PHYSICAL FINDINGS
 Key portions of the history include the following:
Personal or family history or treatment of DDH
History of other hip disorders, including Legg-Calvé-Perthes
Trauma
Skeletal dysplasias
History of cerebral palsy
Birth order and weight
Description of pain or mechanical symptoms, including location, duration, activity limitation, giving way, “clicking,” “catching,” and “popping”
 Physical examination should include gait, limb length, assistive devices, and strength.
 Specific hip tests include the following:
Trendelenburg test: demonstrates weakness in abductors
Anterior apprehension test: A positive result is a subjective noting of “apprehension” or instability by the patient.
Anterior impingement test (pain with passive hip flexion, adduction, and internal rotation): test of anterior labral pathology, not just a tear
Bicycle test for abductor fatigability
 Range of motion (ROM): Dysplastic hips may demonstrate a relative increase in flexion due to anterior acetabular uncoverage. Decreased ROM with pain may indicate arthrosis.
IMAGING AND OTHER DIAGNOSTIC STUDIES
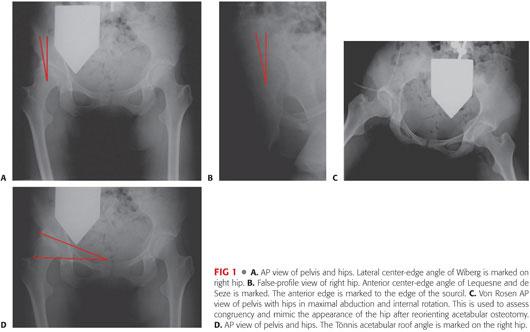
 Radiography includes weight-bearing anteroposterior (AP) views of bilateral hips (FIG 1A), false profile of hips (FIG 1B), and AP views of the hips in maximal abduction and internal rotation (von Rosen view; FIG 1C). These studies allow assessment of lateral and anterior coverage of the femoral head as well as congruency of the hip joint. Additionally noted will be the presence of hinge abduction, which is a relative contraindication to PAO.
 Radiographic parameters include the following:
Lateral center-edge angle of Wiberg measured from AP view of the hip (lower limits of normal about 25 degrees; see FIG 1A)
Anterior center-edge angle of Lequesne and de Seze (lower limits of normal 20 degrees measured on the false-profile view; see FIG 1B)
Tönnis acetabular roof angle measured on the AP view of the hip (upper limits of normal 10 to 15 degrees; FIG 1D)
Crossover sign (anterior wall shadow crossing posterior wall shadow on AP view of the pelvis)
Assessment of the line of Shenton for breaks indicative of femoral head subluxation
 Computed tomography (CT) scan of both hips with three-dimensional reconstruction as well as with axial slices through the femoral condyles may be of assistance in preoperatively assessing the amount and direction of correction required as well as the potential need for proximal femoral osteotomy.
 Magnetic resonance imaging (MRI) of involved hips with radial sequences centered at the femoral head allows assessment of articular and labral cartilage.
Delayed gadolinium-enhanced MRI of cartilage (dGEMRIC) is a recently developed technique that assesses the mechanical damage to the articular cartilage. It has been demonstrated to be a better preoperative predictor than plain radiographs in determining outcome after PAO.2
NONOPERATIVE MANAGEMENT
 Activity and job modification may be of benefit in delaying or mitigating arthritic symptoms.
 Physical therapy may be of some benefit in increasing ROM and strength. To date, there are no data to suggest that a specific therapy regimen can affect the onset of arthritis in the dysplastic hip.
SURGICAL MANAGEMENT
 Indication: symptomatic, congruous acetabular dysplasia (closed triradiate cartilage) with lateral and anterior center-edge angles 18 degrees or less
 Contraindications: Tönnis osteoarthrosis grade 2 or more (subchondral cysts, significant joint space narrowing), severe limitation of motion secondary to arthrosis, active joint infection
Preoperative Planning
 Radiographs and MRI are evaluated to assess the following:
Degree and character of dysplasia
Amount and direction of correction required to normalize the Tönnis acetabular roof angle (0 to 10 degrees), correct subluxation, and improve mechanical stability
 Proximal femoral deformity may also require treatment at time of PAO.
 Presence of acetabular articular or labral lesions (seen on MRI) should also be taken into consideration, as treatment either arthroscopically (before the osteotomy) or intraoperatively through limited arthrotomy may be required for best long-term results.
Isolated treatment of a labral lesion in the presence of acetabular dysplasia is contraindicated. Simultaneous acetabular realignment must be considered.
The torn acetabular labrum is usually associated with other structural abnormality within the hip (femoroacetabular impingement or DDH), which may also require correction for best results.9
 Partial weight-bearing technique is taught preoperatively in preparation for postoperative mobilization.
 For perioperative pain management, we recommended considering either epidural or lumbar plexus catheter placement preoperatively as well as multimodal perioperative analgesia. Catheters are removed the morning of postoperative day 1 or 2.
Positioning
 The patient is positioned supine on a radiolucent table.
 The operative extremity is prepared and draped free up to the costal margin; the surgeon should be certain to prepare and drape posteriorly to at least the posterior third of the ilium and medially to the umbilicus.
Approach
 The standard longitudinal anterior Smith-Petersen incision and approach to the hip provides the appropriate access (FIG 2A).
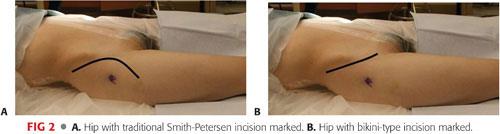
 As an alternative, an ilioinguinal (bikini) incision may be used followed by a similar deep approach (FIG 2B). This incision typically provides a better cosmetic result but can limit access for the anterior ischial osteotomy. Therefore, we recommend the standard anterior incision for larger and more muscular patients.
TECHNIQUES
 Superficial Dissection
The skin is incised into subcutaneous tissue.
The fascia over the external oblique and gluteus medius is identified and incised posterior to the ASIS, and the plane between the two muscles is developed to expose the periosteum over the iliac crest.
The periosteum is sharply divided over the iliac crest and subperiosteal dissection carried out over the inner table of the ilium. This space is packed with sponges for hemostasis.
Entry into the tensor fascia lata–sartorius interval is initially accomplished via the compartment of the proximal tensor fascia lata to avoid injury to the lateral femoral cutaneous nerve. The tensor fascia lata is bluntly elevated off the intermuscular septum and the compartment floor is identified proximally until the anterior ilium is palpated.
Once hemostasis is attained, the ASIS is predrilled with a 2.5-mm drill and the anterior 1- × 1- × 1-cm portion is osteotomized to facilitate the medial dissection and later repair.
Alternatively, the sartorius can be taken off with just a thin wafer of bone that will be sewn back in place at the end instead of with a screw.
Subperiosteal dissection is continued to the anterior inferior iliac spine (AIIS).
 Deep Dissection
Before proceeding with the deep dissection, it is important to have determined preoperatively whether there is intra-articular pathology that will require performing an arthrotomy to address. Examples include labral tear, perilabral cyst, and femoral head–neck cam lesion. If so, the rectus femoris generally is detached (see in the following text). If however, no intra-articular work is needed, the rectus tendon can be left intact.
Flexion and adduction of the hip facilitates the deep intrapelvic and superior ramus dissection.
The reflected head of the rectus femoris is divided at its junction with the direct head (TECH FIG 1A,B).
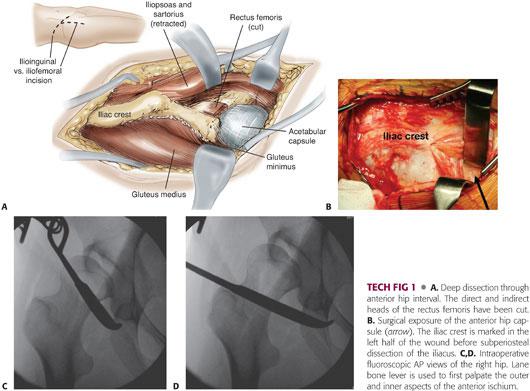
The direct head and underlying capsular iliacus are elevated as a unit and reflected distally and medially off the underlying joint capsule.
If one is performing a rectus femoris-sparing PAO, identifying the interval between the capsular portion of the iliacus and the rectus femoris can be a challenge. To assist with this, it is recommended to start within the pelvis dissecting underneath the iliacus there, then following it over the pelvic brim onto the capsule.
The iliacus, sartorius, and abdominal contents are reflected medially.
The psoas sheath is opened longitudinally, and the psoas tendon is retracted medially to allow access to the superior pubic ramus medial to the iliopectineal eminence.
The interval between the medial joint capsule and the iliopsoas tendon is created and sequentially dilated using the tip of a long-handled Mayo scissor, then further by Lane bone levers, with the tips of each palpating the anterior ischium at the infracotyloid groove.
Proper placement of the scissor and bone levers can be confirmed with the image intensifier (TECH FIG 1C,D).
 Osteotomies
Anterior Ischial Osteotomy
Before performing the first osteotomy, it is recommended that one confirms with the anesthesia team that the patient is no longer paralyzed. Without paralytic, direct contact of the sciatic or obturator nerves during any of the osteotomies will elicit a muscular response, warning the surgeon of that they may be in harms way.
With the hip flexed 45 degrees and slightly adducted, a 30-degree forked, angled bone chisel (Synthes USA, West Chester, PA; in 15- or 20-mm blade widths) is carefully inserted through the previously created interval between the medial capsule and psoas tendon to place its tip in contact with the superior portion of the infracotyloid groove of the anterior ischium, just superior to the obturator externus tendon (TECH FIG 2A–C).
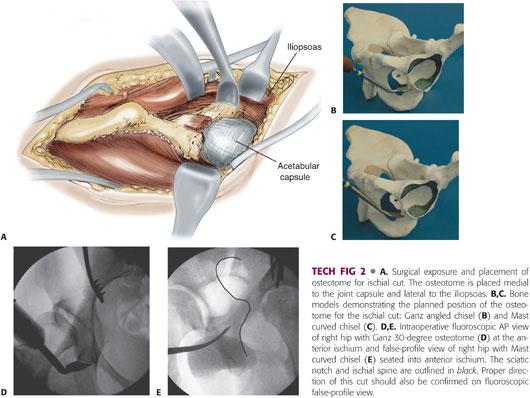
Staying proximal to the obturator externus tendon helps to protect the nearby medial femoral circumflex artery. The medial and lateral aspects of the ischium should be gently palpated with the chisel. Proper chisel placement (about 1 cm below the inferior acetabular lip) is confirmed on AP and oblique projections with the image intensifier (TECH FIG 2D).
The osteotome is impacted in a posterior direction to a depth of 15 to 20 mm and through both medial and lateral cortices of the ischium (TECH FIG 2E).
Care should be taken not to drive the osteotome too deeply out the lateral cortex, as the sciatic nerve is nearby.
Superior Pubic Ramus Osteotomy
The hip is kept flexed and adducted to relax the anterior soft tissues.
The psoas tendon and medial structures are gently retracted medially (TECH FIG 3A).
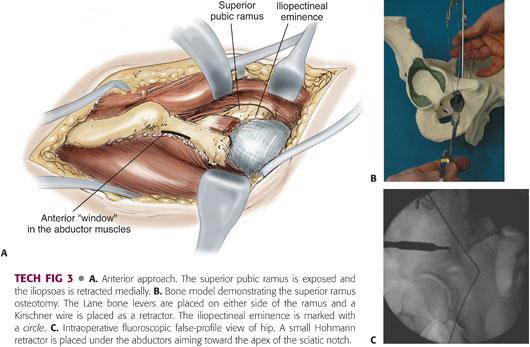
After circumferential subperiosteal dissection of the ramus, either a spiked Hohmann retractor or a large-gauge Kirschner wire may be impacted into the superior aspect of the ramus at least 1 cm medial to the iliopectineal eminence (TECH FIG 3B).
Blunt Hohmann retractors, Rang retractors, or Lane bone levers are placed anteriorly and posteriorly as well as inferior to the ramus to protect the obturator nerve and artery.
The osteotomy is perpendicular to the long axis of the ramus when viewed from above but oblique from distal medial to proximal lateral when viewed from the front and may be carried out either by passing a Gigli saw around the ramus and sawing upward away from the retractors or by impacting a straight osteotome just lateral to the spiked Hohmann or Kirschner wire. In the former method, the Gigli saw is passed with the aid of a Satinsky vascular clamp.
The key to this osteotomy is to stay medial to the iliopectineal eminence and avoid entering the medial acetabulum (TECH FIG 3C).
Arthrotomy and intracapsular inspection: At a point before all osteotomies are completed, an arthrotomy may be performed to identify and treat intra-articular lesions such as a torn labrum or impingement lesions of the femoral head and neck.
This is closed loosely with simple, interrupted absorbable suture before proceeding with the remainder of the osteotomies.
Supra-acetabular Iliac Osteotomy
A 1.5- to 2-mm subperiosteal window is started beneath the anterior abductors just distal to the ASIS without disturbing the abductor origin.
The leg is slightly abducted and extended to allow atraumatic subperiosteal dissection using a narrow elevator posteriorly toward, but not into, the apex of the greater sciatic notch.
A narrow, long, spiked Hohmann retractor is placed in this window. Correct placement is confirmed with image intensifier; in the lateral projection, the spike of the Hohmann should point toward the apex of the sciatic notch (TECH FIG 3C).
The iliacus and abdominal contents are retracted medially with a reverse Hohmann with its tip on the quadrilateral surface.
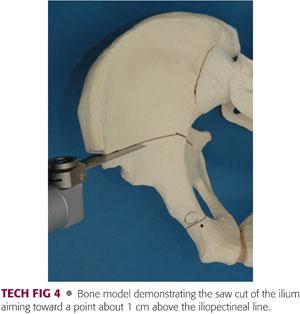
Under direct vision, the iliac osteotomy is performed with an oscillating saw and cooling irrigation in line with the Hohmann retractor until reaching a point about 1 cm above the iliopectineal line (well anterior to the notch). This end point of the iliac saw cut represents the posterosuperior corner of the PAO. This corner is also the starting point of the posterior column osteotomy, which will be midway between the sciatic notch and posterior acetabulum (TECH FIG 4).
At this point, a single Schanz screw on T-handled chuck is inserted into the acetabular fragment distal and parallel to the iliac saw cut, well above the dome of the acetabulum, into a hole predrilled with a 3.2-mm drill.
Posterior Column Osteotomy
The leg is once again flexed and adducted to relax the medial soft tissues.
A reverse blunt Hohmann retractor is placed medially with the tip on the ischial spine. Dissection into the sciatic notch is neither necessary nor recommended.
The osteotomy is made through the medial cortex with a long, straight 1.5-cm osteotome. It extends from the posterior end of the iliac saw cut, passing over the iliopectineal line, through the medial quadrilateral plate, parallel to the anterior edge of the sciatic notch on iliac oblique fluoroscopy, and is directed toward the ischial spine (TECH FIG 5A).
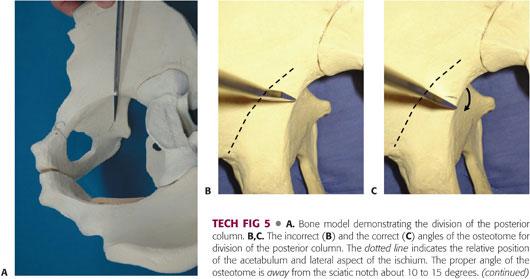
This osteotomy must extend at least 4 cm below the iliopectineal line to avoid entry into the acetabulum when completing the final (posteroinferior) infra-acetabular osteotomy. This posterior cut is made first through the medial, then second through the lateral wall of the ischium.
The ischium is wider here than at its anterior extent. If pictured from above, it resembles a triangle with the narrower apex at the anterior edge of the sciatic notch. Therefore, the surgeon should not place the osteotome perpendicular to the medial quadrilateral plate. Instead, the free medial edge of the osteotome should be tipped 10 to 15 degrees away from the sciatic notch to create a more true coronal plane osteotomy, perpendicular to the lateral cortex of the posterior column (TECH FIG 5B,C).
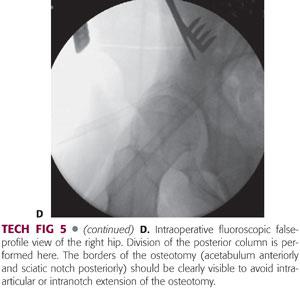
Correct angulation and positioning are once again confirmed by the image intensifier (TECH FIG 5D).
If your initial anterior ischial osteotomy was placed sufficiently deep, it is possible to have this osteotomy propagate into your anterior osteotomy and potentially avoid the need for the “completion” osteotomy described in the next step.
Completion Osteotomy
The final osteotomy is a completion osteotomy of the posteroinferomedial corner of quadrilateral plate connecting the anterior and posterior ischial cuts.
A 30-degree long-handled chisel is used to connect these two prior osteotomies (TECH FIG 6).
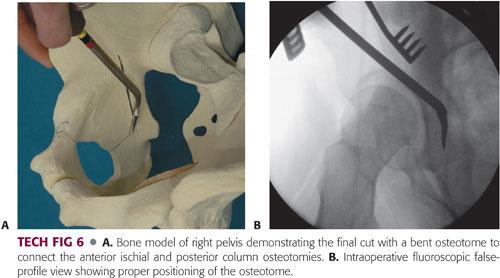
A key point: The blade is placed to connect the prior cuts, and the osteotome face should not be more than 50 degrees off the quadrilateral plate. This will prevent accidentally aiming anteriorly into the acetabulum.
 Acetabular Displacement
A 1-inch straight Lambotte chisel is placed into the supra-acetabular iliac saw cut to both confirm completion of the lateral cortex osteotomy and protect the cancellous bone above the acetabulum during displacement.
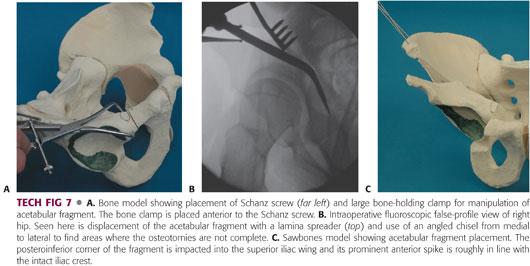
The tines of a Weber bone clamp are placed onto the superior ramus portion of the acetabular fragment in such a way as to place its handle anterior and in contact with the Schanz screw (TECH FIG 7A).
A lamina spreader is placed into the iliac osteotomy between the posterosuperior intact ilium and the Lambotte chisel anteriorly.
While gently opening the lamina spreader, the Schanz screw and Weber clamp are used to mobilize the acetabular fragment. It is important to ascertain whether the posterior and anterior osteotomies are complete; otherwise, the fragment will not freely rotate and the common outcome will be distal and lateral displacement as you hinge on the lateral, intact cortices. These cuts can be inspected with a narrow or broad 30-degree chisel (TECH FIG 7B).
Once the fragment is completely free, it may be positioned to obtain the desired correction. As previously noted, the most common deficiency is anterior and lateral. Therefore, the most commonly used maneuvers are to lift the acetabular fragment slightly toward the ceiling, creating an initial displacement, followed by a three-step movement of lateral, distal, and internal rotation.
When performed properly, the posteroinferior corner of the acetabular fragment should be impacted slightly into the superior intact iliac cut and the prominent superior tip of the acetabular fragment should be roughly in line with the superior intact iliac crest (TECH FIG 7C).
The radiographic “teardrop” and its relation to the femoral head after fragment positioning should be elevated and tilted laterally commensurate with the amount of lateral correction.
It is commonly necessary to medialize the acetabular fragment a little once the desired anterolateral coverage is obtained to recreate the proper position of the femoral head in relation to the medial pelvis. This will maintain proper biomechanical position of the femur in relation to the pelvis.
 Acetabular Fixation
Once the desired acetabular position is obtained, 3/32- or 7/64-inch smooth Kirschner wires (the approximate diameter of a 2.5- and 3.5-mm drill bits) are placed proximal to distal through the ilium and into the fragment in a divergent pattern.
At this point, we perform a final fragment position check in the AP and false-profile views (TECH FIG 8A,B).
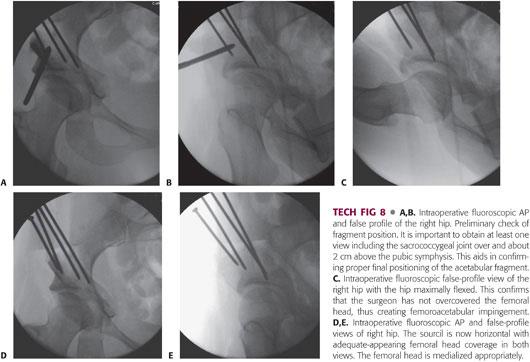
Importantly, in the false-profile view, we check the anterior femoral head coverage in full extension and at 100 degrees of flexion (TECH FIG 8C). In the former view, the sourcil should be roughly horizontal, the femoral head should be well covered, and the line of Shenton should be intact. The false-profile view is to confirm that we have neither overcovered the femoral head nor created impingement from a femoral-sided deformity.
If there is less than 90 degrees of flexion on palpation or radiograph, it may be necessary to either reposition the fragment or address femoral-sided deformity.
The Kirschner wires are measured for depth and length and then replaced with either 3.5- or 4.5-mm cortical screws.
The image intensifier is used to confirm extra-articular placement of all screws (TECH FIG 8D,E).
An additional “home-run” screw may be placed anterior to posterior from the AIIS posteriorly into the inferior ilium if required for stability (especially in patients who are ligamentously lax or have a neuromuscular condition or poor bone quality). We prefer not to use this screw unless necessary, as it is our practice to remove these screws once bony healing is confirmed for screw head irritation or in case MRI is to be performed at a later point.
The anterior iliac prominence of the acetabular fragment is trimmed and used for bone graft.
Gelfoam may be placed along osteotomy sites to assist with hemostasis.
 Wound Closure
All sponges are removed, and wounds are irrigated copiously.
Suction drains are placed under the iliacus.
The ASIS osteotomy (if performed) is reattached either by using a 3.5-mm, partially threaded cancellous screw and washer or by being sewn back with heavy, absorbable suture passed through the thinner wafer.
Careful attention is paid to proper, tight closure over the iliac crest. This is accomplished by predrilling holes in the iliac crest to facilitate passage of heavy, absorbable sutures to reattach the abductor, iliacus, and external oblique musculature.
The remainder of the wound is closed in layers.
PEARLS AND PITFALLS | |
Patient selection |
|
| |
| |
Pubic osteotomy |
|
Ischial osteotomy |
|
| |
Iliac osteotomy |
|
Incomplete osteotomies |
|
Schanz screw placement |
|


POSTOPERATIVE CARE
 Partial weight bearing is reviewed by a physical therapist.
Out-of-bed mobilization is permitted on the first postoperative day if a lumbar plexus block is used; day 2 or 3 if an epidural catheter is used.
 Weight bearing is progressed from partial to full, typically by 4 to 6 weeks with radiographic healing and return of abductor strength.
 ROM is limited to 90 degrees of flexion; 10 degrees from full extension; and 10 degrees of adduction, abduction, and rotation for the first 4 to 6 weeks.
 Resistive exercises are avoided for 3 months.
 Patients older than 16 years are given either low-molecular-weight heparin or warfarin for 4 to 6 weeks.
 Nonsteroidal anti-inflammatories are avoided.
OUTCOMES
 Outcomes are generally good to excellent in the appropriately selected patient.
 Hips with minimal arthrosis (more than 2 mm of joint space and no significant subchondral changes) in younger (younger than 35 years old) patients have demonstrated significant improvement in Harris hip and Merle D’Aubigne scores that can last at least 20 years.1,3,4,6–8
 Hips with moderate to advanced arthrosis in older patients can still show significant improvement in symptoms. However, their symptom relief may be shorter lived, requiring conversion to either a surface replacement or total hip arthroplasty.
COMPLICATIONS
 Sciatic or lateral femoral cutaneous nerve palsy
 Postoperative wound hematoma requiring return to operating room
 Wound infection
 Nonunion of pubic ramus
 Heterotopic ossification
 Vascular injury
 Intra-articular osteotomy
 Malalignment of fragment leading to insufficient correction or overcorrection
REFERENCES
1. Clohisy JC, Barrett SE, Gordon JE, et al. Periacetabular osteotomy for the treatment of severe acetabular dysplasia. J Bone Joint Surg Am 2005;87(2):254–259.
2. Cunnigham T, Jessel R, Zurakowski D, et al. Delayed gadolinium-enhanced magnetic resonance imaging of cartilage to predict early failure of Bernese periacetabular osteotomy for hip dysplasia. J Bone Joint Surg Am 2006;88(7):1540–1548.
3. Ganz R, Leunig M, Leunig-Ganz K, et al. The etiology of osteoarthritis of the hip: an integrated mechanical concept. Clin Orthop Relat Res 2008;466:264–272.
4. Millis MB, Kim YJ. Rationale of osteotomy and related procedures for hip preservation: a review. Clin Orthop Relat Res 2002;(405):108–121.
5. Murphy SB, Ganz R, Muller M. The prognosis in untreated dysplasia of the hip. A study of radiographic factors that predict the outcome. J Bone Joint Surg Am 1995;77(7):985–989.
6. Peters CL, Erickson JA, Hines JL. Early results of the Bernese periacetabular osteotomy: the learning curve at an academic medical center. J Bone Joint Surg Am 2006;88(9):1920–1926.
7. Steppacher SD, Tannast M, Ganz R, et al. Mean 20-year followup of Bernese periacetabular osteotomy. Clin Orthop Relat Res 2008;466:1633–1644.
8. Trousdale RT, Ekkernkamp A, Ganz R. Periacetabular and intertrochanteric osteotomy for the treatment of osteoarthrosis in dysplastic hips. J Bone Joint Surg Am 1995;77(1):73–85.
9. Wenger DE, Kendell KR, Miner MR, et al. Acetabular labral tears rarely occur in the absence of bony abnormalities. Clin Orthop Relat Res 2004;(426):145–150.
< div class='tao-gold-member'>


