11 The Elliptical Excision
Contraindications
Contraindications by lesion include the following:
Contraindications by lesion include the following:
Equipment
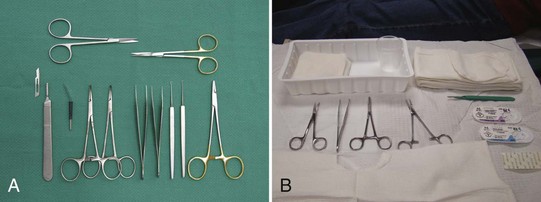
The following equipment is required to perform an elliptical incision (also see Figure 11-1), although excision of small ellipses may not require all of the items on the list:
 to
to  inch for injection
Disposable instrument setups (Figure 11-1B) may be the only option in practices that do not do regular surgeries and don’t have an autoclave. Note that disposable instruments are of lower quality than nondisposables.
The Elliptical Incision: Steps and Principles
The major steps involved in the elliptical excision involve the following:
Perform a check of vital signs and be aware of coexisting medical issues such as anticoagulation before starting any surgical procedure. Obtain informed consent in writing at the time of the procedure and perform a surgical time-out before starting (see Chapter 1, Preoperative Preparation).
Planning and Designing the Excision
Important factors to consider when planning an excision are listed in Box 11-1.
Box 11-1 Factors to Consider When Planning an Excision
Important factors to consider when planning an excision include the following:
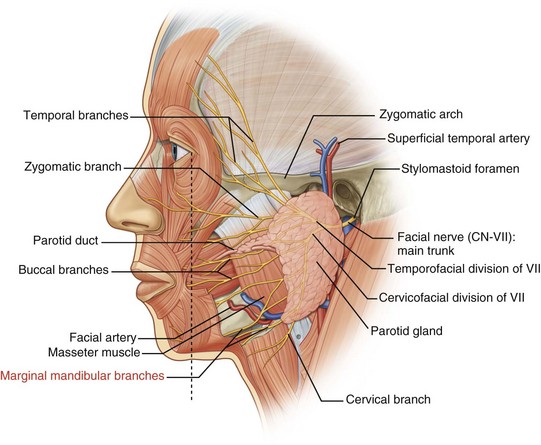
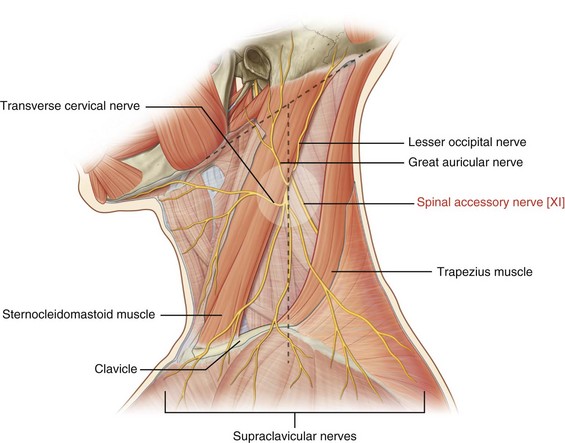
Danger Zones
(Adapted from Vidimos A, Ammirati C, Poblete-Lopez C. Dermatologic Surgery. London: Saunders; 2008.)
Placement of the Incision Line
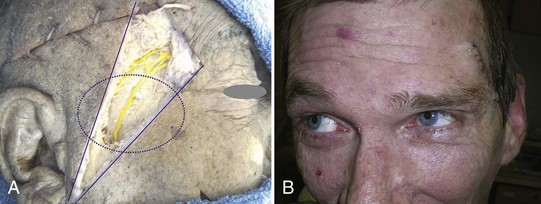
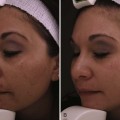
Major factors to be considered when determining the placement of the incision line are wrinkle lines and relaxed skin tension lines (RSTLs). The design of an ellipse on the face is usually done within wrinkle lines. If wrinkles are not apparent, asking the patient to smile, lift the eyebrows or tightly close the eyes can bring out lines of facial expression (Figure 11-5A). That is because these lines run perpendicular to the muscles of facial expression (Figure 11-5B).
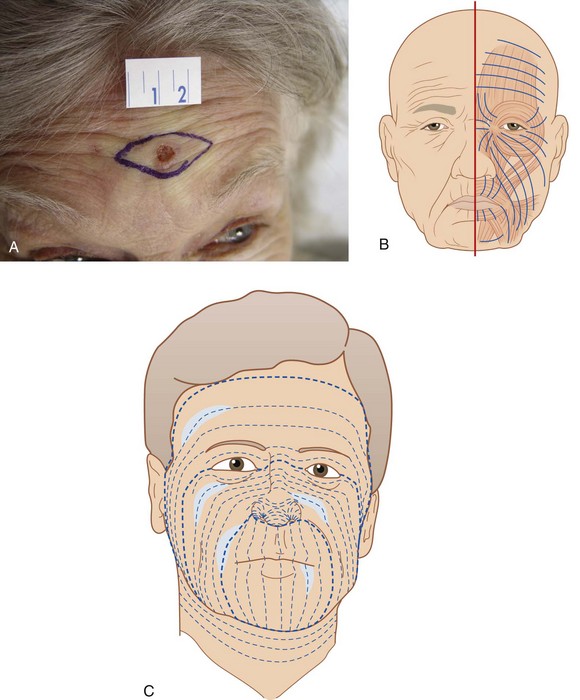
The RSTLs are the parallel skin lines that are seen when the skin is pinched together while the muscles are relaxed (Figure 11-5C). For example, when the skin is pinched together on the wrist, the RSTLs run horizontally from the lateral wrist to the medial wrist (Figure 11-6A). The RSTLs are used to plan the ellipse on the trunk, extremities, and on facial areas where wrinkle lines are not apparent (Figures 11-5 and 11-6).

FIGURE 11-6 (A) Pinching the skin to determine the direction of RSTLs. (B) RSTLs on the body.
(B: Redrawn from Fawkes JL, Cheney ML, Pollack SV. Illustrated Atlas of Cutaneous Surgery. Philadelphia: Lippincott-Gower; 1992.)
Surgical Margin
The ellipse is designed so that the lesion is cleared with a margin. When possible, knowing the type of lesion in advance can guide the amount of tissue to be removed. The surgical margin may be 3 to 5 mm for basal cell carcinomas, 3 to 6 mm for squamous cell carcinomas, and 1 to 2 cm for diagnosed melanomas (Table 11-1).1,2 When the suspicion for malignancy is low, a shave biopsy or an excision with smaller margins of 1 to 2 mm is usually adequate. For the initial excision of a suspected melanoma the margin should be 1 to 2 mm so as not to affect subsequent lymph node testing,7 and additional tissue will be excised later based on depth of invasion seen on pathology. One option for some suspected melanomas is to do a scoop shave excision with 2-mm margins since a full excision may be premature before histology is obtained (see Chapter 8, Choosing the Biopsy Type). It is important to balance taking enough tissue to reduce the need for repeat procedures due to positive margins while minimizing impact to form and function.8 In some cases it may be necessary to utilize Mohs surgery or take a smaller margin if the lesion is too close to vital structures.
TABLE 11-1 Surgical Margins by Lesion Type1,2,4,5,11–14
Lesion Type | Surgical Margin |
|---|---|
| Uncertain | Consider shave or punch biopsy to delineate prior to elliptical excision or start with 1- to 2-mm margins to avoid unnecessary tissue removal. |
| Benign | Visible lesion removed. |
| BCC | 3–5 mm |
| SCC | 3–6 mm |
| Initial excision of possible melanoma | 1–3 mm |
| Melanoma in situ | 5 mm |
| Melanoma < 1 mm | 10 mm (may need referral for lymph nodes 0.75 to 1 mm depending on ulceration, regression, or mitotic figures) |
| Melanoma > 1 mm | 20 mm and lymph node evaluation |
Ellipse Geometry
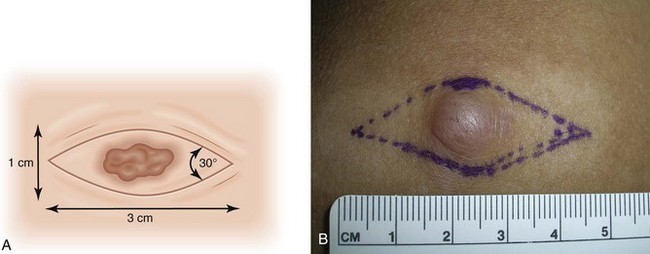
The ends of the ellipse should be approximately 30-degree angles so that potential dog ears (standing cones) are minimized (Figure 11-7). Standing cones consist of bulging skin at the ends of a sutured wound. Looser skin areas sometimes allow slightly larger angles at the end of the ellipse because the standing cones flatten slightly. Undermining the end of the ellipse also helps minimize these potential standing cones. A clinician should explain to patients before the surgery that the length of the incision needs to be about three times the diameter of the lesion. It is helpful to draw this for patients so they can see how large their incision will be.
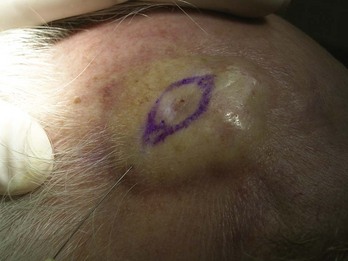
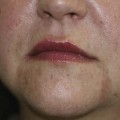
It is very helpful to mark the biopsy margins with a surgical marking pen (Figure 11-8). To orient the ellipse properly, determine the wrinkle line or relaxed skin tension line that will define the axis of the ellipse. The area to be cut may be prepped with alcohol first. A clean and nonsterile surgical marking pen is acceptable if you prep the skin again after marking the lesion. The usual ellipse is drawn so that the length of the ellipse is at least three times the width of the ellipse (Figures 11-7 and 11-8). Conditions in which a greater than 3 : 1 ratio may be desirable include tighter skin, skin over the joints, and curved surfaces.
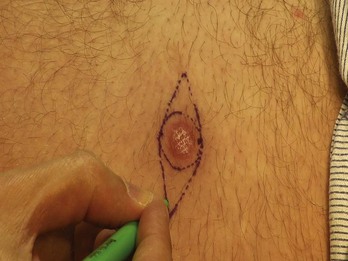
FIGURE 11-8 Ellipse being drawn around a SCC. First the margins are drawn with a circle and then the ellipse is added.
(Copyright Richard P. Usatine, MD.)
Avoiding Distortion of Tissue
Elliptical excisions on the forehead, upper lip, and around the eye require careful planning because they can distort the eyebrow, lip, or eyelid. When possible it is better to orient an ellipse perpendicular to the eyelid or lip margin (Figure 11-5). For facial excisions, it is important to understand cosmetic units that relate to the organs of the face. Ask the patient to perform the following maneuvers: smile, show the teeth, raise the eyebrows, and purse the lips. It is best to keep the excision within one cosmetic unit rather than crossing between two units. When planning an excision, try to avoid creating functional problems with the eyes and mouth. Avoid pulling down eyelids and causing ectropion, pulling up eyebrows, cutting significant facial nerves, or distorting the look of the lip or nasal alae.
If there is doubt about whether the ellipse can be closed or if the potential exists for anatomic distortion, creation of a flap may be necessary (see Chapter 13, Flaps). In some instances the closure can be very tight. Wider undermining or thicker sutures may be required to accomplish the closure.
Anesthesia
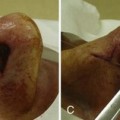
Epinephrine is valuable for all elliptical excisions and is used for virtually all patients in all surgical locations. For patients with normal circulation, it is safe to use epinephrine for local anesthesia in areas such as the tip of the nose, the fingers and toes, the ears, or the penis despite old dogma. In one study there was no evidence that buffered 0.5% lidocaine with epinephrine 1 : 200,000 causes ischemia or necrosis when injected into digits at the surgical site (not digital blocks).3 That was true despite a history of circulatory disorders, thrombosis, diabetes, smoking, anticoagulation, or significant preoperative hypertension.3 However, in patients with severe peripheral vascular disease or Raynaud’s phenomenon, one might discuss the risks and benefits with the patient.
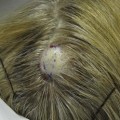
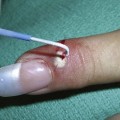
The amount of anesthesia needed depends on the location of the surgery and the thickness of subcutaneous tissue in the area. For example, the forehead and scalp have very little subcutaneous tissue because of the skull bones below, so a small amount of anesthesia will go far to distend tissue for hemostasis and numbness (Figure 11-9). However, excising an ellipse on the thigh or abdomen will require more anesthetic volume because the thicker subcutaneous tissues will soak up the volume faster. For an ellipse in the range of 1 × 3 cm to 2 × 6 cm, it is not unusual to need at least 20 to 30 mL of anesthesia. This should be safe for even the smallest adult. Plan ahead by drawing up at least one to two 10- to 12-mL syringes with anesthesia.
 -inch needle on the forehead.
Add 8.4% bicarbonate in a 1 : 9 dilution to minimize pain and burning upon injection (see Chapter 3, Anesthesia). Pinch the skin at the area to be injected while injecting (based on the gate theory of pain). Start with a 30-gauge needle for the most sensitive areas and use a 27-gauge needle for less sensitive areas or when the initial anesthesia begins to work. Inject slowly because tissue distention hurts.
There are many ways to cover the needed area with anesthesia. Small ellipses can be anesthetized by a single injection distal to one end of the ellipse (Figure 11-9). For large excisions, one method that will minimize the number of painful injection sites begins with a single injection at one end of the ellipse that is far enough out to get the area to be undermined. The anesthesia is then delivered in a fanlike fashion until adequate volume is given (Figure 11-10

Stay updated, free articles. Join our Telegram channel

Full access? Get Clinical Tree


