(1)
Private Practice Fulya Teras, Istanbul, Turkey
In this section we will describe nasal surgery. Each description is accompanied by numerous photographs corresponding to that specific subject. Hence, once you read each description, a look at the photos will be sufficient for guidance.
1 Patient Position and Tracheal Intubation
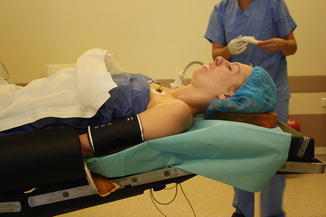
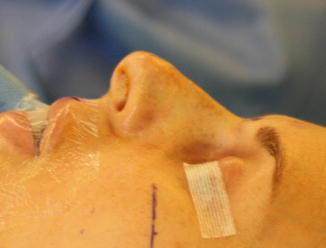
The patient’s chin should be visible and the tube should be positioned away from you at a 45° angle. Be sure that the intubation tube is not pulling the lip. This will prevent interference with your work. If you place the tube in the midline as reference, it can slip and mislead you. If the chin can be seen, you will gain greater control of the face.
Place a transparent band on his/her mouth. Your little finger and the suture strand should not enter the mouth. Closing the mouth is a suggestion advanced by Ali Teoman Tellioğlu.
A small gauze pad can prevent blood coming from the mouth.
Systolic blood pressure should not go beyond 80 mmHg. A stable blood pressure is important: If the blood pressure decreases and then increases, the vasoconstriction effect of the local solution could decrease.
After the patient becomes unconscious, spray pseudoephedrine onto the nasal mucosa; two puffs for each nostril is enough. I have not yet tried cocaine for mucosal vasoconstriction.
Raise the patient 20–30° from the waist and by laying down the head position the face parallel to the floor. Be very careful about the parallel position of the face to the floor. The head position will affect your decisions about nasal tip rotation.
You should have a foot-controlled adjustable chair. Profile assessment is required frequently. In addition nose tip sutures are performed more easily while seated.
Important
Check the position of the tube from time to time since the tube can pull at the upper lip and the nose. Connecting the intubation tube to the anesthesia circuit with an extension hose decreases the possibility of such pulling.
Important
Do not put adrenalin-soaked cotton or gauze pads into the nose. The pseudoephedrine spray will give the same result. In order to prevent posterior bleeding, it is adequate to place a gauze pad on the tongue. In a complex surgery of this kind, it is a great risk to forget gauze inside the patient. Prefer gauze with strings. In my opinion there is no difference between pseudoephedrine spray and pseudoephedrine-soaked gauze for mucosa vasoconstriction. I use gauze if there is an active bleeding in the posterior.
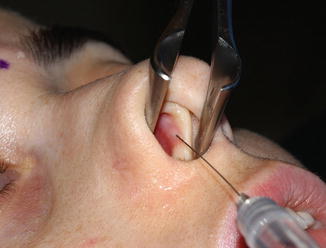
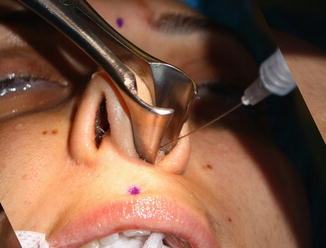
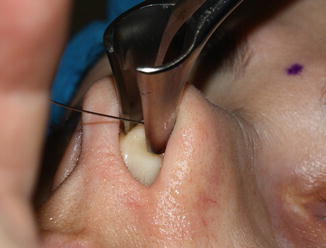
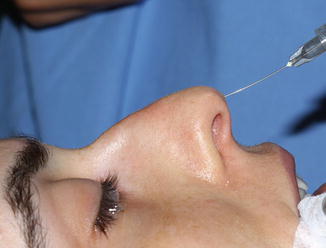
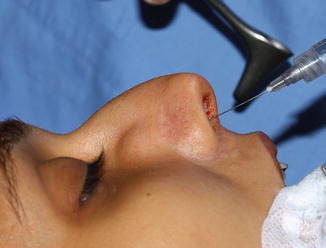
2 Local Anesthesia
Infiltrate the local anesthesia, then clean nostril hair and prepare the patient. In this way you will have waited 15 min for the local anesthesia to take its effect without losing any further time. Do not postpone the infiltration to after patient preparation. You will not gain any time and your surgery will be more bloody.
Formula: Prepare fresh
10 cc saline solution
5 cc 2 % Lidocaine
5 cc Bupivacaine
¼ adrenalin
While injecting, keep an eye on the patient’s pulse and blood pressure. If the pulse or pressure increase, stop the infiltration.
1.
Both sides of the septum caudal cartilage 0.5 cc,
2.
Anterior maxillary spine 1.5 cc,
3.
Internal valve peak point 0.5 cc,
4.
Both sides of the maxillary spine 0.5 cc,
5.
Septum posterior bilateral 0.5 cc,
6.
An artery passes from the bone mucosa peak point. A 0.5 cc local solution infiltration there decreases bleeding.
7.
Infiltrate 1.5 cc solution into the nasal ridge. Making this injection from the septal angle down to the perichondrium facilitates subperichondrial dissection.
8.
To both sides of the upper lateral cartilages and the bone near the cartilage 1.5 cc,
9.
To the rim incisions and the lateral crura 0.5 cc,
10.
Inject 1–2 cc to the septum hump and upper lateral mucosa planned to be removed.
Important
If you only use Lidocaine, the analgesic effect decreases after two hours and as the patient feels pain, his/her blood pressure increases. If you add Bupivacaine, you will not encounter any blood pressure increases due to pain.
Important
Do not inject into the nose too much. This can result in a loss of the surface details. You should be aware of the side effects of local anesthetics. A total of 10–15 cc solution should be sufficient.
Important
I no longer perform infraalveolar and supratrochlear blocks. Although I control the injection by pulling on the piston, in 3–4 of my patients I made the injection into the vessel. The face turned white very quickly. Now, I make injections only into the nose.
Important
In the nasal dorsum dissection, there can be bleeding from the bone. These are generally venous and difficult to control. Infiltration inside the mucosa of the bone in the region of bleeding with local anesthetics can decrease bleeding.
Now take a break as your nurse prepares the patient. Adjust your head lamp and scrub.
3 Head Lamp
Closed nose surgery is done with a head lamp. In this way you can even see the medial canthal periosteum. A head lamp with a battery can give you more freedom to move when compared with cabled lamps. You can walk around your patient. This will allow you to assess the patient in the correct manner, from many different angles.
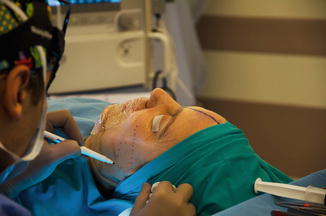
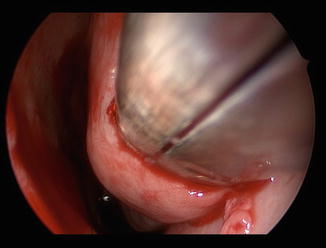
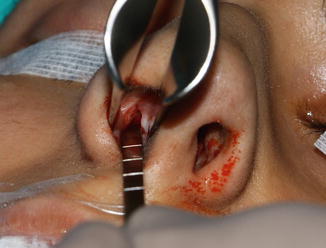
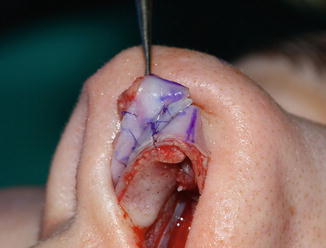
4 Cleaning
Clean the nostril hair with a blade. Applying poviodine can facilitate cleaning. Do not struggle with oiled cream and scissors.
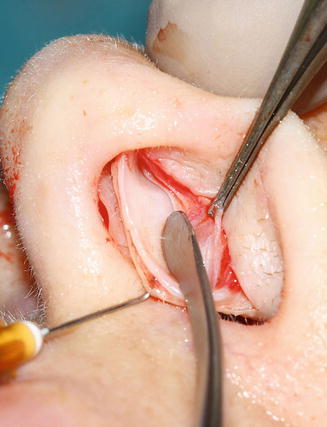
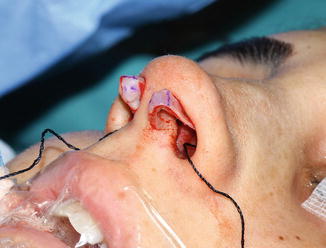
Clean the inside of the nose with a poviodined cotton bud and wash with saline solution.
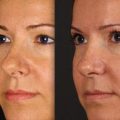
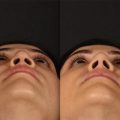
As my nurse prepared the patient and made the aspirator and cautery connections, I scrubbed and had the above patient photo taken. You can see the vasoconstrictive effect of the local infiltration solution.
5 Lighting in the Operating Room
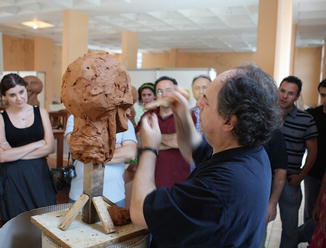
Perform surgery in a brightly lit environment. If the lights in the room are not adequate, turn the top lamps to the ceiling. Do not point the top lamps directly towards the nose, or you will not see the details. I have learned this information from Micheal Esson, an Australian artist who attends plastic surgery operations and arranges workshops for plastic surgeons. He organized a course in Istanbul in 2009. As Esson said: “Operating room lights prevent you to see the form.”
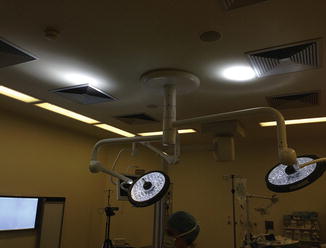
A photo from Esson’s course in Istanbul in 2009.
6 Drawings
For years I have been marking lines on the cheek that show my new tip point, and this effectively facilitates my job. Performing surgery without planning makes me nervous as I want to control every step. Operating according to my drawings in Photoshop is safe. I look at shadowed photos. I mark my planned nose tip on the current nose. I draw two to three lines that show this point onto the cheek. These lines guide me while adjusting the tip position. I determine the amount of stealing from the lateral crus according to these lines. I determine the correct dome positions performing the lateral crural steal until the tip rotates to my previously marked points.


7 Basic Surgical Steps
1.
Concha
2.
Nasal dorsum dissection
3.
Nasal dorsum resection
4.
Septum surgery
5.
Tip dissection
6.
Tip surgery
7.
Nasal dorsum reconstruction
8.
Nasal tip stabilization
9.
Scroll ligament repair
10.
Closure of incisions
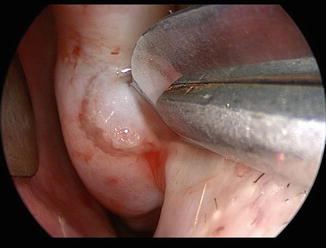
8 Concha
Compensatory concha hypertrophy due to septum deviations does not regress when correcting the septum. Therefore, a big concha should be reduced. I am performing an outfracture only to the concha, which can contract sufficiently with pseudoephedrin spray. If the spray does not cause contraction, I remove the concha’s bone. Hypertrophic concha can also cause a relapse of the septum deviation. Do not cauterize the concha mucosa. There is no such treatment. It is rarely successful if you cause necrosis and make it detach. Cauterization of the mucosa impairs breathing and usually causes adhesions. Moreover, it causes large crusts inside the nose, which are very uncomfortable for the patients. A large concha’s bone is also big. Radiofrequency cauterization is a temporary solution. It was performed on me twice and its effect is only temporary.
8.1 Concha SMR
1.
Apply a small amount of local anesthesia to the big concha and wait for a few minutes.
Important
Do not expand the concha with local infiltration. As conchae have a rich capillary network, this can cause tachycardia or arrhythmia. A 0.3 cc of local solution is adequate for conchal surgery.
2.
Expand the concha with 10 cc saline solution.

3.
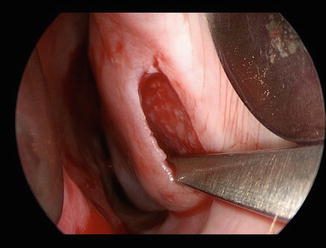
Cut the head of the concha 4 mm with a surgical blade in a C shape (the body of the C should look towards the nasal cavity). You can also start concha surgery by making elliptic resections starting from the concha head.
4.
Cut out the cavernous tissue in between the mucosa and the bone. This procedure is useful even when applied to a depth of3–4 cm only.
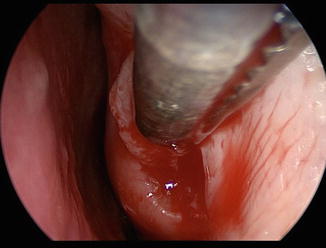
5.
With a 2-mm chisel, dissect on both sides of the bone. Turn the chisel 90°, get into the bone and try to fracture the bone with controlled back and front movements. Aspirate the free pieces.
6.
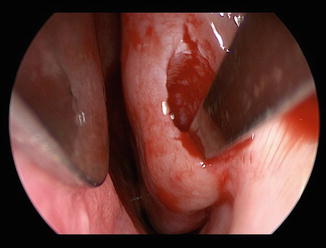
Take the bone pieces out with a thin punch.
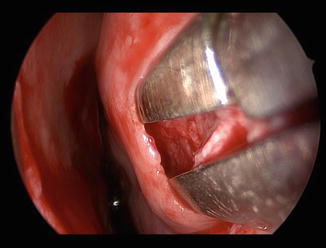
The inside of the concha.

The procedure is finished without tearing the conchal mucosa.
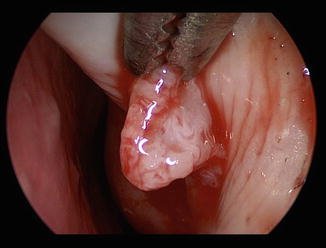
7.
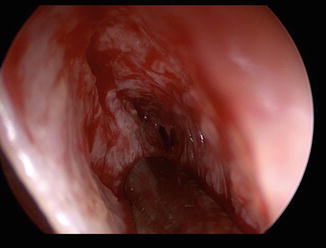
Control the bleeding for 5–10 s with electro cautery. Be careful not to tear the mucosa.
8.
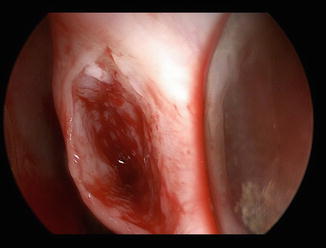
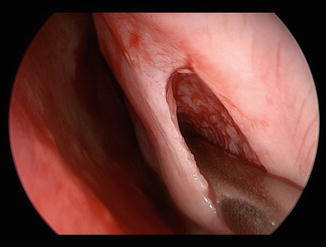
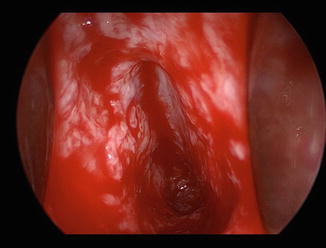
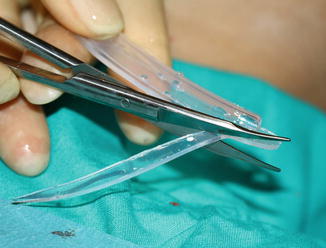
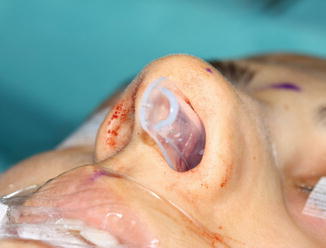
With the blunt elevator push on the concha, folding it to open the nasal airway passage. Close the wound with a 6/0 Monocryl suture and put in place the silicon splint.
Here you can see the airway after the concha SMR procedure has been completed.
I perform conchal SMR in about 20 % of my patients. Even if there is a mild deviation at the septum base, I always remove a 1–3 mm wide cartilage piece from this area. After osteotomy, in cases with low resistance, an asymptomatic septal deviation on the interior can cause total axis deviation after surgery. I make resections from the septal cartilage in about 90 % of my patients. In septum surgery, I leave a 1–2 mm space between septum and maxillary spine. I want the periosteum and perichondrial segments in the intersection of the septum base bone cartilage to get into this space. I prefer to insert a silicon splint for two days in cases with concha and septum surgery. If a procedure has been done on the septum base, I prefer to cut the silicon. This increases patient comfort.
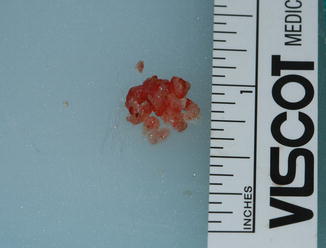
Note
In the picture below, you can see a conchal bone which was removed in one piece. It is impossible to take out a bone this size without tearing the mucosa. Therefore, I prefer not to remove the concha bone in one piece. I included this photo in order to illustrate how big the conchal bone can be. You can imagine how this bone could obstruct the airway. It is more logical to take the concha bone in pieces. Radiofrequency and laser cannot reduce the bone in size because they are effective on cavernous tissue only. Conchae of this size also have large mucosa. After bone reduction and bleeding control by means of electro cautery, the conchal mucosa can be contracted. I have previously used Tebbett’s technique for excising conchal bone and mucosa, repairing with 6/0 Monocryl continuous sutures. This is a time-consuming and a difficult technique. The concha SMR technique satisfies my needs.
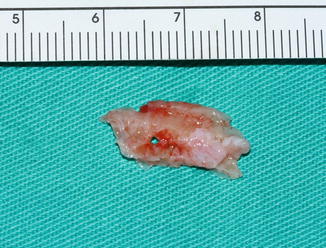
This is how the conchal bones are removed usually.
My experience as a patient for my allergic conchae hypertrophies included electrocautery, radiofrequency (twice), steroid injections into the conchae, acupuncture and concha SMR. I wasted much time before the concha SMR. The shaver is not a controlled way of bone removal. It is easier to take out the bones under visual control. Finally I had concha bone reduction and outfracture of the Webster triangle. As a result I can now breathe much better.
In secondary patients and sometimes in primary patients, the bone to which the concha is attached is either infractured or naturally narrow. If you outfracture a 3–4 mm long segment of this part with a Çakır V or a 4 mm chisel, your patient will remember you with gratitude (Webster triangle outfracture).
8.1.1 Normal Anatomy
8.1.2 Inward Collapsed Maxillary Base
8.1.3 Segmental Outfracture
Important
In patients with outfracture, the bone should be supported for at least 4–8 days.
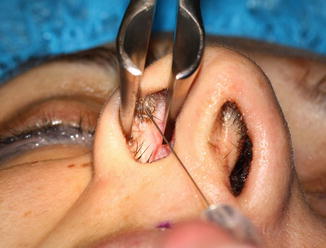
9 Nasal Dorsum Surgery
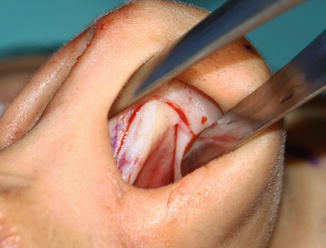
9.1 Transfixion Incision
Do not make the transfixion incision on the membranous septum, or you will disturb the Pitanguy midline ligament and destroy the integrity of this ligament. Make the transfixion incision leaving a 3 mm edge of the septal cartilage on the columellar side. This cartilage can be called the “posterior strut.” Cut the cartilage full thickness with a no. 11 blade. Cut the periosteum of the anterior nasal spine. Dissect through the maxillary anterior wall. If the projection of the footplates is high, dissect anteriorly on the maxilla to decrease it. This dissection mobilizes the nasal tip. This also increases your field of vision during nasal dorsum dissection.
9.2 Intercartilaginous Incision
The incision is continued in between the upper lateral and the lateral crus 1–2 mm above the internal valve peak point with a no. 15 blade. If you are a planning a large reduction of the nose, make the incision 2.5 cm, otherwise a 2 cm length should be adequate. Incise the mucosa 2 mm deep. Take care not to cut any cartilage during the intercartilaginous incision. Closed rhinoplasty can be done infracartilaginous, without intercartilaginous incision. The exposure is smaller, but the mucosa at the internal valve area heals better.
Note
Erol Benlier et al. have published a paper noting that the caudal part of the septum should be left adjacent to the Pitanguy ligament and sutured back to the septum.
Benlier E, Top H, Aygit AC. Management of the long nose: review of techniques for nasal tip supporting structures. Aesthetic Plast Surg. 2006 Mar-Apr;30(2):159–68.
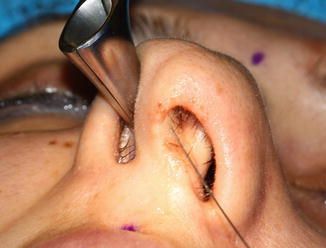
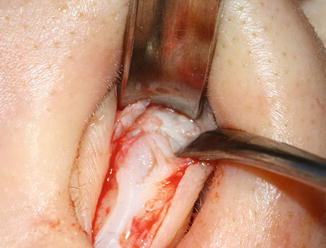
9.3 Entering the Nasal Dorsum from the Septal Angle
Take your sharp tipped scissor. Separate the posterior strut completely from the septal angle. After a 3–4 mm separation with your scissors, head towards the nasal dorsum from the septal angle. Dissect up to the upper lateral cartilages. At this point you will see the caudal edge of the nasal dorsum perichondrium. This is an important region, the most appropriate area for getting under the perichondrium. If your scissors are not sharp enough, you will have difficulty getting under the perichondrium.
With your scissors, advance 2 mm under the perichondrium. Get under the perichondrium with the Çakır perichondrium elevator and advance along the midline for 1 cm.
By moving the elevator sideways, dissect the perichondrium of the upper lateral cartilages. Extend the dissection and combine this plane with the intercartilaginous incision, hence dissecting the upper laterals completely.
Important
It is difficult to get under the dorsum perichondrium from the intercartilaginous incision. It is easier to access the subperichondrial plan from the septal angle. When you arrive at the right plane, dissection will be faster than with the sub-SMAS plan. Once you have achieved this, it is likely that you will find it an indispensable technique.
In the scroll area, detach the upper lateral cartilage and lateral crus from each other completely. You can see that the upper lateral cartilage perichondrium stays on the skin side without tearing.


When putting a small retractor under the perichondrium, the dissection becomes much easier if you compress the skin and perichondrium between your fingers, with the retractor pulling them down. This will also increase your field of vision.
9.4 Subperichondrial Dissection in the Open Approach
After the columellar incision, enter between the medial crus without cutting the cartilages. Cut the superficial SMAS. Open a perichondrium window on the medial crus and start to scrape upward.

Continue with the subperichondrial dissection on the lateral crus.
You can begin the dissection from the lateral crus and cut the columella later. Some surgeons find dissection from the lateral crus towards the dome more practical.
The Pitanguy midline ligament can be visualized easily in the middle when the tip cartilages are dissected subperichondrially.
In order to repair it more easily later on, tie two marking sutures and cut in between them to reach the septal angle. Find the perichondrium at the septal angle level and enter beneath it, using the Çakır perichondrium elevator.


Dissect the upper lateral cartilages perichondrium by making right and left swiping movements similar to the closed approach.
When you reach the bone, cut the periosteum and perichondrium with a blade. There is a sharp bone corner at the lateral bone defect. You can scrape that corner with the Çakır periost elevator and start to elevate the periost easily.
Dissect the bone starting laterally with the Çakır periosteum elevator.
The scroll and Pitanguy ligaments as seen in an open approach subperichondrial dissection.
Important
There is a second subperichondrial plane entering under the bone rack 1 cm caudal to the septal angle. Find it with your sharp tipped scissors.
Enter beneath this perichondrium with the perichondrium elevator and dissect it under the bone for 1 cm forward. With right and left movements, dissect the dorsal cartilages from the overlying bone in the midline.
With this dissection it is possible to leave the perichondrium at the keystone level on the flap. At the keystone region the skin is thinner, a reason why we should preserve the soft tissue in this area.
9.5 Periosteum Dissection
Do not try to enter beneath the subperiosteal plane from the keystone area. This will damage the periosteum. Take your small retractor and insert it through the intercartilaginous incision. Using the Çakır perichondrium elevator, get up to the bone above the upper lateral cartilage laterally.
Attention
The subperichondrial plane continues beneath the bone. If you are in the subperichondrial plane, stop when you feel the bone. Otherwise you will separate the upper lateral cartilages from the bone laterally.
Make a small incision into the perichondrium and the periosteum using a blade by feeling the bone.

Attention
After cutting the periosteum with the blade, be careful when taking the blade out. If you do not pay enough attention you may easily cut the nostril or columella.
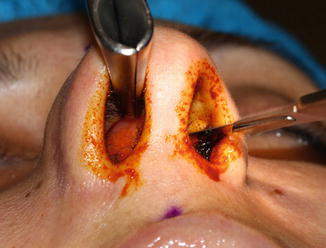
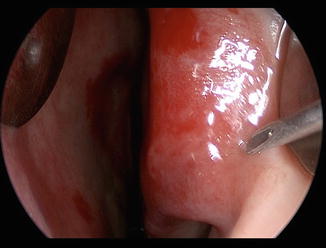
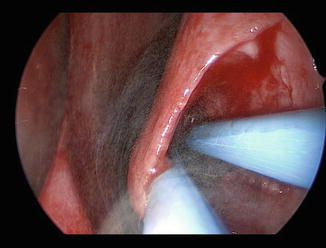
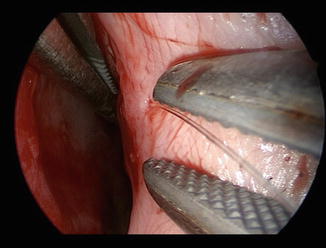
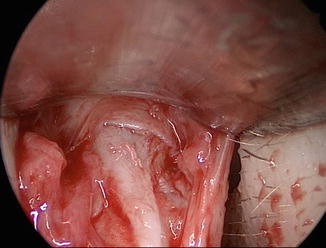
Visualize and dissect the lateral walls of the bone using the Çakır periosteum elevator. Do not open a tunnel without clear visualization. Create a wide pocket for visual clarity. Dissect until the maxillary base, the medial canthus and the nose radix. In the picture below, the maxillary bone periosteum was cut with a blade.
In this endoscopic view, the cut at the left maxillary periosteum can be observed.
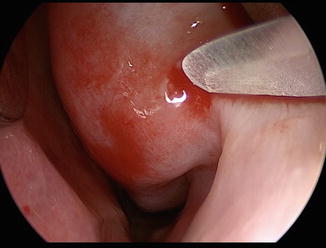
The dissection starts with the Çakır periosteum elevator.
The periosteum is dissected under wide visualization.
I try to dissect the periosteum very delicately.
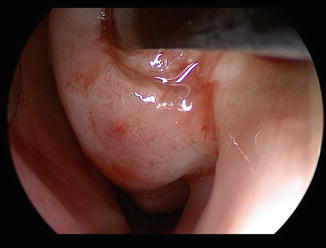
Dissection of the right nasal bone. The periosteum is cut with the blade.
The right nasal bone and maxillary periosteum are dissected.
At the sides of the keystone region generally there is no bone. In this region the cartilage merges into the bone like a wedge. Carefully protect the perichondrium in this region. This is one of the regions in which dorsal irregularities can be seen most.
Incise the periosteum of the dorsal bone shelf in the midline. Raise the dorsal periosteum. In this way, the planes will combine.
A straight tipped elevator is useful in this region.
You can see the transition from the perichondrium to the periosteum.
Although the periosteum of the nasal bone is slightly injured, the dorsal periosteum is intact.
Here you can see the borders of the soft tissue dissection.
Important
Do not perform the periosteum dissection without clear visualization. Otherwise the periosteum will be damaged. Using a little retractor and head lamp, it is possible to see and dissect easily up to the nose radix.
There should be no soft tissue in the material extracted from the nasal dorsum. If you do not perform a good dissection, after cutting the bone hump you will have to pull out the bone with a clamp instead of a bayonet forceps. This is because of the incomplete dissection of the bone periosteum. Skin ecchymosis usually occurs at this stage. A good dissection, however, rarely results in ecchymosis of the skin. Below you can see the photos of five consecutive patients after surgery. In all five of them there occurred an intervention to the bone and the average surgery time was three hours. Note that dissection, resection and intervention to the bone have had no significant effect on the skin. The last patient’s nose skin was sensitive because of using oral Vitamin A. Note the rash on the nasal dorsum.


With this dissection it is possible to elevate the periosteum all the way up to the osteotomy borders.
Important
If you are performing a wide dissection for all nasal bones, do not use the lateral osteotomy. The bone can collapse into the nasal cavity since the bone and periosteum have been separated completely. Instead you can perform osteotomy with a 2 mm chisel or osteoectomy with a Çakır 90 chisel.
Attention
In surgery with correct dissection, ecchymosis of the skin is not common. If it occurs, you may have damaged the periosteum or even the SMAS, or you may have compromised a vessel during local injection. If the SMAS and subcutaneous fat tissue are damaged, nasal skin will look shiny for months. This is the result of inflammation related to soft tissue injury. If you perform a delicate subperiosteal and subperichondrial, you will not see any shining of the skin. If the skin shines, this is a sign that the nose will go on changing.
Ahmet Karacalar has used lateral based perichondrium flaps for coverage of dorsal irregularities.
Karacalar A, Korkmaz A, Içten N. A perichondrial flap for functional purposes in rhinoplasty. Aesthetic Plast Surg. 2005 Jul-Aug;29(4):256–60.
Nazım Çerkeş has also elevated the nasal dorsum perichondrium as a flap and repaired it at the end of the surgery.
Cerkes N. Concurrent elevation of the upper lateral cartilage perichondrium and nasal bone periosteum for management of dorsum: the perichondro-periosteal flap. Aesthet Surg J. 2013 Aug 1;33(6):899–914.
9.6 Why the Subperichondrial Dissection?
One of the new approaches in this book is the subperichondrial dissection of nasal tip cartilages and the nasal dorsum. I have used this plane since 2006. This dissection accelerates nose healing. In addition it has been possible for me to see, protect and reconstruct the ligaments that we only see in anatomy papers. For further reading, see:
Cakir B, Oreroğlu AR, Doğan T, Akan M. A complete subperichondrial dissection technique for rhinoplasty with management of the nasal ligaments. Aesthet Surg J. 2012 Jul;32(5):564–74.
9.6.1 Subperichondrial Dissection and Healing
As a rule we have performed subperichondrial dissection for the septum, resulting in less inflammation and fibrosis. The same principle is valid for nose surgery. If we damage the muscle and fatty tissue during dissection, our fears become real. Progressive thinning occurs in nasal tissue, the main reason being soft tissue injury. The simplest indicator is shining of the skin in the first months. If the skin shines, this shows soft tissue injury with a possibility of changes to the nose in the long term.
Important
1.
Entering the subperichondrial dissection is difficult, but dissection is easy.
2.
Dissection is easier when a previous subperichondrial dissection was applied on that nose. Similarly, once dissected, the septum can be dissected more easily.
3.
Yet, in a sub-SMAS surgery patient, the subperichondrial dissection plane has been kept intact. You can perform subperichondrial dissection under the previous sub-SMAS without any fibrosis.
9.6.2 Subperichondrial Dissection and Muscle Function
A person with facial palsy breathes with more difficulty from the paralytic side. The nasal muscle helps keeping the internal and external valves open. Since the muscle functions stop when the human dies, the external and internal valves close. (See “Functional Rhinoplasty”).
The nerves of the facial muscles enter the muscles from below. A sub-SMAS dissection plane hence is adjacent to the nerves. Therefore, if we cause nerve injury, the muscle function decreases. Another reason for impaired muscle function is muscle tissue injury itself. If you see fat in the dissection, then you are progressing inside the muscles. In addition to the sub-SMAS dissection damage, our retractors also damage muscles during surgery.
Seyhan Çenetoğlu calls the muscle function impairment due to rhinoplasty a “paralytic nose,”which is an excellent expression. Muscle function is impaired due to subsequent dissections. In patients who have had three or four surgeries, examine the valves and look for their resistance against inspirium. You are going to see that the functions of the nose have iatrogenically decreased. Structural rhinoplasty aims to treat this side effect by solidifying the nose. If you protect the nose muscles, your need for structural graft decreases.
If you dissect the nasal cartilages entirely in the subperichondrial plane, you will never see fat and muscle tissue.
Perform surgery in the subperichondrial plane, the nose is not aware that it is being operated on.”
9.6.3 Subperichondrial Dissection and the Camouflage Effect
In primary rhinoplasty, if you think there is a need for putting acellular dermis or fascia onto the dorsum, think about your dissection again. The nasal dorsum perichondrium is a 1-mm-thick great covering and healing tissue. Do not look for camouflage material in any other place. With a little attention paid to dissection and the correct tools, you can benefit from the advantages of subperichondrial dissection. In the photo below, a dorsum reconstruction was performed. Examine the covering tissue of the perichondrium above.
Important
Cartilages are surrounded with perichondrium. When you make a sub-SMAS dissection you resect the cartilage with the perichondrium on it. Especially at the nasal dorsum, the cartilages left over will be in direct contact with the overlying soft tissue without the perichondrium barrier.
9.6.4 Effect of Subperichondrial Dissection on Bleeding
This book includes many preoperation patient photos. I start tip surgery after finishing dorsum reduction. Examine my dorsal skin surfaces. You will see very little edema and ecchymosis. Likewise pay attention to how the surgery causes very little bleeding. If you perform a subperichondrial dissection, there will only be bleeding from the mucosa cuts, the Pitanguy ligament dissection and the veins from the bones. I rarely use cautery. Before I started paying attention to dissection, I used to see hematoma under some of my patients’ nose skin. When you pay attention to dissection and insert a drain, a hematoma will become a rare complication. Below you can see a patient with 1 cc of hematoma drainage from the radix.
9.6.5 Effect of Subperichondrial Dissection on Ligaments
The Pitanguy and scroll ligaments are in fact thickenings of the SMAS. These ligaments can tear if you pass the suture through them. The perichondrium and sesamoid cartilages on the other hand are tough tissues adequate for holding the suture. If you perform a subperichondrial dissection, you can see the sesamoid cartilages attached to the scroll ligament. In sub-SMAS dissection, however, these scroll ligaments and the attached sesamoid cartilages stay on the cartilage and are cut off with the lateral crura cephalic resections. The perichondrium is a strong tissue for repairing the Pitanguy in the open approach. In the closed approach, however, surgery is done without cutting the Pitanguy ligament. I use the sesamoid cartilages while repairing the scroll ligaments.
As a result, subperichondrial dissection allows you to protect the ligaments and reconstruct them effectively.
9.7 Upper Lateral Cartilage Mucosa Dissection
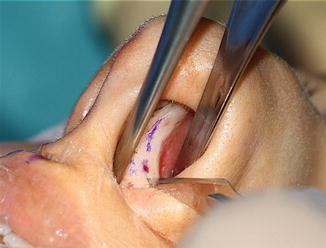
After separating the upper lateral cartilages from the septum, it is difficult to dissect the upper lateral cartilage inner mucosa. Upper lateral cartilages become extremely mobilized because they are thin, and while separating the mucosa can be damaged. Dissect the mucosa of the upper lateral cartilages before separating them from the septum. Incise the perichondrium in the mucosal side of the upper lateral cartilages from the septal angle using a surgical blade. While holding the soft tissues with a forceps and stretching them, open a tunnel with the Daniel elevator. From the septal angle, dissect the perichondrium of the septum and take down the internal valve mucosa.
Dissect the cartilage dorsum from the one dorsum with an elevator. In this way you can remove the cartilage and bone dorsum separately.
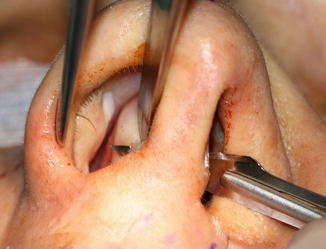
Stretch the mucosa with a forceps. Incise the inner perichondrium of the upper lateral cartilage with a surgical blade.
While stretching the mucosa with a forceps, dissect the mucosa using a Daniel perichondrium elevator.
Dissection of the contralateral upper lateral cartilage mucosa.
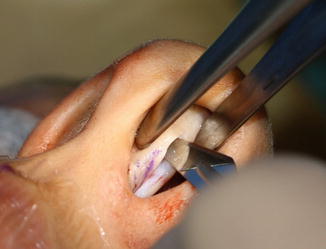
After taking down the upper lateral cartilage mucosa, dissect the septum mucosa subperichondrially connecting the septum and upper lateral cartilage dissection planes.
The internal valve mucosa was taken down without damage.
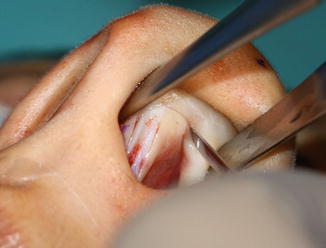
9.8 Dorsal Cartilage Resection
Cut the upper lateral cartilages and the septum respectively, at the same level. With mild dissection, the cartilage hump can be taken off easily since we have dissected the cartilage hump from the bony hump during dissection.
If the nasal body is deviated to one side, asymmetric resections should be made. Less upper lateral cartilage is resected from the deviated and more from the contralateral side. In the example below, there is an axis deviation to the left; hence, more resection is made from the right cartilage and nasal bone when compared to the left side.
Attention
In deviated noses, less upper lateral cartilage is removed from the deviated side and more from the other side. Take out the dorsum cartilage in one piece. If you are going to use spreader flaps, you should not make resections from the upper lateral cartilages. Separate the upper laterals from the septum using a blade and fold them inside. I prefer to use the Libra graft technique if the dorsal cartilage is strong. I could not achieve strong dorsal aesthetic lines with the spreader flap technique when compared with the Libra graft. If I have to use spreader flaps, I try to give a fusiform shape to the upper laterals folding inside. I get the fusiform shape by suturing tight near the septal angle and loose in the keystone area.
9.9 Dorsal Bone Resection
When you remove the cartilage dorsum, the bone will show its slim edges.
1.
Cut the bone from both sides with bone scissors.
2.
A few taps to the midline with a 4 mm chisel will get the bone out easily. It is easy to make additional 1–2 mm resections using the bone scissors. You can rasp irregularities. Since the bones of Turkish patients are thick, it can take plenty of time rasping.
Left nasal bone is being cut using bone scissors.
Below, the right nasal bone is being cut using bone scissors.
Bony dorsum is removed in this patient without using a 4 mm bone chisel.
In the example below, you can see the right and left nasal bones cut with bone scissors and the dorsum removed by a 4 mm chisel. Make sure your chisel is not blunt.
Bone and cartilage dorsum removed with clear sharp edges.
In the example below, there is an axis deviation to the left; more resection is done at the right upper lateral cartilage and the nasal bone when compared with the left side.
9.10 Nasal Radix
If you are going to reduce the nose radix, a curved 8 mm chisel will be sufficient. Removing the bone via grating is a very controlled procedure. Take down the radix by making 1 cm back and forth movements with an 8 mm chisel. A curved 8 mm chisel will grate when moving forward and not backward. Press the chisel to the bone when moving forward. Take out the piled bone particles with bayonet forceps. In order to create a sharp nose starting point from the radix, a hollow pit should be formed in this area. Curved nose radix rasps are unsuccessful for creating this hollow radix. In addition, radix rasps can damage the periosteum and hence expand the glabella. Protecting the periosteum in the radix area is very important. If the periosteum gets damaged, bleeding can occur, leading to glabellar edema. Tissue injury in the glabella and nose radix area cause long-term edema.
It is possible to perform bone resections as shown in the following photo by pushing the chisel forward five to six times.
You can use a 90° osteoectomy chisel in the nose radix area. It removes bone when moving both forward and backward. Removed bone is like dust, not in in the form of particles. The removal is slow but more controlled.
10 Septum
10.1 Dissection
The caudal part of the septum is tough and therefore easy to get under the perichondrium. Incise the perichondrium with the blade’s blunt side.
When a posterior strut is created, the cephalic septum part is very thick and an easy place for entering the subperichondrial plane.
Dissect the perichondrium with a thin Cottle elevator.

The Daniel-Cottle elevator was inspired by a dentist’s tool. By rubbing this ragged tip to the cartilage, you can check whether the perichondrium is there or not.
Important
Do not perform an L-strut septoplasty. The excess part of the septum is usually the base.
Important
There is usually a group of patients that come for revision rhinoplasty. The open approach has been usually preferred, and the posterior septum cartilage removed via L septoplasty; aggressive tip surgery was performed and no spreader grafts were used. It is not wrong to assume that in these patients excess cartilage has been disposed of. I do not know whether L septoplasty is taught as a routine step in rhinoplasty such as lateral crus cephalic excision, but I believe these patients were treated wrongly. L-septoplasty is not an effective method for the correction of septal deviation or axis deviation treatment. These patients’ axis deviations generally are not corrected either. If you plan a revision in these cases, you now have to harvest rib cartilage. The excess cartilage storage place should be the septum. The deposited cartilage size should be recorded in the surgery note. A more rational technique is to take only as much cartilage graft as needed. The excess part in the septum base usually meets the graft requirement in 90 % of the patients.
Important
Cartilage presence in the septum is important for secondary surgery. The amount of cartilage available in the septum area can be determined easily by touching the septum with a cotton bud while examining with a speculum and light.
Without removing the excess part in the septum base, no procedure (not even L-septoplasty) can correct axis deviation.
Do not completely dissect the septum. Only dissect on the two sides of your resection area. If you need to score the cartilage, dissect accordingly.
Reveal the excess part of the septum, cut it with a blade and 4 mm chisel and take out the cartilage with a Cottle elevator and perichondrium elevator, taking care not to break it.
After removing the curved or excess cartilage, dissect the maxillary crest periosteum. Do not dissect completely before resection as you might hurt the mucosa.
Important
You can cause mucosa tears anytime. Defects larger than 2 cm heal with difficulty. Repair these tears with a locking microsurgical needle holder and a slim tipped bayonet forceps. A 6/0 Monocryl suture mounted on a small needle is sufficient. It is difficult to suture with big needles in the nasal cavity.

Incise the anterior maxillary spine periosteum.
Dissect the soft tissue with a Cottle elevator. As the amount of dissection increases, the footplate height decreases.
Correct the maxillary spine deviations. Do not try to centralize it in the midline. The bone is tough there and would mobilize, and you will have to resect it. Trim the excess parts on both sides using a 4 mm chisel or cut the bone with bone scissors.
Leave a 2 mm space between the septum base and the anterior maxillary spine. Periosteum and perichondrial tissue left on the mucosa will fill the space.
Correct deviations of the ethmoid bone.
Attention
It is dangerous to advance too far superior in this region. If you apply excess force on the ethmoid bone, it can fracture from the cranial base and result in CSF leakage. The ethmoid bone portions that cause breathing problems and are in contact with the middle conchae should be resected. There is no rationale for correcting superior deviations of the ethmoid bone. Deviations of the ethmoid and vomer should be resected using bone scissors to cut little pieces rather than using a chisel. If the bones are removed in big parts, they can easily tear the mucosa. These bones generally have sharp edges and can tear the mucosa completely when taken out. In the picture below, note the sharp edges in the excised vomer bone.
At this stage stabilize the septum to the maxillary spine midline using 5/0 PDS. Since we have used blunt dissectors while removing the excess cartilage from the nasal base, enough soft tissue remains on the anterior maxillary spine for this stabilization. If the septum mobilizes later during surgery, fixing it to the base will become more difficult. The transfixion incision is a good incision for fixing the septum to the base. If the PDS knot remains between the septum and spine in the 2 mm space, it will not cause any suture reaction. If the space is bigger than 2 mm, you can fill this space by tying more knots.
When septum surgery is completed, check the nasal passage. If there is no problem, insert the silicon splint. When septoplasty is completed, you should check the nasal passage as it can still be plugged. Sometimes a bone or cartilage piece can tear the mucosa and be exposed to the nasal passage. This kind of spur will not easily be epithelized and can cause bleeding, crusting and smell in the patient’s nose.
Important
We have already put in the silicon splint at the beginning of the surgery in patients who have had a concha intervention. You can perform septoplasty without removing the splints. If you have difficulty, then remove them, finish your septoplasty and finally insert the silicon back again. If you insert the silicon at the end of the surgery, the blood accumulated under the septum perichondrium can move to the nasal dorsum and mobilize the grafts.
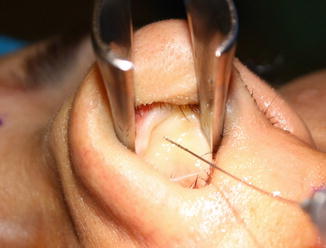
10.2 Removing the Septum
The septum should rarely be reconstructed extracorporeal. If the septum is broken badly, it is not logical to repair it inside the nose. It is more rational to take it out after the septal base and nasal dorsum resections are complete, because it is more difficult to make resections from the septum corrected with grafts. Drawing the silhouette of the septum on the exterior can be a guideline for us. Spreader grafts, ethmoid bone with holes drilled and horizontal mattress sutures can be used for extracorporeal septum deviation corrections. In my view, this approach is too aggressive and should be employed no more than 2–3 times per 1000 patients.
10.3 The “Gummy Smile”
The lips move upwards while smiling; however, this upward movement is limited by the nose. In cases with anteriorly placed footplates, I frequently see the “gummy smile” deformity. Dissection of the periosteum inferior to the anterior nasal spine towards the teeth results in repositioning the footplates superior to the orbicularis oris muscle and a barrier to the upper lip movement. Hence the lips do not elevate when smiling due to the footplates’ positions and reduction or complete correction of the “gummy smile” deformity.
10.4 When there is Extreme “Gummy Smile”
Dissect wider at the inferior of the anterior maxillary spine and fill this space with grafts. If you do not have enough material for this purpose, break and use the bones removed posteriorly. Debris from the lateral osteoectomy material can also be a great filler for this region.
In the photograph below, you can see bone dust material removed via osteoectomy with a 90° angled chisel. This material can be used for filling the lip nose junction.
As an alternative, you can plan and design a columellar strut thicker at the base.
Yet another method could be the placement of 3–4 pieces of cartilage struts 10 × 1 mm in size on the columellar base.
Important
Filling under the periosteum inferior to the maxillary spine can increase nose projection. Setting the footplates back via dissection on the other hand decreases projection. The footplates are generally set back in combination with the lateral crural steal procedure. It is important to note that the loss in tip projection due to dissection of the periosteum inferolateral to the anterior nasal spine is much larger than the gain in projection caused by filling under the maxillary periosteum.
Here you can see the one year photographs of a patient whose “gummy smile” deformity has been corrected with this approach.
11 The Footplates
The footplate polygon is frequently wide and should be narrowed in most of our patients because of the septum cartilage getting in between.
Important
In normal anatomy, there is a space between the footplates and the septum, which is filled by the Pitanguy ligament. We preserve this anatomy with the help of the posterior strut technique.

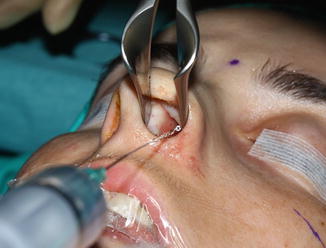
11.1 Narrowing of the Footplate Polygon
1.
Mark the footplates externally; symmetry is of great importance.
2.
Pass a 5/0 Prolene suture through the transfixion incision under the mucosa, out through the footplate marking.
3.
Pass the suture back though the hole going through the contralateral footplate.
4.
Pass the suture back though the needle hole under the mucosa and back through the transfixion incision.
5.
Tying the knot caudal to the posterior strut will narrow the footplate polygon.
Important
Footplate suturing results in a lowering of the footplates since the septum does not get in between the footplates, hence pushing them downwards. This results in a lowering of the nasolabial angle for 3–4 mm. Even if not planned, one may have to shorten the septum caudal region at this level. If caudal resection of the septum is not sufficient, resection from the maxillary spine should be performed.
A 4 mm chisel can be used for anterior maxillary spine resections.
However, some patients may need this effect. Suturing the footplates in the patient below will result in blunting of the nasolabial angle and a better-looking nostril shape.
12 Tip Surgery
Now we have come to the most exciting subject, i.e. tip surgery. The key point to nasal tip surgery is to find the correct lateral crural length.
Important
It is not enough to make only cephalic excisions from the lateral crura via the intracartilaginous incisions in the closed approach. The length of the lateral crura may need to be changed in addition. Hence, in my opinion, it is not correct to perform rhinoplasty without visualizing the domes.
1.
Sit on your chair. Lower it to the level that can exactly show you the lateral profile.
2.
In the shadowed photo, determine the location of the nasal tip that you have planned. Determine the new tip location.
3.
Mark the new tip position on the nose of the patient by drawing three lines that show this point. Do this before starting the surgery since the nose shape will change after dissection and resections. If you have a tip reference point in surgery, you can make your decisions more easily.
Important
You may have a wonderful surgical talent, but you also need a well-trained eye for aesthetic surgery. You should be familiar with the beautiful nose and be able to make the right decisions throughout surgery.
Important
We will begin with tip surgery after finishing nasal dorsum and septal surgery. Dorsum reconstruction should be done after tip surgery. If you completely reconstruct the nasal dorsum prior to tip surgery, you cannot make the correct tip to dorsum adjustments. In addition, an early intervention of the nasal base can cause the nose to swell while working on the delicate tip adjustments.
12.1 Incision
If there is no caudally excessive lateral crura, we will cut from the edge of the cartilage (infracartilaginous incision). If however there is a caudal excess, we will plan an autorim flap (inferior intracartilaginous incision).
12.1.1 Infracartilaginous Incision
1.
Place the double hooks and evert the nostril tip with your finger. The lateral crus edge can be seen. Make an incision throughout the lateral crus edge for 1.5 cm length and 1 mm depth. When you get close to the domes, the cartilage edges can be visualized only with difficulty. Do not cut here based on chance.
2.
Turn the columella with your finger and incise it throughout the medial crus edge.
3.
Place a double hook on the nostril peak point and evert it. Now connect the two incisions. In this way you decrease your chance of making a mistake.
4.

Make a 3 mm incision mark perpendicular to the infracartilaginous incision near the dome. In this way you can decrease the chance of sliding the incision edges at closure. If you slide the edges of the incision, nostril asymmetry can occur.
12.2 Autorim Flap
Steven Denenberg has made lateral crural caudal resections for bulbous tip cases on his website. This is a powerful technique. I have utilized it as well.
12.2.1 My Experience
1.
In most patients there is caudal excess of the lateral crura.
2.
In thin-skinned patients, direct resections can cause retractions of the alae.
3.
I incised the excess and left it on the mucosa: some of my patients had asymmetry.
4.
Finally I left the cartilage on the skin. I am happy with this technique and have been using it since 2012.
5.
It is not correct to leave a cartilage more than 3 mm in width. A big cartilage piece will not rotate towards the nostril. I want the autorim flap to turn inside and support the facet polygon.
In the example below you can see a patient with lateral crus caudal resections. In the first-year postop photos you can see that the tip is well narrowed, but the facet polygon is not clear. Caudal resection in thin-skinned patients can easily cause ala retractions.

12.2.2 When to Apply the Autorim Flap
If the lateral crus polygon is getting over the facet polygon narrowing the facet region, you should do an autorim flap. 80 % of my patients have this indication. Let’s look at the drawings of a thin-skinned patient. In the oblique view you can clearly see the caudal edge of the lateral crus which is curved towards the facet polygon. We make the incision by leaving this part of the cartilage on the skin. You can see the photos of the patient ten months after surgery. Note the changes of the facet polygon.
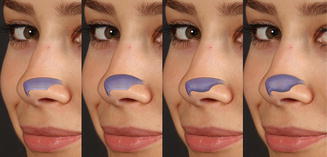
If the lateral crus polygon is facing down, getting into the facet polygon, and has caused narrowing of the facet polygon, there is an indication for the autorim flap. Ali Murat Akkuş proposed the idea of classifying the indications for autorim flap. Therefore we classified 30 of my consequent patients according to the distance between the lateral crus and the nostril edge:
1 % of the cases had a normal lateral crural width. 20 % had excess cephalic width. 20 % had excess caudal width. 59 % had both cephalic and caudal width excess.
There is no autorim flap indication in the first two groups. Cephalic trimming is contraindicated in the third group. If you try to correct the caudal excess using cephalic trimming, you will create a defect between the upper lateral cartilage and the lateral crus. If the skin is thin, the lateral crus will retract cephalically until it contacts with the upper lateral. Since this will change the alar position as well, nostril asymmetries or notches can appear. The autorim flap and 1–2 mm caudal resection will be more appropriate for these patients. The final group consists mostly of my cases. The lateral crura are usually convex in shape. You can treat this group efficiently with the autorim flap, 0–1 mm caudal resection and 2–3 mm cephalic resection combination. In this group, if you just perform a cephalic trim, you will face problems as well.
From left to right: normal, only cephalic excess, only caudal excess, cephalic + caudal excess.
To clarify the indications, let’s take a look at a thin-skinned patient. The excess caudal edge of the lateral crus can clearly be seen to turn into the facet polygon in the operative views.
The incision is placed on the cartilage in order to keep this part of the cartilage on the skin flap.
The new caudal edge of the lateral crus now creates a distinct highlight. The autorim flap is left to the skin and now part of the facet polygon.
The case below is a case of my own with caudal and cephalic excess that was treated only with cephalic resection before starting to use the autorim flap technique. As a result, the nostrils are retracted.
The case below is another one of my cases with caudal excess that was also incorrectly treated with cephalic resection only. As a result, the facet polygon has not changed. Notice the tip highlights being very close to the nostril edges.
12.2.3 Is the Autorim Flap Difficult to Perform?
The only difficult part is cutting in the right place. I do not recommend you to use this technique on your first 100 rhinoplasty patients. When junior, try to incise a 1 mm autorim flap. You can increase the autorim flap size as time goes by.
12.2.4 What is the Rationale for the Autorim Flap?
All of us resect the curved cephalic piece of the lateral crus in surgery. However, the caudal part’s curved portion is left behind. It is very difficult to designate the lateral crural polygon lower edge using this curved caudal cartilage. We cannot have a good light reflection with this cartilage in the lateral view. It is then logical to leave this curved piece in the skin. The incised 3 mm caudal cartilage piece is inverted inwards when cut, creating the autorim flap. Since the autorim flap is attached to the skin, it is stronger than a normal rim graft. The remaining lateral crus relax as a result of horizontal shortening, and bulbosity decreases. With cephalic resection, the bulbosity decreases even more. Thus the flat middle part of the lateral crus is used effectively.
Important
Convex lateral crura have a more resistant shape because of their short cephalic and caudal curved parts. The autorim flap technique decreases this resistance, hence enabling the suture techniques to work better on the lateral crus.
In the example below, the lateral crura are dissected while creating a 3 mm autorim flap. There is still caudal excess. Pay attention to the curved cartilage piece marked on the caudal edge.
An additional 2 mm caudal resection was performed. Thus 5 mm narrowing of the lateral crus was achieved.
Important
In patients with the autorim flap, an additional caudal resection facilitates angling of the autorim flap into the facet polygon. This is not always necessary; however, some patients require this additional caudal resection. In patients with thin nasal skin, you can incise the 1 mm caudal edge of the lateral crus and leave it attached to the mucosa to prevent retraction.
The flat region in the middle of the lateral crus is now available by making a 2 mm cephalic resection as well. The lateral crura convexity is decreased easily without the use of any sutures.
The domes are relocated 5 mm superiorly.
Here you can see the completed tip surgery.
Making repetitive cephalic resections for treating the bulbous cartilage creates nothing but trouble. A defect is created between the upper lateral cartilage and lateral crus. The remaining caudal crus shows cephalic migration over time, causing alar retraction. Equal resections from both the cephalic and caudal parts can prevent this migration and hence alar deformities. A defect will not be created between the upper lateral cartilage and the lateral crus, allowing reconstruction of the scroll area.

Note that how the autorim flap supports the facet polygon.

12.2.5 How to Perform Autorim Flap
Evert the nostril wing with a doubled hook, mark the caudal edge of the lateral crus and the inner curve 3 mm from the lateral crural edge. Make the incision from there. Forget the remaining part and continue surgery as usual. From now on the caudal piece will behave like a rim graft. At the end of the surgery, there is a possibility of puffiness in the infralobule polygon in 5 % of the patients. Stealing from the lateral crus can cause the tip of the autorim flap which is normally placed laterally to extend into the infralobule polygon. In this case, you can shorten the medial part of the autorim flap 2–3 mm. Surgery using the in situ cartilages is more controlled and easier than using plenty of grafts.
The patient’s lateral crura are close to the nostril edges. The facet polygon width is not more than 2 mm. Here we will lengthen in a controlled manner the facet polygon using the autorim flap technique.
3 mm autorim flap, 2 mm lateral crus caudal resection and 4 mm lateral crus cephalic resection were planned.
Narrow facet polygon.

Desired facet polygon width is marked.
We will let this portion turn inwards.
The autorim flap is created from the curved caudal part of the lateral crus.
The lateral crus caudal edge is marked.
The incision mark is drawn 3 mm cephalic to the lateral crus caudal edge. This incision will be the new border of the facet polygon.
A clear 2 mm deep incision is made.
The edge of the medial crus is incised.
The two incisions are connected.
The hook is placed.
The nurse gently everts the mucosa using a forceps.
The cartilage surface is cut with a blade’s blunt edge.
The subperichondrial plane is entered using scissors.
The lateral crus is dissected in the subperichondrial plane.
Dissection is extended up to the footplates, while the deep and superficial SMAS planes are divided.
The domes are connected while preserving the Pitanguy ligament.
You can see the autorim flap left over on the skin.
The caudal edges of the lateral crus are trimmed.
Important
Do not make resections more than 2 mm from the lateral crus caudally. Generally 1 mm will be enough. The lateral crus width can be narrowed easily up to 4–5 mm using the autorim flap and an additional 1–2 mm caudal resection. Therefore, less cephalic resection will be required.
A 3 mm cephalic resection is made.
New dome points are planned.

Cephalic dome sutures are placed.

Domes are connected with a figure-of-eight suture.
The columellar strut graft is placed.
AC suture is used.
The suture is passed from the medial crus’ caudal side and turned back from the caudal edge and then from the caudal edge of the other medial crus.
Incisions are closed by only stitching the mucosa without passing through the cartilages.
Important
If your suture is passed through the cartilage, the autorim flap cannot rotate into the facet polygon.
See how the facet polygon enlarges. Our autorim flap is now inside the facet polygon in between the two markings.
You can clearly see the change in the facet polygon when comparing this picture to the preoperative photograph.

The patient’s one-year photos. Clear acceptable facet polygons have been created when compared to the almost indistinguishable preoperative photograph.
Convexity of the lateral crus has been significantly decreased.
Alar support has also been increased as the facet polygon size increases.
Important
If excessive puffiness is noted on the facet polygon at the end of the surgery, you can make a cephalic resection from the autorim flap.
Let’s take a look at some patient examples. Note the changes in the facet polygons in the photographs below. In the basal view, the excess on both domes has been used as autorim flaps. Remember how many structural grafts are usually employed to form this triangular shape in the basal view.
The excessive puffy region of the dome is now part of the facet polygon as the autorim flap.
Case Example
In the patient below, you can see the effects of a decrease in nose tip projection and use of the autorim flap technique on the nostrils.
Case Example
In the front view, note the dome lights getting farther away from the nostrils.
Case Example
The heights of the dome and the facet polygons should be similar. In this example, the dome triangle has been shortened and the facet polygon widened. Ten-month postop photo.
Lateral crus caudal excess has been reduced, while a strong facet polygon has been obtained.

I have presented the autorim flap technique at the Turkish Aesthetic Surgery Society in winter 2014. After the presentation I had the chance to talk to the surgeon Ahmet Seyhan. He told me: “Barış, the cartilage you left behind gets under the dome at the end of the surgery due to the steal and therefore supports both the dome and the soft triangle. This is an important advantage and you should talk about this.” I am indeed indebted to Seyhan. Examine the autorim flap-dome relationship in the drawing below.
12.2.6 The Effect of the Autorim Flap on the Nostril
In bulbous nose tips, we want the nostrils’ peak points to turn superomedially. Our standard weapon, i.e. the cephalic resection, can cause nostril retraction. With the autorim flap technique, the peak points of the nostrils move superomedially while the mucosa is sutured. The autorim flap which was left behind in the rim prevents the notching while the mucosa is sutured. Below you can see a patient photo who had 3 mm autorim flap and 2 mm caudal resection. Note the space between the lateral crus and the autorim flap. If this patient did not have an autorim flap performed, notching of the ala could have occurred when the mucosa was sutured. This is one reason one could be in need of a rim graft or cutting the mucosa sutures just to correct the notching at the end of the operation.
In the example below, you can see the controlled superomedial movement of the nostrils with the autorim flap.
12.3 Lateral Crus Subperichondrial Dissection
Lateral crus subperichondrial dissection can sound fantastic, but one may say that it is already being done in that plane. (See, for example, Gruber’s comment on the following paper: Çakır B, Öreroğlu AR, Doğan T, Akan M. Rhinoplasty: A Complete Subperichondrial Dissection with Management of the Nasal Ligaments. Aesthet Surg J. 2012 Jul;32(5):564–74). Subperichondrial dissection can make use of the autospreader flap technique easier for the dorsum; however, all surgeons say that they are already dissecting in the subperichondrial plane on the lateral crus. If you make a true subperichondrial dissection, you can clearly write on the cartilage, like writing on a paper with a pen. When you dissect subperichondrially on the lateral crus, as in the septum subperichondrial dissection, you can clearly see the perichondrium on the flap. Since muscle and perichondrium stay on the cartilage when subperichondrial dissection is not used, your writings with a marking pen disperse. Subperichondrial dissection is extremely easy with the correct surgical tools and appropriate technique. It takes 10–15 s to get into the correct plane and dissection is much quicker.
12.3.1 Tools Needed for Subperichondrial Dissection
1.
A 1 mm hook. You can use fine doubled hooks as well.
2.
Perichondrium elevator. Traditional elevators will not be delicate enough to perform the subperichondrial dissection. I have used my own elevators for years. I was buying elevators and thinning them. Medicon produces these tools now.
3.
Sharp tip long dissection scissor. Use this scissor for entering the subperichondrial dissection plane.
4.
Retractor that will compress both the perichondrium and the skin with mild traction. This retractor should be minuscule as well. A concave shape will enhance your field of view.
5.
Sharp tip forceps. This is used for holding and stretching the perichondrium. It is needed when entering the subperichondrial plan for the first time.
12.3.2 How to Dissect the Lateral Crus in the Subperichondrial Plane
1.
Place the hook onto the mucosa without getting through the cartilage.
Important
If the hook plunges into the cartilage, it can break it. Because of this, you should use a hook not penetrating more than 1 mm.
2.
Your nurse should pull the hook down gently.
3.
Retract the skin to see the cartilage edge using the sharp tip forceps.
4.
Cut using the blade until you reach the cartilage.
5.
When you reach the cartilage, hold the knife reversely and incise the perichondrium of the cartilage.
6.
Hold the perichondrium and its overlying tissues tightly using the forceps.
7.
Try to get into the subperichondrial plane without bleeding by using your sharp tipped scissor through the long axis of cartilage for a length of 2–3 mm.
Important
You may not succeed at first. But remember that you were also disappointed while suturing your first vein. It is similar to scraping adventitia with your fingertips. You will get used to it, so do not give up. By using the subperichondrial plane, you can protect the nasal muscles and nerves.
8.
After entering 2–3 mm into the subperichondrial plane, place in the small retractor, hold and compress with the ala and stretch it.
Important
Perichondrium or cartilage can tear with sharp dissection. Use a blunt perichondrium elevator.
9.
While stretching the perichondrium with one hand, move forward with the elevator in the subperichondrial plane. The perichondrium can be dissected easily through the dome. Be careful about lateral dissection. The perichondrium can tear easily in this region. You can perform lateral dissection after delivering the domes.
10.
When you come to the scroll region, you can reach the nasal dorsum dissection plane by pulling the elevator gently. Connect the two planes, and the lateral crus will be totally freed from the skin. Wide dissection of the lateral crus facilitates redraping of the skin flap.
Important
If you have done everything correctly to this point, you will see sesamoid cartilages attached to the scroll ligament under the flap. We will use these cartilages for internal bandaging while closing.
11.
Place the hook closer to the dome and, while protecting the perichondrium, approach the dome using subperichondrial dissection.
12.
Attach the hook to the dome’s mucosa, create traction and move forward by cutting the tight junctions of the perichondrium to the caudal side of the lower lateral cartilage.
13.
After passing the dome, medial crural subperichondrial dissection becomes easier. After stretching the nose ala with a hook, dissect this region with the Daniel elevator.
14.
Apply the same procedure to the other side.

Important
Cartilage with subperichondrial dissection applied is softer than sub-SMAS dissection applied cartilage. 6/0 PDS is enough for shaping the cartilage.
12.3.3 Subperichondrial Dissection in Secondary Rhinoplasty
It is possible to perform subperichondrial dissection on patients who have had surgery before. This is because surgeries are generally made in the sub-SMAS, i.e over the perichondrium. This means you can perform your surgery in an untouched plane.
Important
In secondary rhinoplasty, if you use the subperichondrial dissection, you will not see the previous operation’s grafts. In order to reach the tip grafts, you should cut the perichondrium and reach the sub-SMAS plane.
Important
It can be difficult to dissect the domes in secondary rhinoplasty. In such cases you can approach from the medial crus and join both dissection planes at the dome. Below you can see the secondary dissection of an open rhinoplasty patient.

12.4 Delivering the Domes
1.
Grab the dome mucosa bilaterally using hooks while your nurse pulls them equally.
2.
Insert the little retractor to allow you to see the medial perichondrium of the dome.
3.
With a sharp-tipped scissor, dissect to the other dome from the end point of the perichondrium transversely. Do not cut more than 2–3 mm.
4.
Separate the superficial SMAS and the Pitanguy ligaments on the columellar and infralobule polygons. The superficial SMAS should stay on the columellar skin.
5.
Start splitting the Pitanguy ligament from the middle while the domes are being held firmly on both sides. With 2–5 mm of splitting, the domes will be mobilized and stay out of the nostrils. With this procedure, the Pitanguy midline ligament can be seen clearly. Do not spoil the integrity of this system. After having performed 100 rhinoplasties, you will no longer need to split the Pitanguy to access the tip cartilages, and you will not have to suture it again.

Emrah Aslan has introduced a flap from the Pitanguy midline ligament, using it to control the supratip skin. Without disturbing the integrity of the ligament, controlling the supratip skin becomes easier.
Arslan E, Gencel E, Pekedis O. Reverse nasal SMAS-perichondrium flap to avoid supratip deformity in rhinoplasty. Aesthetic Plast Surg. 2012 Apr;36(2):271–7.
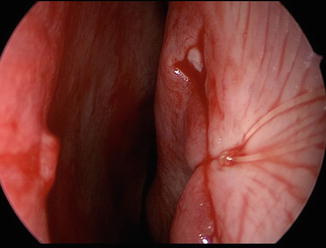
Below is an endoscopic view of the dissected Pitanguy midline ligament and the superficial SMAS. At position 8 o’clock you can see the left medial crus, at 10 o’clock the left medial crus perichondrium and superficial-SMAS, and at 4 o’clock the Pitanguy midline ligament.
Note the vascular structures passing through the Pitanguy midline ligament.
The Pitanguy midline ligament attaches to the right and left scroll ligaments. In the middle you can see the left scroll ligament. Generally there is one long and another short sesamoid cartilage on the scroll ligaments. I use the short sesamoid for internal bandaging by suturing the short sesamoid piece to the septum perichondrium. I use the long sesamoid piece for the reconstruction of the scroll region.

In the photograph below, you can see the left lateral crus at 4–7 o’clock, the short sesamoid cartilage at 11 o’clock, the long sesamoid cartilage at 12 o’clock, and the septum at 9 o’clock. The lateral crus perichondrium can be seen on the near side of the long sesamoid cartilage and the perichondrium of the upper lateral on the far side.
Note that the Pitanguy midline ligament is a thick structure similar to the palmaris longus tendon.
The Pitanguy ligament can be split into two equal parts from the midline or close to either dome, but if possible you should not split the Pitanguy midline ligament at all.
In the photo below the Pitanguy ligament has been separated from the domes without splitting from the midline.
With appropriate dissection, the lower lateral cartilages have been delivered from the nostrils.
Important
If you do not sufficiently separate the two domes from each other, you cannot perform a lateral crural steal. You should separate the domes without disrupting the Pitanguy system. You should free the cartilages as much as you are going to change the shape of the cartilages. If the lateral stealing is not going to be more than 1–3 mm, a dissection allowing the domes to get out will be enough.
Important
One of the advantages of the closed technique is to be able to perform surgery without the need to cut the Pitanguy ligament. In the open approach you can suture the ligament back. This will have a similar effect, but you should be careful about a symmetric alignment.
Tellioğlu has stated that, after repairing the Pitanguy ligament, the droopy nose rises when smiling. When we repair the Pitanguy ligament, we enable the nasal muscles to show their elevating effect.
Important
While separating the domes, leave the Pitanguy system intact for a width of 2–3 mm. When you do an excess splitting, the Pitanguy ligament can be cut. Therefore, you should split the ligament all the way up to the posterior strut. The tip subperichondrial dissection plane and the dorsum subperichondrial planes should not be joined. If the planes join, the Pitanguy midline ligament can rupture and escape under the supratip skin, creating a supratip fullness. This is the main reason of supratip deformity. Projection decreases equal to the Pitanguy ligament thickness (2–4 mm). This is because the Pitanguy tissue is like a pillow on which the domes fit.
Important
In thick-skinned, long interdomal distanced and bulbous noses, only removing the cartilage will not be enough. Soft tissue should be removed as well. Do not assume this procedure as a skin reduction. If you want to narrow the nasal tip in such cases, leave 2–3 mm of perichondrium on the Pitanguy ligament while entering between the Pitanguy and superficial-SMAS with scissors. Then resect the perichondrium and soft tissue that you leave on the Pitanguy ligament. Take care not to disrupt the Pitanguy ligament during this procedure. In the patient below, soft tissue removal from the interdomal space is planned.
The region between the superficial and deep SMAS was entered such that on both sides 3 mm of domal perichondrium is left below.

This perichondrium left below was then resected.

First-month photos of the patient.
If you have projection problems, you can suture the perichondrium which you left on the Pitanguy ligament under the domes instead of removing it. Thus you will be adding a 2 × 2 mm tissue volume to the soft tissue pillow.
In the example below, the perichondrium below the mark was added to the soft tissue pillow between the domes and the septal angle.
12.5 Marking and Resections
If you are performing surgery with the closed technique, always have a marking pen with you. Do not operate with an imaginary sense of proportion only. You should always do many markings, and your pen tip should be thin. If the pen tip is thick, thin it yourself.
1.
Enter beneath the domes with an unserrated pickup forceps and bring the domes together by creating upward traction in the midline. Mark the exact contact point. This point will be the reference point.
2.
Check the symmetry of the caudal edges of the lateral crus and perform caudal resection if necessary.
3.
Using serrated and unserrated pickup forceps perform a lateral crural steal simulation. Place a mark on the estimated new dome point.
4.
We will shape the tip cartilages with the cephalic dome suture. Cephalic dome suture makes the lateral crus rotate towards the medial. Surplus in the cephalic part of the lateral crus prevents this rotation. Resection that allows rotation towards the medial is enough. More than 3–4 mm cephalic resection is rarely needed. If the resection is not sufficient for rotation, we will perform an additional resection from the caudal part of the upper lateral cartilage. Do not adjust the rotation amount with cephalic resection. In the photo below, cephalic resection will be made to the lateral crus.
Imitate the lateral crus resting angle with a pickup.
Mark the part that prevents the lateral crus from rotating inwards and remove it.
5.
For cephalic resection, you should have a serrated super-cut scissors. Stabilize the lateral crus with a multitooth forceps, hold your scissors crosswise and cut the cephalic surplus of the lateral crus.
6.
Check whether the remaining parts of the lateral crus are equal.
Examine the determination of the cephalic resection amount of another patient.
The lateral crus is curved inwards with a pickup. The part that prevents this rotation is marked and removed.
Before discussing how to shape the tip with sutures, I want to turn to another very important issue. The concepts discussed here will allow for a deeper understanding of tip surgery.
12.6 How Did the Nose Break Down?
I often investigate my patient’s families. Sometimes two siblings come for consultation, one with a wonderful nose with a perfect lateral crus resting angle nose tip. However, the other sibling who wants surgery, has a hump, septum and axis deviations and parenthesis tip. How can the nose of two siblings be so different? Another question in my mind is: How can one sibling have beautiful nose tip polygons, while the other has a cephalic malposition?
12.7 Observation and Theory
12.7.1 Observations
1.
Cephalic malposition occurs more often in humped noses.
2.
Fracture in the vomer occurs more often in humped noses.
3.
Patients with axis deviation and hump have a trauma history before adolescence.
4.
There is a relation between the septal angle and the position of the dome. The dome is located at the bisector angle of the caudal septum and dorsum edges, hence the septal angle indicates the dome.
5.
These patients have weak dome cartilages.
6.
Sometimes we can see a folding line that is 2–3 mm away from the domes on the lateral crus. It appears as if the dome should be on that point, but it is in fact on the middle crus.
Patient Example
The patient’s nose tip cartilages have been dissected.
Note the symmetric notches 9 mm away from the current dome.

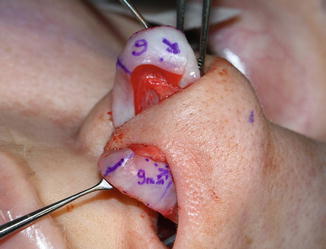
As the coordinates which we have drawn on the cheek show these notches, the dome was created on these notches.
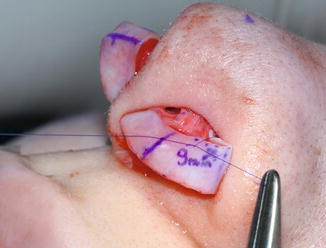
Overlap has been applied to the medial crus.

You can see the finished state of tip surgery. A steal of 9 mm is very rare. Generally, a steal of 4–5 mm is sufficient.
Below are the patient’s first-month photographs.
7.
In some patients, when the footplate setback and lateral crural steal surgery are completed, the location of the dome at the beginning of surgery becomes the columellar breakpoint now. Examine the example below. The domes in the first photo have now become the C point in the second.
8.
Most of these patients have a short infralobulelenght and the nose is affected by depressor and orbicularis oris muscles.
12.7.2 Theory
1.
All cartilages are connected to each other.
2.
Trauma occurs in the vomer as a result of an impact, and blood circulation increases because of wound healing in that region.
3.
A broken vomer produces more cartilage.
4.
Septum cartilage grows up towards caudal and anterior.
5.
As it cannot fit into the nose, it causes right and left deviations in the nose.
6.


Dorsal cartilage is connected to the upper lateral cartilage and pulls it anteriorly as well.
Related posts:

Stay updated, free articles. Join our Telegram channel
Full access? Get Clinical Tree
