(1)
Private Practice Fulya Teras, Istanbul, Turkey
You can draw noses and make nose sculptures with Çakır polygons. Moreover, you can use this method for giving shape to the cartilages in nose surgery. We developed these polygons together with my sculpture teacher. Since 2010, my sculpture instructor and I have been organizing rhinosculpture workshops at rhinoplasty congresses, and plastic surgery assistants study nose drawings and nose modeling. Polygons are one of the main topics of instruction. For an article discussing this method in detail, see:
Çakir B, Doğan T, Öreroğlu AR, Daniel RK. Rhinoplasty: surface aesthetics and surgical techniques. Aesthet Surg J. 2013 Mar;33(3):363–75.
What is the difference between Çakır polygons and Sheen’s aesthetics?
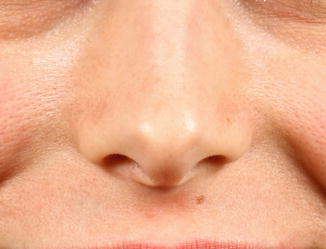
Jack Sheen has described the ideal tip shape as “two equilateral geodesic triangles with a common base formed by a line connecting both domes. The highest projecting point of the tip should lie along the apogee of the curved line that connects both domes.” We all know the infratip, supratip and soft triangles.
Sheen JH, Sheen AP. Aesthetic Rhinoplasty. 2nd ed. St Louis, MO: CV Mosby; 1987.
Shield grafts try to mimic the infratip triangle. However, we see that this graft constantly changes over time. Using a shield graft in a Y shape is an increasing trend, because the short arms of the Y graft and the gap between them gives more natural results. Placing a block cartilage to prevent the shield graft from overturning is one of the least common differences. The block graft both supports the shield graft and forms a second tip breakpoint just 2–3 mm above the breakpoint formed by the shield graft. Thus, it protects thin-skinned patients from pointed tip deformity. The aesthetic concepts described by Sheen cannot meet the needs of open rhinoplasty technique. In this book, polygons, as they will be examined in detail, can be considered as open rhinoplasty update of Sheen’s aesthetic concept.
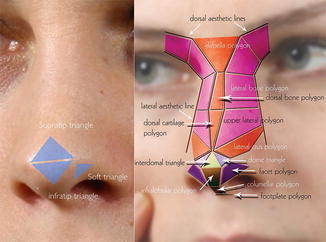
1 Infratip Triangle
We try to create this triangle with a shield graft. I use a shield graft only for overly deformed noses. I think that it has no place in primary rhinoplasty. We described this area with the infralobule polygon and added more details to the nose tip.
2 Tip Defining Point
When the shield graft is used for increasing projection, the tip becomes pointed. To prevent this, a block cartilage has been used behind it. Toriumi mentions this graft repeatedly. We have described the nasal tip area with two dome triangles and an interdomal triangle.
Note
I admire the approach based on an aesthetic conceptual description from 30 years ago. Sheen counts asone of the legendary surgeons for me. Topographic anatomy is a more important concept for closed rhinoplasty surgeons; we have to follow the skin reflections created by means of cartilage in the surgery.
3 What Is a Facet?
These are multi-edged flat areas which surround a three-dimensional objects. This is the easiest method for making a sculpture. You can imagine round organic forms consisting of several facets. Their sizes, angles, and the ratios between them are important. Analyzing organic forms with the help of cubic forms is a basic drawing method.
4 The Non-Mobile Nose
These polygons are mass polygons. They are created from cartilage and bone.
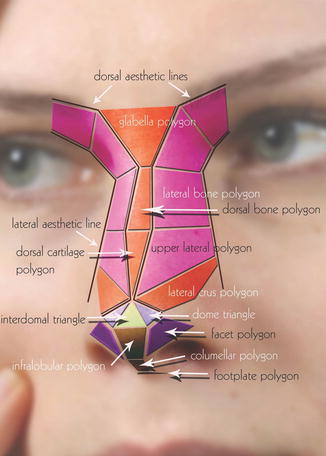
Glabellar Polygon
Dorsal Bone Polygon
Dorsal Cartilage Polygon
Lateral Bone Polygons
Upper Lateral Cartilage Polygons
5 The Mobile Tip Area
5.1 Mass Polygons
Dome Triangles
Lateral Crus Polygons
5.2 Space Polygons
Interdomal Polygon
Facet Polygon
Columellar Polygon
Footplate polygon (we do not elevate the skin in this region)
Infralobular Polygon
These polygons cannot be seen when the skin is raised.
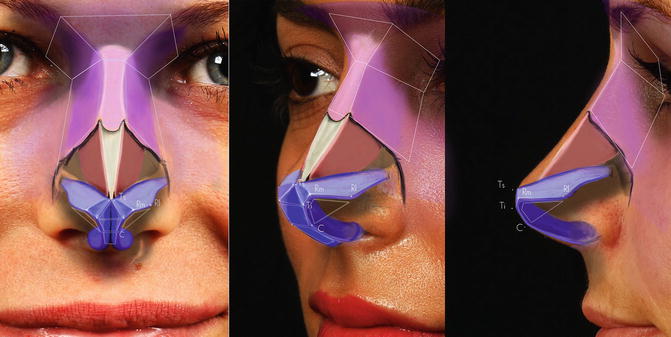
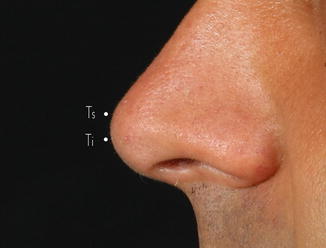
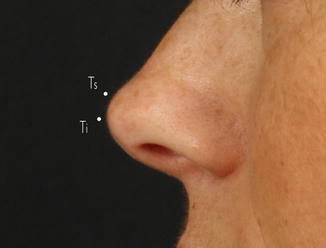
6 Tip Breakpoints
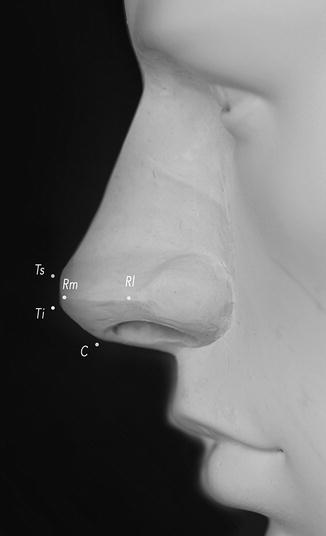
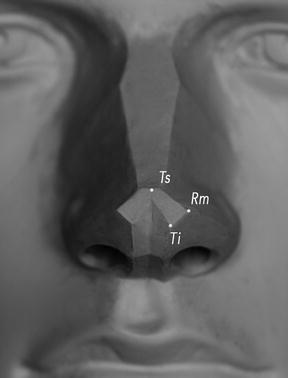
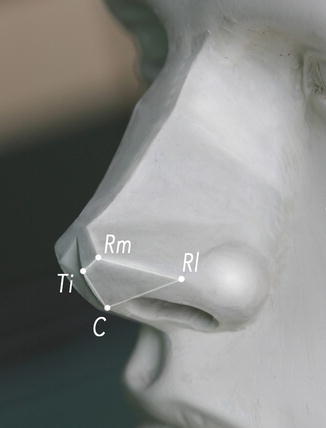
In profile, the nose tip makes two breaking points on the same vertical plane. We call the upper refraction Ts (tip superior) and the lower one Ti (tip inferior) points. Peak points of the dome triangles form the Ts point. Bottom inner edges of the dome triangles form the Ti points.
Pay attention to the polygon drawings. If possible, draw them by yourself. It is easiest to begin the drawing with the interdomal polygon.
7 Dome Triangles
These are the triangles formed by the Ti, Ts, and Rm points. There are two dome triangles. Dome polygons should look exactly towards the front.
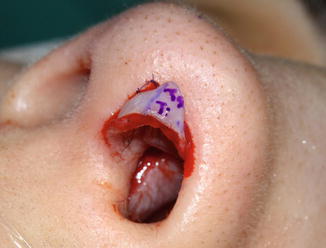
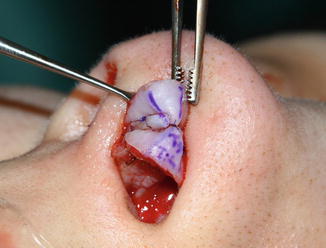
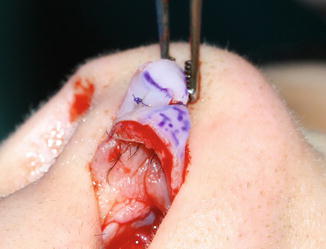
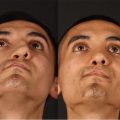
In 2008, the right dome of one of my patients who had beautiful right dome highlights had a triangular shape. In order to give it a similar shape, I made the left dome triangular. The dome triangle concept emerged with this photo.
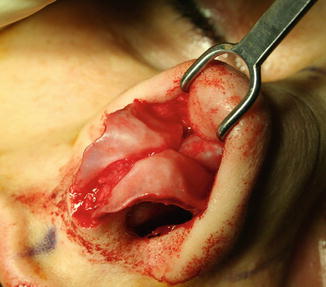
The dome is the meeting point of the lateral and medial crus. Lateral and medial crura are not formed by the curve of a plane rectangle cartilage from the middle with one angle. If you force it to curve on one plane with stitches, the domes, lateral and medial crura can be malpositioned. The infralobule polygon expands, the apex of the facet polygon closes and the caudal edges of the lateral crura turn towards the nostril.
The lateral and medial crura meet each other at a 15–20° angle. This angled articulation makes the meeting point triangular. In some patients, you can see this triangle clearly. Generally there are more soft transitions between these triangles.
Patient Example
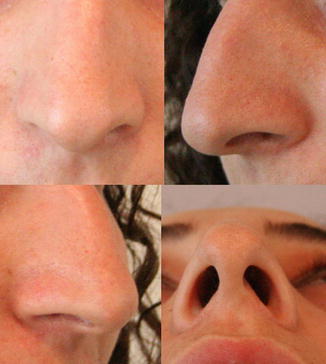
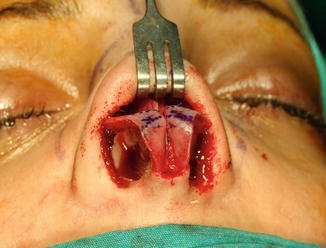
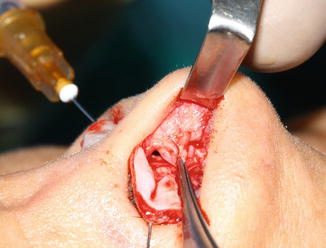
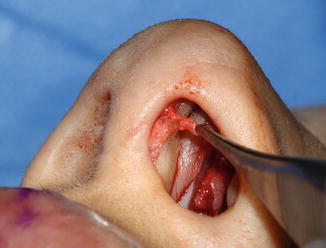
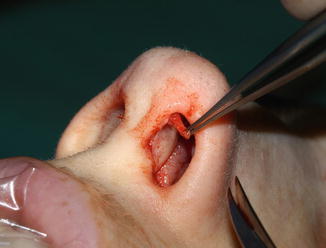
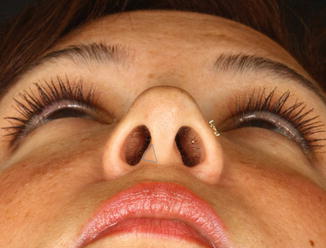
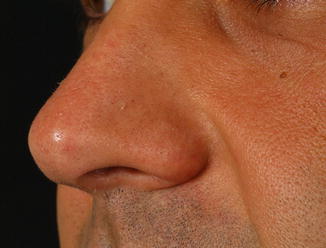
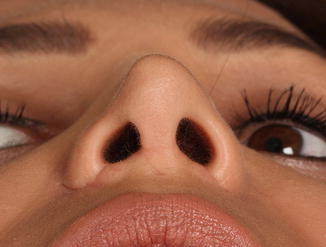
Before surgery, let’s examine the cartilage anatomy of a patient with well-articulated nose tip polygons. As the patient’s skin is thin, it is easier to see the cartilage anatomy underneath. You can clearly see the facet polygon. As the resting angle of the lateral crus is adequate, we can see the light formed by the lateral crus caudal edge.
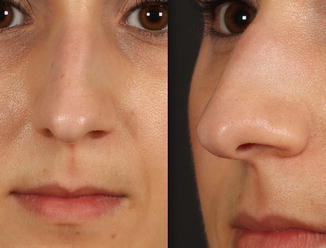
The patient’s right dome shows the triangle form more clearly. Examine how close the medial crus and lateral crus are to each other on the cephalic edge of the dome. We are trying to copy this form with tip sutures.
However, the left dome of the patient does not show the triangle form. The folding line near to the lateral crus is more bent than the other one. Moreover, the folding line close to the lateral crus is folded more at the cephalic edge of the dome. The common characteristics of the left and right domes are that the medial and lateral crura on the caudal edges of the dome which will form the tip of the facet polygon are far away from each other. Cephalic dome suture generates a form similar to the right dome. Cephalic dome suture does not generate a clear triangle, but this form can be expressed with a triangle polygon. The triangle form can be obtained with two different transdomal sutures that are positioned to each other at a 30–40° angle, but a clear aesthetic achievement cannot be obtained. It lasts longer, is more difficult and harder to achieve symmetry.
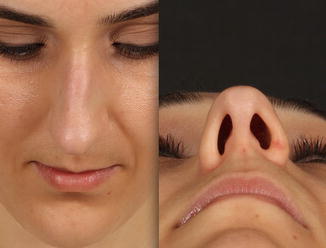
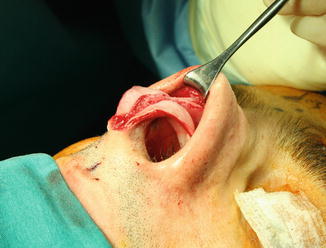
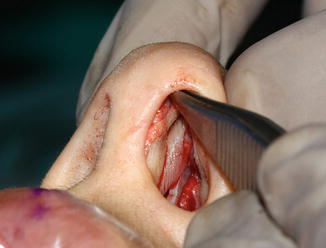
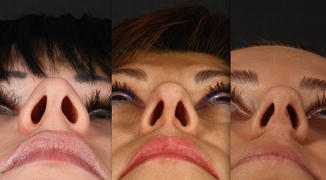
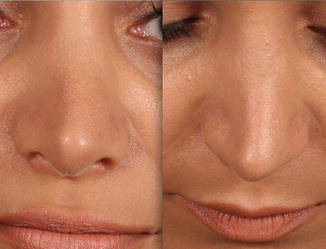
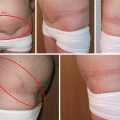
Below, you can see the photograph of a patient who has clear dome triangles.
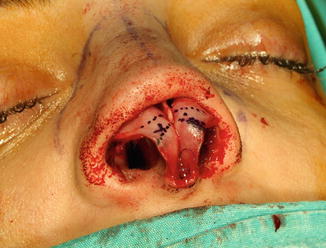
Below are the preoperative photos of one of my patients who had an operation in 2007. I created dome triangles by placing two different horizontal mattress sutures at a 30–40° angle. Clear triangle forms were given to the domes, but planning and performing the surgery was not easy.
I have not used this method since 2008. Although the cephalic dome suture cannot make the domes as triangular as above, it is a more useful technique.
Important
While drawing, turn organic shapes into cubic forms. This will make the analysis easier. The base length of this triangle forming the dome is approximately 3 mm, and this length constitutes the root of the facet polygon.
Important
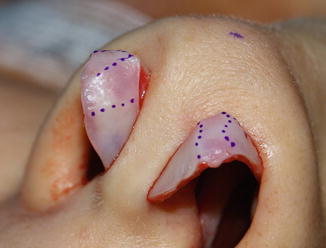
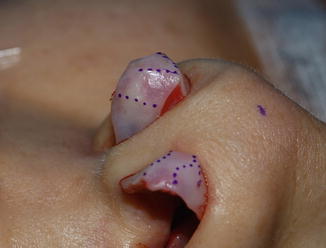
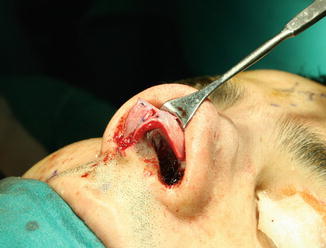
The horizontal mattress suture, named the dome spanning, transdomal or dome-creating suture, is not a suitable suture for dome anatomy. The stitch that copies the trianguler dome anatomy best and at the same time is the easiest one consists of the cephalic dome suture. Cephalic dome suture forms the dome by narrowing the top of the triangle. Do not put any stitches from the caudal edge of the domes. Below you can see an example of a patient where I used a dome spanning or transdomal suture in 2008. I was trying not to collaps the facet polygons by passing the stitches to the cephalic edges of the dome. If you contract the stitch too much, it can collapse; however, if you do not tighten it enough, it does not work. Technically, this is not an easy stitch. It cannot correct the lateral crus resting angle properly.
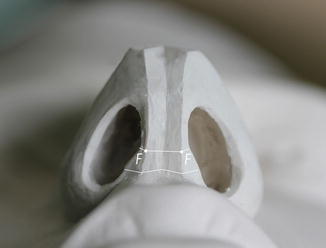
8 Interdomal Triangle
The interdomal triangle is the space between the Ts point and both Ti points. Like the dome polygon, it looks towards the front.

For the purposes of aesthetics, you should not only see mass, but also the spaces in between. The superior angle of the interdomal triangle is 80° in men and 100° in women.

Try to see the borders of the light reflected through the tip of the nose. You will see that it forms a triangle.
Note
I discovered these angles through measurements that I performed on beautiful noses in Photoshop. Angles can vary between 5 and 10°. Based on my findings, the peak angle of the interdomal polygon in men is narrow.
Important
As the rotation of the nose tip increases, the caudal edges of the domes drift apart. The angle difference between women’s and men’s noses is due to the rotation differences.
Dome triangles only contact each other at the Ts points. There should be space between the Ti points. If you close this space with a suture, tip aesthetics substantially deteriorate. Facet polygons expand horizontally; hence you should consider a rim graft. The incidence of a pinch nose increases as the caudal edges of the lateral crura also become medial.

As a result, never close the interdomal polygon.
8.1 Dome Divergence
This is a controversial issue that has not yet been explained clearly. It has been discussed in theory, but not yet performed in practice. Perhaps the inadequate explanation of interdomal space based on dome divergence has caused confusion. In some drawings, dome divergence has been shown as space between the cephalic edges of the domes. However, the domes contact or stand close to each other even if there are thin ligaments between them.
Important
Ti and Ts points should be on the same vertical plane. In women, the Ti point could be 1–2 mm anterior of the Ts point.
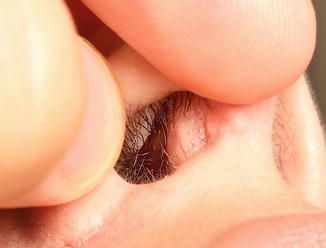
Does the Interdomal triangle make a pit on the skin?
In naturally beautiful noses, the interdomal triangle always exists. It is rare to see it on noses with thick skin, but more obvious on thin-skinned noses. The interdomal triangle can be seen from the outside as a facet or litte groove. In the cartilage anatomy this groove is more obvious. The superficial part of SMAS and the interdomal ligaments fill the space in between. The superficial part of the SMAS should be protected during the dissection. If you leave the superficial part of the SMAS on the cartilages when you are elevating the flap and make a resection while it gets between the cartilages, that area will be empty when the flap is closed again.
The strut graft should be fixed to the cephalic edges of the medial crus. Otherwise, we cannot protect the interdomal triangle. We should leave a place for the superficial part of the SMAS between the medial crura. In thick-skinned noses, you can make this polygon obvious with small resections from the perichondrium and SMAS.
Important
Do not resect too much because you may damage the artery, vein and nerve.
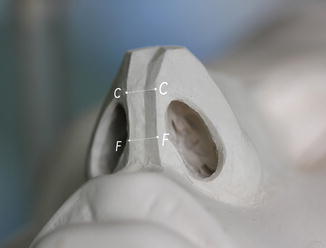
9 Infralobular Polygon
The infralobular polygon is the rectangle between the Ti and C points, and it has been named by Rollin Daniel. The infralobular polygon looks downwards at a 45° angle. It is a space polygon. The superficial part of the SMAS fills this space and makes it a facet. The strut graft is also located in this polygon. If the strut graft is close to the caudal edge of the medial crus, the infralobule polygon becomes round. The infralobule polygon is constituted by the weakest part of the lower lateral cartilage, named the middle crus. After dissection this part weakens, and contour grafts will be needed in order to strengthen it. We will describe this topic in the chapter on surgery techniques.
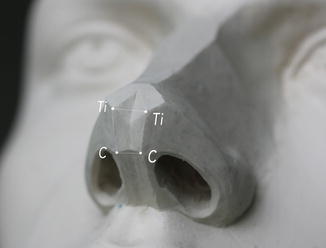
10 Columellar Polygon
The columellar polygon is a space polygon, between the C points and the footplate polygon. The columellar polygon looks downwards. The space between the caudal edges of the medial crus should be protected. A commonly occurring mistake is the extreme grafting of this region or making the caudal edges too close to each other. Extreme grafting expands the columellar polygon. Suturing the caudal edges narrows the columellar polygon. However, in a normal and beautiful nose, the columellar polygon can be seen clearly. A little groove seems to be natural and will not disturb the patient. The medial crura turn laterally and upwards in order to form the footplates. If the columellar polygon is short, then it is possible to lengthen the columellar polygon by suturing the footplates to each other.
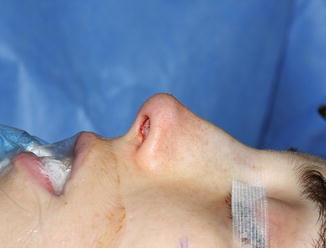
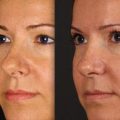
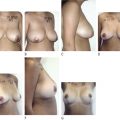
When the tip surgery is finished, the superficial SMAS and perichondrium may cause bulging on the columellar polygon. You can perform resections for the bulging on the columellar polygon or make small flaps and turn them to the space in the infralobular polygon. Below, the bulging on the C point was treated with a perichondrium flap.
11 Footplate Polygons
These are the planes formed by the footplates. They look at sideway and downwards.
The footplate polygon, columellar polygon and lip may not be separated from each other clearly. As in the examples below, the lip, columella or footplate can be dominant.
It can be plumper in women. In men, it is not uncommon to see it form a sharp angle with the lip. In tension noses, the excess of the caudal posterior part of the septum extends between the footplates and expands this polygon. In patients with short columellar polygons, it is possible to make the columellar polygon longer by suturing the footplates. The footplate polygon may be wide enough to obstruct breathing. In surgery this region should usually be narrowed.
In many of our patients, the footplate polygon projection is excessive. This projection can be decreased via dissection. However, if the footplates are constricted too much, the footplate polygon disappears and the columellar polygon elongates too much. This creates an operated look.
12 Facet Polygons
This is the polygon between the Ti, Rm, Rl and C points. It looks downward and lateral 45°. One of my essential objections is this region. This area is not a triangle. There is a 2–3 mm edge between the Ti and Rm points. The facet polygon is not a space that has to be filled. This can be seen clearly in beautiful noses. A thin-skinned nose without the facet polygon significantly shows that it has been operated on. It has an anatomy like a tentformed between the middle and lateral crus.
For a good facet polygon,
1.
A strong middle crus is required. If it is weak, then I use contour grafts.
2.
A right-sized infralobular polygon is needed. If the infralobular polygon is constricted with stitches, the facet polygon expands. In order to compensate this mistake you have to use big rim grafts.
3.
The dome polygon which is at the top of the facet polygon should be appropriate to the polygon concept. Non-anatomical sutures like the dome-spanning suture or the transdomal suture should not be used. Non-anatomical sutures constrict the caudal part of the dome and thereby the top of the facet polygon.
4.
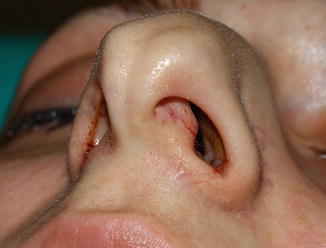
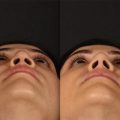
The caudal edge of the lateral crus should be strong and elevated like the rod of a tent. The lateral crus resting angle is important. The caudal edge of the lateral crus should be anterior to the cephalic edge. Thus, the caudal edge of the lateral crus creates tension upwards and sideways and stretches the facet polygon and as a result sets up the tent. Otherwise a pinched nose occurs. In a pinched nose, the caudal edge of the lateral crus is collapsed inwards to the nostril. Noses with obvious facet polygons can breathe better. Below you can see a nose with a clear facet polygon.
Example
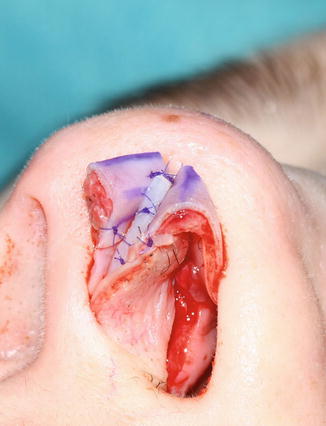
Below are the first-year photos of a patient with open surgery technique. The pinched nose deformity occurs especially on the right side. The cartilage which can be seen from the nostril is the caudal edge of the lateral crus. The lateral crus resting angle has been completely destroyed, and the caudal edge contacts the septum. The patient’s dome plane and lateral crus polygons have been deformed consecutively. This nose cannot support deep inhalation. Additionally, the caudal edge of the lateral crus also creates breathing problems.
How can the facet polygon be destroyed?
1.
The transdomal suture constricts the top of the facet polygon. Because of that, the caudal edge of the middle crus and the caudal edge of the lateral crus interfere with the facet polygon.
2.


If you use a lateral crus spanning suture, you will obviously destroy the facet polygon. This suture will impair the resting angle.
Related posts:

Stay updated, free articles. Join our Telegram channel
Full access? Get Clinical Tree
