Occiput and Posterior Cervical Instrumentation
Daniel J. Hedequist
Indications
Any age
Instability
Trauma
Tumor
Deformity
Equipment
Halo ring/vest
Standard spine table
Occipital plating system
Posterior cervical instrumentation system
Titanium cables
Transcranial motor-evoked potential and somatosensory-evoked potential neuromonitoring
Fluoroscopy
Positioning
Avoidance of inadvertent motion (especially flexion) during intubation
Consultation regarding airway management prior to surgery
Care must be taken to turn patients and consideration of placement in halo ring and vest prior to turning prone. Remove posterior aspect of vest once prone
Baseline neuromontoring may be done prior to placing the patient prone. Placement of halo ring-vest allows for turning with more stability, and in these instances preflip monitoring is not necessary
Prone positioning with eyes free and bite-block
Assure posterior occipital region clear from halo ring (use of ring with occipital clearance advised)
Place arms at side and tape into place in order to fluoroscopically the subaxial lateral masses
Assessment of alignment should be done fluoroscopically prior to prepping
Shave posterior occipital region with clippers and prep widely (Figure 2.1)
Exposure
Standard midline incision planned over the region of operation. The occiput as well as the large bifid spinous process of C2 are usually palpable and form the basis for incision. Fluoroscopic check may also be done to mark incision and to help avoid potential overexposure
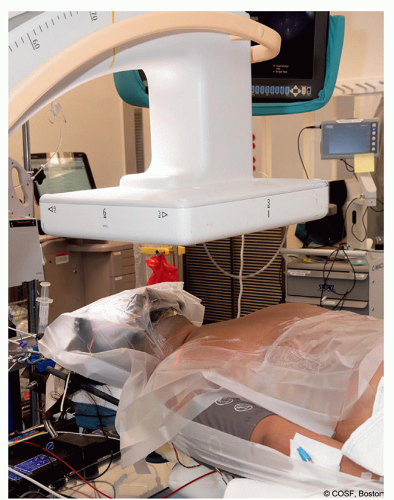
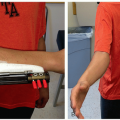
Figure 2-1 ▪ Clinical photo of a patient in prone position with halo attached to traction, arms taped down to side, and wide prep area. (Courtesy of Children’s Orthopaedic Surgery Foundation.)

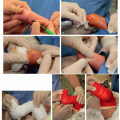
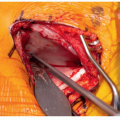
Figure 2-2 ▪ Intraoperative photo of a 1-year-old patient treated with occipital loop attached to skull via drill holes and titanium cables. Distal fixation was supramuscular rod in a growing rod construct. (Courtesy of Children’s Orthopaedic Surgery Foundation.)
Standard subperiosteally exposure may be performed with the aid of electrocautery out to the lateral border of the lateral masses
Exposure of the occiput is relatively easy with care taken to avoid the foramen magnum caudally in midline as well as avoiding excessive lateral dissection at the inferior-caudal region. Bone wax is helpful given the vascular nature of the cranium
Exposure of the ring of C1 requires careful attention to detail when dissecting 1 cm lateral to the midline. Laterally, the vertebral artery runs on the superior aspect of the ring of C1
Exposure between C1 and C2 requires care given the space between the posterior elements and the ligamentum, which can be penetrated if care not taken
Dissection of the lateral mass of C1 is critical to placement of screws and can be an area of bleeding given the robust venous plexus. This should be done by aggressive bipolar cautery of the venous plexus before bleeding. Occasionally, it is necessary to dissect out the C2 nerve root and tie it off in order to allow better visualization ( Video)
Subperiosteal exposure of the isthmus of the C2 pars is also critical when placing screws through this region. Dissection can be done with a freer elevator and judicious bipolar cautery
Surgical Technique
Occipital Fixation
Occipital fixation with a plate may be done in the vast majority of children over age 2. In children with thin or absent occipital tables where screw fixation is not possible, an occipital loop may be created by custom bending a rod
Occipital loop fixation requires 2 steps that are imperative to successful fixation:
Contouring a rod in a U-shape fashion, which may be done with special contouring benders. Once bent into a U-shape, lordosis needs to be contoured in at the cranial-cervical junction
The rod may be affixed to the occiput by drilling holes approximately 1 cm away from the foramen magnum and then passing cables through the holes and into the foramen magnum. There should be multiple holes/cable to share stress and care must be done to have a strong enough bridge to avoid cut-through (Figure 2.2)
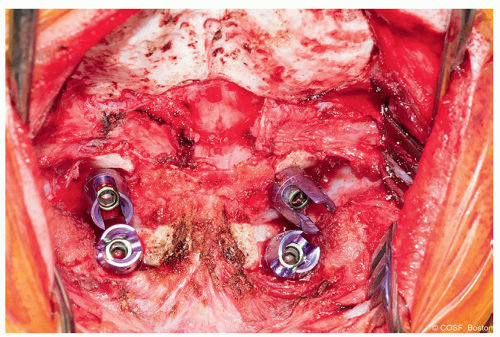
Figure 2-3 ▪ Intraoperative photo showing the wide exposure of occiput prior to placing a plate. (Courtesy of Children’s Orthopaedic Surgery Foundation.)
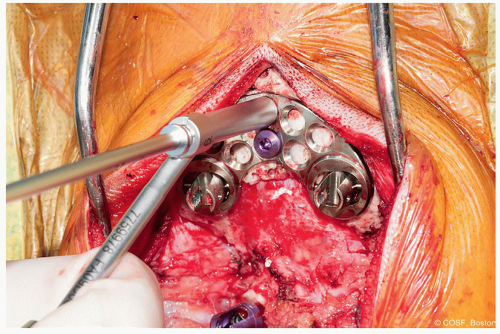
Figure 2-4 ▪ Placement of midline occipital screws through plate. Use of a stop drill may help prevent inadvertent dural penetration. (Courtesy of Children’s Orthopaedic Surgery Foundation.)
The loop may then be fastened to the occiput by sequential tension of the cables and then affixed to the cervical spine by cable or screws depending on the anatomy
Plate fixation to the occiput is technically simple with one of the key steps being a plate, which fits the anatomy of the patient, allows for surface area below it for bone grafting, and has midline screws available for the occipital keel. The majority of children have anatomy that is sufficient for a standard array of occipital plates (Figure 2.3)
The plate should rest just below the external occipital protuberance with the midline screw holes lining up with the occipital keel (midline thick occiput)
Screw fixation may be done by drilling sequentially by 2 mm with a stop drill to avoid potential overdrilling and penetrating the dura (Figure 2.4)
The majority of screws may be bicortical with tapping necessary as occipital screws have a blunt tip to avoid the dura
C1 Lateral Mass Screws ( Video)
Video)
Lateral mass fixation into C1 is possible in the majority of children at any age. Care should be taken to obtain a preoperative CT to look at lateral mass measurements as well as for any aberrant vertebral artery anatomy
Screw fixation revolves around the ability to expose the starting point, which can be difficult due to the venous plexus. The C2 nerve root needs to be retracted inferiorly to obtain access to the starting point and may be sacrificed if desired to obtain better visualization. The lateral mass starting point may be found by following out the inferior portion of the ring of C1 laterally and following the dissection as the ring of C1 turns anteriorly and meets the superior aspect of the lateral mass. Below the inferior portion of the ring entry into C1 lies the lateral mass starting point and it is then necessary to define the medial and lateral borders (Figure 2.5)
The entry point into the lateral mass of C1 is dense and sclerotic bone and so using a burr to enter into the starting point will then allow a handheld awl to pass into the cancellous bone and prevent skiving on the hard cortical bone
The trajectory of the drill for the lateral mass screw is caudal 10° to 15° and medial 10° to 15°. It is crucial to burr away the inferior portion of the ring of C1 as this may affect your drill trajectory by forcing your hand down and thus the drill bit more cranially directed if not done and potentially risks going into the occiput-C1 joint
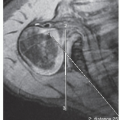
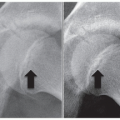
Lateral fluoroscopy needs to be done in order to guide cranial-caudal direction. A good rule is to aim the drill bit at the midpoint of the anterior arch on the lateral fluoroscopy view and drilling just short of this. The lateral mass and anterior ring are curvilinear so the drill bit should not pass anterior to the lateral projection of the ring (Figure 2.6)
Standard probing and measuring should be done and at least the first 5 to 10 mm should be tapped given the dense and sclerotic bone of the starting point
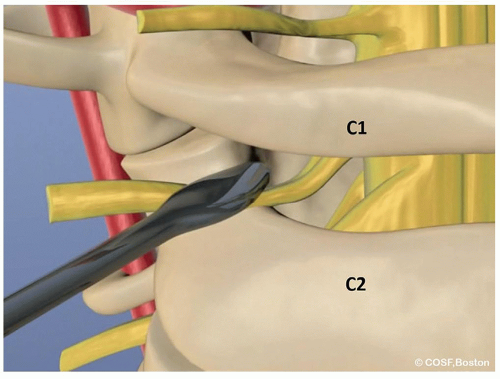
Figure 2-5 ▪ Schematic representation of the area needed to dissect for C1 lateral mass screw placement. The C2 nerve root may need to be retracted or occasionally sacrificed. (Courtesy of Children’s Orthopaedic Surgery Foundation.)Related posts:
 Surgical Decision-Making in Pediatric Hand and Arm
 Decision-Making in Pediatric and Adolescent Hip Disorders
 Clubfoot Casting and Heel Cord Lengthening
 Radioulnar Synostosis Derotation Osteotomy
 Neuromuscular Hip Surgery: Prevention to Reconstruction
 Minimally Invasive Techniques for Foot Deformity Correction

Stay updated, free articles. Join our Telegram channel

Full access? Get Clinical Tree


