13.2 Evaluating the Child with Unilateral CFD
13.2.1 History
Most children born with unilateral CFD have no family history of this or other congenital anomalies. Nevertheless, inquiry should be made into family history, exposure to drugs, medications, radiation, or infectious diseases during the first trimester. Many cases are now identified with prenatal ultrasound early in the pregnancy by measuring the lengths of the two femurs.
13.2.2 Physical Exam
There is an obvious leg length discrepancy. Associated fibular hemimelia and ray deficiency may be present. The hip and knee should be examined for flexion contracture greater than the other side. Neonates and young infants normally have such contractures for the first 3–6 months. The range of motion of the hip, knee, and ankle should be recorded.
Characteristic physical examination findings include the following:
Hip: external rotation (ER) deformity or increased ER vs. internal rotation (IR), fixed flexion deformity (FFD) of hip, and limitation of abduction (when coxa vara is present)
Knee: FFD of knee, no limitation of knee flexion, hypoplastic patella, lateral tracking or subluxed or dislocated patella, anteroposterior instability of knee, rotary instability of knee, anterior dislocation of tibia on femur with knee extension followed by reduction of knee with attempted flexion, hypermobile meniscal clunks, and temporary locking of the knee during flexion
Ankle: limitations of ankle dorsiflexion, obligatory eversion with dorsiflexion, hypermobility of ankle to eversion, and lateral malleolus high compared to medial
13.2.3 Radiographic Examination
13.2.3.1 Before Standing Age
Long anteroposterior (AP) pull-down X-ray; this is an AP radiograph of both femurs and tibias with the legs pulled straight and the patellas forward. It allows measurement of length of both femurs and tibia. It does not include foot height. Long lateral radiograph of both lower limbs pull-down with X-ray tube distance the same for both sides; this includes the femur and tibia of each lower limb in maximum extension on the same film. When there is a knee flexion deformity, it also allows accurate measurement of length of femur and tibia on both sides. AP pelvis supine; this allows more accurate measurement of the center-edge (CE) angle of both hips to assess for hip dysplasia. It is also a better-quality X-ray to assess for the ossification of the femoral neck. It is important that the pelvis be level for more accurate measurement.
13.2.3.2 Magnetic Resonance Imaging (MRI)
MRI is useful for assessment of integrity of the proximal femur. It can help determine whether the femoral head is joined to the shaft of the femur via a cartilaginous femoral neck. It can also help determine whether the cartilage of the femoral head is fused to the cartilage of the acetabulum in cases of femoral neck pseudarthrosis. Finally, it helps outline the deformity of the proximal femur. For optimal imaging, the cuts of the proximal femur should be reformatted in an oblique plane to see the entire proximal femur on one cut. MRI can also help outline the intra-articular pathology of the knee identifying deficiency of the cruciate ligament(s) as well outlining the shape of the joint surfaces in frontal and sagittal planes.
13.2.3.3 Computerized Tomography (CT)
CT is only useful at an older age when the acetabulum and proximal femur are nearly fully ossified. Three-dimensional CT reconstruction is useful to compare the normal acetabulum with the dysplastic side. In older children 3D CT can show the pathologic anatomy.
13.3 Surgical Reconstructive Strategy
13.3.1 Step 1: Preparatory Surgery of the Hip and Knee
Prior to lengthening one must determine whether the hip or knee are stable and/or deformed and whether surgical procedures for these joints are required before initiating lengthening. At the hip, if the acetabulum has an acetabular index that has a comparable slope to the opposite normal side, a CE angle is ≥20°, and the neck shaft angle (NSA) is ≥110°, no separate hip surgery is required before the first lengthening. If the acetabulum shows signs of dysplasia, then a pelvic osteotomy should be performed prior to lengthening. Objective evidence of dysplasia is defined by a CE angle of less than 20° (Suzuki et al. 1994) or CE angle greater than 20 degrees with an increased slope of the sourcil (acetabular roof) compared to the other side. Similarly increased acetabular index in young children is equivalent to increased sourcil slope in older children or adults. Coxa vara should be corrected prior to lengthening if the NSA is less than 120°. Similarly external rotation deformity of the hip is a factor to consider for correction at the same time as the acetabular dysplasia. If a Dega type of osteotomy is chosen, then there is usually a gain of about 1 cm in leg length. Associated hip deformities of retroversion, hip flexion contracture, and hip abduction contracture should be simultaneously addressed. The flexion contracture of the hip is treated by recession of the psoas tendon and release of the rectus femoris tendon. Flexion deformity may also be bony in which case it is treated by extension osteotomy. The abduction contracture is treated by lengthening or resection of the fascia lata and if necessary an abductor muscle slide. When all of these deformities are present together and especially with higher degrees of angulation, the reconstructive procedure is called the “superhip” procedure. Many of these more severe cases also have delayed ossification of the femoral neck or subtrochanteric region. Before lengthening the proximal femur should be as ossified as normal for that age. It is not enough to restore the biomechanics to normal by correcting the femoral and acetabular deformities. If there is a delayed ossification of the femoral neck, BMP should be added to the femoral neck to get it to ossify. It is beneficial to femur lengthening to remove the fascia lata. The fascia lata is a thin but very tough limiting membrane which resists lengthening and applies pressure across the knee joint and the distal femoral growth plate. For this reason, it should always be removed or at least cut before lengthening. Rather than throw away the fascia lata, I prefer to use it to reconstruct the absent cruciate ligaments. Although this is not an essential preparatory procedure, I prefer to reconstruct the knee ligaments at the same time as the hip surgery when indicated. Together with the knee ligament surgery a hemi-physiodesis can be added using a plate. The ideal age for the preparatory procedure is between age 2 and 3 years.
13.3.2 Step 2: Serial Lengthenings of the Femur
To determine the number of lengthening surgeries required, a prediction of leg length discrepancy at maturity is carried out. This can be done using the Paley multiplier method (Paley et al. 2000). The first lengthening of the femur can proceed 12 months after the preparatory surgery assuming the femoral neck has ossified. If the preparatory surgery is performed between 24 and 36 months (age 2–3 years), the first lengthening can follow between ages 3 and 4 years, respectively. The exception to this is if the femur is excessively short for an external fixator and it would be beneficial to wait a year or two to allow it to grow or if the femoral neck fails to ossify in the Paley type 1b case. The lengthening goal depends on the total discrepancy at maturity. Since the total discrepancy is large in most cases, we try and achieve as much length as possible safely. The safe range is 5–8 cm if a good physical therapy program is available. In most cases, we achieve 8 cm as long as the patient is able to maintain adequate knee range of motion. As a rule of thumb to make it easy for the parents to remember the age for lengthening, we follow the rule of 4, one lengthening every 4 years (e.g., ages 4, 8, 12). The age for the second lengthening is around 8 years and the final lengthening around 12 years. If each time we can get up to 8 cm, after three lengthenings, the gain is up to 24 cm, and together with the one cm gain from the hip surgery, the total is 25 cm. If more equalization is needed, a physiodesis of the long leg distal femoral growth plate is carried out for an additional 5 cm. In this manner, we can equalize 30 cm of discrepancy with three lengthening surgeries and one physiodesis. If more is required one more lengthening of up to 10 cm can be done, increasing the total to 40 cm. Following the rule of 4, this would be done at age 16 years or older. In some cases, the tibia is also short and contributes to the LLD. During one or more lengthenings of the femur, the tibia would also be lengthened. This will be discussed in more detail later. When the LLD is from both the femur and the tibia, lengthening both at the same time can reduce the total time of external fixation while achieving even more length than is possible with lengthening of only the femur.
13.3.3 Acetabular Dysplasia
It is very common for even mild cases of CFD to have acetabular dysplasia, which predisposes the femoral head to subluxation during lengthening. The acetabulum should be assessed at the age of two by means of a supine AP pelvis radiograph. A CE angle <20° is an indication for pelvic osteotomy. A sourcil angle that is not horizontal ±5° or which is asymmetric from the opposite side is also an indication for pelvic osteotomy even in cases where the CE angle is at 20°. The acetabular dysplasia associated with CFD is not like that associated with developmental dysplasia of the hip. The deficiency is more of a hypoplasia of the entire acetabulum. This is most manifest superolateral and posterior with a hypoplastic posterior lip of the acetabulum. In young children (2–5), the Dega osteotomy is my preferred method to improve coverage (Grudziak and Ward 2001). Although the Dega gives excellent superior and lateral coverage, it is misleading to think that it improves the posterior coverage. Since the posterior lip is an ischial structure located distal to the triradiate, the Dega cannot increase its coverage but rather does not reduce its coverage like a Salter osteotomy does. In older children (6–12 years old) with an open triradiate cartilage, I prefer a periacetabular triple osteotomy, and in adolescents or adults (>13 years old with closed or closing triradiate cartilage), I prefer the Ganz periacetabular osteotomy. In both of these, there is the ability to improve the posterior coverage by internally rotating the periacetabular fragment prior to abducting this fragment for increased lateral coverage. In my early experience I used the Salter or the Millis-Hall modification of the Salter (combining innominate bone lengthening with the Salter) (Salter 1978; Millis and Hall 1979). The problems with this are twofold: (1) the hip becomes more uncovered posteriorly and (2) femoroacetabular impingement tends to develop as they mature since the femoral neck, which is often short and has a poor anterior recess, impinges with the more prominent anterior lip of the acetabulum (which is now retroverted). The Salter osteotomy and its modifications are to be avoided. Similarly, when performing the Dega osteotomy, it is also important to make sure the cut extends posteriorly past the apex of the sciatic notch to end as a T junction with the triradiate as it separates the ischium from the ilium laterally. This will ensure that the Dega osteotomy hinges on the triradiate or medial bone of the ilium rather than rotate the quarter pelvis the way a Salter osteotomy does.
13.3.4 Proximal Femoral Deformities (Fig. 13.2a, b)
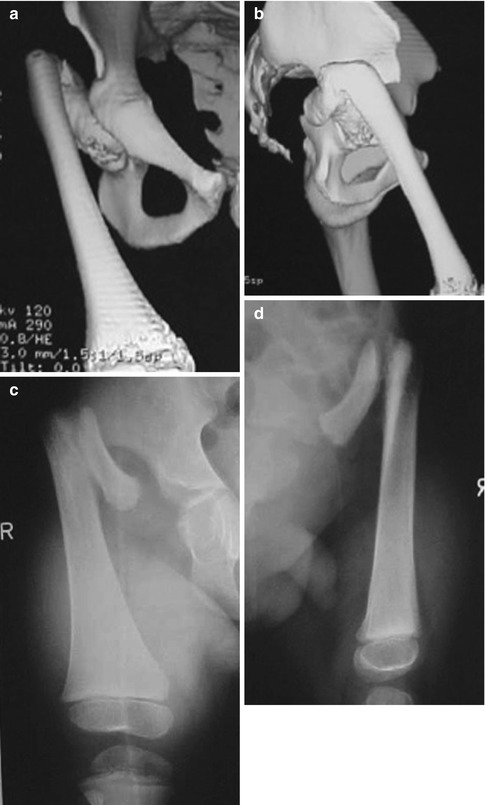
Fig. 13.2
3D CT reconstruction AP (a) and lateral views (b) showing typical type 1b deformity. Corresponding radiographs AP (c) and lateral (d)
There is a wide spectrum of deformity of the proximal femur seen in CFD. This is nicely illustrated in the Pappas classification (Pappas 1983) which is very descriptive but not very useful for directing reconstruction. The mildest cases may have coxa valga (Pappas type 9). The majority of cases however have varying degrees of coxa vara. This coxa vara ranges from mild uniplanar deformity to severe triplanar deformity. Until recently, the pathoanatomy of this deformity was not clear. We now understand that it is a complex combination of bony deformities in the frontal, sagittal, and axial planes, combined with soft tissue contractures affecting all three planes. The severity of these deformities is often but not always milder in type 1a cases and more severe in type 1b cases. Since the natural history of delayed ossification of the proximal femur is to ossify, very severe proximal femoral deformities may be seen in type 1a cases which at one point would have been classified as type 1b (Sanpera and Sparks 1994). Therefore, the difference between type 1b and type 1a may be a matter of the timing of the classification. Had the same 1a case been seen young enough, it might have shown a delay in ossification and been called a 1b and vice versa. In other words, the natural history of all 1b cases is to ossify and become 1a.
The proximal femoral deformity of CFD can occur between the level of the femoral neck to and including the subtrochanteric region of the femur. It is a result of a combination of extra-articular hip joint contractures combined with a bony deformity between the proximal diaphyseal part of the femur and the intertrochanteric or subtrochanteric region of the upper femur segment. Due to combination of frontal plane, sagittal plate, and axial plane angular deformities, the deformity appears differently when observed from a proximal vs. a distal reference perspective. This phenomenon is called “parallactic homologues” (Paley 2005a).
To avoid confusion in the description of the deformity, we need to establish a point of anatomic reference. Since the only deformity of the pelvis is hip dysplasia, I will describe the deformity of each of the two segments of the femur relative to the pelvis with the pelvis in an anatomic position. I will also use the convention of describing the distal relative to the proximal segment with the proximal segment being the anatomic pelvis laying flat on a table.
Proximal femoral deformity relative to the pelvis: The proximal femur consists of the femoral head, neck, and greater and lesser trochanter, including a smaller or larger segment of the femoral diaphysis (neck type vs. subtrochanteric type, respectively). The proximal femur relative to the pelvis is in flexion and internal rotation associated with extra-articular contractures of the hip abductors, hip flexors, and piriformis tendons. In the most severe cases, it is common for the hip flexion deformity to be as much as 90° and the internal rotation deformity to be 45°. Purely flexing the femur 90° places the neck of the femur horizontal to the pelvis in the frontal projection but at a 45° angle to the sagittal projection of the neck of a femur with a 135° neck shaft angle. The neck would be oriented anteriorly from the head to the trochanter. The flexion therefore makes the neck appear to be retroverted 45° (apparent retroversion deformity) when viewed from distal to proximal. Internally rotating the femur around its mechanical axis, while the hip is in a 90° flexed position, moves the neck from being horizontal to the pelvis (parallel to the line connecting the two ischial tuberosities), to appear 45° abducted to the horizontal of the pelvis (apparent abduction deformity). The neck moves proximally closer to the iliac wing. The greater trochanter faces posterior, medial, and distal towards the sacrum. Since the tip of the greater trochanter is pointing towards the sacrum, the piriformis muscle which originates at the sacrum will be very short and appear contracted. Similarly for the hip abductor muscles, the greater trochanter is so medial and proximal that the hip abductor muscles have never been stretched out to length. Finally the psoas and rectus femoris tendons will also be tight for the same reasons.
13.3.5 Distal Femoral Deformity
The distal femur relative to the pelvis is mostly externally rotated. It may also have some flexion and adduction relative to the pelvis depending on the amount of relative deformities of the proximal and distal segment to each other.
Deformity of the proximal to the distal femur: If we connect the distal femur to the proximal femur, we have a CFD hip deformity. The relationship of the two segments relative to each other is the confusing part. As a reminder, the deformities of the proximal femur to the pelvis include actual flexion and internal rotation deformities, combined with the apparent abduction and retroversion. The deformities of the distal femur to the pelvis include actual neutral to adducted position, neutral to flexed position, and external rotation. In relation to each other, the distal relative to the proximal femur deformities appears very different. The distal femur appears adducted to the proximal segment (coxa vara). I call this apparent since there is no actual abduction of the proximal femur. The proximal femur deformity that appears to be abduction is actually internal rotation of the proximal segment of the femur. There will be a net adduction deformity relative to the pelvis since the adduction of the distal femur relative to the proximal femur is greater than the apparent abduction of the proximal femur relative to the pelvis. Relative to the proximal femur, the distal femur appears to be in extension. I call this apparent extension because the distal femur rotation makes a true flexion deformity of the distal femur appear to be extension. This will become more understandable as we proceed to unravel this complex deformity. Since the apparent extension deformity of the distal femur is smaller than the flexion deformity of the proximal femur, the net is a smaller fixed flexion deformity relative to the pelvis. Relative to the proximal femur, the distal femur appears to be externally rotated. The reason I call this apparent external rotation is because the proximal femur is in apparent retroversion due to its flexion deformity. Because the retroversion is apparent, the relationship between the two is apparent. The smaller apparent retroversion of the proximal segment to the pelvis combined with a larger external rotation deformity of the distal femur leaves a net external rotation deformity relative to the pelvis.
If one could remove all of the soft tissue tethers and place the proximal femur in a normal anatomic position relative to the pelvis but keep the distal femur connected to the proximal femur in its deformed position, what position would the distal femur be in? We start by internally rotating the proximal femur. Because the hip is at 90° of flexion, the internal rotation appears to be abduction. Using the distal femur as a handle, we have to adduct the distal femur until the neck is horizontal. Next we need to extend the proximal femur around the horizontal axis of the pelvis. To rotate around the horizontal axis of the pelvis using the distal femur as a handle, one must consider the apparent adduction deformity of the distal femur (which in extreme cases can make the diaphysis appear parallel to the femoral neck). The maneuver for reduction of the proximal femur to an anatomic position requires the distal femur to rotate externally and flex. Once the femoral neck is reduced to a normal position, the final position of the distal femur relative to the proximal femur and to the pelvis is adduction, flexion, and external rotation. The adduction and external rotation were anticipated, but the flexion was not. This is due to the principle of parallactic homologues mentioned earlier. The rotation deformity makes the angular deformities appear different when the deformity is moved around and viewed from a different perspective.
Chicken and egg question: which came first: the contractures of the proximal femur or the deformity of the bone of the distal femur relative to the proximal femur? We will never know the answer to this question. The net effect in the frontal plane is that the greater trochanter with its insertion of the abductor muscles (gluteus medius and minimus) is abnormally close to the pelvis. This leads to several problems including impingement of the trochanter with the iliac bone and contracture of the gluteal muscles since the distance between their origin and insertion is short. The fascia lata with its iliotibial band extension to the tibia combined with part of the gluteus maximus is the most lateral of the soft tissue structures. They therefore contribute the greatest to the abduction contracture of the hip. Since adduction of the hip is preserved due to the varus of the femur and since the hip cannot be abducted much because of iliotrochanteric impingement, the abduction contracture is not obvious. It is rather stealth and hidden in plain view. If the bony coxa vara is corrected by osteotomy, without soft tissue releases, the abduction contracture will be uncovered. The abduction contracture will prevent the hip from coming back to a neutral position relative to the pelvis producing a fixed pelvic tilt. An abduction pelvic tilt on the short leg makes the limb length discrepancy (LLD) appear less than before surgery. In the face of an open growth plate or a nonossified neck or subtrochanteric segment, as in Type 1b cases, the abduction contracture leads to recurrence of the coxa vara after osteotomy. The mechanism for this recurrence may be differential growth of the physis, bending at the nonossified tissues, or slipped capital femoral epiphysis.
13.4 Superhip Procedure
Positioning, prepping, and draping for the superhip procedure: The patient should be on a radiolucent operating table, positioned supine close to the edge of the table, bumped up 45°, to roll the pelvis towards the opposite side. The entire side should be prepped and draped free from the nipple to the toes.
Step 1: Incision (Fig. 13.3a). A long midlateral incision is made from the iliac wing in a straight line to the tibial tuberosity in the anterior midline of the upper leg. The incision is carried down to the depth of the underlying fascia lata and iliotibial band.
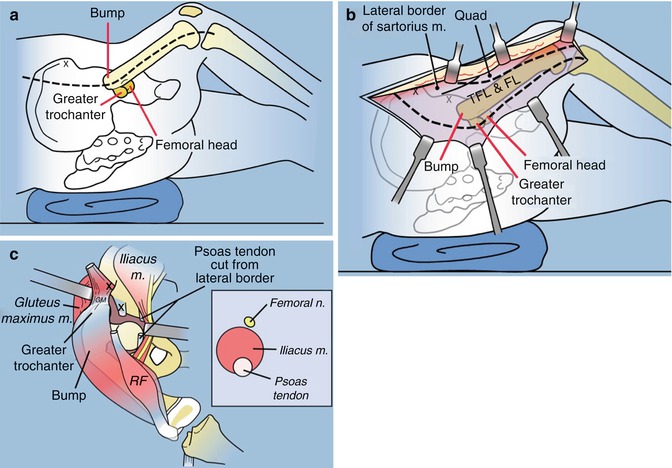
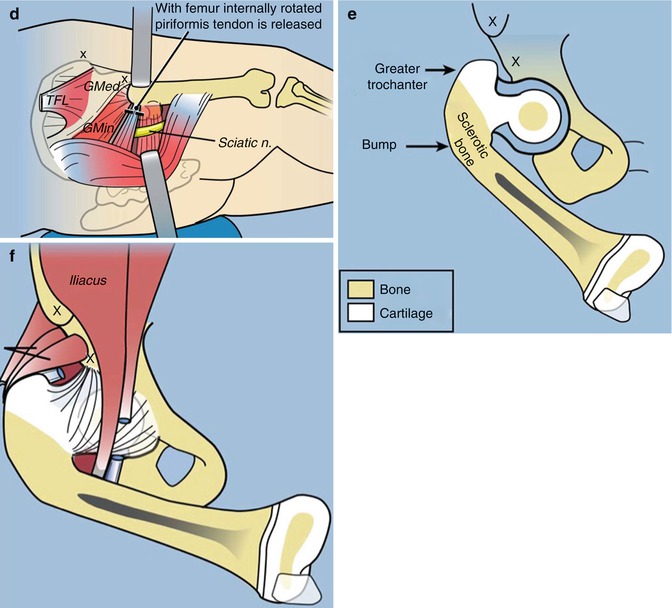
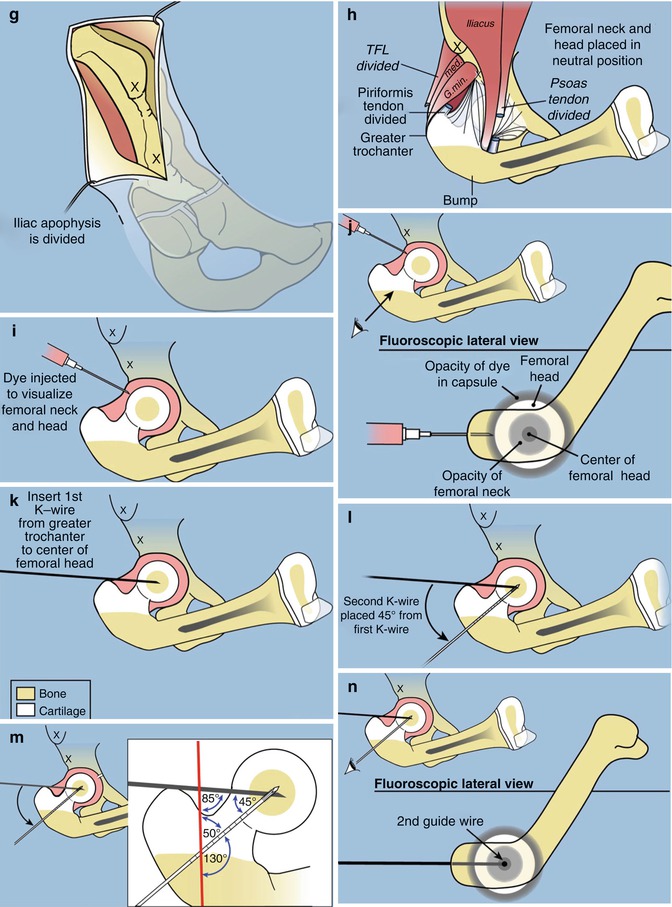
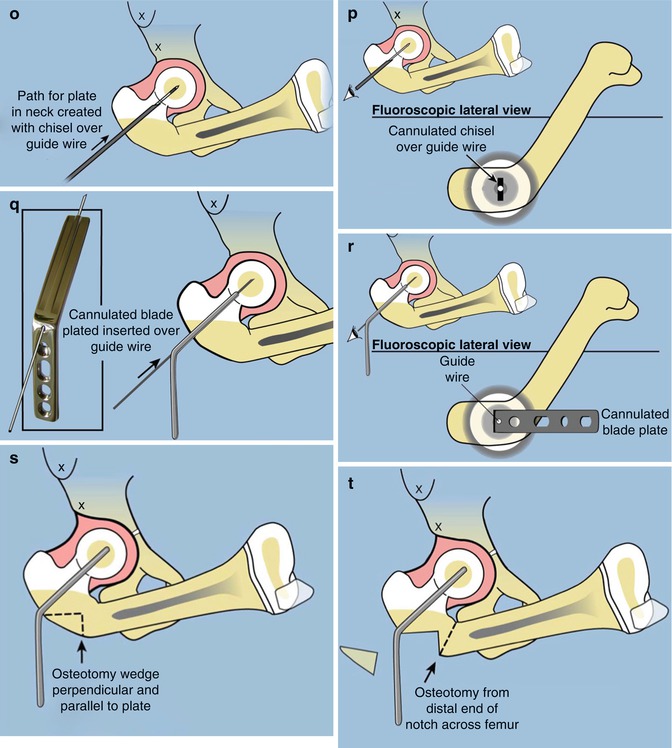
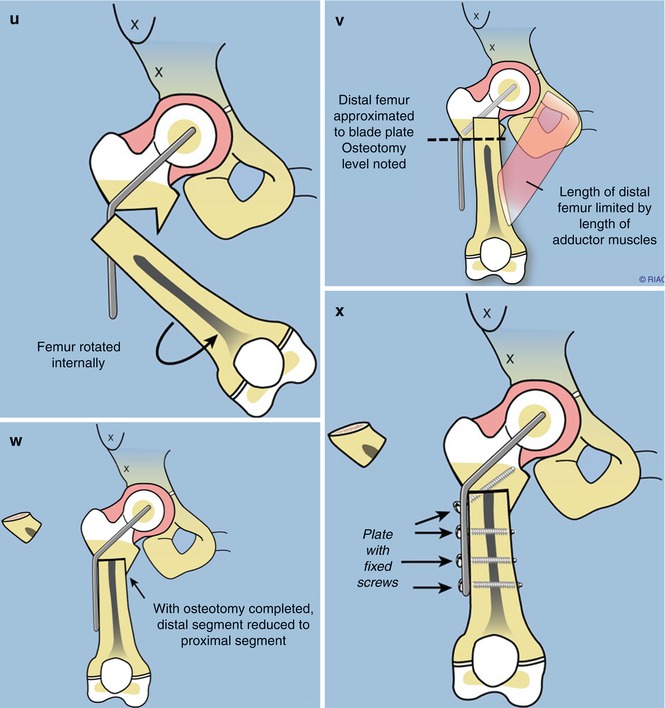
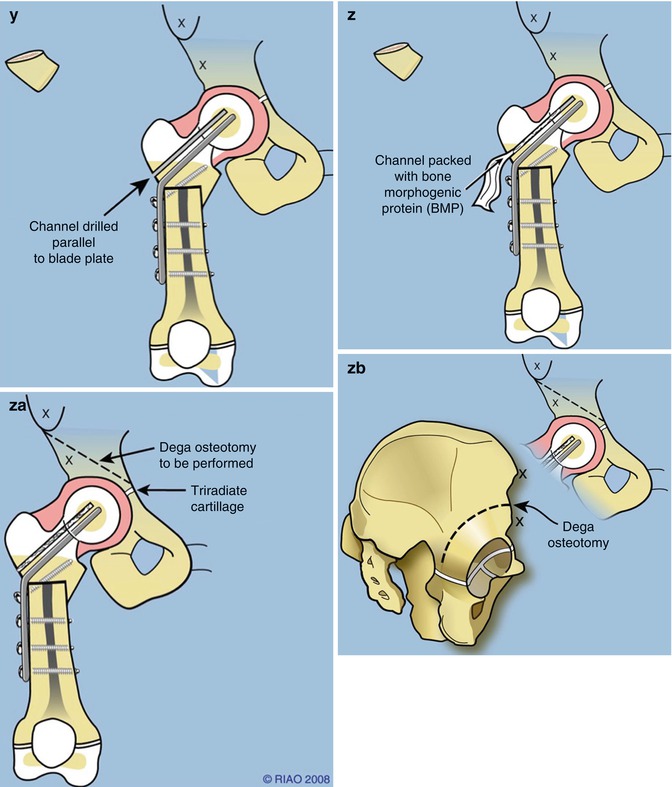
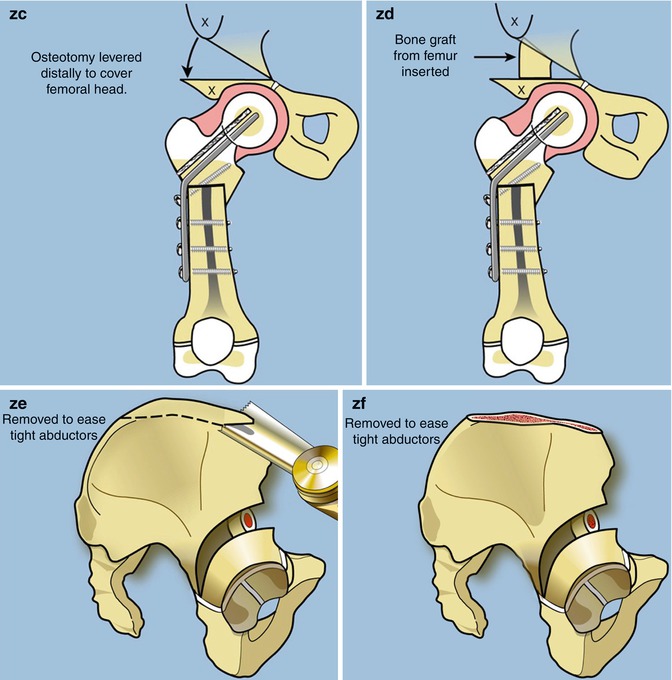
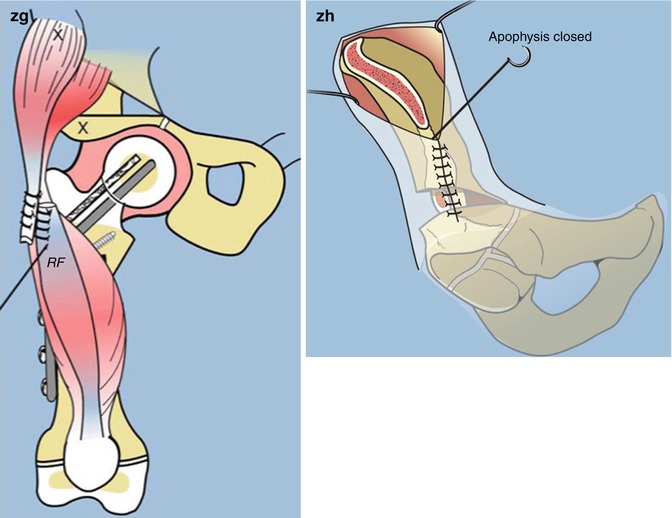
Fig. 13.3
Superhip Procedure (Paley Hip Reconstruction-1). (a) The patient is positioned supine with bump under affected hip. A straight midlateral incision is made from the top of the iliac crest to the tibial tuberosity. (b) A large anterior flap is raised off of the underlying fascia lata. (c) The rectus femoris is released from the anterior inferior iliac spine. The psoas tendon is recessed over the iliacus muscle. The femoral nerve is identified and decompressed. (d) The piriformis tendon is released from the greater trochanter. The sciatic nerve is identified and decompressed. (e) The remaining flexion deformity of the femur is due to the hip abductor muscles. (f) The hip abductor muscles tether the femur and limit its adduction. (g) To untether the hip abductors the apophysis is split and the abductor muscles are allowed to slide distally. This is called an abductor slide. It also allows the iliacus muscle to slide distally (flexor slide). (h) The abductor and flexor muscles have slid distally allowing the proximal femur to be fully adducted and exteneded. (i) A hip arthrogram outlines the cartilaginous femoral head (j) On the lateral view one can visualize concentric circles representing the outside of the femoral head, the perimeter of the femoral neck and the ossification of the ossific nucleus. (k) Place a guide wire from the center of the tip of the greater trochanter to the center of the femoral head. (l) Insert a second guide wire up the femoral neck at 45° to the first guide wire. (m) The red line is the future anatomic axis of the femur. Together with the two guide wires the anatomic axis forms a triangle made up of three angles: 50° (the complement of the NSA = 130°), 85° (MPFA), and therefore the third angle must equal 45°. (n) The second guide wire is in the center of the concentric circles and this in the center of the femoral neck and head. (o) Use a cannulated chisel to create a path for the blade plate up the femoral neck. (p) The chisel should be perpendicular to the posterior edge of the greater trochanter. (q) Replace the chisel with a 130° cannulated blade plate. (r) The side plate will be parallel to the posterior border of the greater trochanter. This demonstrates the flexion deformity of the upper femur that is present. (s) Cut perpendicular and parallel to the side plate and remove a small piece of bone. (t) Perform a subtrochanteric osteotomy. (currently I prefer to resect the medial lip to avoid impingement. (u) Rotate the femur internally and abduct it out of varus. (v) Overlap the bone ends and cut the diaphysis of the distal segment at the level of overlap to shorten the femur. The length is limited by the medial muscles. (w) Resect the diaphyseal segment and save it for bone graft for the Dega osteotomy. (x) Fix the plate with additional screws in the diaphysis and one up the femoral neck. (y) For cases with delayed ossification of the femoral neck, make a drill hole in the superior neck parallel to the blade. (z) Insert BMP-2 through this hole into the cartilage of the femoral neck. (Za) Perform the Paley modification of the Dega osteotomy. (Zb) The Paley modification cuts around the acetabulm all the way to the triradiate cartilage between the ilium and ischium posteriorly and triradiate cartilage medially. Unlike the original Dega no break is made through the medial cortex. (Zc) Lever down the roof of the acetabulum using a laminar spreader. (Zd) Customize and insert the cortical femoral graft from the bone that was resected from the femur. (Ze) Perform an iliac osteotomy to allow closure of the apophysis after the abductor slide. (Zf) The iliac bone can be used to graft the acetabulum and the femur osteotomies. (Zg) Transfer the recuts femoris tendon to the tensor fascia lata muscle. (Zh) Close the apophysis
Step 2: Elevation of flap (Fig. 13.3b). The subcutaneous tissues are dissected off the fascia of the thigh and pelvic region. The fat is adherent to the fascia and should be dissected preferably with a cautery. It is important not to incise the fascia with the cautery if the fascia is to be used for knee ligament reconstruction. Elevate a large flap of skin and subcutaneous tissues anteriorly allowing it to fold upon itself. Posteriorly a subcutaneous flap is elevated for only 1 or 2 cm. Extend the flap dissection medial to the Smith-Peterson interval (interval between the tensor fascia lata (TFL) and the sartorius) proximally. Distally reflect the flap to the patella if no ligament reconstruction is to be done and all the way to the medial side if ligament reconstruction is to be done. The fascia lata is now fully exposed from the patella to a couple of centimeters posterior to the intermuscular septum distally and from the medial side of the TFL to the mid-gluteus maximus proximally.
Step 3: Fascia lata release (Fig. 13.3c). The fascia is incised at the TFL-sartorius interval making sure to stay on the TFL side in order to avoid injury to the lateral femoral cutaneous nerve. The fascial incision is extended distally to the lateral border of the patella ending at the tibia. The posterior incision of the fascia lata starts distally and posterior at the intermuscular septum and extends proximally to overlie the gluteus maximus in line with the incision. The gluteus maximus (GMax) should be separated from the overlying fascia anterior to the posterior fascial incision. The fascia should be retracted anteriorly and away from the underlying muscle, while the GMax should be dissected off of the fascia and the intermuscular septum that separates it from the TFL. The GMax should not be split in line with the fascial incision to avoid denervating the muscle anterior to the split. It can now be reflected posteriorly to allow exposure of the greater trochanter, piriformis muscle, and sciatic nerve. When ligamentous reconstruction using the fascia lata is planned, the fascia lata is cut proximally at the muscle tendon junction anteriorly. The fascial cut should be sloped posteriorly and proximally to include a longer fascia segment posteriorly from the fascia that was dissected off of the GMax. The fascia lata is reflected distally to Gerdy tubercle. The TFL can be left in place without further dissection. It does not have to be separated from the underlying gluteus medius (GMed). The two muscles are often adherent to each other. In fact, it may be confusing at times which fibers are TFL and which are GMed. The distinguishing feature is that the GMed fibers insert on the greater trochanter while the TFL does not. The distal fascia lata also called the iliotibial band (ITB) blends with the underlying lateral knee capsule. It is common to reflect some capsule with the ITB. The fascia should be mobilized all the way until Gerdy tubercle. The fascia can then be divided into two halves using a straight pair of scissors. It should be kept moist while the rest of the surgery proceeds. The two limbs of the fascia are ready for later use in the superknee procedure.
Step 4: Hip flexion contracture releases. The dissection is carried beneath the sartorius to find the rectus femoris tendon. The rectus femoris tendon insertion is identified at the anterior inferior iliac spine. The constant ascending branch of the lateral femoral circumflex artery and vein is cauterized prior to cutting the tendon. The conjoint rectus femoris tendon (distal to the split into reflected and direct heads) is cut and allowed to reflect distally. Care should be taken not to go too distal on the rectus femoris to avoid injury to its innervating branch of the femoral nerve. Just medial to the rectus is the iliopsoas muscle. The iliocapsularis muscle (capsular origin head of iliopsoas muscles) can also be seen here. The femoral nerve lies on the anteromedial surface of the iliopsoas muscle. Before looking for the psoas tendon, the femoral nerve should be identified and decompressed below the inguinal ligament. The posterior aspect of the iliopsoas muscle belly is now elevated from lateral to medial. The psoas tendon is located on the posteromedial surface in the substance of the muscle. The tendon is exposed and cut. Any remaining flexion contracture of the hip is due to the sartorius, gluteus medius and minimus (the part of these muscles originating anterior to the center of rotation of the femoral head in the sagittal plane), and the anterior fascia of thigh. If the anterior thigh fascia is tight, it can be released, taking care not to injure the neurovascular structures. Before releasing the anterior fascia, the lateral femoral cutaneous nerve should be identified and decompressed. It runs inside the fascia covering the sartorius muscle just medial to the anterior superior iliac spine. The next flexors to release are the gluteus medius and minimus muscles. This is accomplished by the abductor muscle slide technique (see step 6).
Step 5: External rotation contracture release (Fig. 13.3d). The piriformis tendon is contracted and prevents internal rotation of the hip. It should be released off of the greater trochanter. The greater trochanter should be identified by palpation. The gluteus medius muscle posterior border is very distinct and proceeds down to the greater trochanter where it inserts. Deep to the medius is the gluteus minimus and just distal to the minimus is the piriformis muscle. Its tendon can be palpated through its muscle. It may be difficult to identify the piriformis from the minimus. Care should be taken to avoid dissection at the distal border of the piriformis tendon. This is where the medial femoral circumflex branch anastomoses with the inferior gluteal artery branch. The entire piriformis is transected about one cm from its insertion onto the trochanter. The sciatic nerve can be identified and if necessary decompressed. It is more posterior to the trochanter and runs deep to the piriformis.
Step 6: Abductor muscle slide. The abductors may not appear to be tight on first inspection because of the coxa vara. Adduction of the hip into a true AP of the hip with the neck oriented normally in the acetabulum is restricted by the gluteus medius and minimus since the fascia lata has already been cut. Furthermore, the Dega osteotomy which lengthens the height of the ilium makes the abductors even tighter. There are two options to lengthen the abductor mechanism: lengthen it at the tendon end or slide its origin distally. At the tendon end, the conjoint tendon of the glutei and quadriceps can be released and then later reattached to the greater trochanter. I did this for 10 years and found that it lead to permanent weakness due to the change in muscle tendon length ratio. The second option is to detach the abductors from their origin and let them slide distally. This avoids changing the muscle tendon length ratio and avoids weakening the hip abductors. Since switching to the abductor slide, it has eliminated the problem of weakness, lurch, or Trendelenburg gait. To do this in the growing child, we split the iliac apophysis from the anterior inferior iliac spine to the anterior superior iliac spine and then posteriorly along the rest of the iliac crest. It is important to expose the apophysis along the entire length of the desired split. There is a tendency not to elevate the apophysis posteriorly enough. This starts with the reflection of the subcutaneous tissues in step 2 when the anterior and posterior flaps are elevated. The proximal and posterior extent of the dissection should be just beyond the highest point of the apophysis laterally. The anterior extent is just distal to the anterior inferior iliac spine which is exposed for the release of the rectus femoris tendon. The abdominal external oblique muscle is peeled off of the apophysis to expose it along its entire length. The external oblique muscle insertion overlaps the apophysis more laterally and posteriorly than anteriorly. Once the apophysis is bare, it can be split from anterior to posterior. This should be done with a number 15 blade. To know where to split, pinch the apophysis between thumb and index finger of the hand not holding the knife. Then push down on the knife blade until you feel bone. It is important to try and stay in the middle of the apophysis along its entire length. It is also important to push down hard with the knife blade until one feels bone. Using a periosteal elevator, “pop off” the apophysis from the ilium. This should be done at multiple sites to get the entire apophysis to peel back as a unit from the ilium. The apophysis and lateral periosteum are reflected distally, thus relaxing the abductor muscles. Since part of the abductors acts as flexors of the hip, the abductor slide helps eliminate any remaining flexion deformity of the hip. The medial half of the apophysis is reflected medially with the iliacus muscle. This effectively produces a flexor slide effect for additional treatment of flexion contracture of the hip.
Step 7: Elevation of quadriceps. The quadriceps are now elevated off of the femur in a subperiosteal fashion. Since the femur is so short, the exposure may extend as far as the distal femoral physis. Proximally, the vastus lateralis should be elevated off of part of the cartilage of the greater trochanteric apophysis by sharp dissection.
Step 8: Arthrogram. A hip arthrogram is now performed using a 20 gauge spinal needle. This will outline the femoral head, acetabulum, and femoral neck.
Step 9: Guidewire insertion. Since the abduction, flexion, and rotation contractures have all been released, the femoral head and neck can now be placed in a neutral orientation to the pelvis by extending and maximally adducting the lower limb over top the other side. A guidewire should now be drilled up the center of the femoral neck to guide the insertion of a fixed angle fixation device. Since the femoral neck is unossified and short, it is very difficult to drill a guidewire at the correct angle up the femoral neck. The goal is to create a 130° neck shaft angle and a medial proximal femoral angle (MPFA) of 85°. In the normal femur, the angle between the neck shaft line and the tip of the greater trochanter to center of femoral head line is 45°. The first guidewire is inserted from the tip of the greater trochanter to the center of femoral head. Since the tip of the trochanter cannot be seen radiographically in young children because it is cartilaginous, the tip of the trochanter is located by palpation using the wire tip. From this point the wire is then drilled towards the center of the femoral head as shown in the arthrogram. The image intensifier is placed into the lateral view and the leg rotated until a “bull’s eye” is seen. This “bull’s eye” is formed by the overlapping shadows of three circles. The outermost circle is the dye surrounding the femoral head. The middle circle is the dye surrounding the femoral neck. The innermost circle is the ossific nucleus of the femoral head. All three circles should be seen concentrically. A second wire should be drilled into the center of this “bull’s eye” at a 45° angle to the first wire. Using another wire of the same length as the second wire, measure the amount of wire inside the femoral neck by placing it alongside the second wire and measuring the difference in length between the two wires. This will be the length of the blade of the blade plate to be used.
Step 10: Insert cannulated chisel. The cannulated chisel for the blade plate should now be hammered up the femoral neck guided by the second guidewire. The chisel should be rotated until it is perpendicular to the back of the edge of the posterior aspect of the greater trochanter. This will guide it to the correct angle in the sagittal plane.
Step 11: Plate insertion. Bang the chisel out of the femur and reinsert the guidewire. Insert the appropriate length 130° blade plate along this wire to the depth of the bend of the plate. Make sure on the image intensifier that the tip of the blade is not too deep into the femoral head. Check its position on AP and lateral as well as using the approach withdrawal technique with live fluoroscopy. If the plate is suspected of being too long, then replace it with one with a shorter blade. If the cannulation of the plate is off center, there is greater risk of protrusion into the joint.
Step 12: First osteotomy. The femur should be osteotomized with a saw perpendicular to the plate starting at the bend in the plate. The depth of this cut is incomplete and when the deformity angle is very large may be parallel to the lateral cortex. To guide this cut drill a wire perpendicular to the plate. Keep the plane of the saw blade perpendicular to the plate. The width of the perpendicular cut surface is as wide as the width of the femur diaphysis.
Step 13: Second osteotomy. A subtrochanteric osteotomy should be made oriented less than 90° to the first osteotomy to minimize the bone protruding medially.
Step 14: Peel the femur off of the periosteum medially and cut the periosteum. After the second osteotomy the distal femur can be peeled off of the surrounding periosteum. The periosteum medially is very thick and restricts correction of the varus and rotation deformity. Cut the periosteum by carefully separating it from the surrounding muscle. The profunda femoris and its perforators pass immediately under this periosteum and care should be taken to avoid injury to these vessels. Cutting the periosteum allows the thigh to stretch longitudinally reducing the amount of shortening required of the femur.
Step 15: Shortening of the femur. The distal femur is now mobile and can be valgusized and rotated internally. The distal femur is too long to fit end to end with the proximal femoral cut. The two ends should be overlapped. A mark should be made at the point of overlap. The distal femur should be osteotomized at this level. A wire is drilled perpendicular to the femur at the level of the osteotomy. A saw is used to cut the femur at this site. The segment of bone that is removed is stored on the back table in saline. It will be used as a bone graft for the Dega osteotomy.
Step 16: Fixation of the distal femur. The femur is now brought to the plate. The bone ends should oppose without tension. The femur is rotated internally to correct the external torsion deformity. To adjust the femur to the correct anteversion, the guidewire should be reinserted into the cannulation of the plate. This wire shows the orientation of the femoral neck. The knee should be flexed to 90° and the angle between the wire and the frontal plane of the femur as judged by the perpendicular plane to knee flexion is observed. This wire should appear at least 10° anteverted relative to the knee. The most distal hole in the plate can now be drilled with the femur held in this rotation. The drill hole should be made at the distal edge of the hole to compress the osteotomy. A depth gauge is used to measure the hole and a screw is inserted. Two more screw holes are drilled and screws inserted into the plate. The most proximal hole in the plate is designed to drill parallel to the blade of the plate. The wire in the plate cannulation is used to guide the drill bit. This screw helps secure the plate to the proximal femur. The other three screws secure the plate to the distal femur. In type 1b cases the blade of the plate goes across the proximal physis into the femoral head as does this oblique screw. In type 1a cases with a horizontally oriented growth plate, neither the blade nor the screw should cross the growth plate of the upper femur. In type 1a cases with a vertically oriented growth plate, the blade but not the screw should cross the physis.
Step 17: Insertion of bone morphogenetic protein (BMP). In type 1b neck cases, BMP should be inserted into the upper femur to stimulate ossification of the cartilaginous neck of the femur. A wire is drilled proximal and parallel to the guidewire in the cannulation of the plate. A 3.8 mm hole is then drilled overtop this guidewire. The drill hole should extend all the way into the ossific nucleus. BMP-2 (Infuse-Wright Medical) is then inserted in this hole. The BMP-2 is on collagen sponges, which can be pushed into the hole using the tip of a 3.2 mm drill bit in one hand and a forceps in the other hand.
Step 18: Pelvic osteotomy. The type of pelvic osteotomy depends on the age of the patient and the degree of dysplasia. In the majority of patients under age 6, I prefer to use the Dega osteotomy to treat the dysplastic acetabulum. In older patients and especially if there is a high grade of dysplasia, I use a periacetabular triple osteotomy (PATO) in children and the Ganz periacetabular osteotomy (PAO) when the triradiate cartilage is closed or nearing closure.
Step 19: Iliac wing osteotomy and repair of the iliac apophysis. After the pelvic osteotomy, the apophysis can be sutured back together. Due to the abductor muscle slide, the lateral apophysis cannot reach the top of the iliac crest. Part of the crest has to be resected to allow repair of the apophysis. The bone removed can be inserted into the Dega osteotomy or used to bone graft a PATO or PAO as well as the subtrochanteric femoral osteotomy.
Step 20: Muscle repairs and transfers. The TFL muscle should be sutured down to the greater trochanter to act as a hip abductor. The rectus femoris tendon should be sutured to the side of the TFL. The quadriceps should be sutured to the region of the linea aspera. The gluteus maximus should be advanced back to the posterior border of the TFL.
Step 21: Closure. If no knee releases or reconstruction are required, the wound can now be closed. The interval between the TFL and the sartorius should be sutured closed with care not to suture the lateral femoral cutaneous nerve. Since there is no fascia lata, the deepest layer is the fat layer. This layer is called the underlayer. It should be sutured with a number one Vicryl. A Hemovac drain should be inserted before closing this layer. If a superknee procedure is performed, a second more medial drain is also used. I prefer to bring the drains out proximally and anteriorly. The drains are usually secured with a clear adhesive sterile dressing (e.g., Tegaderm, 3M, Minnesota). It is important to close the wound in a fashion that the opposite layers get sutured at the same level. The next layer is Scarpa’s fascia. It is closed with a 2-0 Vicryl running stitch. The deep dermal layer (subcutaneous layer) is closed with a 3-0 Vicryl and the skin is closed using a subcuticular stitch with 4-0 Monocryl. Sterile dressings are now applied.
Step 22: Final radiographs. After the drapes are removed, an AP pelvis to include the femur is obtained. A lateral of the femur relative to the knee joint is also obtained. These X-rays are reviewed before proceeding to the spica cast.
Step 23: Spica cast. All infants are placed in a spica cast. The position of the limbs in the cast is important. The operated upon limb should be placed in full hip and knee extension. The opposite limb can be in a flexed, abducted, and externally rotated position. The cast should include the entire affected side but with the foot left free. The opposite side should stop short of the knee joint. The cast should be bivalved before leaving the operating room. In most cases the cast can be converted to a removable spica cast after 5 days.
13.5 Knee Considerations
The knee in CFD may range from a normal stable undeformed knee to an unstable, contracted, deformed joint. The most common deformity of the knee is valgus. The valgus deformity of the knee is usually nonprogressive. The distal femoral physis is usually closer to the knee joint on the lateral side. This is often attributed to hypoplasia of the lateral femoral condyle. CFD cases often have a variable degree of anteroposterior and rotatory instability of the knee related to absent or hypoplastic cruciate ligaments. In some cases, the tibia dislocates anterior or posterior on the femur during extension or flexion, respectively. Furthermore, there may be rotatory instability present. One study has related the radiographic appearance of the tibial spines to the degree of hypoplasia of the anterior cruciate ligament (Manner et al. 2006). The patella is usually hypoplastic and may be maltracking laterally. In some cases it dislocates with flexion. Finally, many cases of CFD have a fixed flexion deformity of the knee.
13.5.1 Indications for Preparatory Surgery of the Knee Prior to Lengthening
Isolated anteroposterior instability is not necessarily an indication for surgery. Grade 3 instability (no endpoint on anterior and posterior drawer tests) will usually become symptomatic as the child gets older. If the child is going to undergo a superhip procedure or Dega osteotomy prior to lengthening, and since the fascia lata is going to be excised, it makes sense to rebuild the knee ligaments and not “waste” the fascia lata. In some children there is a “catch” or “locking” sensation in the knee when going from extension to flexion. This is due to contracture of the iliotibial band. This catching feeling may even be painful and may require a trick motion to release it. In more severe cases, the tibia actually subluxes or dislocates anteriorly on the femur and reduces at about 30° of flexion. Once again the culprit is the iliotibial band combined with an aplasia of the anterior cruciate ligament (ACL). In older patients, the posterior aspect of the tibia may be rounded contributing to anterior dislocation of the tibia on the femur. Whether this is a secondary change due to chronic dislocation or a primary deformity is not clear since the tibia is not ossified posteriorly in infancy.
Patellar hypoplasia and instability is very common. The patella frequently maltracks laterally with flexion. In some cases it even dislocates with flexion. This is due to a combination of factors: valgus distal femur, hypoplastic or absent patellar groove, contracture of the lateral retinaculum with the tight iliotibial band, and external rotatory instability of the tibia on the femur due to cruciate deficiency which lateralizes the patellar tendon insertion. Patellar maltracking or subluxation should be corrected prior to lengthening.
Flexion contracture of the knee is another congenital deformity that may be present and which should be corrected before proceeding with lengthening. When the femur is very short, the acute angle created by the posterior thigh muscles gives the appearance of a flexion contracture. The definition of a flexion contracture however is a flexed angle between the anterior cortical line of the femur and tibia in maximum extension. When the contracture is more than 15°, it should be corrected surgically. Knee flexion contracture can be due to bony or soft tissue causes. In CFD the most common is intra-articular capsular contracture. There may be some extra-articular contribution due to contracture of the hamstring muscles and gastrocnemius muscles. Release of these muscles alone rarely corrects the contracture, while capsular release without complete hamstring release corrects the contracture. In some cases, there is a true bony flexion of the distal femur that may need to be corrected by osteotomy.
The knee reconstruction I developed in 1994 (Paley 1998


Stay updated, free articles. Join our Telegram channel

Full access? Get Clinical Tree


