Fig. 1.1
Surgical sequence of femoral LON with a monolateral external fixator. (a–d) Initial drilling, reaming, fixator placement. (e) Proximal pin placement with wire/cannulated drill/pin placement at the lesser trochanter. (f) Distal pin placement. (g–j) Osteotomy, nailing, fixator placement, and lengthening. (k) Locking the nail distally after length is achieved. (l) External fixator removed (Reprinted with permission from the Rubin Institute for Advanced Orthopedics, Sinai Hospital of Baltimore)
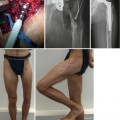
Fig. 1.2
A 15-year-old girl with congenital femoral deficiency who presented with 11 cm discrepancy. She has previously undergone lengthenings and hip and knee reconstructive surgery. (a) Preoperative erect legs standing view with 10 cm lift under the short leg. No mechanical axis deviation. (b) Immediate postoperative view with nail/fixator in place. Note the fixator bridging across the knee, hinged, to allow joint motion without subluxation. (c) After 5 cm lengthening, the nail has risen up but still has sufficient length in the distal segment for stability. (d) After nail distal locking and external fixator removal. Concentrated bone marrow was injected into the regenerate bone at the same time. (e) Six weeks later, the regenerate bone is much more visible. (f) Six months after frame removal, the healing is complete. This patient subsequently underwent tibial LON for final equalization (Reprinted with permission from the Rubin Institute for Advanced Orthopedics, Sinai Hospital of Baltimore)
Fig. 1.3
Surgical sequence of femoral LON with simultaneous acute deformity correction (FAN). (a–d) Initial drilling, fixator placement, osteotomy, and acute correction. (e–g) Guidewire placement, reaming, and nail insertion. (h) Lengthening. (i) Locking the nail distally after length is achieved. (j) External fixation removed (Reprinted with permission from the Rubin Institute for Advanced Orthopedics, Sinai Hospital of Baltimore)
1.1.6 Postoperative Care
1.
Problems
Infections are common. Most are superficial pin site infections that seldom lead to deep osteomyelitis. Oral antibiotics usually suffice. Serious cases do occur. Toxic shock syndrome and necrotizing fasciitis have been reported. These patients present ill, with loss of appetite, decreased activity, and febrile. A diffuse rash may be present with toxic shock syndrome. Urgent attention is required, with urgent and aggressive resuscitation and initiation of empiric intravenous antibiotics.
Institute physical therapy for passive knee flexion and extension. Splint the knee in extension at night. Allow “partial weight bearing” (the weight of the leg, which is generally considered as 1/6 of body weight). Consider electrical stimulation of the quadriceps to maintain tone. Supervised physical therapy should be done daily during the week and with the family on weekends.
Begin distraction after a latency period of 5 days (Fig. 1.1J). Lengthen at a rate of 0.25 mm QID. Later on, this rate may be adjusted up or down depending on bone formation and knee flexion. One strategy to consider is to slightly overlengthen (by up to 1 cm) and then shorten. This compresses the regenerate bone and may speed healing.
Fixator removal/locking (Fig. 1.1K-L): Once the desired length has been achieved, the patient returns to the operating room for locking of the rod and external fixator removal. It is important to insert the distal interlocking screws before removing the external fixator, in order to maintain length. Ideally, preoperative planning included an estimation of where the locking holes in the distal end of the nail would be at the end of lengthening, relative to the external fixator pins. In the operating room, position the patient supine with a bump under the ipsilateral hemisacrum, and bring the image intensifier to the true lateral position, to confirm that you can see “perfect circles” for the distal interlocking sights. If necessary, portions of the external fixator can be modified to provide better visualization and access. For example, the pin trolleys can be locked to the rail, and the compression/distraction rod removed. Such modifications should be completed before prepping and draping. If the external fixation pins are close by the locking site, it may be advisable to insert the locking screws from the medial side, to avoid surgical proximity to the colonized pin sites. This may be problematic in the diaphysis, due to proximity of the femoral artery. In order to minimize the risk of infection after inserting the locking screws, a meticulous prep and drape procedure is recommended: wash the leg and fixator with antimicrobial soap and then rinse with saline or alcohol. Next, prep the skin and the fixator with an alcohol-based iodine or chlorhexidine solution, painting the pin sites last. Apply sterile drapes, and then take Betadine- or chlorhexidine-moistened sponges and wrap each pin site in them to isolate the contaminated pin-skin interface. Apply sterile towels to those parts of the external fixator that can be covered, minimizing the exposure to less than fully sterile components. Change gloves, and then begin the procedure. Once the interlocking screws are inserted, and the wounds sutured and dressed, the fixator may be removed. Postoperatively, limit weight bearing to 25 % of body weight. Advance to full weight bearing when there is healing in at least two out of four cortices in the AP/LATERAL views of the regenerate bone.
2.
Pearls (Fig. 1.2A-F)
If regenerate bone formation is poor at the time of distal nail locking and fixator removal, consider concentrated bone marrow injection to the regenerate. Several commercially available systems are present, such as the BioCUE (Biomet, Warsaw, Indiana, USA) or Magellan (Arteriocyte Medical Systems, Hopkinton, Massachusetts, USA).
With a monolateral fixator, the femur is sometimes pushed into varus alignment. Once the rod is locked and the fixator removed, all or part of the varus will realign itself, as there is no longer a moment from the fixator pushing the bone into the varus position.
Elective removal of the internal rod may take place 1 year later, provided there is healing of all four cortices as seen on AP/LATERAL radiographs. Dynamization can be performed by removing the distal locking screws provided at least two cortices are solidly healed.
Deep infection can occur early or late. If early, then use suppressive antibiotics until all the length is achieved. When locking, consider nail exchange for an antibiotic-impregnated cement-coated locked nail. Alternatively, lock the original nail, with plans to do a nail exchange when the pin sites are well healed. For late infections (defined as infections that present after there is solid healing of at least two cortices of the bone), rod exchange with an antibiotic-impregnated bone cement-coated chest tube nail (with a guidewire core) can be done. When exchanging an infected nail, thorough reaming of the canal and debridement of sinus tracts is required.
1.2 Tibial LON
1.2.1 Indications
1.
Tibial LON is indicated for skeletally mature individuals with leg length discrepancy of up to 10 cm in straight bones (no deformity), a reamable intramedullary canal, and no active infection.
A stable knee and ankle are prerequisite. It is possible to bridge with the external fixator across the foot to prevent equinus/subluxation.
In the face of knee instability, it may be necessary to do a preliminary, staged ligamentous reconstruction procedure.
Tibial LON is almost always done with antegrade nailing. Occasionally, retrograde nailing is indicated, as in the case of a fused ankle that can be nailed from the bottom up. Simultaneous ankle fusion and diaphyseal tibial lengthening may be accomplished with the LON technique.
2.
For select patients, mild to moderate angular or rotational deformities may be acutely corrected with the intramedullary nail.
Proximal femur deformities of mild severity, less than 10° (varus, valgus, rotation), can be corrected through a proximal tibial osteotomy that will also function as the lengthening site.
Diaphyseal and distal metadiaphyseal deformities need to undergo preliminary correction and nailing, to be followed 6–12 months later by LON. In such cases, once the osteotomy is healed, the nail is unlocked distally, a corticotomy is done around the nail in the proximal metadiaphysis, and external fixator is mounted on the tibia for LON.
The decision to correct deformities with a nail, often called “fixator-assisted nailing” or FAN, is discussed elsewhere in this book. In some cases, FAN can be combined with simultaneous LON. The osteotomy must be planned to be at a level that will take into account the final position of the end of the nail tip after it has fully retracted at the end of lengthening. The nail tip must be at least 10 cm beyond the lengthening site in order to provide sufficient stability in the far fragment. If the deformity is at a level that would not permit this, then the FAN should be staged, rather than simultaneous with the LON. Another alternative for this is the method known as “lengthening and then nailing” (LATN). For LATN, an external fixator is used to achieve lengthening, and then a locked nail is inserted after lengthening has been achieved to maintain the correction, and allow early removal of the fixator. The biggest challenge for LATN is applying a stable fixator in such a way as not to interfere with subsequent nail insertion.
Pearl: The primary indication for LATN rather than LON in the tibia is for extensive limb lengthening in dwarfism where the starting length of the bone is very short.
1.2.2 Examination/Imaging
1.
Assess the limb length discrepancy (LLD): Ask the patient to stand, feel the iliac crests, and insert various size lifts under the short limb until the iliac crests are palpable at the same level.
2.
Assess joints: The hip, knee, and ankle must all be assessed preoperatively for documentation purposes. Limited knee flexion may be a contraindication to nailing the tibia, if the degree of knee flexion would not permit nail insertion. Retropatellar nail insertion may be feasible in cases where knee flexion is limited, provided the surgeon is experienced in retropatellar nailing.
3.
Assess muscle function: Preoperative documentation of muscle strength and range is essential.
4.
Assess the neurovascular status: It is essential to document neurovascular function before surgery. Neuropraxia, particularly of the peroneal nerve, can develop during tibial lengthening. Document sensation of the saphenous nerve, superficial peroneal nerve, deep peroneal nerve, sural nerve, and medial/lateral plantar nerves. If compromised nerve function is preexistent as a result of scarring or trauma, consider simultaneous nerve decompression (peroneal nerve decompression or tarsal tunnel release).
5.
Assess the soft tissues: Scar tissue is less compliant than supple skin and may limit joint motion. Scarring around nerves (as in the tarsal tunnel) from prior surgery may be asymptomatic but can become problematic under the stress of stretching the nerves and scar during limb lengthening. Consider prophylactic tarsal tunnel or peroneal nerve decompression in such cases. Preexisting equinus contracture (less than 10° possible dorsiflexion) of the gastrocsoleus needs to be addressed with a tendon lengthening or recession.
6.
Radiographic assessment: Long-leg films with an appropriate size lift under the short leg are required. The ideal film shows both hip joints, both knee joints, and both ankle joints on the same, long, cassette. A magnification marker should be taped to the leg at the level of the bone for accurate measurement of the LLD.
Long-leg standing radiographs: Provide information about limb length and frontal plane deformity.
Long lateral radiographs of the entire limb: Show sagittal plane deformity and sagittal plane malalignment about the knee.
7.
Common radiographic angles:
Lateral distal femoral angle (LDFA): Angle defined by the mechanical axis of the femur and the knee joint reference line. Normal is 85–90°.
Medial proximal tibial angle (MPTA): Angle defined by the mechanical axis of the tibia and the knee joint reference line. Normal is 85–90°.
Lateral distal tibial angle (LDTA): Angle defined by the long axis of the tibia in the coronal plane and the distal tibia plafond. Normal is 86–92°.
Anterior distal tibial angle (ADTA): Angle defined by the long axis of the tibia in the sagittal plane and the distal tibia plafond. Normal is 78–82°.
8.
Pearls:
In the presence of complex deformity of the tibia, do a preliminary operation to straighten the bone, transfix it with a locked IM nail, and then rehabilitate the patient. After healing, you may then unlock the nail distally, apply an external fixator, and perform a corticotomy, at a level other than the original osteotomy, around the nail for LON.
Corticotomy can be done around an existing nail and is sometimes necessary as a treatment for premature consolidation. Repeat corticotomy around a tibial nail requires one anterior incision (for the medial and lateral cortices) and one posteromedial incision (for the posterior cortex).
1.2.3 Surgical Anatomy
The surgeon must be comfortable and familiar with all aspects of intramedullary nailing and also with the use of external fixators for lengthening. Most of the surgery is very “percutaneous” so the relevant anatomic considerations are fairly straightforward.
Cutaneous nerves to avoid in tibial LON include the peroneal nerve and its branches, the sural nerve, the saphenous nerve, and the posterior tibial nerve.Related posts:
 Distraction Arthroplasty for Ankle Osteoarthritis
 Hybrid Lengthening Techniques: Lengthening and Then Nailing (LATN) and Lengthening and Then Plating (LAP)
 Congenital Pseudarthrosis of the Tibia: Redefined (Congenital Crural Segmental Dysplasia)
 Pelvic Inlet Reconstruction for Obstruction Associated with Lumbosacral Agenesis Utilizing Distraction Osteogenesis and Circular External Fixation
 Pelvic Support Osteotomy (PSO): Indications, Limits and Complications
 Reconstruction of Segmentary Defects in Chronic Osteomyelitis Using the Combined Technique

Stay updated, free articles. Join our Telegram channel

Full access? Get Clinical Tree


