“Subperichondrial-subperiosteal dissection technique (SSDT) decreases soft tissue injury to a minimum by protecting soft tissues from dissection and retraction traumas. The fact remains that dissecting the perichondrium of the nasal tip cartilages is not effortless. Cartilages may be harmed if dissection is not initiated at the right location. The aforementioned surgeons have routinely used the SSDT between the years 2008 and 2019 in more than 4000 rhinoplasties. The number of the surgeons making use of the SSDT will increase with the understanding of the key points in dissection, their ordering, and use of correct instrumentation.”
Key points
- •
Subperichondrial-subperiosteal dissection in rhinoplasty ensures minimal trauma to soft tissues.
- •
This plane of dissection provides better healing by avoiding fibrosis and preserving the important ligament system of the nose.
- •
It generates a cover over the reconstructed osseocartilaginous framework.
- •
The learning curve may seem steep but, once mastered, this technique is faster compared to sub-SMAS plane.
- •
Respecting the key points in dissection and appropriate instrumentation are important.
Introduction
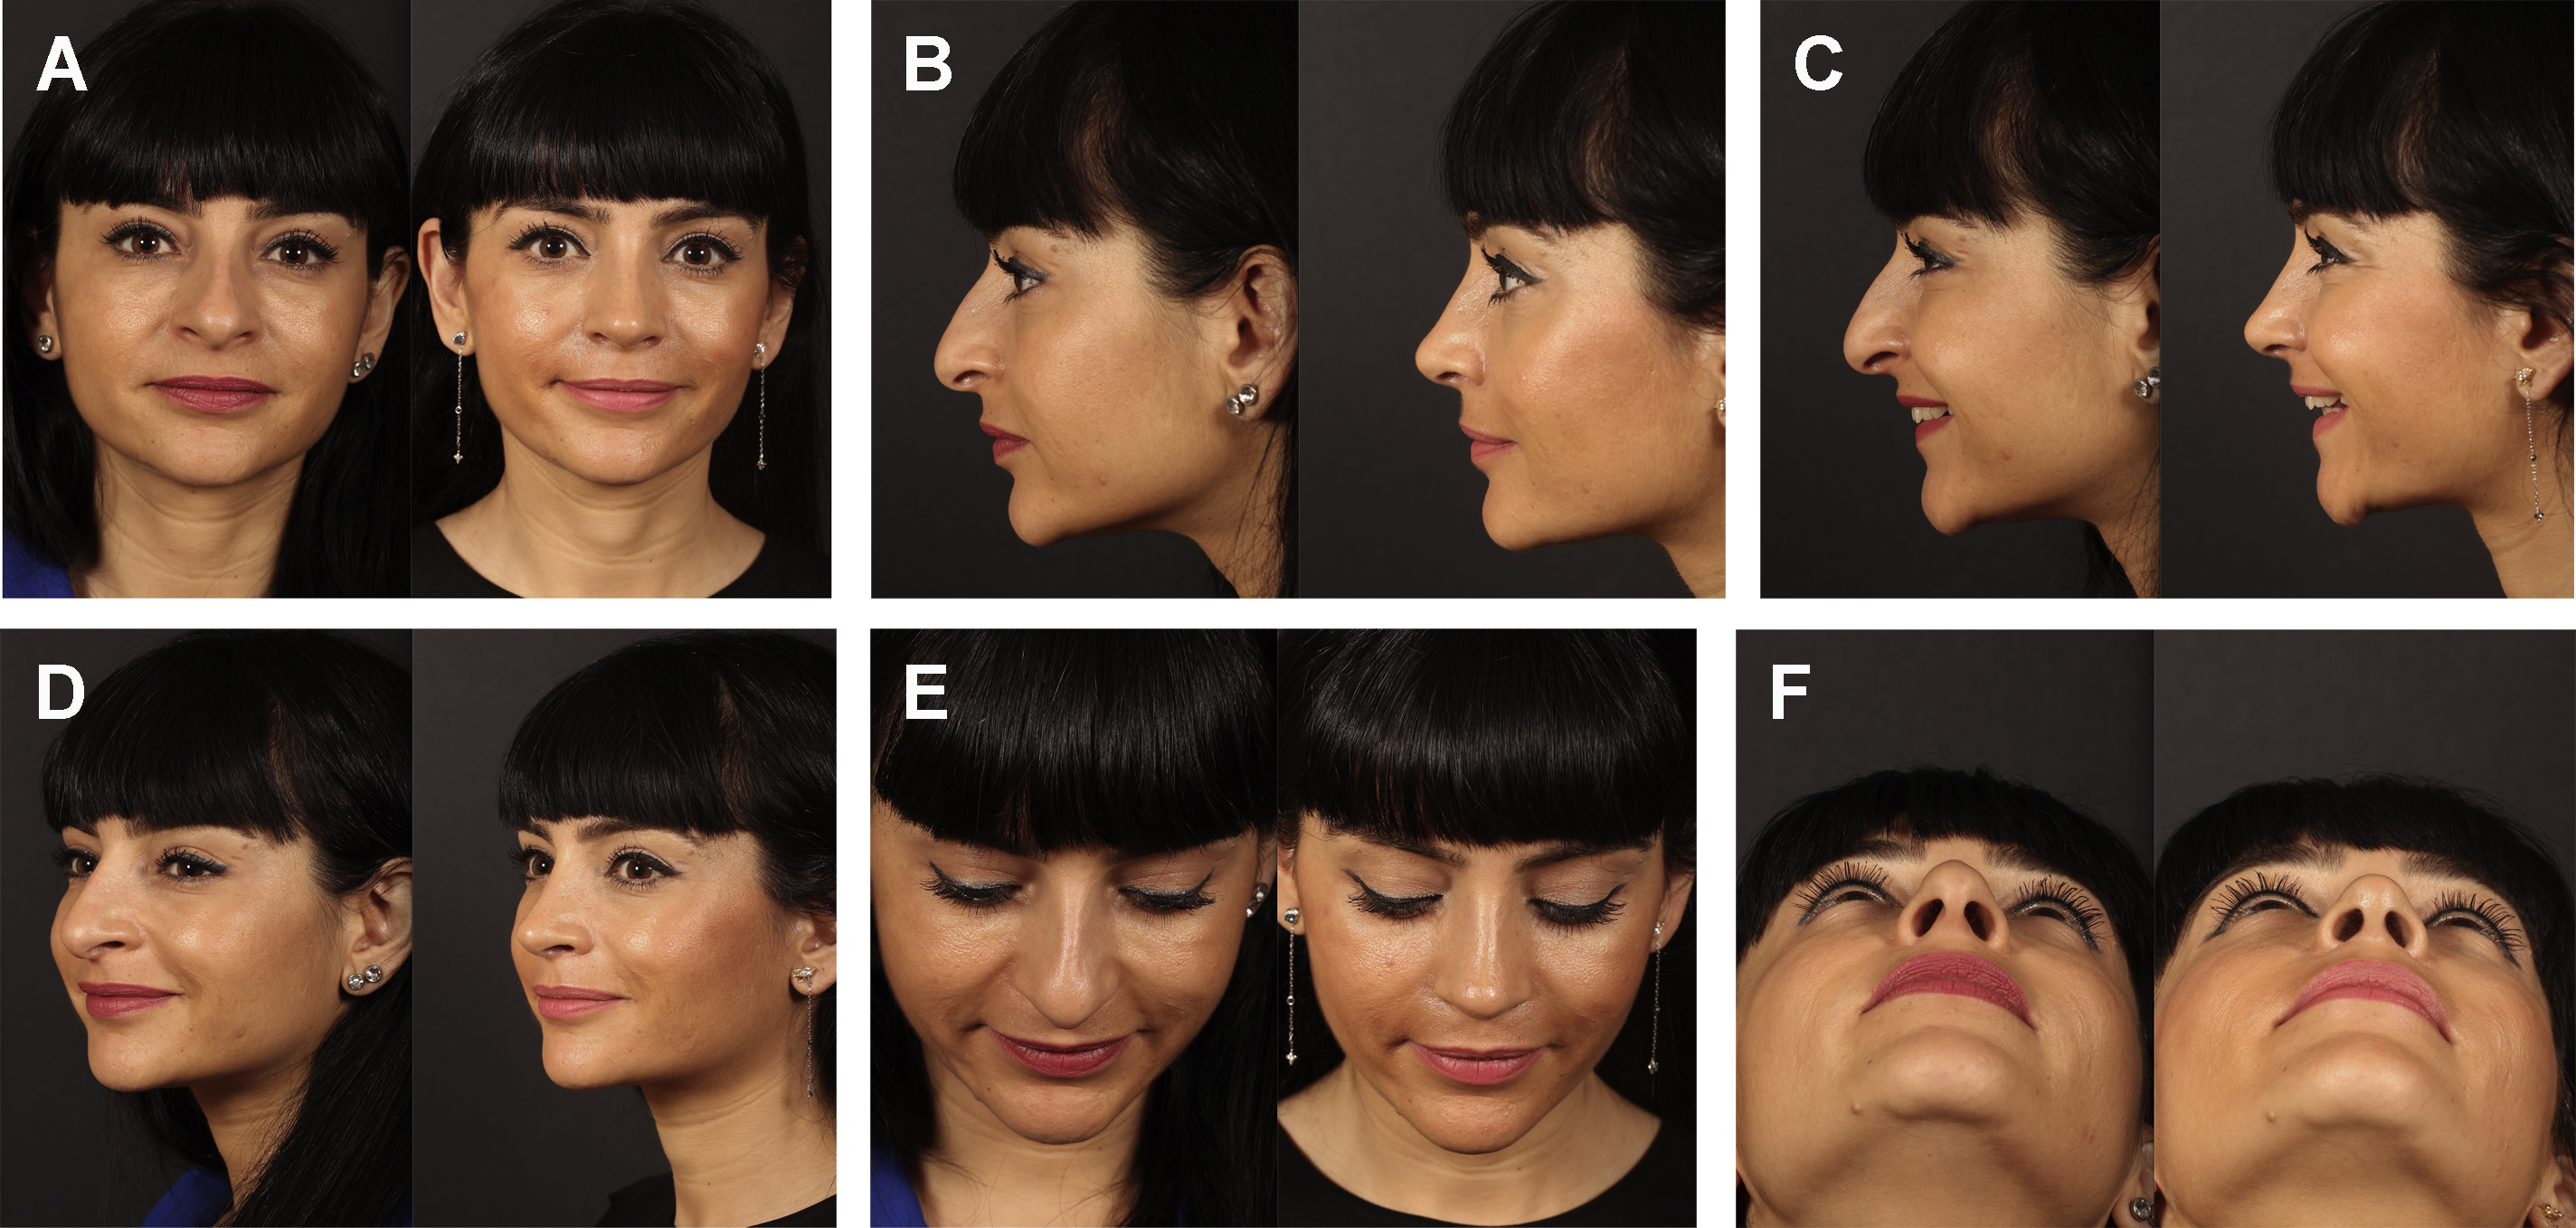
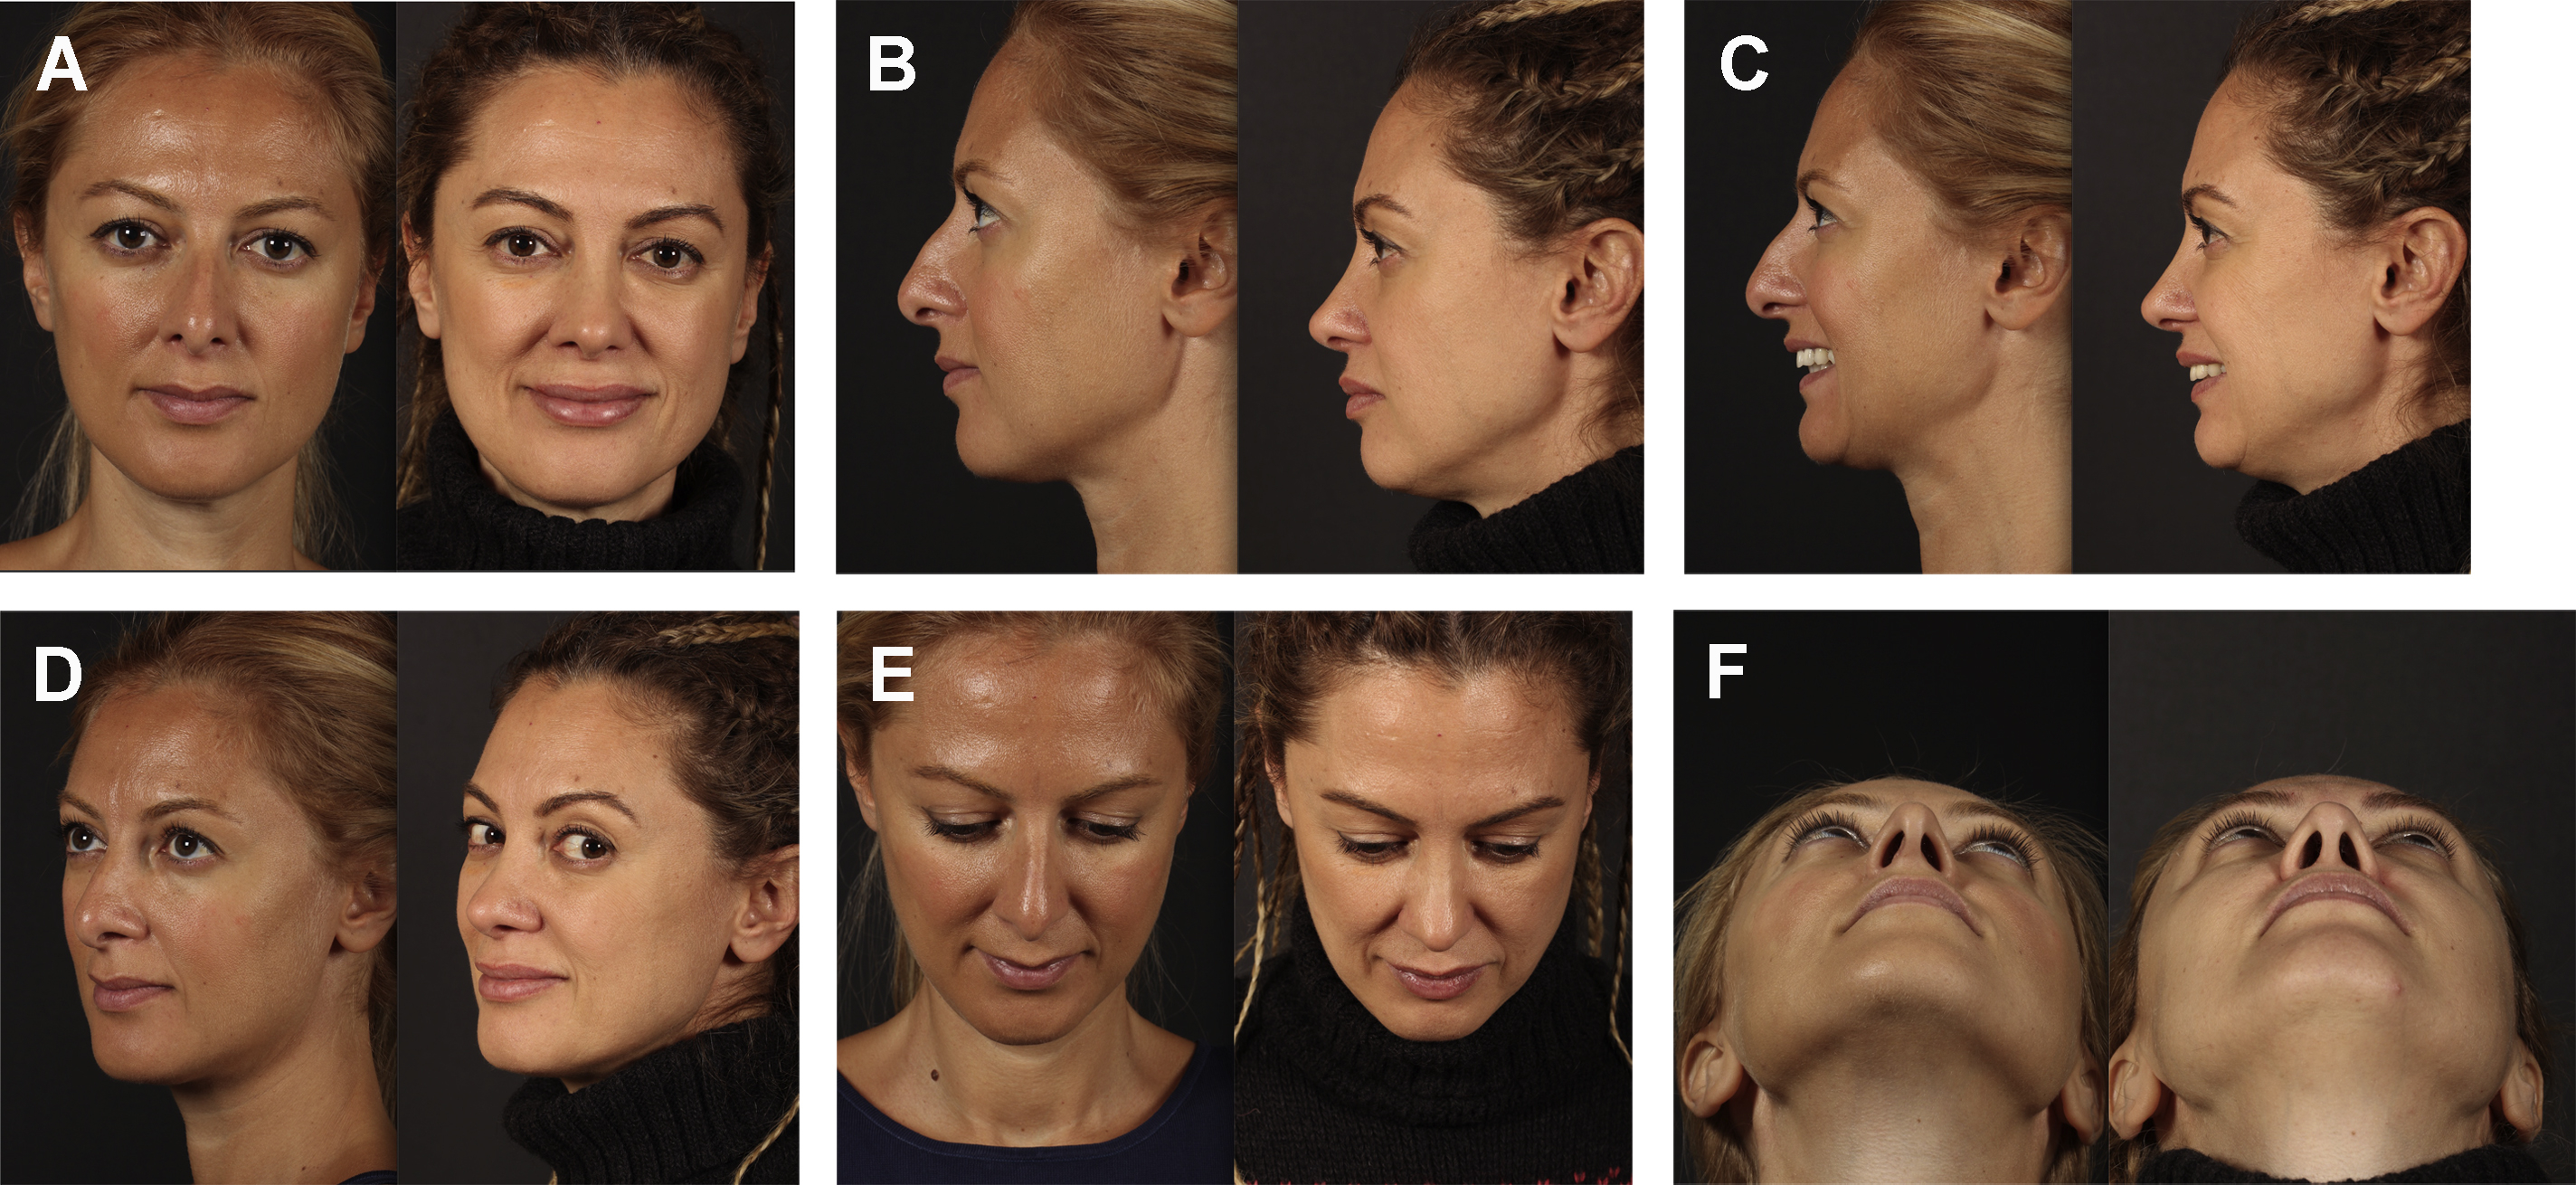
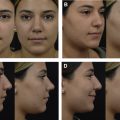
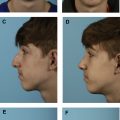
The subperichondrial-subperiosteal technique (SSDT) has started to gain popularity after the year 2013. In SSDT, the perichondrium and periosteum protect the adipomuscular layer of the nose from dissection and retraction trauma, and thereby minimizes soft tissue injury. Faster healing can be achieved in primary rhinoplasty patients. The 20-day postoperative result of a primary rhinoplasty with SSDT can be seen as an example ( Fig. 1 ). Preservation of the scroll and Pitanguy ligaments was achievable with the dissection of the perichondrium. The positive effect of the Pitanguy and scroll ligaments on projection and definition of the nasal tip has started to gain acceptance in the scientific arena. By means of the preservation of the ligaments, the need for soft tissue resections or onlay tip grafts is rare. It is possible to achieve satisfying results in the long term with the SSD technique. The postoperative 7-year result of a patient with SSDT can be seen in Fig. 2 .
There is a learning curve of SSDT. Especially the dissection of the perichondrium of the nasal tip cartilages is not easy. Cartilages can be injured if dissection is not commenced at the correct location. Many surgeons have reported feedback such as “I have difficulty in getting under the perichondrium over the nasal dorsum and lateral crura” or “the perichondrium gets torn.” The localizations where it is easier to dissect the perichondrium and periosteum and the surgical instrumentation have been noted down. By way of this article, the authors attempt to see that the SSDT that they have been using since 2008 is used by more surgeons.
Patients and technique
The aforementioned surgeons have routinely used the SSDT between the years 2008 and 2019 in more than 4000 rhinoplasties.
Surgical instrumentation necessary for subperichondrial-subperiosteal dissection technique
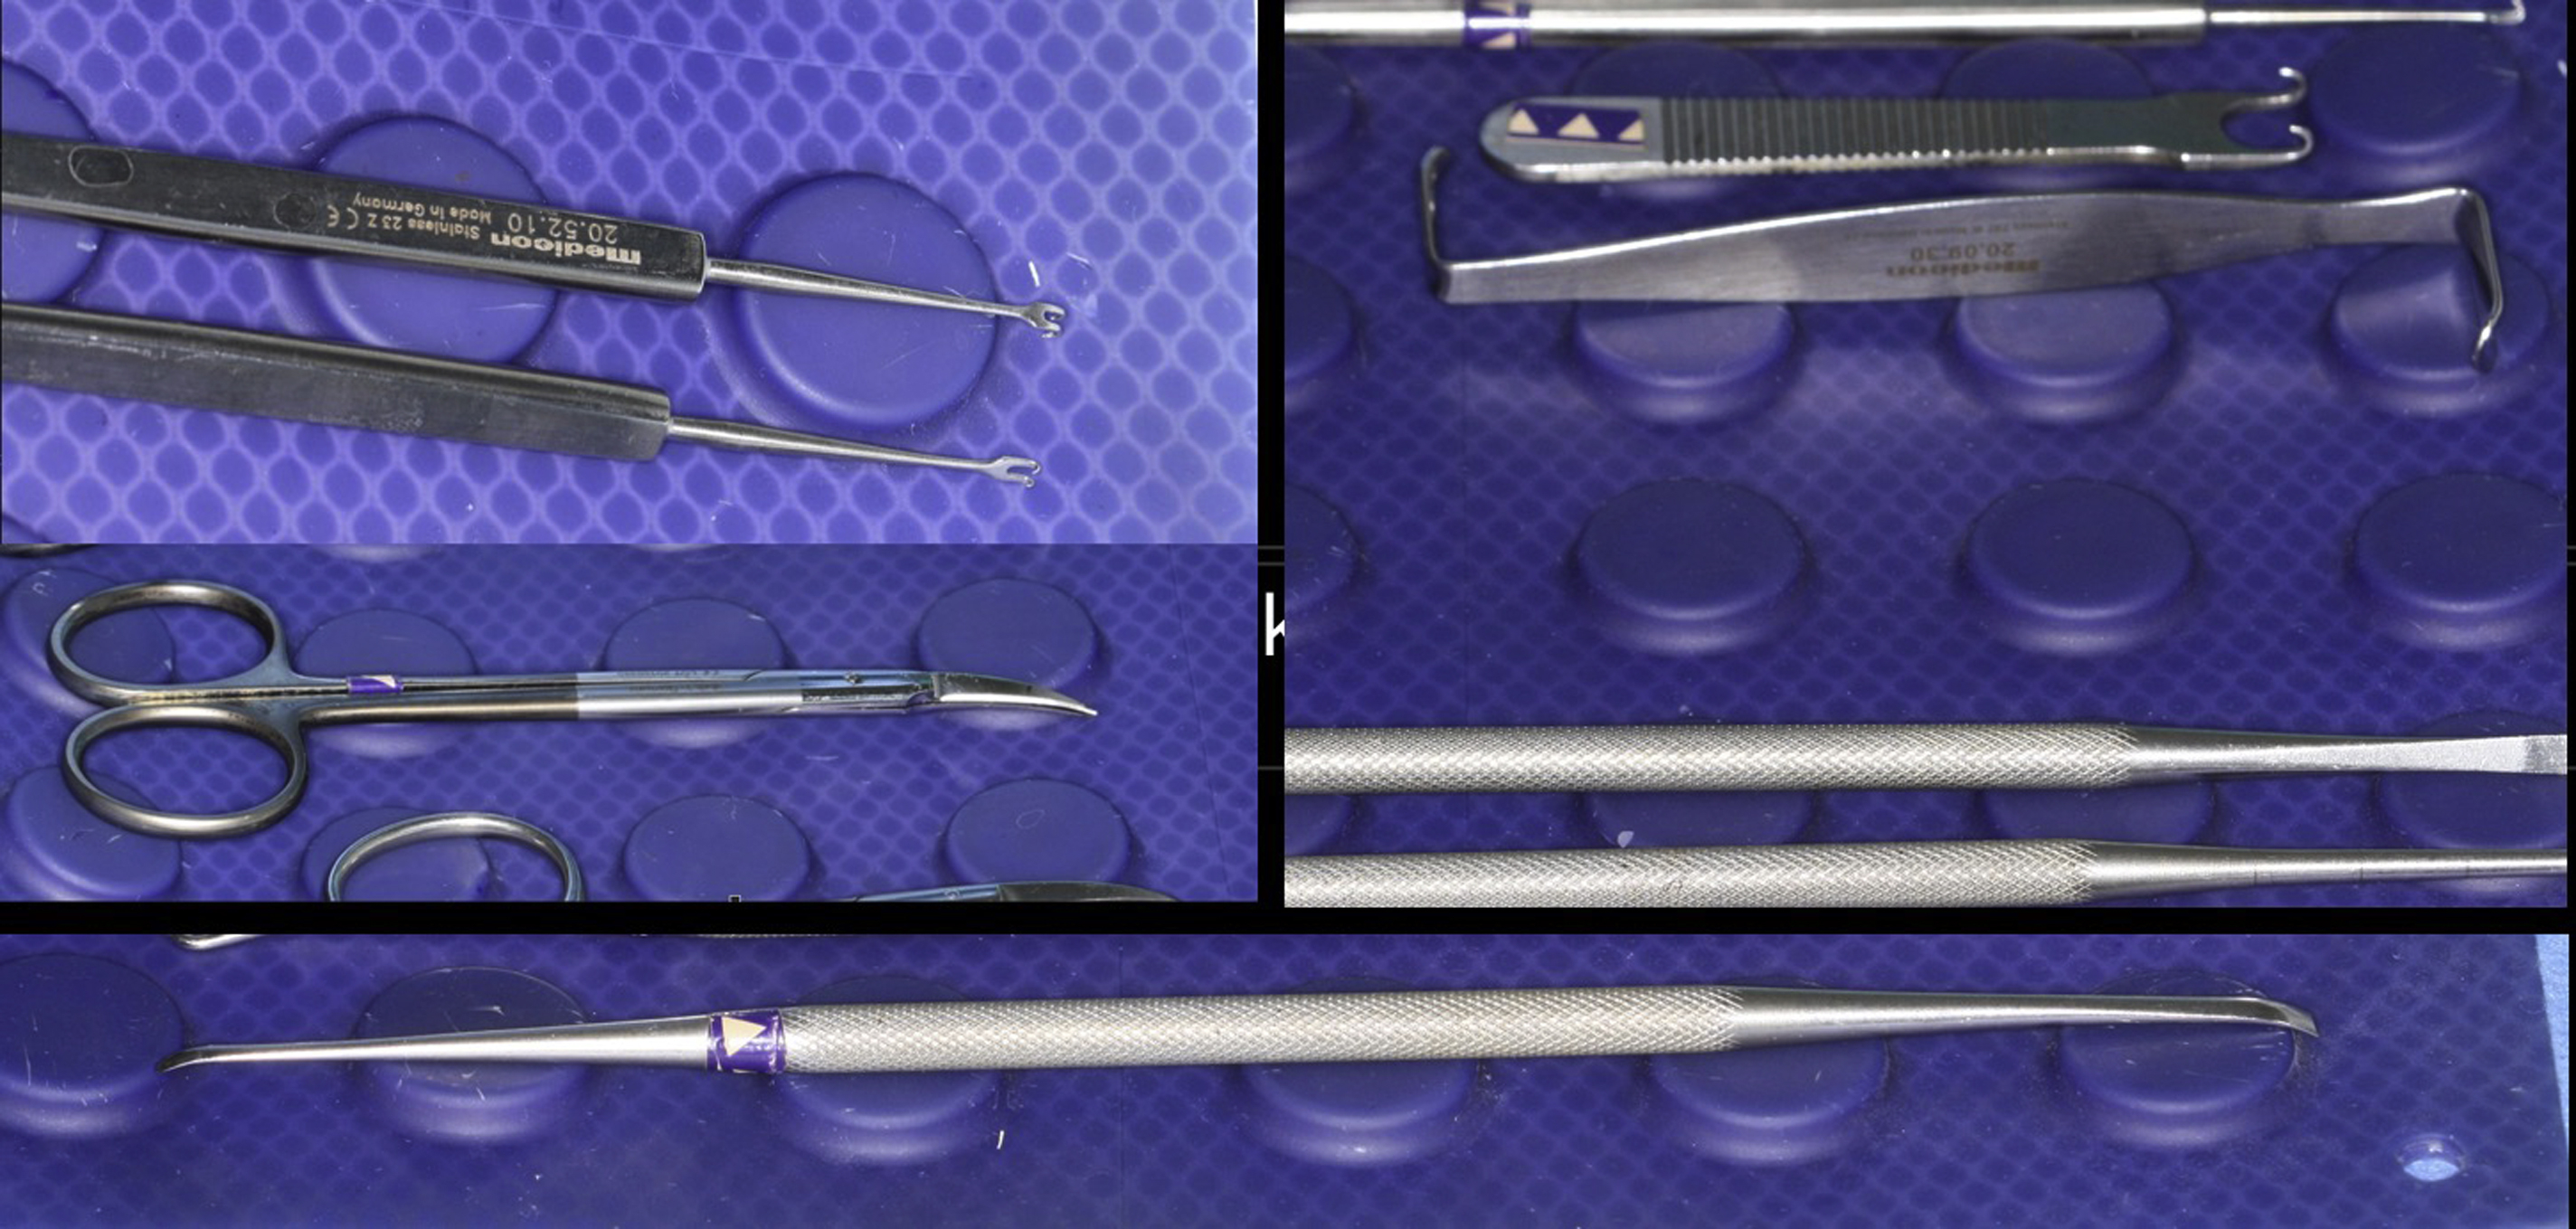
It is troublesome to apply SSDT without using the right instruments in the right order. It is almost impossible to perform the technique with traditional elevators or thick-tipped scissors. The instruments required for SSDT are Crile retractor (Medicon, Germany), Daniel-Cakir elevator (Medicon, Germany), Çerkeş scissors (Marina Medical, USA), double hook retractor (Medicon, Germany) ( Fig. 3 ).
Key points
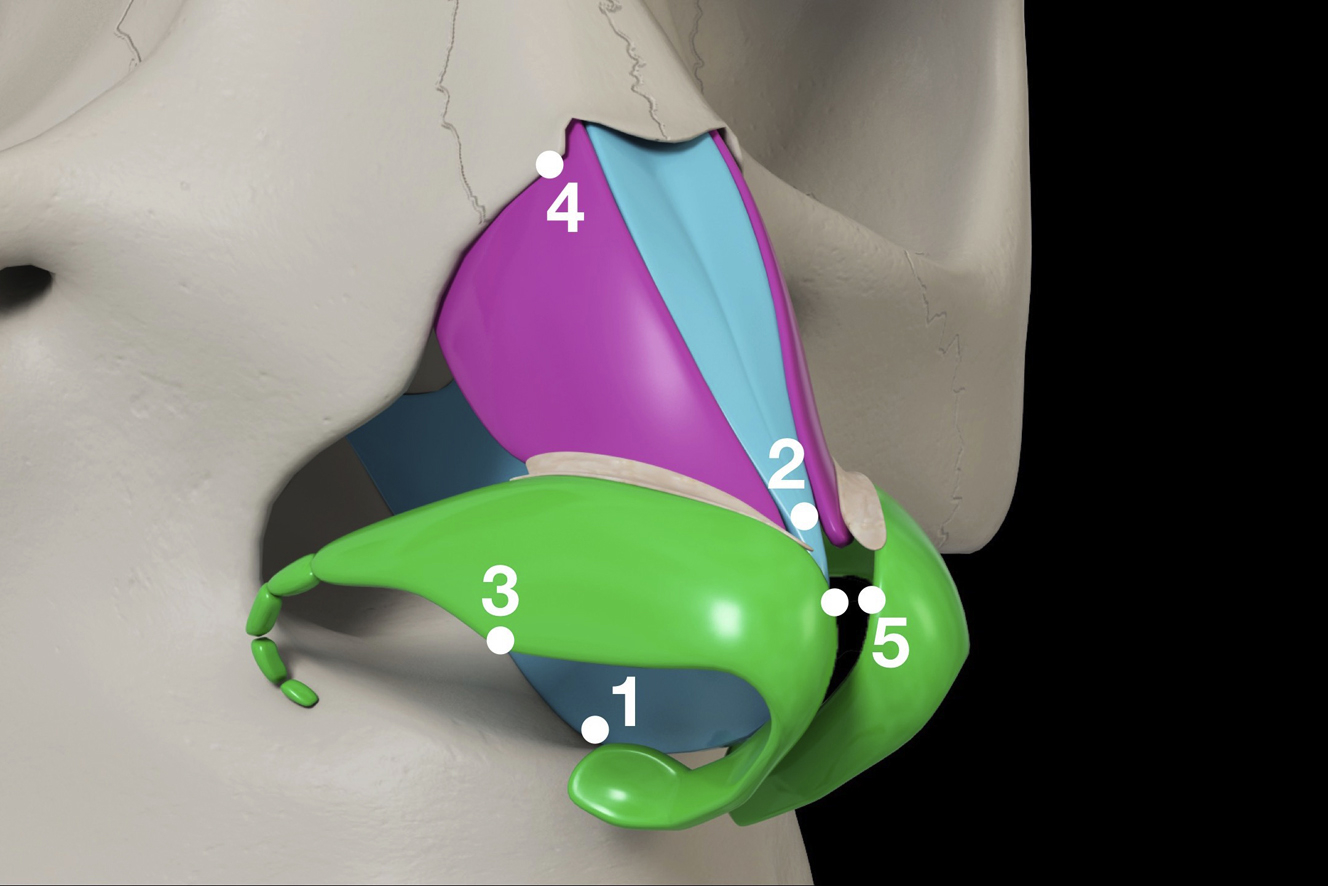
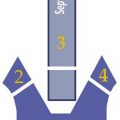
Five principal key points have been identified for SSDT ( Fig. 4 ).
- 1.
Posterior septal angle: the septum is thicker close to the maxillary spine. It is not rare to encounter more than one layer of perichondrium in the floor of the septum. Dissection at the anterior septal angle is difficult because the cartilage is thin and there is a single layer of perichondrium. The septum is reached through a transfixion incision made on the caudal septum ( Fig. 5 A). The caudal septum becomes visible after mucosa is cut at a depth of 1 to 2 mm. The caudal septum is incised so that a 0.5 to 1 mm strip of cartilage is left attached to the Pitanguy ligament that courses along the membranous septum ( Fig. 5 B). The strip of cartilage left attached to the Pitanguy ligament is called “the posterior strut.” After septal caudal resection is finished, projection is controlled by suturing the posterior strut cartilage back to the septum at a desired level. The perichondrium on both sides of the posterior septal angle is scratched with a number 15 blade. This maneuver creates a plane for the elevator to get under the perichondrium. Thin and moderately sharp elevators need to be used at this location. The most convenient instrument is the perichondrial tip of the Daniel-Cakir elevator ( Fig. 5 C). The perichondrium of the posterior septal angle is dissected 3 to 4 mm posteriorly. The elevator is moved toward the anterior septal angle, and the caudal septum is easily revealed ( Fig. 5 D).
- 2.
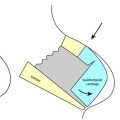
W point: the area where the dorsal septum unites with the upper lateral cartilages is named as the W point by Saban and Palhazi, as it resembles the letter W. The caudal septum should be dissected first to reach the W point. The Crile retractor and the Cerkes scissors (Marina Medical) are indispensable at this stage. The thin end of the Crile retractor is advanced until the internal valve level and the tissues are retracted anteriorly ( Fig. 6 A). The blades of the scissors are held so that they are parallel to the nasal dorsum. The blades of the scissors are opened 3 to 4 mm and closed, and the upper lateral cartilages are reached. Dorsal perichondrium starts from the W point. It is more difficult to find the dorsal perichondrium from the scroll region. The perichondrium is dissected for 1 to 3 mm over the W point with the sharp tips of the scissors ( Fig. 6 B). Dissection is carried out dorsally for 4 to 5 mm with Daniel-Cakir elevator ( Fig. 6 C). The perichondrium of the upper lateral cartilages is dissected until the scroll ligament is encountered with a sweeping movement to the right and left ( Fig. 6 D).
- 3.
Lateral crural turning point: this is one of the regions where the lateral crus is the thickest. Rim flap technique, as the posterior strut, facilitates subperichondrial dissection ( Fig. 7 A). After the incision, small double hooks are placed to the mucosa of the lower lateral cartilage, and care is given not to pierce the cartilage. The assistant is asked to pull the hooks inferiorly. The skin is elevated with microforceps. Perichondrium is rendered visible along the caudal edge using the reverse side of number 15 blade ( Fig. 7 B). A pocket big enough for the Daniel elevator is created with Cerkes scissors ( Fig. 7 C). The Crile retractor is placed, and the perichondrium is dissected 2 to 3 mm with the Daniel elevator. The thin end of the Crile retractor is placed into the pocket formed with the Daniel elevator. Although the Crile retractor is held with the thumb and index finger, the middle finger pushes on the skin. The lateral crural perichondrium is squeezed between the skin and elevator and pulled to the side. This maneuver facilitates and speeds up the dissection of the lateral crus ( Fig. 7 D). When the dissection reaches the dome, the hooks are placed right under the dome and pulled downwards ( Fig. 7 E). When the dome is passed, the assistant pulls the hooks cranially and the medial crura are dissected ( Fig. 7 F).
- 4.
Lateral keystone: the cartilaginous dorsum and upper lateral cartilages have been dissected from the W point. The lateral crus is pushed posteriorly, the vertical scroll ligament is dissected off the SMAS and the upper lateral cartilage plane is reached ( Fig. 8 A). Dissecting the bony dorsum from the midline is more difficult. Dissecting the sides is easier. The caudal edge of the bone is encountered with subperichondrial dissection as the upper lateral cartilages go under the bone ( Fig. 8 B). The caudal edge of the bone has a sharp structure. The sharp periosteum tip of the Daniel-Cakir elevator is used to scratch the caudal edge of the bone and the periosteum is easily cut between the sharp edge of the bone and the sharp tip of the elevator ( Fig. 8 C). Tightening up the skin of the upper lateral cartilages with a Crile retractor aids periosteal dissection. Limited or wide dissection is carried out according to the planned nasal dorsum technique ( Fig. 8 D). After the contralateral side is dissected, the periosteum of the bony cap is cut with a periosteal elevator. The midline is dissected, and the dissected right and left sides are united.
- 5.
The medial perichondrium of the domes: a window is created between the 2 layers of the Pitanguy ligament to deliver and suture the nasal tip cartilages. In this way, the Pitanguy ligament is preserved. For this procedure, small hooks are placed under both domes and pulled laterally and handed to the assistant. The nostril apex is retracted with a Crile retractor. Scissors are used to dissect 1 to 2 mm from where the perichondrium of both domes end ( Fig. 9 A). In cases where the tip needs to be narrowed, 1 to 2 mm perichondrium of the dome may be left attached to the deep Pitanguy ligament ( Fig. 9 B). This 1 to 2 mm perichondrium may be resected. Approaching from the nostril close to the surgeon, a window is created using scissors, with the blades of the scissor’s vertical to the face ( Fig. 9 C, D). In this way, the deep layer of the Pitanguy ligament is left below and the superficial layer above. Especially in patients in whom the lobule is to be elongated, dissection is continued superiorly to create a big enough space. Supratip breakpoint will form where the dissection ends. Marking the projection of the end of the dissection helps the surgeon and roughly shows the breakpoint. Supratip breakpoint is approximately in the middle between the tip and K point. The window between the 2 layers of the Pitanguy ligament is widened until the footplates to allow for the delivery of the domes ( Fig. 9 E). Tip surgery can easily be performed by preserving the Pitanguy ligament ( Fig. 9 F). When the tip surgery is finished, if the supratip breakpoint is prominent more than necessary, the dissection is continued cranially. If this is not sufficient, the lateral crural cephalic resection cartilages can be crushed and placed over the Pitanguy ligament. The Pitanguy ligament may be needed to be cut in patients with thin skin and over projection.
Related posts:
 Combined Functional and Preservation Rhinoplasty
 Preservation Rhinoplasty
 Incorporating Dorsal Preservation Rhinoplasty into Your Practice
 Dorsal Preservation Rhinoplasty
 Piezoelectric Osteotomies in Dorsal Preservation Rhinoplasty
 Conventional Resection Versus Preservation of the Nasal Dorsum and Ligaments
Stay updated, free articles. Join our Telegram channel

Full access? Get Clinical Tree


