Part I – Midface Implants
Changes associated with aging produce midfacial and lower facial ptosis that can begin in the late third decade. Many novice and some accomplished surgeons do not appreciate the subtleties of volume loss, and patients are frequently made to look tighter but not younger by “pulling the skin.” Appreciating the pathophysiologic changes associated with aging allows the cosmetic surgeon to diagnose and treat a variety of aging changes in the middle and lower face.
Treatment options for midfacial rejuvenation include lifting procedures, injectable fillers, autologous fat, orthognathic skeletal surgery, and facial implants. Each treatment option carries advantages and disadvantages but midface implants are an optimum choice in the average patient for numerous reasons. Injectable fillers are temporary, and fat or permanent fillers will move with the sagging soft tissues with aging. Lifting procedures will eventually relapse. Facial implants are unique in that they provide a three-dimensional (3D) augmentation, are permanent and reversible. This sounds like an oxymoron, but in fact, when placed in the subperiosteal plane and anchored to the facial skeleton with screw fixation, there is nowhere for them go. They will not descend or displace with the rest of the soft tissues of the aging face; hence they are permanent. Silicone implants are also reversible and can easily be removed or replaced because they become surrounded with a well-defined tissue capsule, and removal generally only takes minutes. There are very few mainline cosmetic procedures that can boast being permanent and removable!
Facial implants come in a vast array of shapes, sizes, and materials that make them suitable for almost every patient in a stock “off the shelf” configuration. They can also be fabricated with computer-assisted design/computer-assisted manufacturing (CAD-CAM) technology for custom applications, which are discussed below.
Numerous materials exist for US Food and Drug Administration (FDA) approved implants. The most commonly used materials are silicone rubber, expanded polytetrafluoroethylene (ePTFE; Gore-Tex), and porous polyethylene. These implants are all biocompatible, and although any implant can be successful when properly integrated, each material has advantages and disadvantages ( Table 7.1 ).
| Silicone | Porous polyethylene |
|---|---|
| Simple to remove, firm fibrous capsule | Difficult to remove due to tissue integration |
| Flexible | Not flexible, can easily fracture |
| Cannot fragment | Easily fragmentable |
| Easily folded into a small incision | Cannot be folded into a small incision |
| Easily conforms to underlying anatomy | Rigid, does not conform to underlying anatomy |
| Easily accepts a fixation screw | Harder to place screw, may fragment |
| Easy to trim with scissors | Difficult to trim |
Many surgeons utilize porous polyethylene implants, but these can have significant drawbacks. Being rigid, they do not conform to underlying bony anatomy like flexible implants. Since they are rigid and porous, they can be difficult to trim or drill and frequently break or fragment. When placing flexible implants, smaller incisions can be utilized, and the implants can be twisted and bent to facilitate insertion; whereas a rigid implant requires a larger incision or a two-piece configuration that is inserted one side at a time and joined in the middle. Most of these drawbacks are noncritical, but the biggest drawback to porous polyethylene implants is their difficulty of removal. The porous nature of the material induces extreme tissue integration. This can be a positive influence in terms of stabilizing the implant in a case where it never needs removal or adjustment, but presents extreme difficulties when attempting removal. Implant removal can be very traumatic and removal frequently disrupts muscle and other soft tissue that become attached to the implant surface. This can also damage surrounding nerves that become entrapped in the tissue mass. These implants can become so adherent that they fragment upon removal, leaving tiny remnant pieces that are difficult to completely debride or remove. I know surgeons who are very satisfied with this material and say they never take them out. If someone places a few implants, their success rate may be high with rare removal, but extremely busy implant surgeons will have to service their own implants from time to time as well as service complications from other surgeons. Having removed scores of porous polythene implants, I can testify to the difficult and destructive nature of removal. Silicone rubber implants remain the easiest implants to remove because of their well-developed dense, thick fibrous capsules.
Early facial implants were crude and non-anatomic and the earliest ones had to be hand-carved table-side. The last part of the 20th century brought a refinement of both implant form and placement. Contemporary midface implants are anatomic in that they are specifically constructed with anatomic shape and the underside is anatomic in the sense that it is fabricated to conform to the underlying bony anatomy. Modern silicone implants are available in many sizes and shapes and have different indications dependent upon the aesthetic need. These anatomic implants have also given way to more conservative surgical approaches that, again, are designed to provide targeted, precise, and natural-appearing augmentation specific to various regions of the face. About 20% of my facelift patients request cheek or chin implants and in reality, 80% could have benefited from them, but did not choose the option. Occasionally, I will provide cheek or chin implants free of charge if the patient cannot afford them, because they improve the results so noticeably that the marketing effort offsets my cost. Contemporary surgeons understand the importance of volume replacement as part of comprehensive rejuvenation and facial implants are an excellent addition to any facial rejuvenation procedure.
Implant Selection
The greatest challenge for the novice implant surgeon is understanding what implants to use and where to put them. Although this is related to personal preference and experience, I use three main configurations for midface implants, which are effective for almost all cosmetic patients.
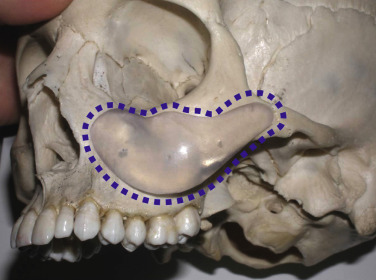
The main contributor to midface volume is the malar fat pads. They lie in the cheek with the base on the nasolabial fold and the apex on the malar region ( Fig. 7.1A ). The malar fat pads provide volume across the entire midface and with age, become atrophic and ptotic. The basis of implant selection lies in the recognition of where the aging changes have occurred and which implant would best restore youthful volume to that area. As patients age, they lose volume in the midface region. Volume loss can occur in the infraorbital region, the malar/submalar region, and the zygomatic region ( Fig. 7.1B ).

The submalar area includes the hollow area of the infraorbital, anterolateral maxillary, and canine fossa regions. If the surgeon pays close attention, they will notice that loss of facial volume represents early aging change (late third, early fourth decade) that is apparent in virtually all patients regardless of gender. I tell my patients that anyone over 35 is a candidate for some type of midface augmentation. Since the midface is subject to early volume loss, implant rejuvenation is technically reinflation.
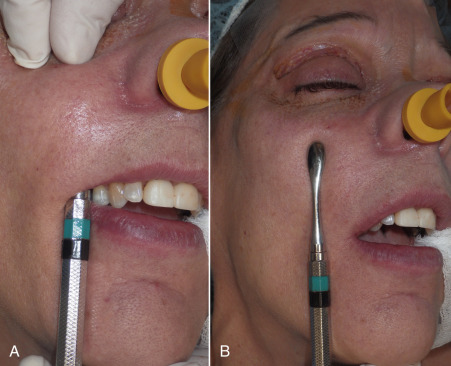
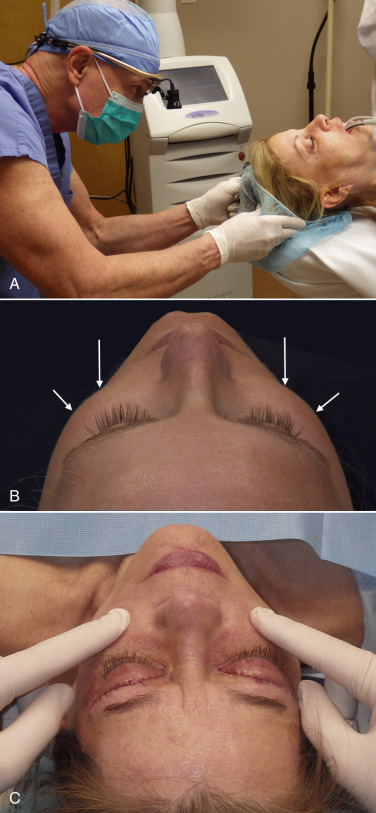
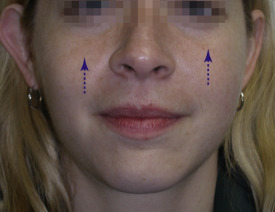
Most patients and many aesthetic practitioners are unaware of this midfacial volume loss after the third decade. If the surgeon hands the patient a mirror and asks them to smile, the ptotic tissues are elevated, which produces a more youthful look. This simulation will cause many patients to comment. If you hold the elevated tissues in place with your thumb and index finger and ask the patient to relax their smile, the midface volume quickly drops to its aged position lower in the face when the fingers are relaxed. In essence, the youthful cheek fat later becomes the jowls with aging. As mentioned previously, the most efficient means of pointing out midfacial volume loss and the result that cheek implants would have is to recline the patient in the exam chair. This will “reposition” the aging and ptotic tissues to a more youthful position and can be used to illustrate aging and improvement and serve as a “surgical prediction” ( Fig. e7.1 ![]() ). It is common for patients to bring photos to a consultation showing their youth and 100% of the time one of the biggest changes is midface deflation.
). It is common for patients to bring photos to a consultation showing their youth and 100% of the time one of the biggest changes is midface deflation.
Midface Diagnosis and Implant Selection
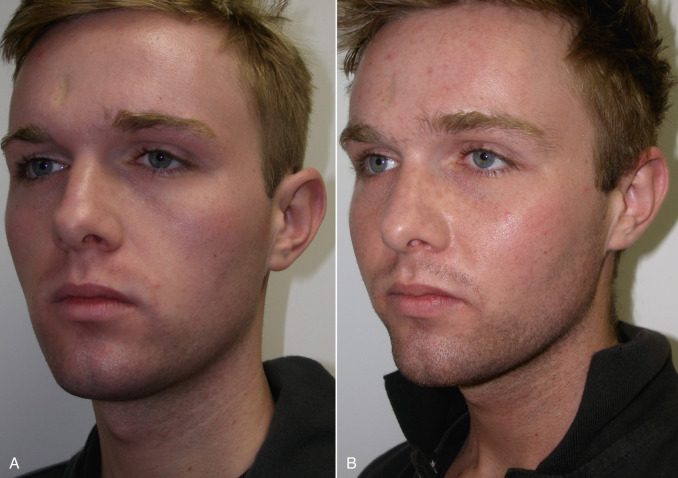
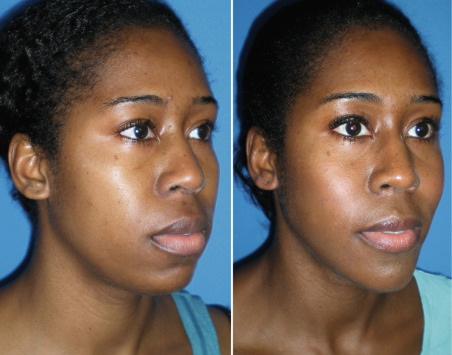
The most common midfacial aging change in younger patients is volume loss in submalar region. It is not uncommon for these patients to have a deflated submalar region , but adequate and well-defined zygomatic and malar aesthetics. That is to say that despite having lost submalar volume, they have adequately projected cheekbones. My best implant choice for treating this area is the Submalar Implant (ImplanTech Inc., Ventura, CA). I use this implant in about 95% of my patients, as it is very versatile for younger and older patients. My most commonly utilized configuration is the Binder Type 2 silicone submalar implant ( Fig. 7.2A ). This is a general duty midface implant and can be utilized in all age groups. The average size is medium for small stature patients, large for average patients, and extra-large for bigger patients, or those with more volume loss. The small size is rarely used as it is very small. The ImplanTech line of implants also comes in a configuration known as “Conform” with cross-hatched rows in the silicone to allow for more surface area to bind when healing. Personally, I prefer the Binder Type 2 model.
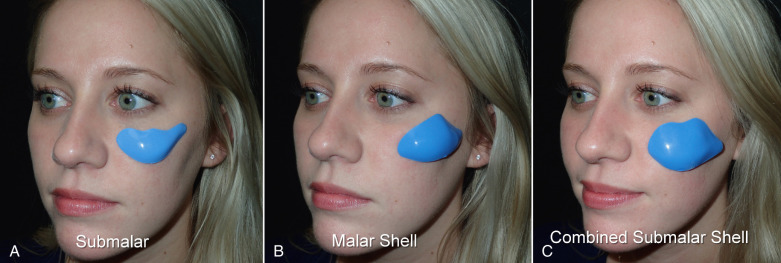
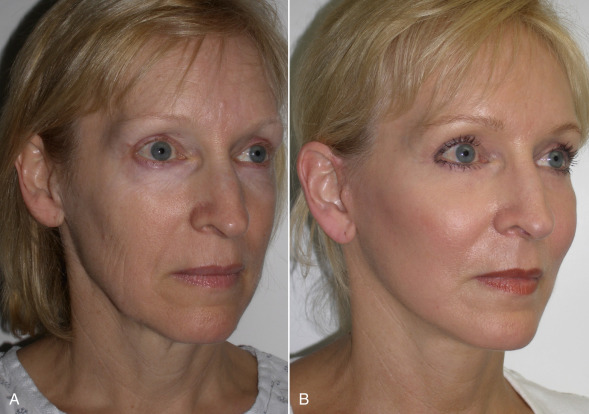
The second type of common facial aesthetic deficiency is apparent in patients who have adequate submalar and anterior maxillary fill but have deficient malar regions . This is the patient who has hypoplasia of the zygomatico–malar regions or simply desires a more defined or “chiseled” appearance, or in layman’s terms, “higher cheekbones.” I treat these patients with the Terino Malar Shell Implant, which I now rarely use ( Fig. 7.2B ). The isolated high cheekbone look was popular several decades ago with the “waif” look, but contemporary patients generally seek a more balanced appearance.
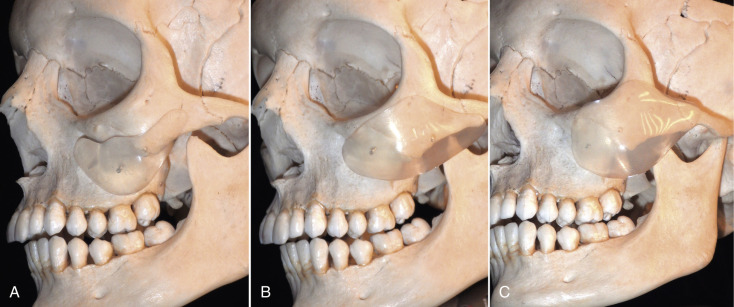
The third type of common midfacial aging change is seen in the patient with submalar deficiency and malar deficiency and this requires combined augmentation. These patients benefit from both anterior maxillary (submalar) fill and malar (“high cheekbone”) augmentation. These can be patients who have lost volume in both areas, or those patients who have underdeveloped skeletal anatomy. Such patients are well suited for treatment with the combined Submalar Shell Implant ( Fig. 7.2C ). This implant is designed to augment the submalar region as well as zygomatic and malar regions constitutes 4–5% of my implant cases. It is actually a combination of the submalar and malar configurations in a single implant. This configuration tends to run large, and generally a small to medium implant is adequate for the average patient. The larger the implant footprint, the larger the surgery and recovery. For decades, I have successfully treated virtually all forms of midface deficiency with the three aforementioned implants. Again, the submalar configuration is 95% of cheek implants I place. Fig. 7.3 shows the common types of midfacial deficiency and Fig. 7.4 shows the approximate skeletal positioning of the described implants.
Preoperative Planning
Prior to surgical placement, the practitioner and the patient must decide upon the area(s) to be enhanced and the size and configuration of the implant. This can be difficult for the novice surgeon, and beginning with easier and more straightforward cases can assist the surgeon with the learning curve. Younger patients with basic submalar implants are a good starting point. Additionally, patients can “test drive implants” by performing midface filler to see how they like the changes before proceeding to a surgical option.
It is important to note, discuss, and document existing asymmetries with the patient before surgery. It is common for patients to have one side of the cheeks or midface bigger than the other. In extreme cases, a medium implant may be placed on one side and a large implant on the other, etc. Most frequently, the degree of asymmetry is such that it does not alter the final result when using the same implant on both sides. To illustrate the difference in symmetry, I keep a picture of me in each consult room that shows my normal portrait and a mirrored image of the right and left halves of my face ( Fig. 7.5 ). The difference is remarkable, and I explain to the patient that the average person has similar asymmetry. I have often had to construct a similar image of a patient to show them their own asymmetry.
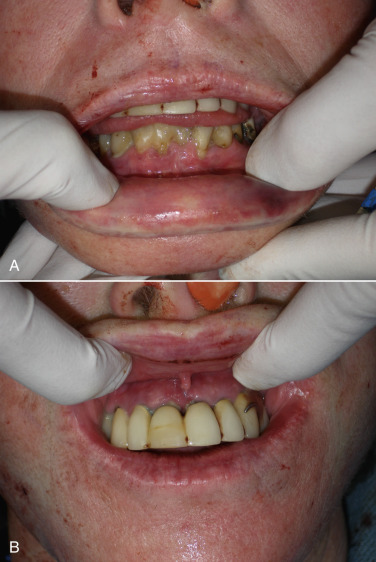
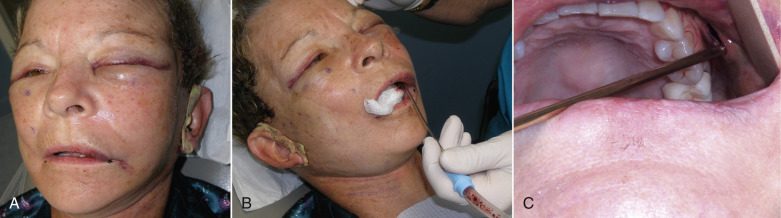
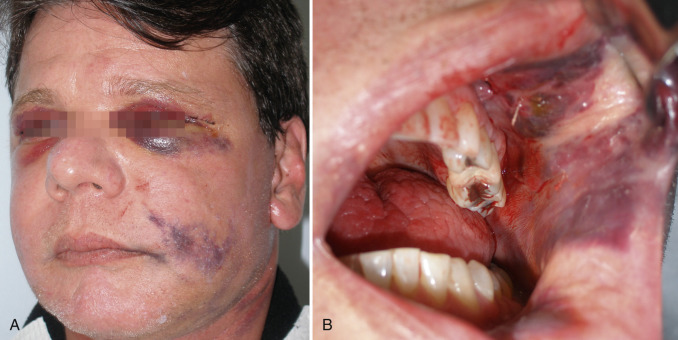
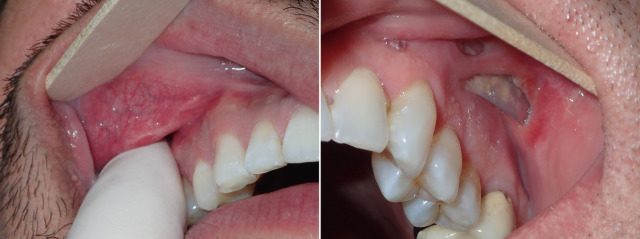
During preoperative evaluation, it is also important to evaluate the patient’s oral health. Placing implants in the presence of dental or periodontal disease can severely compromise the case and result in infection ( Fig. 7.6 ). Patients with oral disease must be treated to achieve a normal state of oral health prior to implant placement. All implant patients require a panoramic radiograph or computed tomography (CT) scan to rule out any osseous or dental or sinus pathology.
The preoperative consent process should discuss the common sequelae and complications experienced with midface implants. The midface is a vascular region, and significant swelling can occur and take up to several weeks to resolve. In some cases, the swelling can last longer, and the patient must understand that it may take 6 weeks to begin to see the true level of augmentation. All patients will experience temporary paresthesia, but permanent numbness is rare. The surgical site and some implant configurations are in close proximity to the infraorbital nerve and the surgeon must continually be vigilant of protection. Oral animation will be temporarily affected owing to the disruption of lip elevators and orbicularis oris muscles. Patients must be made aware that smiling and puckering and possibly speech may be temporarily affected. This dysanimation usually resolves in the first 2 weeks. Infection is rare and in my experience is more common in smokers, who are not optimum candidates for midface implant placement. The possibility of over-correction, under-correction, and asymmetry must also be discussed. Fortunately, it is very easy to remove or exchange midface implants, and that is a comforting point for prospective patients. At the consent process the patient is given prescriptions for a cephalosporin antibiotic, analgesic medications, and possibly prednisone if larger implants are used which require more dissection and hence more postoperative edema. Patients are told to expect the average recovery time to be 10–12 days. They should also be informed that implants are foreign bodies and the patient will initially “feel” them but the body will quickly accommodate.
The patient must understand what exactly cheek implants will and will not do. For instance, sometimes cheek implants can improve the nasolabial fold or teartrough, but it is not something that is necessarily repeatable in all patients. Also, many patients think that an implant will “lift” their jowls or neck. I explain to these patients that implants project, they do not lift. I compare them to breast implants that project the breasts but do not lift the abdomen.
Size selection is more of an art than a science and accuracy accompanies experience. Generally speaking, most females over 5 feet 6 inches in height will be candidates for a large submalar implant. Shorter patients will usually do well with a medium submalar. Larger patients or those with extreme volume loss will need an extra-large submalar. The small size combined submalar implant may be used in most females or a medium can be used and trimmed if necessary. The large combined submalar is huge and I rarely use it.
Surgical Placement
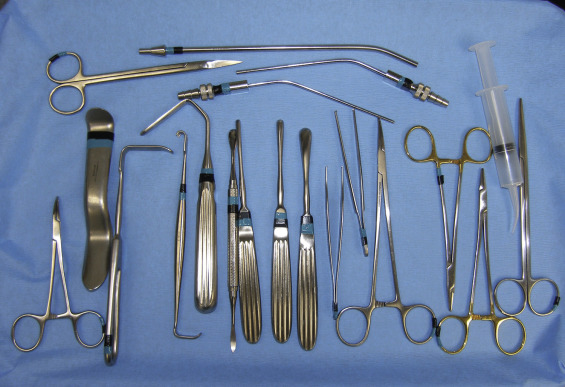
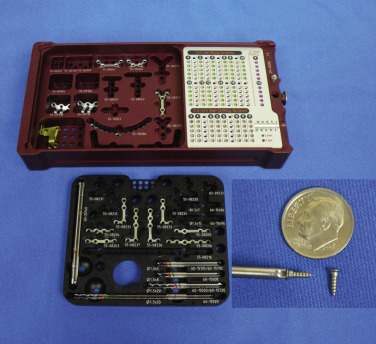
The surgical armamentarium is relatively simple for midface implant placement and does not require highly specialized instruments ( Fig. 7.7 ). A Molt No.9 periosteal elevator, a long thin-tipped tonsil hemostat, an Aufricht nasal retractor (fiber optic is preferable), and a Minnesota cheek retractor are useful instruments.
The placement of midfacial implants is a simple and straightforward surgical procedure for those surgeons with maxillofacial experience, and easily learned by others. With experience, actual placement can be performed in <10 min per side. The implants are always placed in the subperiosteal plane, and this must remain an axiom of placement. With the exception of the infraorbital neurovascular bundle, there is little vulnerable anatomy in the midface region when dissecting in the subperiosteal plane. Midface implants can be placed with local anesthesia, although intravenous sedation or general anesthesia is performed in my accredited office surgery center. The implants can be placed as a solitary cosmetic procedure or concomitantly with other aesthetic procedures, which is usually the case in my office.
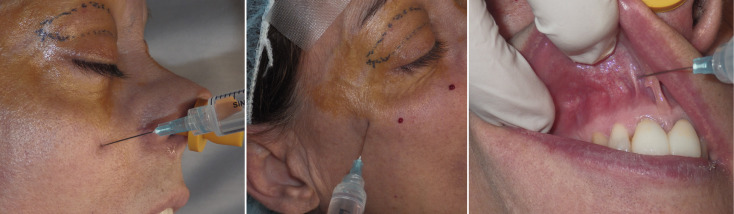
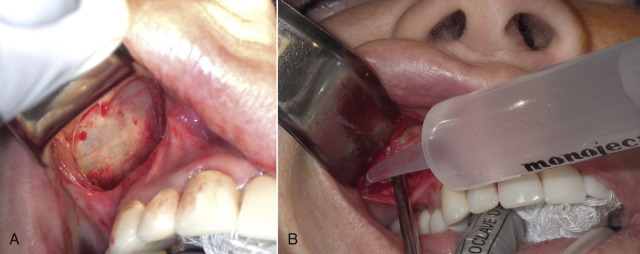
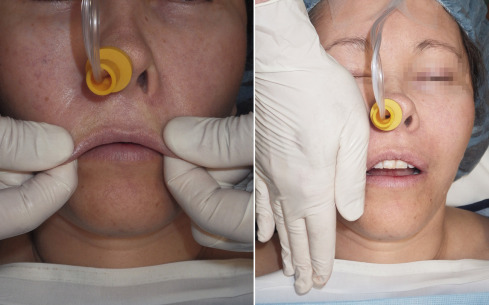
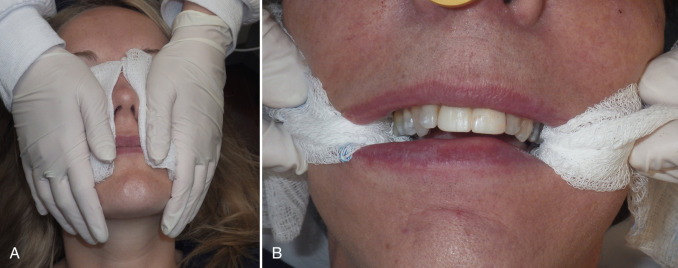
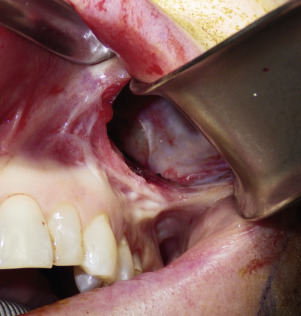
The procedure is begun by injecting about 5 mL of 2% lidocaine, 1 : 100,000 epinephrine transcutaneously in the subperiosteal plane along the region to be dissected. Since many surgeons outline the implant on the cheek, the marked area serves as a template for local injection, and the local is injected 1 cm past all margins. This usually includes the anterior maxilla, malar region, and anterior zygomatic arch region. Additionally, approximately 3 mL of the same anesthetic are infiltrated in the soft tissue planes in the mouth above the canine tooth, primarily to reduce incisional bleeding ( Fig. 7.8 ).
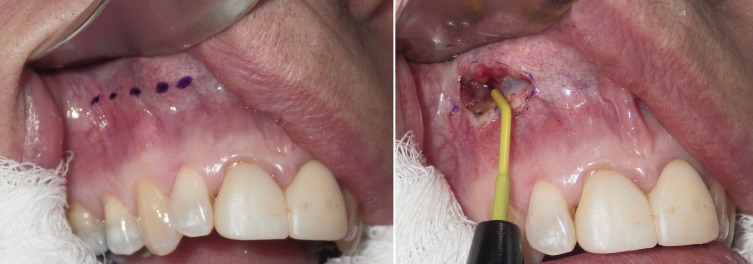
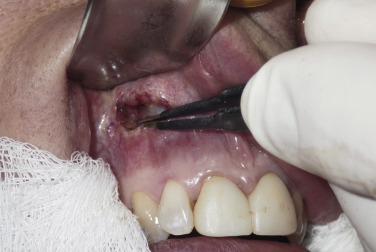
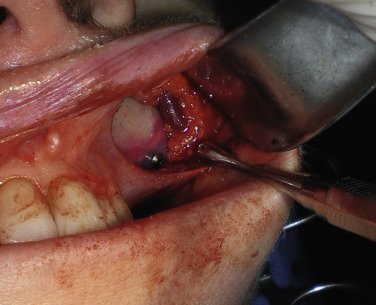
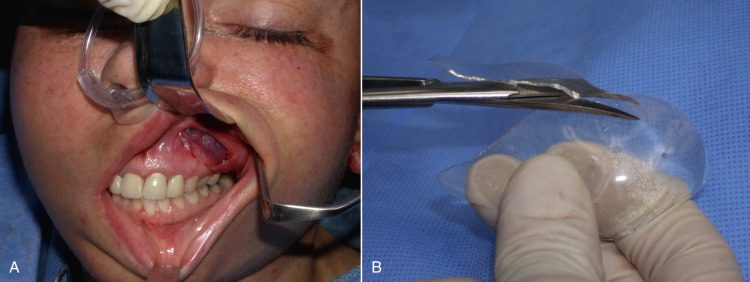
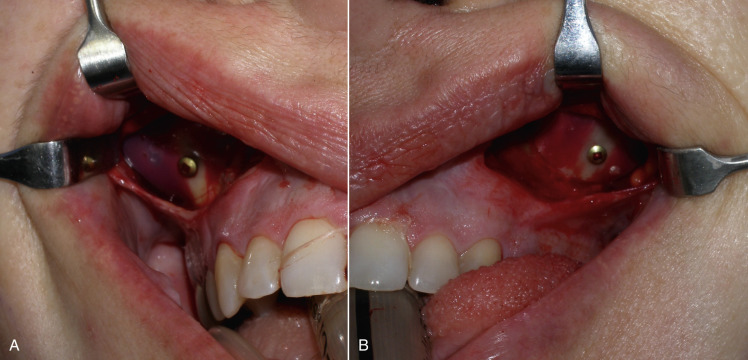
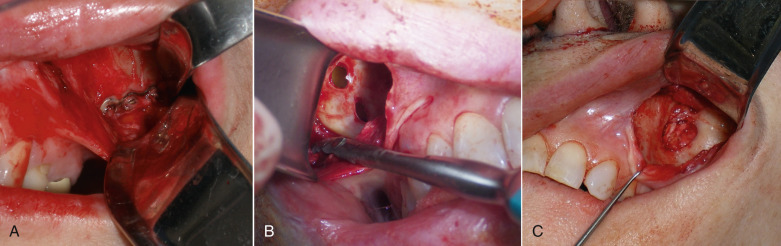
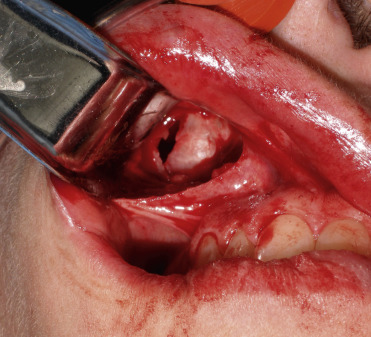
A 1-cm horizontal incision is made approximately 10–15 mm above the canine tooth. Using a radiowave or electrosurgery microneedle to incise the mucosa and soft tissues is hemostatic, and the incision is carried to the periosteal level of the canine fossa region ( Fig. 7.9 ). Alternatively, a vertical mucosal incision can be used but this approach provides less visual and working access compared with a horizontal entry. It is very common to see bleeding from the vascular rich mucosa and this is immediately cauterized with a small bipolar forceps to prevent bleeding throughout the case ( Fig. 7.10 ). The oral mucosa is very pliable, and even with a small incision, the surgical site can be well visualized when retracted. The incision continues to the periosteum and the entire dissection must remain subperiosteal. A Molt No.9 periosteal elevator is used to begin the subperiosteal dissection.
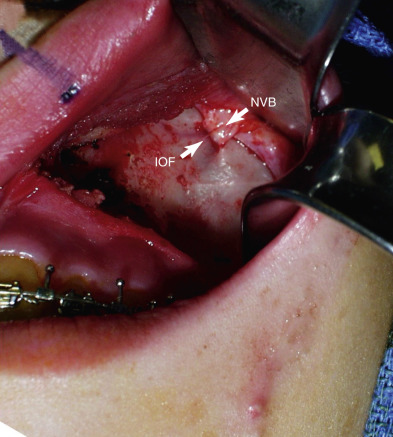
When beginning the subperiosteal dissection, it is not necessary to dissect medially to the pyriform (also spelled piriform) aperture (nasal region), because no part of the implant lies in this region in the average patient. The subperiosteal dissection is begun in the anterior maxillary region, and the initial dissection vector is superior, hence it is important to protect the infraorbital neurovascular bundle ( Fig. 7.11 ). The infraorbital nerve lies approximately 5–8 mm inferior to the infraorbital rim in line with the medial limbus ( Fig. 7.12 ). The implants are configured to lie inferior to the infraorbital nerve, and therefore aggressive infraorbital dissection is unnecessary.
After the anterior maxilla is dissected, the periosteal elevator is angled, and the remainder of the dissection is primarily in an oblique vector ( Fig. 7.13 ). All of the common implants extend over the lateral maxilla and zygomatic regions and taper out to a thin tail. This oblique vector of dissection is carried out over the malar region and extends over the medial portion of the zygomatic arch. It is extremely important to remember that the implant pocket should be just slightly larger than the intended implant ( Fig. 7.14 ). A grossly larger pocket only serves to encourage mobility and dead space. This is even more important if screw fixation is not being used, so the smaller pocket will retain the implant and reduce mobility.
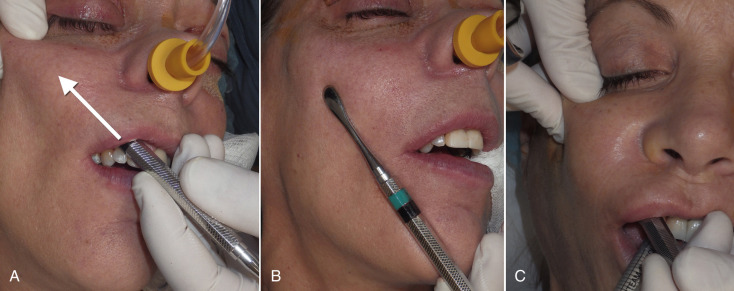
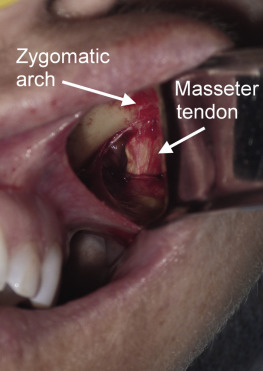
For small or medium submalar implants, minor zygomatic dissection is required, but for combined submalar and malar shell implants, more aggressive malar and zygomatic dissection is necessary. These larger implants also require more aggressive inferolateral dissection. It is not uncommon to encounter the origin of the masseteric tendon (or muscle) while dissecting in the area ( Fig. 7.15 ). There is no need to violate or dissect this tendon or muscle, because the silicone implant can safely lie over these soft tissue structures without a problem and frequently do with the larger-style implants. If adequate dissection is not performed over the masseteric tendon, it can create an obstruction and not allow the implant to sit passively. For smaller implants such as the medium submalar, the extended dissection over the masseteric tendon is usually unnecessary.
Although rare, I have, on several occasions, encountered a large vessel in the lateral soft tissue dissection ( Fig. 7.16 ). Staying in the subperiosteal plane keeps the surgeon out of the soft tissues where accessory neurovascular structures can be encountered.
After the superior and superolateral dissection, a final sweeping maneuver is made with the periosteal elevator ( Fig. 7.17 ). This assists in developing the full pocket for implant placement. It is imperative that the subperiosteal dissection is totally free of adhesions that would impede passive implant placement. The surgeon can also insert the forefinger and use the fingertip to stretch the underside of the cheek for increased freedom. Care must be utilized to not over-stretch the area which could possible damage the facial nerve branches. One of my personal means of deciding if adequate dissection is achieved is the ability to place the working end of the Minnesota retractor fully inside the lateral dissection pocket ( Fig. 7.18 ).

After the implant pocket is dissected, the area is checked for hemostasis. The pocket is then irrigated with antibiotic solution. This is made with two 150-mg clindamycin capsules, which are opened and the powder is mixed with 60 mL of sterile saline ( Fig. 7.19 ). At this point, implant sizers can be placed to give the surgeon an idea of the ideal size ( Fig. 7.20 ). This is only an approximation, as the pocket is dilated from dissection and the tissues have been injected with local anesthesia so accuracy of sizing is compromised. When the sizer is placed, the lips are grasped and pulled down to better show the implant profile. Insertion of sizers and the final implant is assisted by the Aufricht or Minnesota retractor and a long thin tonsil clamp, which is useful to guide the pliable implant into the restricted pocket.
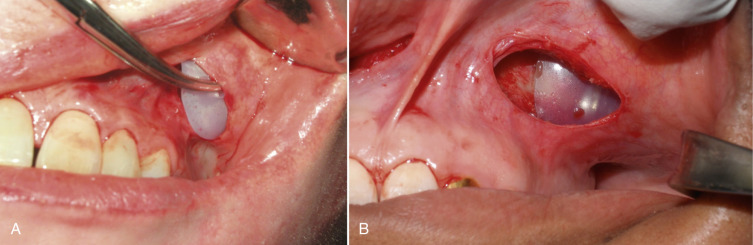
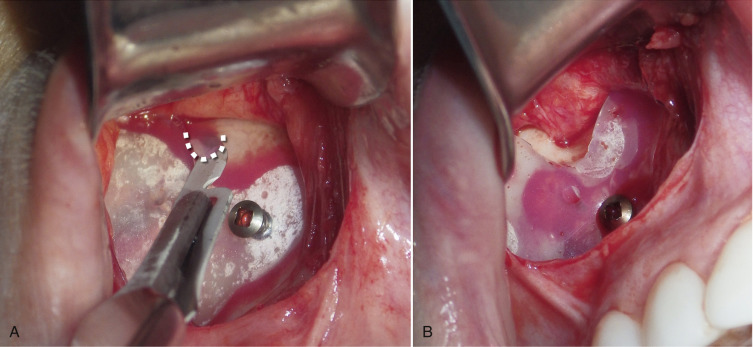
When the sizers are placed, the entire surgical team examines the patient from different angles until the proper size is determined. Experienced staff are very helpful in these decisions, but obviously the final result rests on the expertise of the surgeon. The pocket is again irrigated with the antibiotic solution using a Monoject syringe. When the final implant is agreed upon, it is removed from its sterile packaging and placed in the antibiotic solution. It is important not to contaminate the actual implant with surgical debris, paper, gauze tags, or glove powder. The ImplanTech implants are labeled with the size and correct configuration. “ML” would be medium left, “LR” would be large right, and so on. The implant is grasped with the curved tonsil clamp so that the tail is stabilized and placed into the pocket. If the pocket is correct for the implant, the prosthesis will lie passively and self-seat ( Fig. 7.21 ). An anatomic implant is one that is fabricated on a model of the human skeleton so that the underside of the implant “automatically” seats and fits in the right zone on most patients. The concavity of the underside of the implant sits over the convexity of the maxillomalar area. When implant size is confirmed, the wound is again irrigated with the antibiotic solution. It is imperative that when the thin tail is inserted on the leading edge of the implant that it does not fold over or under ( Fig. 7.22 ). If this happens, a permanent lump will be visible and palpable.
Although the implants are anatomic, they will float several millimeters in all directions and need to have their position finalized before fixation. When the implant is successfully positioned, the soft tissues are manipulated to check that the dissected pocket and implant size are compatible ( Fig. 7.23 ). If the implant is extruded or grossly malpositioned during manipulation, then the implant must be trimmed or the pocket expanded ( Fig. 7.24 ). One of the biggest advantages of silicone implants is their ability to be trimmed and customized.
When the implant is successfully placed, a decision is made in reference to fixation. A well-conforming implant in a tight pocket can be placed without fixation, and experience has shown the implants to remain stable; some surgeons forego fixation. If the pocket is considerably larger than the implant, if the implant does not stay in the desired position, or if there is increased mobility of the implant, the implant should be fixated. In the early part of my career, I successfully placed many implants without screw fixation, but experience has shown that the procedure is more predictable when using a single fixation screw. I see many implant complications from other surgeons and have treated many cases where the implant migrated. I always use a single screw to fixate the implant and I have never experienced a single case of implant migration. I also use screw fixation on all chin and mandibular angle implants. The easiest means of securing midface implants is to use 1.5- or 2-mm diameter self-drilling screws ( Fig. 7.25 ).
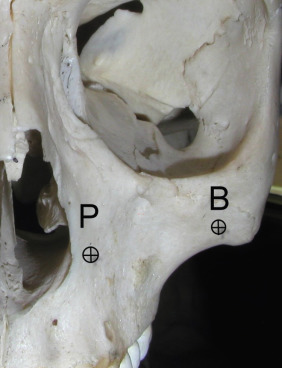
The self-drilling screw allows easy seating of the screw without the need for a drill. The two best regions to place a fixation screw are in the thick bone of the lateral piriform aperture or the thick buttress bone in the lateral maxilla ( Fig. 7.26 ). Occasionally, a screw may be placed through the maxilla and perforate the maxillary sinus. Although I try to avoid placing screws in the sinus, it is a common procedure in orbital trauma, maxillary osteotomy, and sinus surgery. Screws in the sinus are not in themselves problematic, but could possible increase the possibility of sinus infection. Finally, the thin bone of the anterior maxillary sinus is less dense to retain a screw. Fig. 7.27 shows typical screw fixation of implants.
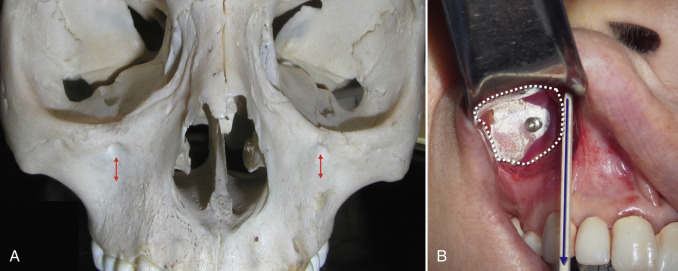
Generally, a single screw is all that is needed to stabilize the implant, but on occasion, an implant may rotate and placing a second screw will provide complete fixation. It is important not to overtighten the screw, or it can sink into the soft implant and the implant can “pop off” the screw and displace. It is also important to avoid the tooth roots when placing fixation screws. It is a good idea to inform the patient to let their dentist know they have fixation screws so they are not misunderstood. When periapical dental X-rays are taken, the angle of the radiograph may be tilted, which can make the screw appear to be in the tooth root, when it actually is not. I have seen this happen several times when a patient had a dental or tooth infection and the dentist thought the screw was perforating the tooth root. A well-positioned radiograph will show the true level of placement. When the implant is at the optimum position, the assistant stabilizes it while the surgeon places the screw. After the implant is fixated, all borders are inspected to make sure they are free and unfolded. Special care needs to be focused on the superior border of the implant to make sure it does not impinge on the infraorbital nerve. It is uncommon for the border to be in contact with the nerve and in these cases, a small crescent of the implant is removed with a scalpel to relieve the impingement and allow space between the nerve and implant ( Fig. 7.28 ). Edentulous patients have maxillary resorption and may have low infraorbital nerves relative to the atrophic alveolar ridge and may require significant implant relief. In addition, the implant at times could be placed superiorly and the thin border can extend above the orbital rim. This may or may not be visible but it can be very noticeable and palpable to the patient, especially during animation. The surgeon should palpate all edges and make sure no portion of the implant extends beyond the lower or lateral orbital rim ( Fig. 7.29 ).
Some surgeons advocate the use of transcutaneous bolster sutures. I have never used these and do not feel they are necessary, in fact I feel they distract the implant from the bone instead of fixate it. In addition, this is an unpleasant experience for the patient; no one appreciates stitches protruding through their cheek for a week. After placing many hundreds of implants, I can attest this type of fixation is unnecessary.
The final step is to confirm that both implants are placed in the symmetrically correct position. This can be estimated by observing the position of the implant relative to the teeth, piriform aperture, or infraorbital foramina. Indexing the implants to fixed symmetric structures allows more predictable accuracy. Technically, the placement of cheek implants is more of an art than a science. It is a “blind” procedure in that the surgeon places the implants and does his or her best to put them in the same spot on each side: because it is not possible to visualize the entire implant and surgical site through the small incision, it boils down to an educated guess. With experience, most surgeons gain this skill to enable accuracy and symmetry. The best way that I have found to standardize implants is to measure superior/inferior and medial/lateral landmarks and align both implants with these structures. To determine the superior/inferior position of the implants, I use the infraorbital foramina as guide marks. I place the first implant and when I am happy with the finalized position, I measure the distance from the infraorbital foramen. When I place the contralateral implant, I place it the same distance inferior to the foramen as the first side ( Fig. 7.30A ). In the average case, the submalar implant superior edge is close to the foramen. To determine the medial/lateral position, I use a straight edge to index the medial edge of the implant to an imaginary line over the teeth ( Fig. 7.30B ). Assuming the patient has a normal compliment of teeth that are in normal position the first side is noted and the second side is placed at the same level. The medial edge of the average submalar or combined submalar implant will fall in line between the canine tooth and the first or second premolar. It does not matter where the imaginary line falls, as long as the first implant is in proper position and the contralateral side is duplicated.
An additional constant for medial/lateral position is to use a caliper to measure laterally from the piriform aperture, but this is frequently obscured as the dissection do not extend that far. The implants should not extend grossly below the zygoma when placing a finger inside the mouth in the maxillary sulcus. If the implants are grossly palpable into the sulcus, they need to be repositioned superiorly as this low position will bother the patient as well as possibly erode the mucosa. Several millimeters of palpable implant in the upper sulcus is not a problem.
The final position is verified by standing eye level behind the patient and observing the symmetry of both cheeks as well as palpating for symmetry ( Fig. 7.31 ).
The incision is closed with interrupted 4-0 gut suture. A water-tight running suture is not used, as it discourages drainage, which could lead to hematoma or seroma. At the end of the procedure a gauze pack is placed between each cheek and the tail is left out of the mouth to prevent swallowing or aspiration. Several layers of 4 × 4 gauze are placed on the external cheeks and palmed with the hand for 5 min to compress the surgical pocket ( Fig. 7.32 ).
Postoperative Care
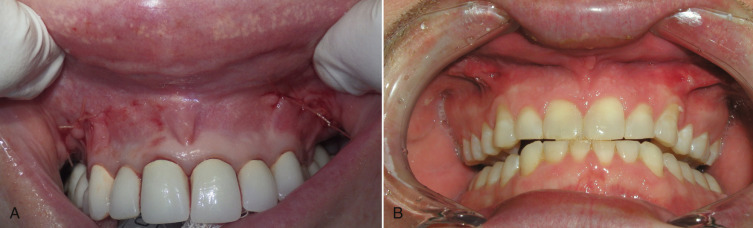
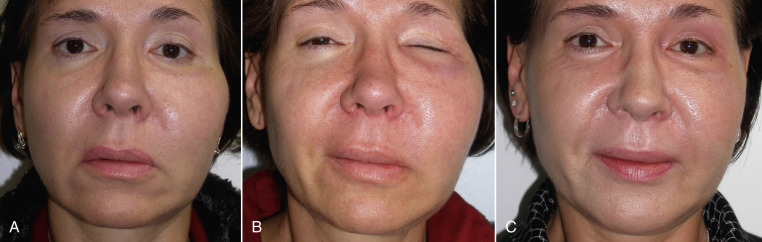
No dressings or compressive head gear are placed or worn after surgery. Postoperative care includes analgesics, antibiotics, and a 5-day course of prednisone (60 mg/day for 5 days). The patient is instructed to refrain from significant talking or animation for the first 48 h and is asked to follow a liquid or soft diet for the same time period. Ice packs are used for the first several days. The amount of swelling can be quite variable. Some patients look great at 3 days, but others may have significant swelling for several weeks. No immediate follow-up care is required, as the sutures are resorbable ( Fig. 7.33 ). Postoperative appointments are generally scheduled for 2 weeks, 1 month, and 3 months. One caveat is be aware of a patient that reports new or unusual swelling as that could represent hematoma or seroma.
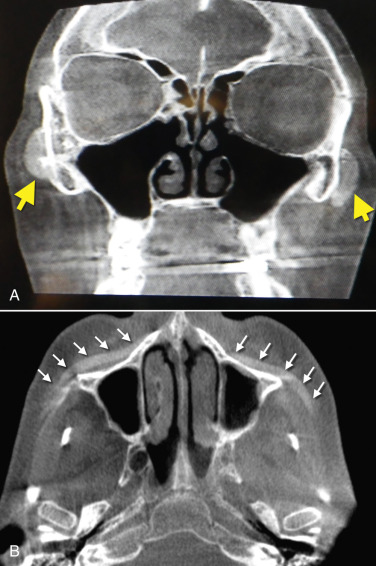
Although silicone implants are radiolucent, they can be visible by enhancing some CT scans and the titanium screws are always visible ( Fig. 7.34 ).
Case Presentations
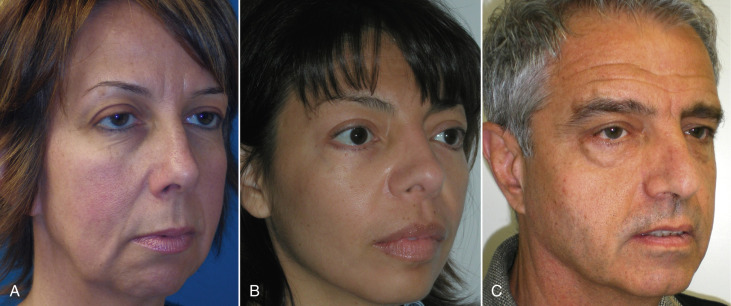
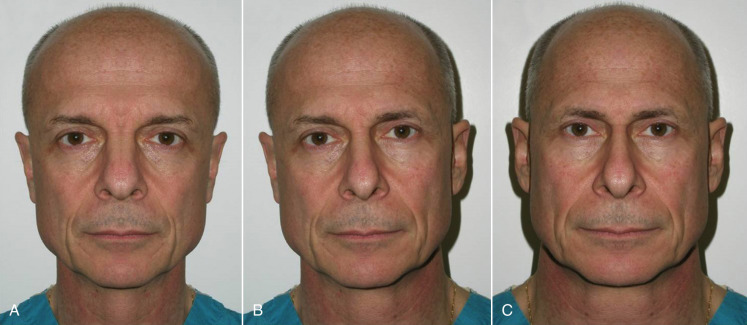
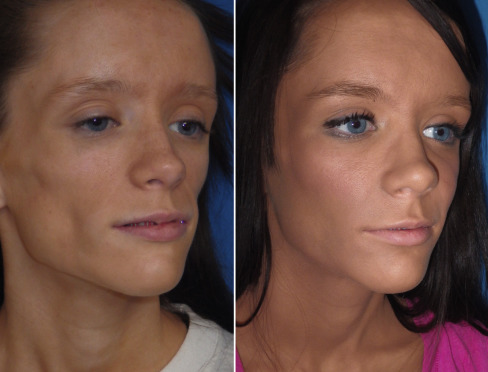
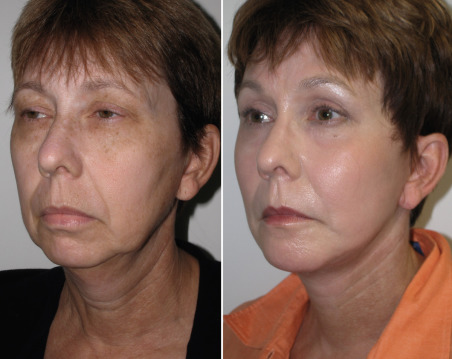
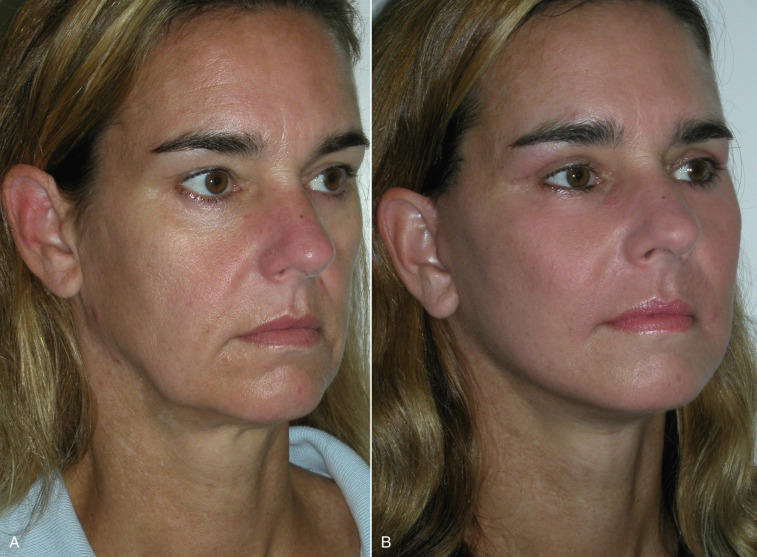
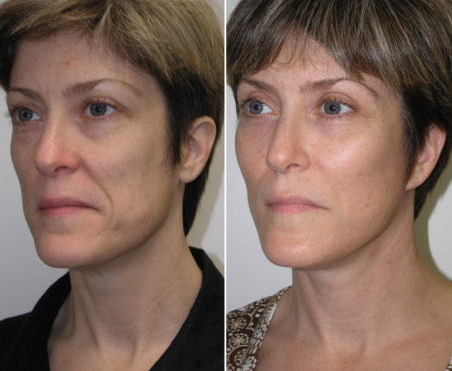
Figs. 7.35–7.40 and Fig. e7.2 ![]() show before and after images of midface implant cases.
show before and after images of midface implant cases.
Sequelae and Complications
Commonly seen complications after facelift surgery include:
- •
Bleeding/hematoma/seroma
- •
Infection
- •
Over-/under-correction/malposition/asymmetry
- •
Extended or permanent paresthesia
- •
Implant mobility/bone resorption/hardware problems.
Unlike facelift and blepharoplasty, significant complications are rare with midface implants. Significant edema can occur in the early postoperative period, especially if large implants are used or when implants are placed concomitantly with other cosmetic facial procedures. Cold packs and tapering steroids are routinely used. Minor fluid accumulations will usually heal spontaneously and if large enough, warrant aspiration. Severe swelling may indicate hematoma or seroma formation, and if the surgeon feels there is significant fluid, it must be drained as soon as it is recognized ( Figs. 7.41–7.43 ). This can usually be done under local anesthesia by opening the incision and suctioning the blood or clot from under or around the implant, without compromising the result. Implants that are screw fixated will not be disturbed with drainage, but unfixated implants can displace. There are many reasons why implant fixation is advantageous. An extremely large hematoma or a continued bleeding source may require implant removal and exploration.
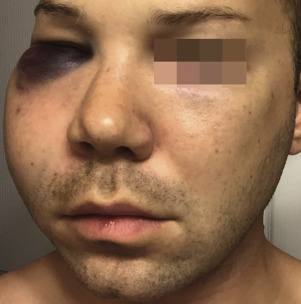
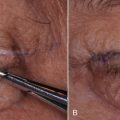
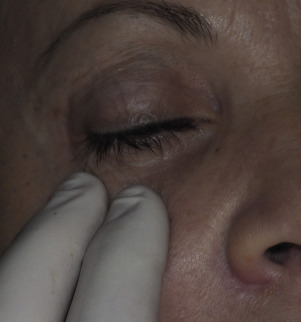
Occasionally, subconjunctival or periorbital ecchymosis is seen but remains an uncommon finding.
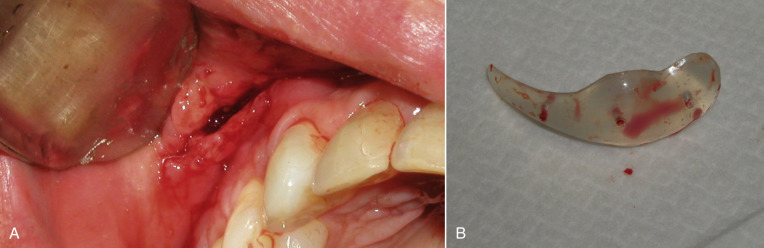
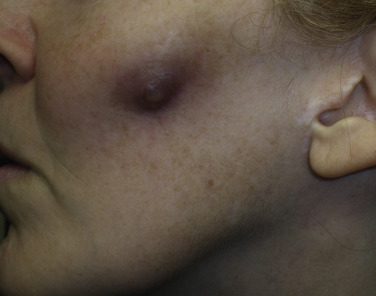
Infection has been an uncommon experience. It usually manifests in the first week or two after surgery. Infection generally presents as one side failing to heal, pain, increased swelling, periorbital edema, and purulent drainage with a bad taste in the mouth ( Figs. 7.44–7.46 ). The incision site will frequently be very inflamed and sometimes open. It is possible to salvage a minor infection with open incision and drainage, irrigation, and systemic antibiotics. If an implant becomes infected and is secured with screw fixation, I will attempt salvage with incision and drainage, antibiotic rinses, and systemic antibiotics. The lack of mobility assists in healing. In my experience, attempting to salvage a mobile, unfixated implant is futile and should not be attempted. Resistant infections warrant implant removal, and the implant can be replaced after healing. Because the explanted site will have scar tissue and remnant implant capsule, the result is sometimes unnoticeable. On occasion, I have taken out a single implant and not replaced it, without any noticeable cosmetic deficit. In other cases, the deficient side is noticeable and must be reimplanted.
The patient must be warned during the consent process that for the first 1–2 weeks after facial implant surgery, they will experience compromised animation when smiling and puckering. The initial implant dissection violates the orbicularis oris and lip elevator musculature, which heals uneventfully with the return of normal animation. Occasionally, return of normal animation can take longer.
The most commonly encountered problems relate to implant position and symmetry and are usually operator-dependent. There is no exact science to placing cheek implants and indexing steps were previously outlined. Even in the most carefully planned cases, it is possible to have a preexisting asymmetry in the patient’s anatomy that can cause a disharmony from one side to the other. All of this must be covered in the informed consent process. It is not uncommon for one side to look considerably different from the other, and the patient must understand that many or most of the initial asymmetries will disappear with edema resolution. I have had numerous patients who felt that the augmentation was too drastic and wanted the implants removed in the first several weeks of placement. My staff and I were able to reassure them and wait out the edema instead of removing the implants. Most of these patients were very happy when the swelling resolved and the true effect of the implants was apparent. I always encourage patients to wait at least 6 weeks to appreciate the true healed result. I have experienced several cases where patients developed psychological ideation that they no longer could mentally tolerate a “foreign material” in their body, despite an excellent cosmetic result and demanded removal. One of the greatest attributes of silicone implants is their easy removal or replacement due to the presence of the dense fibrous connective tissue capsule that forms around the implant ( Fig. 7.47 ).
I have had patients request smaller implants, larger implants, or a totally different implant configuration. When placing a smaller implant, the surgery is straightforward because no additional dissection is required and the recovery is simpler. When changing a smaller implant to a larger one, then additional dissection is required and the recovery will be somewhat increased, but still less than the initial placement.
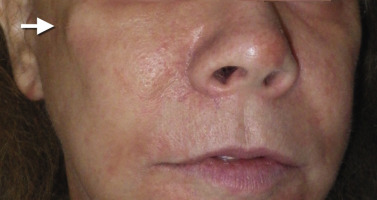
Implant malposition most frequently occurs in non-fixated implants, although it is possible (rarely) for a fixated implant to rotate on a screw or in rare cases the implant can dislodge from the screw. Talking, excessive chewing, excessive animation, sleeping on one’s side and smoking, are all activities that should be minimized for the first postoperative week. There is probably some asymmetry that occurs with all implant cases and small differences usually go unnoticed and blend with the subtle asymmetries of nature. Larger asymmetries may be very visible and warrant correction. When this occurs, the patient must decide which side they prefer and the contralateral implant is then repositioned to match. Fig. 7.48 shows a patient with her right cheek implant placed more inferiorly than the left. The right side was repositioned superiorly, and the patient was happy. If a frank preoperative asymmetry is apparent, then this can be compensated for by placing a larger or smaller implant on one side to compensate for the asymmetry. I have done this several times, where I placed a large implant on one cheek and a medium on the other.
There has been some attention to titanium mesh implants that have an extremely porous and honeycombed metallic network. Although these implants are quite light, their removal or replacement is an exercise in futility. Decades ago, Dacron mesh implants were used by some surgeons and resembled a folded up screen from a window. Removing these was extremely destructive and any ultraporous material would merit the same problem.
Fig. 7.49 shows a patient who had a springy palpable prominence over the zygomatic arch region because the implant tail had folded under the implant body during placement as discussed earlier in this chapter (see Fig. 7.22 ). The implant was removed and the tail successfully repositioned. Fig. 7.50 shows a patient whose implant has migrated superiorly, and the implant border became palpable at the orbital rim. This bothered the patient during animation and the implant was removed, trimmed, and successfully repositioned.
In some cases, implant placement can have minor asymmetries that do not warrant replacement. In addition, some cases of acceptable implant results may be improved by fine tuning with injectable fillers. I have done this to fill in gaps and depressions, feather out the augmentation, or to simply enhance the post-implant result ( Figs. 7.51 , 7.52 ). I usually do this with reversible fillers first to make sure the patient is happy and then commonly use a permanent filler such as silicone oil in cases where I am sure that the permanent result will be acceptable.

Although not a complication, it is worth mentioning that during the placement of cheek implants, the operator can encounter unforeseen situations from previous surgeries or trauma. I have placed numerous implants over antral perforations from trauma or sinus surgery and have also placed implants over bone plates from previous corrective or trauma surgeries ( Fig. 7.53 ). I have never encountered a healing or aesthetic problem with implants I have placed over sinus openings or hardware and personally do not consider them a contraindication to surgery.
Some patients have extremely thin “potato chip” bone on the maxillary sinus and this can be easily perforated or fractured during routine dissection ( Fig. 7.54 ). This is most often seen with novice surgeons but can occur with any surgeon. If a moderate perforation occurs during implant dissection, the procedure can continue and the implant can lay over the perforation. The surgeon must take care not to allow debris to fall into the sinus through the perforation. Since patients are already on antibiotics from the implant procedure, no other coverage is necessary unless the patient becomes symptomatic with sinus-related problems. An antral perforation may result in bleeding from the nose as blood that entered the sinus may drain, but this is not active hemorrhage and is self-limiting.
From time to time, post-cheek implant patients will complain of pain. This generally resolves by 90 days. Shooting pain or radiating pain with oral function or when pushing on the implant may indicate nerve impingement. It is possible for the implant to abut the infraorbital neurovascular bundle and stimulate the nerve. If this is suspected, the implant should be explored to confirm that there is no impingement. If the implant does abut the nerve, a notch of the implant should be removed to free the impingement, as shown in Fig. 7.22 . Valsalva maneuvers, nose blowing, or sneezing can cause an air emphysema in the soft tissues through a sinus perforation. I have seen a patient experience this from nose blowing that forced air through a second screw hole in the anterior sinus. During implant placement, a screw was placed and removed for repositioning laterally. The small screw hole was large enough to admit air from the sinus into the soft tissues.
Custom cheek implants are an option for patients that desire them. These implants can be fabricated from a computer-generated model or directly from a cone beam CT scan. I have performed several custom cheek implants but do not really see a huge advantage, as the size and shapes of available stock implants are so diverse, almost any configuration can be achieved. Custom cheek implants are advantageous in cases with unusual anatomy or as reconstructive options that are status post-surgery or trauma.
Part II – Chin Implants
Chin implant surgery is a very simple procedure with a very high impact on the profile. The chin, like the nose, is a very important aesthetic pillar and is frequently satirized in caricatures: a strong chin is synonymous with macho, bravado, and masculinity, whereas a recessive chin is more synonymous with a repressed, wimpy, or introverted person. It is amazing how several millimeters of augmentation can truly change the look (and confidence) of a person. As with cheek implants, chin implants are easy to place and are permanent but can be removed if desired.
In all surgical procedures, an accurate diagnosis is paramount to proper treatment. Although many individuals have a recessive chin profile, there are other considerations besides merely augmenting the chin. The occlusion must be checked, and if a patient has a deficient chin due to retrognathia with malocclusion, they should be referred to an orthodontist or oral and maxillofacial surgeon to consider orthognathic surgery. By moving the maxilla and/or mandible, the entire lower jaw is frequently anteriorly positioned, which will often normalize the profile, while at the same time correct the malocclusion. Patients with severe malocclusions must be given the option for functional correction. Without treatment, they can experience future problems with oral function, temporomandibular joint (TMJ) disease, and dental restorations. Although orthognathic surgery was very common in the 1980s and 1990s, insurance coverage has dwindled, making the procedure much less frequent. For this reason, even patients with malocclusions are more frequently opting for isolated chin augmentation. Adults with malocclusions may not see benefit in a hospital procedure to advance their jaw and are only interested in cosmetic treatment and not occlusal normalization.
One of the main diagnostic pitfalls involved with chin implants is the failure to diagnose deficiency of the lower-third of the face. This results in placing a chin implant in a patient that requires a genioplasty. Unfortunately, this is a common occurrence.
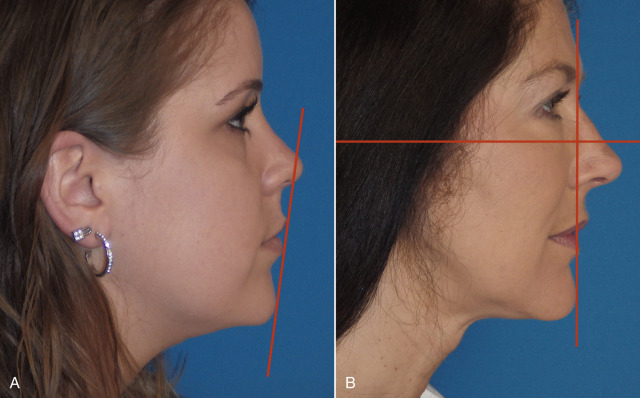
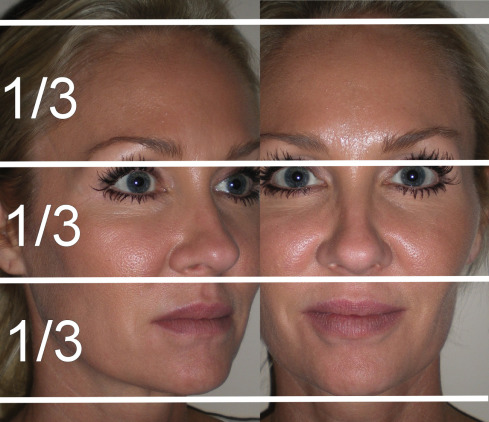
The face is classically divided into three relatively equal vertical thirds. The upper-third is measured from the hairline (trichion) to the glabella; the middle-third is measured from glabella to subnasion; and the lower-third is measured from subnasion to menton ( Fig. 7.55 ). The goal of the surgeon is to balance the lower facial third with the rest of the face. This has to be considered in three dimensions.
When considering the relationship of the chin harmony to the rest of the face, many factors come into play. I feel that profile enhancement is never a “one look fits all” type of situation. Many types of standardized cephalometric and soft tissue measurements are available to determine optimum chin projection. While these are helpful, the astute surgeon will realize that many other influences contribute, including the shape of the neck, cheeks, and nose. A “boilerplate” approach may not look natural on some patients. The best surgeons also realize the variability in faces and their proportions and, with experience, can usually determine “what looks natural.” Riedel’s plane is a commonly used analysis. This involves placing a straight line through the most protrusive portions of the upper lip and lower lip (labrale superius, LS) and labrale inferius, LI) that intersects the soft tissue pogonion. An ideal position is when this line touches both lips and the tip of the chin. If the chin is posterior to the line, the patient is recessive; if the chin is anterior to the line, the patient has chin excess ( Fig. 7.56 ). The Gonzalez–Ulloa analysis (also the called “zero meridian”) has a horizontal line representing the Frankfort horizontal plane and a vertical line that intersects the horizontal line at a 90-degree angle through the soft tissue nasion. In an ideal profile, the line should intersect the most anterior soft tissue projection of the chin (soft tissue pogonion). As with the Reidel plane, a deficient chin will follow posterior to Gonzalez-Ulloa line and a horizontally excessive chin would fall anterior to the line. With either of these analyses, surgical distances can be estimated assuming the photographs are standardized (1 : 1 ratio). If a patient with a deficient chin has the vertical line that lies in front of the chin by 8 mm, then the surgeon can estimate an 8 mm implant projection or osteotomy advancement. Remember, these are estimates and not absolute measurements or analyses.