It is said that the eyes are “the window to the soul.” They are also the window to youth and rejuvenation and are one of the most important aspects of cosmetic facial surgery. The complex anatomy and physiology of eyes, as well as their being the only organs for vision, make cosmetic blepharoplasty an enjoyable but serious procedure. We have 20 digits, 32 teeth, four limbs but only two eyes. Damage to the eye or loss of vision is catastrophic. For this reason, any surgeon who treats the eyes or periorbital region must be extremely competent. Blepharoplasty is one of my favorite procedures as it is effective and fun!
The eyes can truly make a patient look young, alert and awake; or tired, old, and hollow.
The upper face frequently ages earlier than the lower face and the eyelids and brow are frequent areas of concern in patients from the age of 35 and above. Younger patients notice skin excess and fat protrusion, while older patients notice the same but have additional brow and periorbital problems. For most patients, blepharoplasty is a matter of cosmetics, although some patients have functional problems such as eyelid ptosis, lid laxity, and visual obstruction. As this is a cosmetic surgery textbook, this chapter will be limited to more aesthetic than functional treatment.
Orbital Anatomy
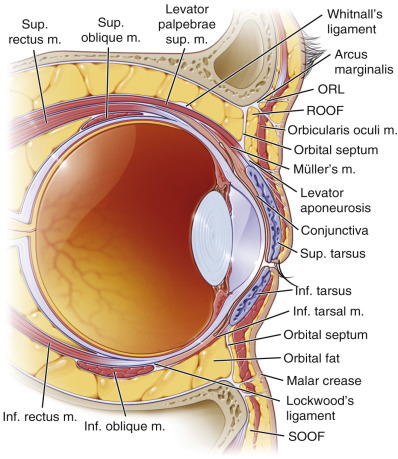
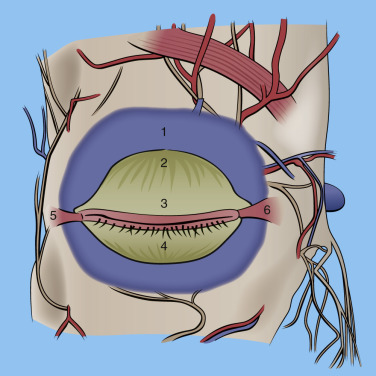
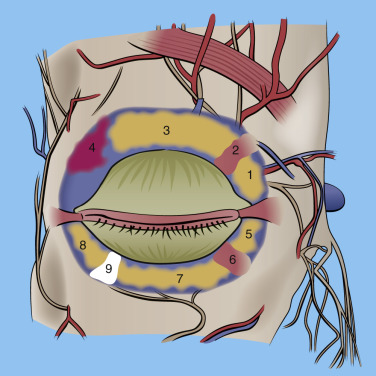
The orbits and eyes have some of the most delicate and complex anatomy in the body. A thorough understanding of eye anatomy is essential to become proficient at blepharoplasty. The scope of this text cannot cover the entire orbital and periorbital anatomy but will discuss structure and function critical to learning and safely performing blepharoplasty ( Boxes 5.1 , 5.2 ). Figs. 5.1, 5.2, and 5.3 illustrate relevant anatomic structures of the periorbital complex.
- 1.
Eyelid skin
- 2.
Sclera
- 3.
Cornea
- 4.
Pupil
- 5.
Iris
- 6.
Lacrimal caruncle
- 7.
Punctum
- 8.
Upper and lower tarsi
- 9.
Conjunctiva
- 10.
Medial and lateral canthus
- 11.
Upper and lower-lid fornices
- 12.
Gray line
| Upper eyelid | Lower eyelid |
|---|---|
| Orbicularis oculi muscle ROOF (retro-orbicularis oculi fat) Orbital septum (extension of periosteum) Orbital fat pads (medial and central) Lacrimal glands Superior oblique muscle Levator palpebrae superioris muscle Levator aponeurosis Müller’s muscle | Capsulopalpebral fascia (lower-lid retractors) SOOF (suborbicularis oculi fat) Lower-lid fat pads (medial, central, lateral) Inferior oblique muscle Orbital rim |

The space between the normal eyelids is referred to as the palpebral fissure and is about 9 mm in height and 30 mm in width.
The layers of the eyelid are referred to as lamellae and are characterized as the outer lamella, which includes the skin and orbicularis muscle, the middle lamella, which includes the orbital septum and fat, and the inner lamella, which includes the tarsus and conjunctiva. (This classification is seen described differently in various texts and also varies by the specific level described). These layers will be discussed here in the order they are encountered in blepharoplasty surgery.
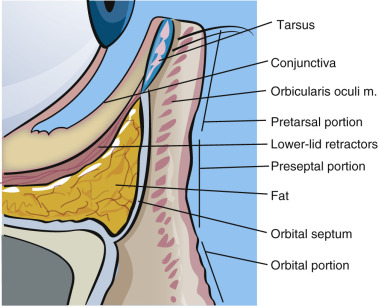
The eyelid skin is some of the thinnest in the body and can be as thin as 0.2 mm. The underlying concentric orbicularis oculi muscle is described in three portions: the pretarsal portion (overlies the fibrocartilaginous framework of the lids); the preseptal portion (overlies the orbital septum); and the orbital portion (overlies the bony orbit) ( Figs. 5.3 , 5.4 ). The orbicularis oculi is responsible for eye closure and innervated by cranial nerve VII.

The orbital septum is a connective tissue layer that is an extension of the orbital periosteum (arcus marginalis) and separates the muscle layer from the periorbital fat ( Figs. 5.5 , 5.6 ). The septum has been described as a diaphragm that provides containment of the orbital contents.
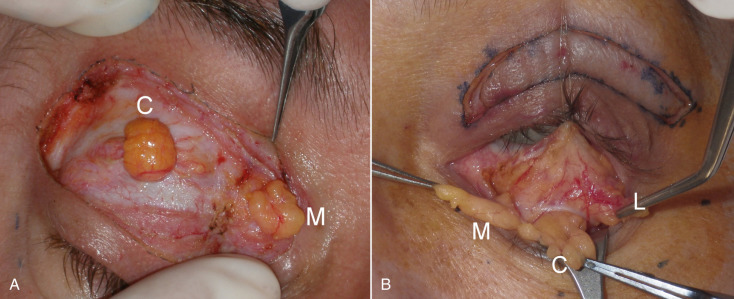
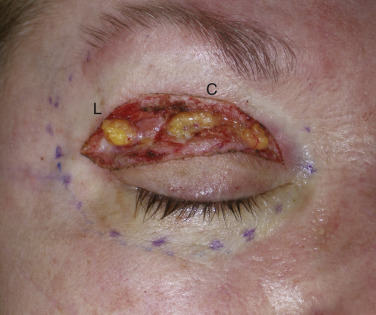
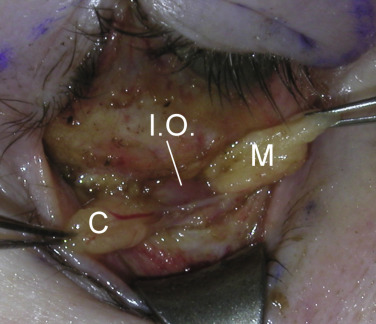
Deep to the septum lie the orbital fat pads (also called preaponeurotic fat ). There are two fat pads in the upper (medial, central) and three in the lower (medial, central, and lateral) in normal circumstances ( Figs. 5.7 , 5.8 ). Instead of medial, central, and lateral, some surgeons refer to these positions as nasal, central, and temporal. Occasionally, a third or lateral fat pad is encountered in the upper lid, which may be an anomalous fat pad or extension of the upper central fat pad ( Fig. 5.9 ). In both lids, the medial (nasal) fat pads are more fibrous and therefore whiter when compared with the distinct yellow central and lateral fat pads. The medial fat pads are also more innervated and manipulation can produce pain, even with local and general anesthesia.
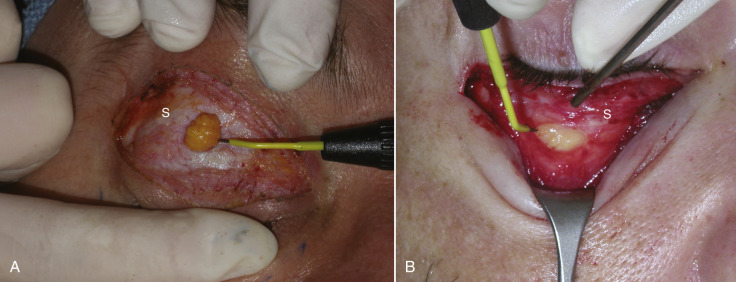
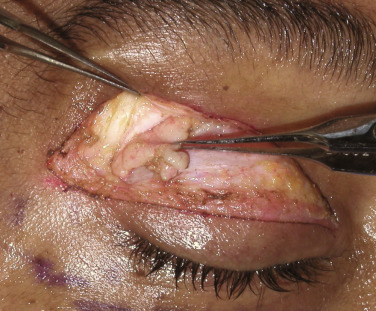
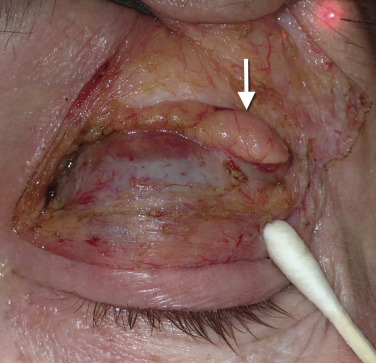
While discussing the upper-lid structures, it is imperative that all surgeons can identify and preserve the lacrimal gland. This structure is found in the upper lateral orbit. There are reports of surgeons inadvertently excising the lacrimal gland when mistaking it for a fat pad. The consequences of lacrimal gland excision, lack of tear production, and resultant corneal discomfort and damage, are drastic and all surgeons must be able to identify lacrimal gland from fat. Lacrimal gland tissue is lobulated and a pink “glandular” color and looks very similar to other glands such as the parotid and submandibular gland tissue. Fat is yellow and a totally different texture and appearance ( Fig. 5.10 ). When the lacrimal gland is encountered, it is left alone unless it is prolapsed and contributing to bulk in the upper lid. In this case, it is suspended to the orbital periosteum to “tuck” it back into the orbit ( Fig. 5.11 ).
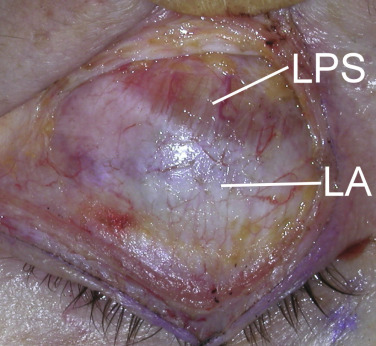
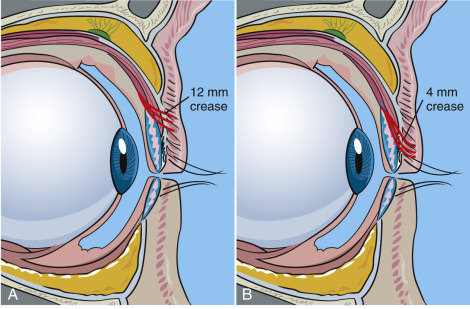
After the skin, muscle, septum, and fat have been encountered, the next layer is the architecture of the upper-eyelid elevators. The levator palpebrae superioris (LPS) is an important muscle, as it opens the eye and is innervated by cranial nerve III. This muscle is also involved in eyelid ptosis and ptosis repair. As this text is solely dedicated to cosmetic surgery, ptosis surgery will not be addressed. The LPS attaches to a connective tissue aponeurosis, which in turn inserts into the orbicularis oculi muscle and skin of the upper eyelid ( Fig. 5.12 ). The region of attachment of the levator aponeurosis fibers on the skin determines the height of the patient’s eyelid crease ( Fig. 5.13 ). The crease is 10–12 mm in females, 8–10 mm in males, and 0–4 mm in Asians. There is no need to manipulate or treat the levator complex in the average cosmetic blepharoplasty.
Proceeding with deep dissection, Müller’s muscle consists of smooth (involuntary) muscle with autonomic innervation. It lies deep to the levator palpebrae superioris muscle and is responsible for approximately 2 mm of upper-eyelid opening. Again, routine blepharoplasty does not proceed to this deep plane. Of interest, is that it is Müller’s muscle that is targeted with alpha adrenergic agonists such as Iopidine when ptosis occurs in the upper lid following over-aggressive neurotoxin injection. Proceeding deep to Müller’s muscle, the tarsal plate is encountered, which represents the fibrous cartilaginous framework of the eyelids (see Fig. 5.7 ). The upper tarsus is approximately 10 mm in height and the lower tarsus is about 4–5 mm in height.
In the lower eyelid, the inferior oblique muscle separates the medial and central fat pads and the arcuate expansion of the inferior oblique muscle separates the central and lateral fat pads in the lower lid ( Fig. 5.14 ). The inferior oblique muscle is frequently encountered in cosmetic blepharoplasty and must be protected. When the surgeon finds this muscle, he or she will know that the medial (nasal) fat pad is medial to it. As stated earlier, the central and lateral fat pad are separated by a fascial band extending from the capsulopalpebral fascia to the orbital rim known as the arcuate expansion (see Fig. 5.7 ).
Encountered lower-lid anatomy is dependent upon the surgical approach. A transcutaneous subciliary approach will incise through skin, orbicularis oculi, orbital septum, and fat. The more common transconjunctival approach is retroseptal and will transect conjunctiva and capsulopalpebral fascia then into the three lower-lid fat pads. The capsulopalpebral fascia consists of the lower-eyelid retractors, which are a fascial extension from the inferior rectus muscle. Some surgeons and anatomists also describe a Müller’s muscle (or inferior tarsal muscle) in the lower eyelid intimate with the capsulopalpebral fascia. As with the upper lid, this consists of sympathetically innervated smooth muscle fibers.
Aging Conditions of the Eyelids and Periorbital Areas
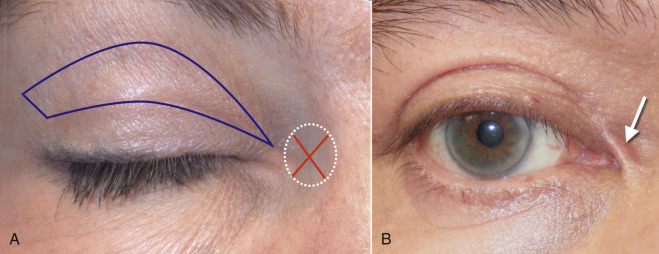
Facial aging changes were discussed in Chapter 1 , but periorbital aging is so focused that it warrants additional review. As we age, various changes become evident in the eyelids. Eyebrow ptosis is a contributing factor in lid aging and especially obvious in the lateral orbital region of the upper eyelids, and is referred to as hooding. Any discussion of cosmetic blepharoplasty must also include discussion of brow treatment if indicated. Often, patients will grab excess brow skin, thinking it is eyelid skin, and want it excised. It is important to point out to them that this is actually forehead skin and cannot be cut off. It needs to be repositioned with browlift. One can easily excise excess skin of the upper eyelid proper, but failure to diagnose a ptotic brow and forehead is a common mistake, even from highly qualified surgeons. As mentioned before, I have seen many patients present to my office for brow and forehead lift that have had several blepharoplasties in the past. Unfortunately, there is not enough skin left to both elevate the brow and close the eyes. This is due to a misdiagnosis on the part of the previous surgeon. Brow position is integral to accurate blepharoplasty. In actuality, many patients require both, especially women. I perform simultaneous upper blepharoplasty on 99% of my browlift patients.
Aging changes in the upper- and lower-eyelid skin come from multiple sources and is mostly age dependent ( Figs. 5.15–5.17 ). This skin is the thinnest in the body, which makes it vulnerable. Actinic damage is a big contributor to elastosis and texture changes in the eyelids. Excess and redundant upper-eyelid skin is referred to as dermatochalasis . This should not be confused with blepharochalasis, which is a rare type of angioneurotic edema. In this condition, recurrent episodes of eyelid edema lead to changes in skin elasticity and pigmentation.
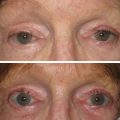
Fat pseudoherniation (steatoblepharon) is a common cosmetic problem occurring in the eyelids. Much discussion exists whether this is a herniation or pseudoherniation and I think a more accurate word is “prolapse.” Most clinicians agree that the orbital septum becomes weakened with age and the periorbital fat pads protrude though this weakened septum and cause the fat bags. To view the extent of fat pad herniation (prolapse), gentle pressure (retropulsion) is placed on the closed eye, which will accentuate the fat pads. Additionally, asking a patient to look upwards and open their mouth will identify the prolapsed fat. In any event, this is frequently familial and hereditary, with some patients developing protruding fat bags in their late teens. In addition, these fat collections are sensitive to fluid shifts and gravity and may appear worse in the morning. Frequently, these patients will present with the chief complaint of dark circles under their eyes. In reality, these “dark circles” actually represent shadows cast by the protruding fat pads. When these patients are in a room with overhead lighting, these circles are much more apparent from shadowing. This can be illustrated by taking a photograph with the patient standing under an overhead light source and taking a photograph with and without a flash. The flashless picture will accentuate the dark circles. Dark circles or periorbital pigmentation can be multifactorial. This pigmentation may be from sun damage and, if superficial, will respond to skin resurfacing or excision, while some ethnic populations such as IndoPakistanis have extremely deep pigment that is difficult to improve. Venous congestion and hemosiderin pigment that has extravasated into the skin can also produce dark circles under the eyes. Localized chronic inflammation can also produce dull and darkened skin on the lower lids. Finally, some patients have large and small veins concentrated in the lower-lid skin, which cast a bluish hue.
Some patients will present with a chief complaint of “fat bags” but in reality they have hypertrophic orbicularis oculi muscles in the lower lids. Patients with orbicularis hypertrophy show increased lower-lid bulges when asked to smile and squint ( Fig. 5.18 ).
Xanthelasma is an accumulation of yellowish plaques in the upper-eyelid skin. This condition is related to increased blood levels of cholesterol or hyperlipidemia and sometimes with diabetes. These lesions are treated by surgical excision or laser ablation, and frequently reoccur.
Diagnosis and Patient Selection
Joe Niamtu, III, and Julie Woodward
Some cosmetic facial surgery procedures can be done with minimal preoperative scrutiny and have limited complications, but eyelid surgery can lead to serious consequences, including blindness. Some of the most important time spent with a patient is at the consultation. In this period, the patient is shopping for a doctor and the doctor is evaluating the patient not only surgically, but psychologically. The primary consideration is to evaluate the patient’s expectations and their appreciation of the reality of the situation. It is the job of the surgeon to give the patient an accurate presentation of what to expect in terms of diagnosis, treatment, recovery, and result. The more information that can be presented before surgery, the easier it is to deal with problems that occur after surgery. It is the surgeon’s job to present the “typical scenario” as well as best and worst scenario options. As they say, a postoperative problem is a sequela if it was discussed preoperatively and a complication if it was not discussed preoperatively.
Adequate time (30–40 min) must be scheduled for eyelid evaluation. A systematic approach is recommended from top to bottom, to guide the surgeon and manage patient expectations. It is helpful to classify aspects of the exam on a Likert scale from 1–4 (1 being less and 4 being most). During this evaluation, procedures, fees, complications, pre- and postoperative considerations, health history, and anesthesia evaluation, etc., must be discussed. There is a lot of information to be appreciated by the patient and the goal of the consult is that the patient and caregiver understand the salient features ( Box 5.3 ).
- •
Their diagnosis and anticipated result
- •
Their surgical options and alternatives
- •
Preoperative requirements (history, physical examination, lab work, anesthesia considerations)
- •
Postoperative care
- •
Possible complications
- •
The need for possible revision surgery
- •
Scheduling and payment options
Before and after images should be shown to the patient to provide an idea of what results to expect after blepharoplasty. Having a list of previous patients that will serve as references to discuss their surgical experience with your prospective patients is also a very useful adjunct. Any additional information such as brochures, websites, slide shows, etc., are very useful to the patient. The consultation includes visual acuity, signing consents, making a down payment of the surgical fee, obtaining forms for physician history and physical exam and lab work (if necessary), postoperative prescriptions, preoperative photographs, and finalizing surgery plans and questions. For some patients, this process may require several appointments.
Important tests and discussion include:
- 1.
Visual acuity
- 2.
Screening the patient for any medications that may affect coagulation ( Box 5.4
 ):
):
- a.
Aspirin or aspirin-containing compounds
- b.
Ibuprofen or other common meds that may affect coagulation
- c.
Herbs such as fish oil, ginkgo, ginseng, etc., that may affect coagulation
- a.
- 3.
Screening for health problems including uncontrolled hypertension or diabetes
- 4.
Screening for anesthesia problems
- 5.
Ophthalmic problems including recent corneal corrective procedures
- 6.
Dry eyes
- 7.
Brow position
- 8.
Symmetry of brows, lids, orbits.
| Advil | Daypro | Lanorinal | Pletal |
| Aggrenox | Diflunisal | Lioresal | Ponstel |
| Aleve | Di-gesic | Lodine | Relafen |
| Alka-Seltzers | Dipridacot | Magan | Robaxisal |
| Anadynos | Dipyridamole | Magsal | Rufin |
| Anaprox | Disalcid | Mamal | Ru-Tess |
| Anatin | Dolobid | Meclofenamate | S-A-C |
| Ansaid | Dolpm | Meclomen | Salatin |
| APC | Dong quai root | Mefenamic | Saleto |
| Argesic | Dristan | Melomen | Salflex |
| Arthritis Pain Formula | Duoprin | Meloxicam | Salicylamide |
| Arthropan | Durasal | Mendomen | Salocol |
| Arthrotec | Durgesic | Methcarbamol with aspirin | Salsalate |
| ASA | Easprin | Micrainin | Selenium |
| Ascriptin | Echinacea | Midol | Sine-Aid |
| Asocdeen-30 | Ecotrin | Mobic | Sine-Off Sinus |
| Aspergum | Emagrin | Mobidin | Sinutab |
| Aspirin | Empirin with codeine | Mobigesic | SK-65 |
| Atromid | Emprazil | Momentum Backache Formula | Soma |
| Axotal | Encaprin | Monacet with codeine | St. John’s wort |
| Azolid | Ephedra (ma huang) | Motrin | St. Joseph’s products |
| B.C. Tablets/Powder | Equagesic | Nabumetone | Stanback |
| Bayer products | Etodolac | Nalfon | Stendin |
| Bextra | Etrafon | Naprelan | Sulindac |
| Bilberry | Excedrin | Naprosyn | Supac |
| Bufferin products | Feldene | Naproxen | Synalgos-DC |
| Buffets II | Fenoprofen | Neocylate | Talwin Compound |
| Buffinol | Feverfew | Norgesic | Ticlopidine |
| Buf-Tabs | Fiorinal | Novnaproxen | Tidid |
| Butalbital | Fish oil | Novodipiradrol | Tolectin |
| Butazolidin | Flaxseed | Nuprin | Tolmetin |
| Cama Products | Flurbiprofen | Oraflex | Toradol |
| Carisoprodol | 4-Way Cold tabs | Orudis | Triaminicin |
| Cataflam | Garlic | Oruvail | Trigesic |
| Chamomile | Gaysal-S | Oxaprozin | Trilisate |
| Cheracol | Gelprin | Pabalate-SF | VaIdecoxib |
| Cilostazol (Pletal) | Gemnisin | Pabrin Buffered Tabs | Valerian |
| Clinoril | Ginger | P-A-C | Vanquish |
| Clopidogrel | Ginkgo (biloba) | Pamate | Vitamin E |
| Congesprin Chewable | Ginseng | Pamprin | Vivarin |
| Contac | Goody’s | Panalgesic | Voltaren |
| Cope | IBU | Pepto-Bismol | Warfarin |
| Coricidin | Ibuprofen | Percodan | Willow bark |
| Cosprin | Indocin | Persantine | Yohimbe |
| Coumadin | Indomethacin | Persistin | Zactrin |
| CP-s | Kava | Phenylbutaxone | Zomac |
| Damason P | Ketoprofen | Piroxicam | Zomax |
| Darvon | Ketorolac | Plavix | Zorprin |
A Snellen chart exam is the standard of care for blepharoplasty, as many patients will experience (or think they experience) visual changes after eyelid surgery ( Fig. e5.1 ![]() ).
).
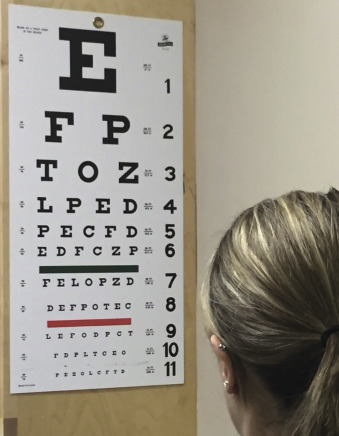
Since uncontrolled bleeding can cause blindness, it is important for patients to refrain from medications that affect platelet function ( Box 5.4 ).
Preoperative prescriptions are given at the preoperative appointment. This includes a cephalosporin antibiotic and appropriate analgesic.
There are several tests that assist the surgeon in assessing the risk of cosmetic blepharoplasty for a specific patient and these tests are a requirement for all blepharoplasty patients. These include:
- 1.
Tear production
- 2.
Tests for lid laxity
- a.
Snap test
- b.
Pull test
- a.
- 3.
Evaluation for Bell’s phenomenon
- 4.
Extraocular muscle function.
The following signs and symptoms can make a difference in successful and unsuccessful blepharoplasty surgery and must be appreciated by the surgeon. Some of the listed aberrations are minor and only require observation, and others could have a critical impact on aesthetics and eye health. If there is ever a doubt of factors that could negatively impact the procedure, an ophthalmology consult is in order. A novice blepharoplasty surgeon should obtain a routine ophthalmology consult on their initial series of patients. This helps rule out pathology, teaches the new surgeon what is normal and what is not, and protects the surgeon to some extent medicolegally.
Dry eyes are very problematic and if a patient cannot close his or her eyes after surgery, irreversible corneal damage may result. A Schirmer’s test may be performed, but an ophthalmology consult is recommended for patients who require eye drops on a regular basis before eyelid surgery. In the Schirmer’s test the conjunctiva is anesthetized by proparacaine eye drops. A Schirmer’s strip is placed in the inferior lateral corner of the eye. Wetness of <10 mm in 5 min, in the strip signifies dry eye. Dryness can be checked in the office by staining the cornea with fluorescein dye and topical anesthetic, then observing with a cobalt blue penlight. The fluorescein dye will be dispersed in the tear film. When the cobalt blue light illuminates it, the dye will appear green. The tear film over the cornea and tear meniscus will be seen as a soft green. Any dry areas on the cornea will pick up the dye as bright pinpoints of green usually on the inferior third of the cornea. A corneal abrasion will light up as a patch of bright green on the cornea. Although some pathologic conditions worsen with blepharoplasty, blepharitis and ocular rosacea may actually improve after cosmetic eyelid surgery.
No human being is perfectly symmetrical and most patients who come into the office are unaware of their asymmetries. It is the surgeon’s job to discuss and document these asymmetries with the patient because if they do not see these asymmetries preoperatively, they are certain to see them postoperatively, which is a far more difficult conversation to deal with.
Orbit
Some patients have large orbits where the pupil is more distant from the superior orbital rim and eyebrow, and other patients have small tight orbits, where the globes sit crowded near the rim and brow. As we age, the floor of the orbit gradually moves infero-laterally away from the globe as the midface rotates posteriorly.
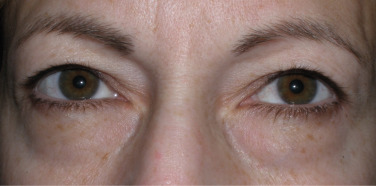
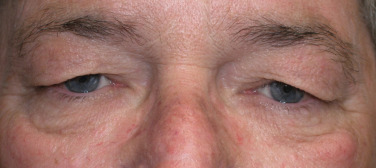
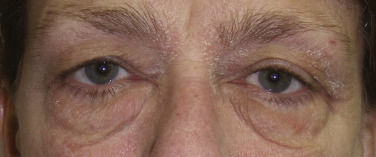
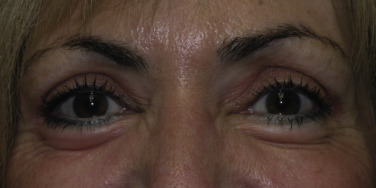
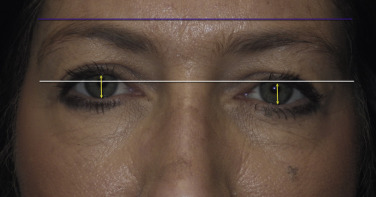
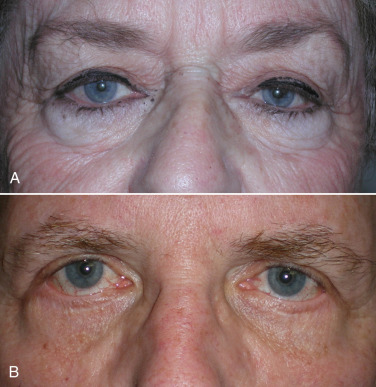
The orbital bones are rarely perfectly symmetrical. When examining the face as a whole, usually one pupil sits slightly higher than the other ( Fig. 5.19 ). This can be noted as orbital dystopia or globe dystopia and is estimated in millimeters. This is important to note because the orbit with a lower globe often has a more hollow superior sulcus that is important to mention to the patient and to document.
A “negative vector orbit” is a term used when the globe has an anterior projection in comparison with the midface. In a normal situation, the midface protrudes in front of the globe. These patients are particularly challenging when contemplating a lower-lid blepharoplasty, as they have flattened midfaces. This midfacial hypoplasia can be developmental or hereditary. Also, a negative vector can occur from globe protrusion due to thyroid disease or similar pathology.
Brow Position
Almost all patients demonstrate some degree of brow asymmetry ( Fig. 5.19 ). This is sometimes due to a greater strength of the seventh cranial nerve on one side of the face in comparison with the other. Facial animation can also contribute to upper facial changes. Patients who exhibit a broader or more accentuated smile often show more wrinkles and a lower brow on that side. Repeated facial expression with one side of the face moving slightly stronger than the other over decades will accentuate one eye appearing smaller than the other while smiling in photos. Patients with brow ptosis at rest often have a compensatory brow hike when animated in conversation which can mask the ptosis.
Eyebrows can demonstrate either medial ptosis, lateral ptosis, or both. Any asymmetry of the brow is critical to discuss as the lower brow can weigh down the upper lids, sometimes on only one side. If the lid is treated and the brow remains ptotic, the affected eyelid can remain lower even when additional skin is removed from that lid. Younger females have brows elevated above the superior orbital rim and younger males have brows positioned at or slightly below the superior orbital rim. As stated above, it is imperative to discuss brow position and brow treatment with every blepharoplasty patient. If a patient is a browlift candidate and the surgeon does not perform that procedure, the patient should be informed and given the opportunity of a referral to a surgeon who does perform browlifts.
Compensatory brow hike is a condition where patients are often able to lift their brow more on one side than the other. If there is a slight eyelid ptosis on one side, the patient may have slightly more compensatory brow hike on that side, to subtly try to improve their vision in the affected eye. It is important to evaluate all patients in the resting and dynamic state to properly assess and document such conditions.
Levator Function
Normal levator function (LF) is 12–18 mm and is the distance the eyelid travels from downgaze to upgaze, while the frontalis muscle is held inactive at the brow. Normal or abnormal levator function is documented at consultation.
Dermatochalasis
The amount of redundant skin, fat, and orbicularis muscle can be graded 1–4+ (see Fig. 5.16 ). Prolapse of the nasal fat pat is evident in most patients. The nasal fat pad is in close approximation to the trochlear arteries that can lead to significant orbital hemorrhage if not managed properly. The preaponeurotic fat can either show atrophy, or in some patients, show hypertrophy. Occasionally, a patient may have a large brow fat pad that when reduced, enhances aesthetics.
Eyelash Ptosis
Lashes can have a variety of positions, graded 1–4+. In these patients, the lashes point downward and become erratic with loss of parallelism. If a patient has 3–4+ lash ptosis and seems to look through their eyelashes in primary gaze, they should be questioned about heavy snoring and sleep apnea. These conditions are associated with floppy eyelid syndrome. These patients may have more edema after surgery.
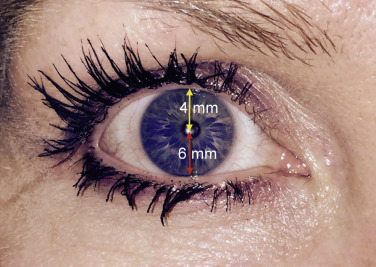
Marginal Reflex Distance
Marginal reflex distance (MRD) is an important measurement in the blepharoplasty exam. This is the distance in millimeters from the upper-lid margin to the pupillary light reflex (center of the pupil). A normal eyelid sits about 2 mm beneath the superior limbus of the cornea, which corresponds to the normal MRD1 being about 3–4 mm. If the MRDs are <4 mm or asymmetrical, the patient needs to be aware that a ptosis repair may be indicated. The patient should be made aware of this, and if the cosmetic surgeon does not perform functional surgery, the patient should be given the option of referral for ptosis surgery evaluation. Many patients do not care about the small amount of ptosis they have had for years and simply desire cosmetic treatment, but they should always be given the option of correction.
The MRD2 is the measurement from the pupil center to the lower lid and is approximately 6 mm. Lower-lid retraction is defined as an MRD2 >6.
The palpebral fissure is the sum of MRD1 and MRD2 ( Fig. 5.20 ).
A-Frame Deformity (Hollow Superior Sulcus)
Patients can show a hollowing in the superior orbit, particularly over the supraorbital notch that carries the supraorbital nerve and artery. The fullness of the sulcus (or lack of thereof) is noted and documented. Again, this should be discussed with the patient so they do not blame the surgeon for “hollowing” postoperatively.
Lagophthalmos
This is measured in millimeters from upper to lower lid upon forced eyelid closure. Obviously, patients who cannot fully close their eyes are not good candidates for blepharoplasty because they can develop exposure keratopathy and dry eye.
Lower-Lid Laxity
Lower-eyelid lid laxity can cause significant functional and cosmetic problems and the patient must be warned about this preoperatively and the surgery must be modified to avoid postoperative lower-lid malposition or ectropion. Several simple exams can be performed to evaluate the integral function of related anatomy.
The Snap Test
The snap test (also called the snapback test) involves distracting the lower eyelid inferiorly away from the globe and letting it go. The surgeon must remind the patient NOT to blink during this count, because a blink will return the lid to the globe. A normal snap test is 1–2 seconds ( Fig. 5.21 ). The count should be carried to 15 seconds and then recorded as no return “until blink.” If this is delayed, the patient may need a lid tightening procedure such as a tarsal strip ( Fig. 5.22 ).

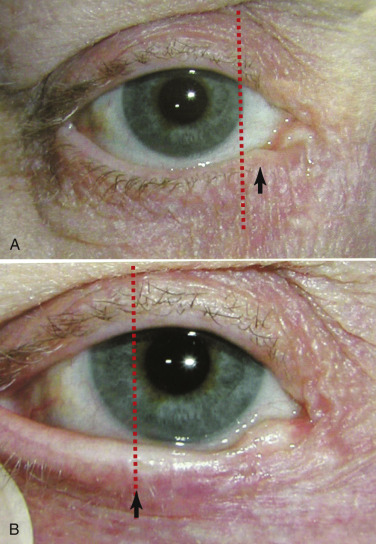
An additional test to evaluate eyelid laxity involves stretching the lower eyelid laterally and accessing the distance of travel of the punctum. In a normal eyelid, when the lower eyelid is stretched laterally, the punctum does not move beyond the medial limbus ( Fig. 5.23A ). In the lax lower eyelid, the same maneuver will cause the punctum to travel lateral to the medial limbus ( Fig. 5.23B ).
Distraction Test
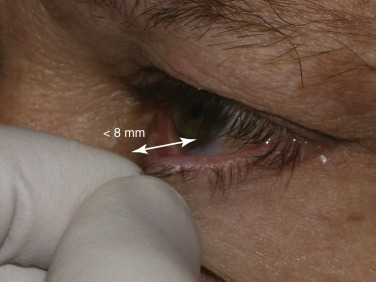
The distraction test (also called pull test) accesses lower-eyelid laxity and is performed by pulling the lower eyelid anteriorly from the globe and measuring the distance ( Fig. 5.24 ). A gap of over 8 mm indicates lower-lid laxity and again merits caution and conservative blepharoplasty if not an adjunctive tightening procedure such as canthopexy.
Patients with lower-lid laxity, ectropion, scleral show, canthal rounding, or previous eyelid surgery should alert all blepharoplasty surgeons of potential complications ( Fig. 5.25 ).
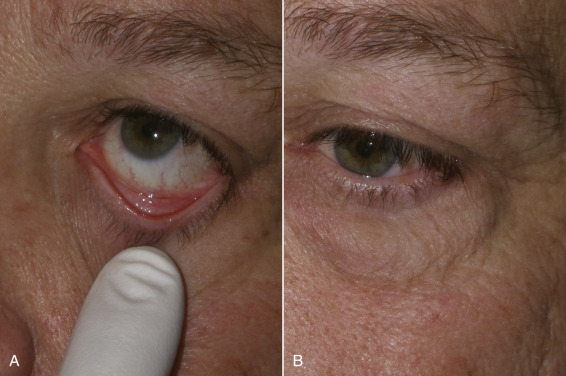
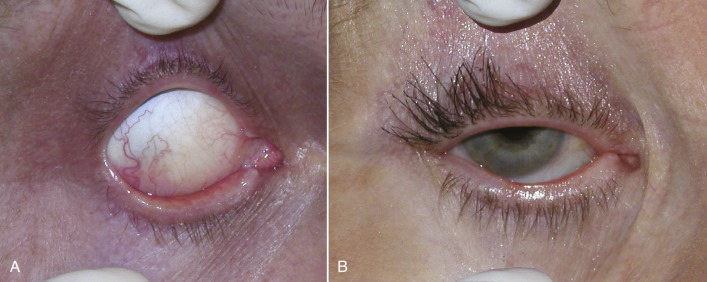
Bell’s phenomenon is a description of a mechanism that exists to protect the cornea during sleep or unconsciousness. This phenomenon causes the globe to rotate superiorly and cover the cornea behind the upper eyelid to prevent desiccation and can be witnessed in some patients that sleep with their eyes partially open, showing the white sclera. A patient with dry eyes or without a protective Bell’s phenomenon could have catastrophic corneal damage from corneal exposure and drying if a lagophthalmos (inability to close the lids) should occur post-blepharoplasty. To check for the presence of Bell’s phenomenon, the patient is asked to close their eyes and the examiner gently pries the lid open with their fingers. With a normal Bell’s phenomenon, the eyeball should roll back and protect the cornea. The examiner should see only the white sclera ( Fig. 5.26A ). A patient with an abnormal Bell’s phenomenon has their corneal surface exposed and visible with their eyes closed and when pried open ( Fig. 5.26B ). Any patient with even a hint of an ophthalmologic problem should have an ophthalmology consult preoperatively.
Ectropion
Scleral Show
This is the distance in millimeters from the lower corneal limbus to the lower-lid margin. Normal is 0 mm. Anything more than this can be associated with epiphora (excessive tearing), thyroid eye disease, or a negative vector orbit and present a more challenging lower-lid blepharoplasty. If a negative vector of the orbit exists, the lid could slip under the globe and look even worse. Such a patient may need spacer grafts, which are well beyond the scope of this chapter.
Punctal Ectropion
The position, graded 1–4+, of the lower-lid punctum against the tear lake and globe is important for proper tear flow. Even if there is just 1+ punctual eversion, the patient can have troublesome epiphora and may not be a suitable blepharoplasty candidate.
Hypertrophied Pretarsal Orbicularis Muscle
It is important to describe to patients who complain about this and mistake it for fat bags (see Fig. 5.18 ). Some blepharoplasty surgeons will not resect this muscle, as it can weaken the lower-lid tone and change the lower-lid shape.
Lower-Lid Fat Prolapse (Steatoblepharon)
The degree of fat prolapse due to an attenuated orbital septum is usually graded 1–4+. In some patients with thin eyelid skin, each of the three fat pads can present prolapse distinctively.
Hollow Infraorbital Rim
Patients tend to atrophy soft tissue along the ligaments of the face. The orbitomalar ligament connects the skin to the infraorbital rim. The atrophy along the rim is graded 1–4+. Either fat transposition during surgery or facial fillers at 1 month postoperative can be used to correct this area.
Malar Hollows
The zygomatic cutaneous ligament that attaches the zygomatic major and minor to the periosteum also sends attachments to the skin. This area can also show atrophy just below the lower-lid suborbicularis oculi fat pad. Patients must be aware before surgery that a blepharoplasty alone may not correct this area and that facial fillers or cheek implants may be indicated.
Skin Evaluation
Fitzpatrick Skin Type
Skin type I (most pale) through VI (most dark) should be recorded. Carbon dioxide (CO 2 ) or Erbium laser resurfacing of the lower eyelids is accomplished safely in most patients.
Texture
Some patients have thin skin with many rhytids and will respond well to laser. Other patients have thicker skin with rhytids that are caused more by the orbicularis muscle insertions beneath the skin. These patients will not see as much improvement from laser resurfacing because they need neurotoxins to relax the muscles beneath the skin.
Translucency
Very thin skin promotes the appearance of dark circles because the skin is so thin that one can see through to the orbicularis muscle that is dark. Laser can create more collagen that is opaque and will help to hide the dark circles. Pigment, hemosiderin extravasation, and vascular structures can also contribute to “dark circles” and simple blepharoplasty may not remedy them. The patient must understand this.
Comprehensive Cosmetic Blepharoplasty
Joe Niamtu, III
The need for preoperative images cannot be overemphasized. Patients rarely pay attention to their eyes until they have surgery, then they look at them every 10 min and can become very critical. It is not unusual for a patient to complain about something “that was not there before the surgery.” They may focus on the tiniest skin excess or asymmetry and blame the surgeon for the problem. I often show preoperative images to patients to show them that they always had one lid lower than the other, or a similar condition they never realized existed. For this reason, any asymmetry or other variable that may affect the outcome is documented and the patient signs it. It is a fact that soon after surgery the surgeon and the patient forget what the patient looked like preoperatively and so previous documentation is essential.
Besides chart records and medicolegal usage, before and after images are invaluable marketing tools. Cosmetic surgery is all about before and after pictures and they can be used (with consent) in the office, on the Internet and social media, and for many other marketing purposes. The surgeon and staff must be meticulous about obtaining legal written consent from the patient. Million dollar lawsuits have been lost for the improper use of patient images, which can be an HIPAA (Health Insurance Portability and Accountability Act of 1996) violation. Since this may vary from state to state, legal consultation should be obtained that clearly details the use of non-compensated images for educational and promotional purposes.
Photographic images must be standardized or they are useless. Common background, position, lighting, animation, and pose are the essential requirements.
A minimum preoperative series should include:
- 1.
Frontal
- 2.
Right and left oblique views
- 3.
Eyes looking upward (to accentuate lower fat pad herniation
- 4.
Eyes closed views (to prove that the patient could close their eyes)
- 5.
The patient at full smile.
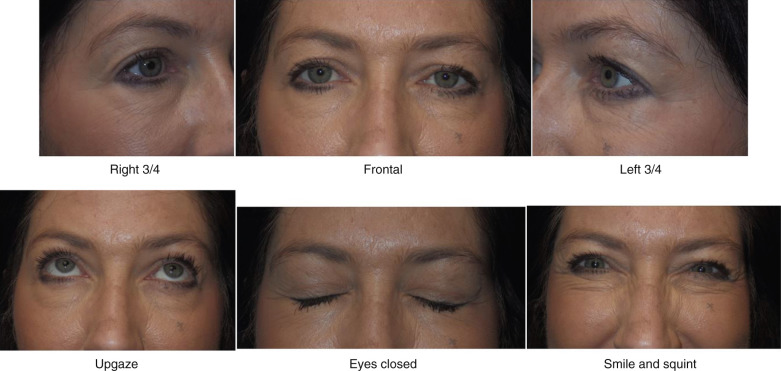
I always take a picture with the patient at full smile and review it with them. The reason is that I have had patients with great post-blepharoplasty results that complained that they still have wrinkles when they smile. Obviously, blepharoplasty surgery cannot stop dynamic periorbital wrinkles and the patient is reminded about our preoperative picture and discussion. Fig. 5.27 shows a typical preoperative series used by the author.
Treatment Planning
Blepharoplasty surgery is an extremely sophisticated surgical procedure that is reliant on many factors for success. Much of what determines this success has little to do with the scalpel and much to do with patient selection, marking technique, and especially the ability to accurately judge what stays and what tissue is excised. In general, blepharoplasty is more about what stays behind than what is to be removed.
Occasionally, a patient will present that only desires isolated upper or lower blepharoplasty, but in general, if a patient has aging changes in the lowers, they have them in the uppers as well, and vice versa. I encourage patients to do upper and lower lids simultaneously. One reason is that I have done many isolated cases only to have the patient look in the mirror and love the treated lids but the untreated lids are more apparent, leaving the patient wishing they had done upper and lower lids at the same time. On the other hand, experienced surgeons will remind novice surgeons never to push a patient into a surgery.
Although some patients will present for only eyelid procedures, many patients will request 4-quadrant blepharoplasty with browlift and possibly other cosmetic facial procedures. It is rare in my experience for a patient do undergo a facelift without eyelid surgery. If they have enough lower facial aging for a lift, they have enough upper facial aging for lids.
Upper-eyelid blepharoplasty is pretty standard in technique but lower-lid approaches vary in internal and external approaches to the fat. For years, external skin/muscle approaches were used with a subciliary incision. This involved incising and excising skin and muscle from the external approach. In addition, it involved violating the orbital septum (middle lamella), which is more prone to producing lower-lid malposition. This approach is still utilized, but most contemporary oculoplastic surgeons maintain that violating the middle lamella can be a prime cause of lower-lid malposition, which can result in lid retraction with scleral show, ectropion, and dry eyes ( Fig. 5.28 ).

Transconjunctival approaches have become more popular as the orbital septum is spared, there is no external incision, and lower-lid malposition is not a concern. The conventional transconjunctival approach is a retroseptal surgical approach and spares violation of the orbital septum. When dealing with transconjunctival approaches, alternate methods are used to address excess skin. In young patients, no ancillary skin removal may be required. In older patients, CO 2 laser resurfacing of the eyelid skin is my treatment of choice; 30% trichloroacetic acid (TCA) is my second choice, and skin pinch techniques are my third choice, and can address the skin excess without invading the lower septum. These techniques will be discussed in detail below.
In terms of comprehensive treatment planning, brow position must be addressed preoperatively. If concomitant endoscopic or open browlift and upper blepharoplasty is planned, the sum of both procedures can stretch the upper-lid skin to a point where the eyelids cannot be closed, so both of these procedures must be tempered to account for adequate residual upper-eyelid skin for normal function. The average amount of skin I remove from the upper lid is approximately 9–12 mm. Some patients may only require a 7-mm reduction, while others may require a 15-mm reduction. When performing simultaneous upper-lid blepharoplasty and browlift, this amount of skin resection is reduced dramatically to 3–4 mm. If skin resurfacing of the eyelids is planned with blepharoplasty and browlift, even more caution is required. The golden rule of cosmetic surgery is that more skin can be taken away later, but it is difficult to replace! For the novice surgeon contemplating both browlift and simultaneous upper blepharoplasty, it may be best to perform the browlift first and address the upper lids at a later procedure, so as not to over-resect skin. For experienced surgeons, my axiom is that “if you need a browlift, you also need a blepharoplasty.” In my early career, I performed several browlifts with fantastic results but the untreated dermatochalasis of the upper lids severely detracted from the aesthetics of the case. Everything looks cleaner and more sculpted when the lids are addressed with the brow.
I have encountered numerous surgeons that perform blepharoplasty but do not perform browlifts. Unfortunately, many of their patients were browlift candidates and were not offered the ethical courtesy of referral for browlift consultation. Instead, these patients received overly aggressive skin removal. Because of this, they will never be able to undergo browlifting as there is inadequate skin to close the eyes. I have heard of lawsuits for this misdiagnosis and failure to refer in such circumstances. It is an ethical requirement to always offer the patient the full complement of contemporary options. If the treating surgeon does not possess the skillset, then a referral or a second opinion is in order.
Although it has already been stated, it is imperative that patients are educated in the preoperative consent phase as to exactly and precisely the difference between browlift and blepharoplasty, as well as what each will and will not do.
Surgical Technique
Preoperative Marking
Upper Eyelid
Blepharoplasty is a technique of finesse. Removing too little skin will produce a substandard result and necessitate revision surgery and inconvenience to the surgeon and patient. Over-resection can cause serious functional and aesthetic problems and lead to legal action. There is no honor lost by revision surgery, only inconvenience. As previously stated, my supreme word of advice to all blepharoplasty surgeons is to be conservative. You will never go wrong with this pearl. I tell all of my blepharoplasty patients in the preoperative period (and in the consent) that a small percentage will need some touch-up surgery. If they do require revision, they are mentally prepared for it.
The key to many types of cosmetic surgery procedures is accurate marking of the surgical site and landmarks; with blepharoplasty, it is absolutely critical. I have taught and proctored upper blepharoplasty surgery to hundreds of surgeons from every conceivable specialty. Without exception, the biggest challenge for novice blepharoplasty surgeons is learning how to properly mark the eyelids. Once the marking procedure is understood and mastered, the surgery is relatively straightforward. Understanding correct marking technique is understanding cosmetic blepharoplasty. There is no “cookbook” technique to mark the upper eyelid, as each lid (even on the same patient) is different.
It is imperative to take preoperative pictures before the patient is marked. If the preoperative pictures are taken with makeup, the postoperative pictures must be taken the same way and vice versa. I also take a picture of the markings as well.
It is imperative to mark the eyelids with the brow relaxed in the upright position before any local anesthetic is injected. When the patient is reclined or supine, the brows and lids are not in a natural position and the markings can be inaccurate.
A huge pearl to remember is that it requires a minimum of 20 mm of upper-lid skin for normal lid closure and function. Regardless of what technique is used to mark the lids, the “20 mm rule” must always be observed.
To increase adherence of the ink, the eyelids are wiped with alcohol before marking to degrease the skin. These marks must remain visible through surgical scrub, local anesthesia, and manipulation. Some marking pens fall short and I have found the retractable ultra-fine point Sharpie markers to be the best for ink longevity on the skin. If a robust ink is not used, the markings can wipe off with prep and the surgeon is at a loss for accuracy.
When marking the lids, the brow is elevated with the fingers to stretch the lid skin, which facilitates drawing. The first step is to decide where to locate the upper-lid crease. Most males (non-Asian) have an upper-lid crease of about 8 mm above the lashes and most females (non-Asian) have upper-lid creases of 10–12 mm above the lashes. Generally, the lid crease is marked using the patient’s existing lid crease. Females desire a high lid crease in order to have a significant lid shelf on which to apply eye shadow. A high crease in males can be feminizing. The position of the upper-lid crease can be discussed preoperatively but I prefer10–12 mm for females and 8–10 mm for males. There are always exceptions, where a patient has an exceptionally high or low crease which can be raised or lowered. The same situation exists when the crease height is not symmetric.
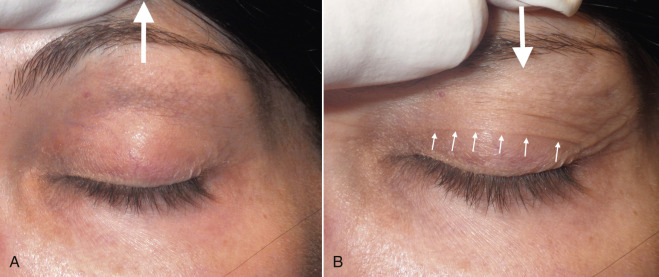
I first elevate the brow to remove any skin redundancy and almost always mark the patient’s existing upper-eyelid crease. Most patients have discernible creases and look normal with their existing creases. A fine-tip surgical marker is used to make a dotted or straight line from the lateral canthus to the lacrimal punctum. As many patients flinch and blink during marking, I prefer to make dots across the crease and connect them at the end of the marking procedure. The crease in many patients is arcuate, peaking in the center and tapering 4–5 mm at each terminus. Many patients have relatively straight line creases, which are replicated with the markings. In these patients, exaggerating an arch can cause an artificial look. Some patients have levator dehiscence or simply do not have a discernable crease. In these patients, the average markings previously described are used per gender and race. It is sometimes difficult to find the actual crease, as some patients have multiple creases. I find it easiest to elevate the brow to stretch the lid skin, then slowly relax the upper-eyelid skin and observe the redundancy, which will reveal the actual crease ( Fig. 5.29 ). A skin marker is used to make a line on the crease from the lacrimal punctum to the lateral canthus ( Fig. 5.30 ).
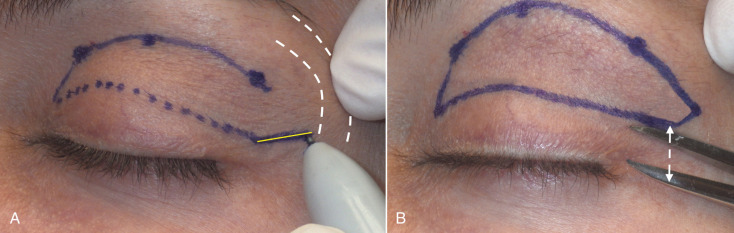
The next step is to mark the upper extent of the blepharoplasty incision and there are numerous ways to accurately perform this task. Experienced surgeons simply pinch the upper-lid skin with forceps until the lashes slightly evert and make a mark. This is done in the medial, central, and lateral portion of the lid ( Fig. 5.31 ). Then, the marks are connected in an arc ( Fig. 5.32 ). Finally, the lateral angled leg of the incision is completed ( Fig. 5.33 ). The lateral limb is angled 15–20 degrees superiorly instead of an angular junction like the medial corner. This extension incorporates a larger amount of skin to be excised to improve lateral hooding. Although some texts describe carrying this angled incision into the crow’s feet region, I never do this as the scar can be very noticeable. I always stop this incision at, or slightly beyond, the lateral orbital rim.
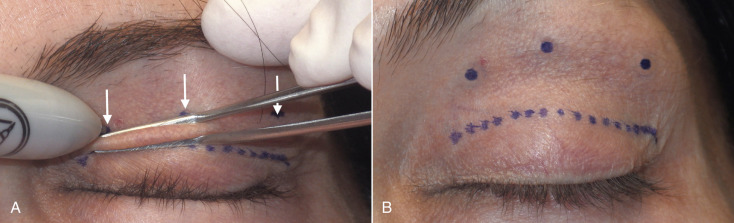
It is important that the medial and lateral extensions of the incision are 3–5 mm above the lid margin and should be measured to be symmetric on both eyes. Although it is important to have symmetry in the crease, it is very common for one lid to have a bigger upper incision margin, hence more skin will be removed from that lid. Creases must always be the same and even a 1–2 mm difference can be very noticeable to the patient.
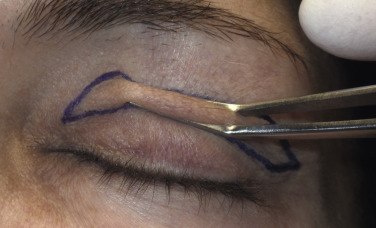
The final maneuver in this (and all other lid-marking techniques) is to test that the planned skin removal will allow full eyelid closure. This is an extremely critical and easily performed check. I prefer a dental cotton plier but any type of angled forcep can be used. With the brow in the relaxed position, the upper- and lower-lid markings are pinched between the forceps and the eye should remain closed with the lashes slightly everted ( Fig. 5.34 ). If pinching the lines together opens the eye, the upper incision line must be lowered to allow less skin removal. Conversely, if the marks are approximated and the lashes do not evert, then the upper incision marking can be extended to remove more skin. If there is ever a doubt, the surgeon should err on the conservative side. If future revision is required, this is easily performed with local anesthesia and minimal recovery. Remember: measure twice, cut once ! Regardless of the marking technique utilized, this step is critical. Although the aforementioned series of marking is effective, it can be confusing for the beginning surgeon.
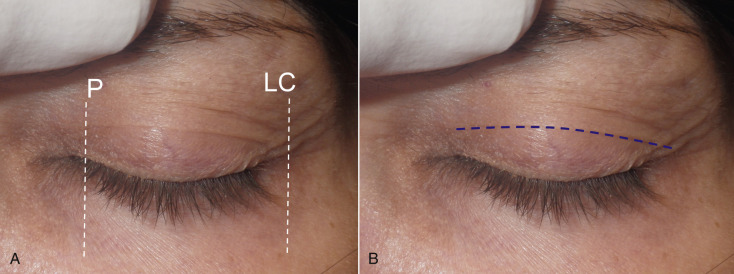
Marking the upper-lid crease is always the same, but other methods of marking the upper incision extent are easier to learn for the novice surgeon. The marking method I most often use is what I informally call the “finger gaze” technique. The patient stands about 1 foot in front of me and I place my index finger on my nose tip and ask the patient to stare at my finger. It is imperative that they do not lift their brows during this marking technique, or it will be inaccurate. Also, patients tend to flinch or have wandering eye movements while marking, so they must be reminded to stare directly at the index finger in a relaxed brow position. Patients with redundant upper-lid skin will have a skin fold at the bottom of the redundancy. A series of dots are made across the bottom of this fold from the punctum to the lateral canthus ( Figs. 5.35 , 5.36 ).

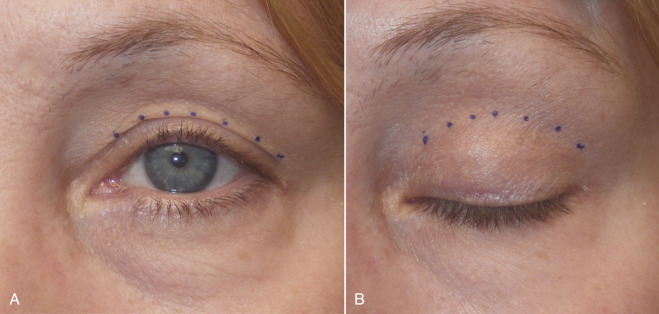
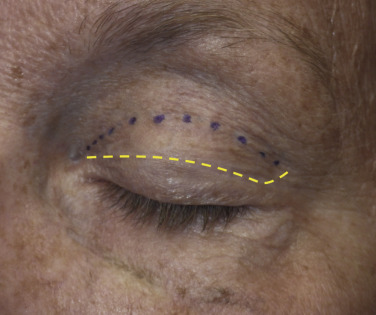
The dotted line at the bottom of the fold will correspond with the upper incision marking when the eye is closed. At this point, the medial and lateral corners are connected, as described ( Fig. 5.37 ).
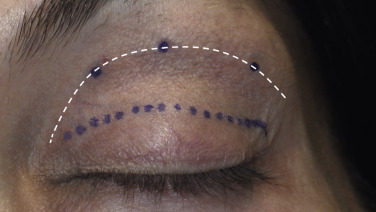
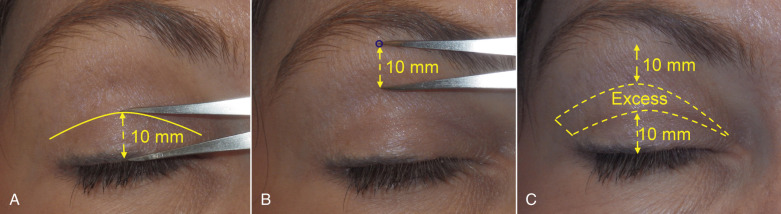
A final way to mark the upper eyelid is what I call the “mathematic technique” because it is based on the axiom of the upper lid requiring a minimum of 20 mm of skin for normal closure. In this marking method, the surgeon first marks the crease as described previously. The distance from the lashes to the crease is measured and noted. Next, the surgeon identifies the region of transition from the thick forehead skin to the thin, crinkly upper-lid skin and makes a mark ( Fig. 5.38 ). The math occurs when the crease measurement is subtracted from 20 mm and the balance is the distance from the brow marking inferiorly. Although this sounds complex, it is actually simple. An example would be a crease measured at 10 mm from the lash margin. If this 10 mm is subtracted from 20 mm (the amount of lid skin that will remain intact) the product is 10 mm. A line is drawn 10 mm inferior to the brow/lid skin transition. The bottom mark leaves 10 mm of remaining skin and the top mark leaves 10 mm of skin. This means that the obligatory 20 mm of skin will allow normal lid closure. This also means that all the skin between these markings can be safely excised. Another example would be a patient with a crease 12 mm above the lash margin; 20 mm minus 12 mm equals 8 mm. This means that a marking will be made 8 mm below the brow/lid skin transition. All the skin between these lines can be removed and still allow 20 mm of remaining skin for normal lid closure. This is an approximation and obviously is only accurate in patients with >20 mm of upper-lid skin.
Regardless of which of the three upper-lid marking techniques are used, remember that normal lid closure requires at least 20 mm of skin.
When marking the patient, it is important to have an acute angle at the medial canthal region to allow a smooth approximation at closure. It is also very important not to extend the medial portion of the incision onto the multicontoured concave regions on the lateral nose. Incisions over concave regions are notorious for poor scarring and can produce medial canthal webbing, which can be very difficult to improve ( Fig. 5.39 ).