Key points
- •
We learn most from complications and our difficult revision patients.
- •
The key to maximizing patient outcomes and developing best practices is through refining the process of breast augmentation and minimizing complications.
- •
Common major complications of breast augmentations will be presented, along with some techniques for surgical revision.
- •
Specific techniques are discussed for capsular contracture, fold malposition, symmastia.
- •
Extrusion/potential infection will be presented.
- •
Capsular flap and neopocket techniques will be described in augmentation revision patients for malposition including the inframammary fold and symmastia.
Introduction
Learn from the mistakes of others.
You will never live long enough to make them all yourself
Sam Levenson
It has been said, ‘If you do not have any complications, then you are not performing enough surgery.’ Complications and revsion surgery are inevitable. Although our goal for surgical revisions should be zero and ‘perfection’, every plastic surgeon even a month into practice understands this goal is unattainable. One of my surgical mottos is: Pursue perfection, but accept excellence. Breast augmentation by its nature is elective and, because implants will not last forever, every patient we augment will require a breast revision surgery. The key to minimizing patient complications, maximizing patient outcomes and enhancing our surgical lives is to constantly pursue and improve the process of breast augmentation, determine which complications we can actually impact and lower, and then choose to make the necessary changes in our practices to achieve these goals. I am the first to recognize that changing the way we practice is difficult. Many studies have shown that once a physcian develops a routine for more than 5–7 years, few will change. Hopefully, after reviewing this brief chapter you will be challenged to look specifically how you are performing breast augmentation and as necessary adapt and change your approach to avoid the complication versus just viewing this chapter as correcting or enhancing a complication once it occurs.
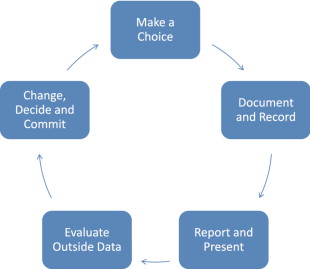
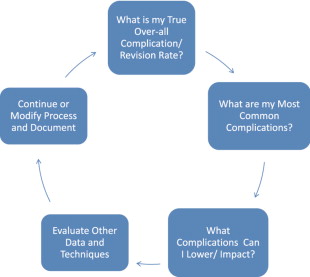
As surgeons, unless we document, follow, photograph, are self-critical and objectively measure our patients and outcomes, we will underestimate our complications and overestimate the number of procedures we perform, and quite frankly the quality of our results. The turning point for me was beginning the Style 410 cohesive gel implant study. Being involved in an FDA, CRO reviewed, highly scrutinized new implant study brings with it immediate accountability. I would encourage each surgeon reading this text to make a conscious commitment to begin today to start a patient database (sample format included) tracking all of their breast augmentation patients and their outcomes. Once you make this choice and begin following your patients in this way, then can begin the positve patient cycle shown in Tables 18.1 and 18.2 . So where is this all going? We need to understand that breast augmentation is a process and that equally important as a refined meticulous surgical technique is pre-operative patient assessment and education, implant selection and tissue based planning, and defined post-operative follow-up. We should constantly review our ever-advancing science and technique, evaluate data and documented experiences and constantly move toward ‘excellence’. It is with this background and approach that I have prepared this chapter.
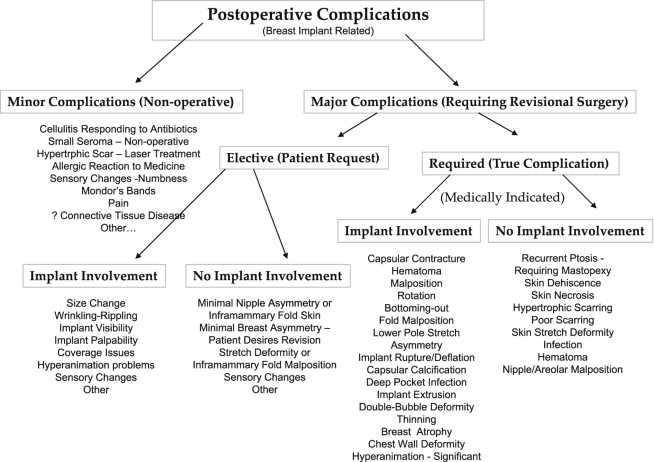
Complications may be presented in many different formats and ways. By their nature, they are difficult to categorize with many patients having multiple problems such as malposition, thinning of overlying tissues, palpable and visible wrinkling and rippling simultaneously. We must also be careful not to create a new problem while we are correcting another, such as creating a fold malposition while correcting a capsular contracture. Shown here in Table 18.3 is one method. It has been modified since its initial publication ( ) and is not perfect but helps to show the most common complications in breast implant surgery. It also is not an excuse or an attempt to minimize a complication. All complications are not however equal in significance, and stratification is helpful in sorting both importance and frequency.
By adopting a standardized approach to the process of breast augmentation, complications may not be eliminated but untoward events and revisions can be minimized. We should also improve over time. I will be presenting a few of the most common complications in breast augmentation revsion, suggest ways to minimize or prevent their occurrence, and describe some current approaches and techniques to correct, improve or enhance a specific complication and include specific patient case studies and outcomes.
Specific complications and background
Capsular contracture
Actual techniques in treating patients with capsular contracture depend upon multiple factors. Some of these include: the style and generation of the device, the position of the current implant pocket, if any complications occurred at the primary operation, the degree of glandular atrophy and coverage over the implant, any calcification of the capsule, prior size, manufacturer and surface of the implant, to name a few. If you did not perform the prior operation(s), obtaining the prior operative note and medical record is important along with weighing and assessing the implant intraoperatively. Saline implants not only have greater projection and radial diameter when inflated, they also weigh more. The shell of the implant has weight and adds 7–15% to the final weight of the device. Saline devices are filled at surgery, the shell has weight, and saline is more dense than gel. Silicone gel devices are pre-filled and their mL or weight includes the shell.
Options for revision in a patient with a capsular contraction have been well delineated. BASPI and additional options include: capsulotomy only, capsulectomy–partial or complete, capsular flap or neopocket with collapse of the capsule placing the new implant on top of the prior capsule, changing pocket planes, usually subglandular to partial subpectoral or dual-plane, and more recently adding a soft tissue matrix such as Alloderm or Strattice. It should also be mentioned that implant removal with or without capsulectomy may be performed without replacement. This is always an outpoint. The true etiology of capsular contracture is unknown; however the most common theories include a low-grade bacteria: bacterial theory and the hypertrophic scar theory secondary to blood, fluid or tissue trauma. It is likely that one or both play a role in each individual patient. Because the exact etiology is unknown, similar to deep vein thrombosis, I recommend doing everything possible to lower the incidence of capsular contracture or prevent it. In addition, technical points to maximize success and limit recurrence include: meticulous hemostasis and atraumatic technique, use of surgical drains with any capsulectomy, antibiotic irrigation such as the Adam’s solution, perioperative antibiotics, and the use of op-site or tegaderm over the nipple. If implant rupture is suspected placement of a protective barrier drape over the entire incision area and chest/breast region will limit contamination and silicone skin contact ( Figure 18.1 ).

Further background
The most common patient presentations include a subglandular capsular contraction where a position change is performed following capsulectomy and implant removal or a patient with a prior partial submuscular implant that has developed a capsular contracture. Patient examples of each of these scenarios will be presented.
Capsular contraction
- •
Baker IV capsular contracture and an early generation silicone device placed in the subglandular position with visible distortion and asymmetry.
- •
Proper pre-operative informed consent including management of patient expectations and implant range and patient asymmetry information documented.
- •
Patient goals and desires are discussed and factored.
- •
Tissue based planning is performed and documented taking into consideration the measurements including the base width of the breast (BW), skin stretch (SS) or breast elasticity, sternal notch to nipple distances (SN-N), nipple to inframammary fold distances (N-IMF), contribution of the breast parenchyma. Assessment of the patient’s chest wall and any breast ptosis and breast asymmetry are recorded.
- •
Surgical marking of the midline, IMF and pre-operative measurements are performed.
- •
Implant selection is confirmed.
- •
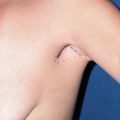
The new IMF incision is preferred and has been found to have the lowest complication rate and recurrent capsular contracture rate, although periareolar may be used. The incision can be very accurately positioned directly in the IMF based on ‘High Five’, a selector device or other planning methods.
Operative technique for correction capsular contraction
- •
Large op-site dressing is applied to the entire field if implant rupture is suspected ( Figure 18.1 ).
- •
A minimum of a 5 cm incision is made directly in the predetermined IMF.
- •
Pocket position is determined with partial submuscular prioritized for both soft tissue coverage and reduction of recurrent capsular contracture.
- •
New virgin pocket with heavily textured implant.
- •
Short acting anesthetics and muscle paralysis are used with multiple anti-nausea agents.
- •
In the case of a prior subglandular implant, if an older generation, thick or calcified, the entire capsule is removed including the implant preferably without capsulotomy ( Figure 18.2 ). If a newer generation device is encountered, and thinning is present, the capsule against the muscle may be removed and anterior capsule left intact. This is dramatically facilitated with a double handle retractor, spatula retractor, lighted retractor, suction and consideration for tumescent fluid ( Figure 18.3 ).
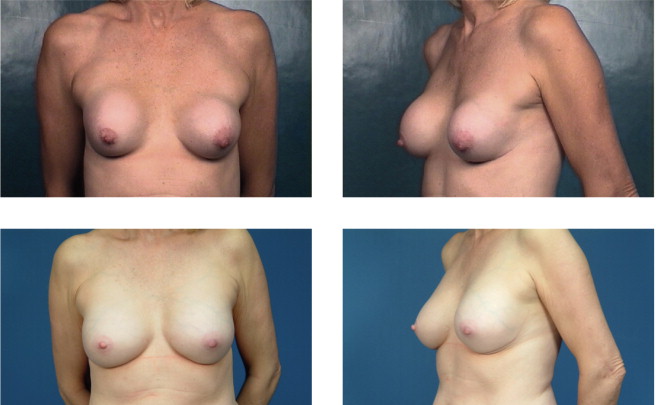
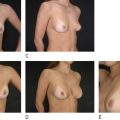
Figure 18.2
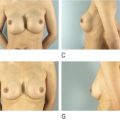
This patient had bilateral Baker IV capsules following a subglandular implant with 240 mL smooth silicone implants 16 years prior to surgery. Her tissue-based planning measurements included a 13 cm breast base width, 3 cm of skin stretch, 22 cm SN-N distance, and 8.5 cm N-IMF distances. Style 410 FM 350 g implants were placed in the partial submuscular, dual-plane placement position with her result shown at 5 years with no recurrence of capsular contraction and implants in good position.
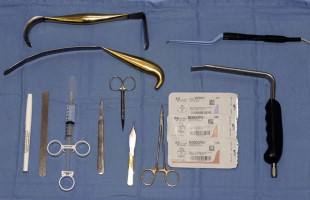
Figure 18.3
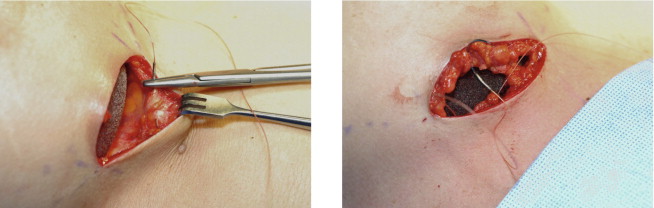
Instrumentation for breast augmentation revision cases is similar to primary cases. Spatula, retractor along with the double handle, lighted retractors and smoke evacuators are extremely helpful. 2-0 vicryl is used to set the IMF, 3-0 vicryl for a deep running closure and 4-0 monocryl for the subcuticular layer.
- •
In the case of a prior submuscular implant, a neopocket with capsular flap is made or a capsulectomy, complete or partial, may be performed ( Figure 18.4 ).
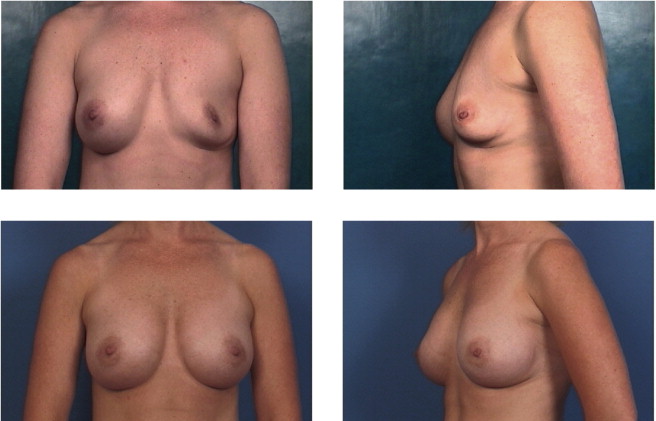
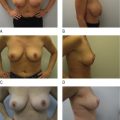
Figure 18.4
Implant deflation submuscular to submuscular with neopocket. This patient had a prior partial submuscular placement of 350 mL smooth saline implants 6 years prior to surgery. Her tissue based planning measurements included a 13.5 cm breast base width, 2 cm of skin stretch, 21 cm SN-N distance, and 9 cm N-IMF distances. Style 410 FM 440 g implants were placed back into a new partial submuscular, dual-plane placement position following a capsular flap, Neopocket procedure with her results shown at 30 months.
- •
Atraumatic and bloodless precise pocket dissection is performed with prospective hemostasis either with creation of a new submuscular pocket or a neopocket with a capsular flap method or capsulectomy.
- •
I prefer to begin the pocket dissection centrally proceeding laterally being careful not to over-dissect the lateral pocket, then defining the fold maintaining a fascial shelf when possible with prospective hemostatsis with monopolar cautery coagulating the perforating vessels as they come in above the muscle insertions, then medial and high in the pocket.
- •
The muscle fibers, including false insertions on the ribs are dissected free with preservation of the sternal insertions.
- •
Hand-in-glove pocket dissection is performed for form stable implants. Lateral pocket dissection is implant independent but for smooth devices the superior or cranial pocket is developed to the second rib.
- •
Triple antibiotic irrigation using the Adam’s solution (50 K units of bacitracin, 1 g of cefazolin and 80 mg of gentamicin in 250–500 mL physiological saline).
- •
No touch handling and placement of the implant is used with the surgeon touching the implant only and dipping his/her finger in antibiotic solution if pocket is re-entered including a glove change just prior to implant placement. Consideration for an insertion sleeve, particularly with textured devices ( Figure 18.5 ).
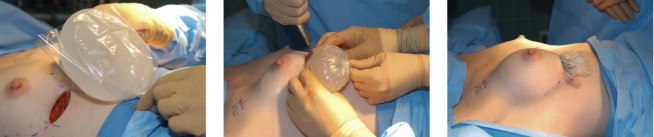
Figure 18.5
Insertion sleeve. A temporary plastic insertion sleeve is particularly useful when inserting heavily textured implants. I cut the sleeve in half and place antibiotic pocket irrigation fluid inside the pocket and sleeve. The assistant retracts and holds the twisted sleeve at the 6 o’clock position. After the inplant is in position, fingers are inserted inside the sleeve lifting up the implant off the chest and the posterior or deep side of the sleeve is removed first followed by the anterior sleeve.
- •
I like to put the implant in the first web-space of my left hand with constant pressure against the incision and spin the implant in with alternating index and thumb pressure versus a rocking back and forth from side to side motion.
- •
The patient is sat up at 90 degrees and symmetry checked. No blunt dissection with all additional pocket manipulation under direct vision with cautery and retractors.
- •
Closure is performed in multiple layers. I use a 2-0 vicryl to set or redefine the fold ( Figure 18.6 ) followed by a 3-0 vicryl running suture to approximate the fascia and deep dermis followed by 4-0 monocryl running subcuticular closure.