Key points
- •
Simple surgical technique, with minimum incisions.
- •
No undermining of the forehead skin, except for the sites where suture threads are passed.
- •
Gliding of the eyebrows over deep soft tissues of the forehead.
- •
Low morbidity.
- •
Possibility for reversion (undoing the surgical correction).
Introduction
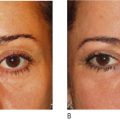
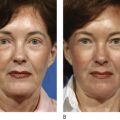
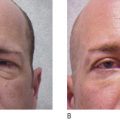
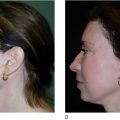
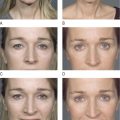
The position of the eyebrows exerts great influence over the upper eyelids, both in terms of skin excess as well as in the overall aesthetics of the lid/orbit region. Brow ptosis, which is common in facial aging, can happen even in teenagers, principally in the lateral portion, giving the impression of a sad look. A lowering of the eyebrow due to aging often results in excessive skin in the upper eyelid as well as a poorer overall aesthetic appearance in the orbital region.
Various techniques have been described in the literature for the correction of superciliary ptosis, each with its own indications, good results, technical limitations and complications. Since 1994, aiming to realize an essentially simple technique with little undermining and low morbidity, and which could be associated with blepharoplasty, we have developed a technique using eyebrow anchoring and previously unexplored concepts such as suture thread for suspension.
Patient selection
Patients selected for this browlifting surgery should be young or middle aged, with few or no frontal wrinkles and low positioning of the eyebrows. These patients should still possess skin elasticity. Typical subjects are patients who do not wish to submit to a major facelift.
Indications
Light or moderate eyebrow ptosis.
Operative technique
Pre-operative preparation
Marking and vectors
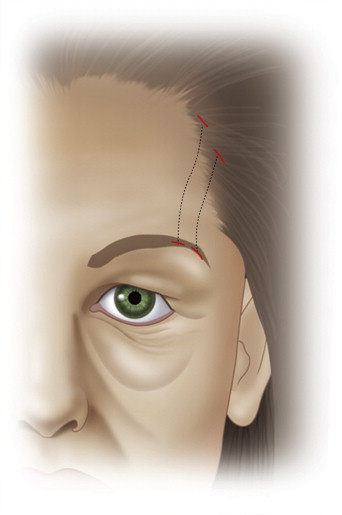
As there are various types of eyebrows, the marking must always be suited specifically for the individual patient. With this technique the entire eyebrow can be raised. It must be emphasized that the eyebrows are normally arched and an ideal place must be chosen at which to raise them, in order to obtain a natural result. If the goal is to raise the lateral third of the eyebrow, we first simulate the surgical effect by applying traction with a finger, pulling the eyebrow up to find the most suitable point for raising it. In the lateral portion ( Figure 2.1 ), due to the curvature at the eyebrow’s lateral end, the vector for traction generally assumes an oblique position, corresponding to an angle of 90 degrees with the eyebrow axis. Once this vector is found, we trace two lines ( Figure 2.2 ) parallel to it, spaced 1 cm apart, running from the edge of the scalp to the upper edge of the eyebrow, at the portion to be raised. These lines correspond to where the suture threads will run. The same drawing is repeated for any part of the eyebrow to be raised. It is important to emphasize that the above description using the finger as traction should be performed in order to find the points that will yield an aesthetically pleasing result. In recent years, due to the demand of the patients themselves, we have only been performing the lateral elevation.

Technique
Positioning on the table
We currently use the horizontal position with the patient lying on his or her back. This position results in a natural elevation of the eyebrow that allows us to fix it at the proper height with only a slight hypercorrection.
Anesthesia
We generally perform the procedure using local anesthesia and sedation, but it can be performed on patients under general anesthesia for other procedures. We use 10 mL of 2% lidocaine diluted in 40 mL of saline solution and epinephrine at a dilution of 1 : 400 000, which is infiltrated at the places where the incisions are made and where the threads will be run through the subgaleal plane.
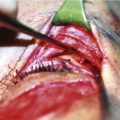
Incisions
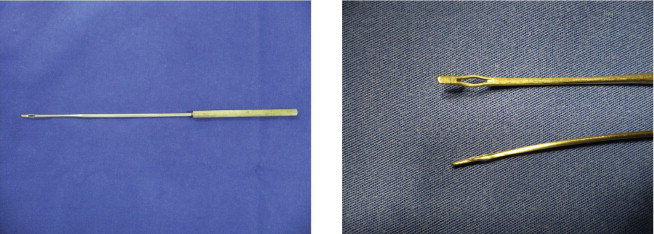
Four minimal incisions are made for the passage of each section of the suture thread, forming a rectangle. Each of these incisions is approximately 1 mm long, and made with a #11 scalpel ( Figure 2.3 ) .
Passage of the suture threads
For the passage of the suture threads, we use an undermining tool designed specifically for this technique (Dr Graziosi detacher R-769-26G, Richter, Brazil, Figure 2.4 ) in the following way:
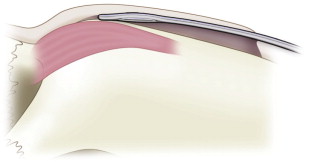
We insert a polyester suture thread (Mersilene, Ethicon, United States) through the tip of the detacher, which is then inserted through one of the incisions in the scalp, until reaching the subgaleal plane ( Figure 2.5 ). The detacher is then advanced along this plane, under the frontal region, in the direction of the eyebrow. During this time, the concave face of the detacher should be facing the cranium, while it slides over the periosteum of the frontal bone. When the detacher reaches the upper edge of the eyebrow, it is rotated 180° so that its concave face points upward, away from the cranium, and its point is brought out through the incision made previously at the edge of the eyebrow ( Figure 2.6 ). Sometimes, the rigidity of the tissues of the galea may make it difficult to push the tip of the needle up and out. To help in these cases, we introduce a #11 scalpel into the incision and touch it against the tip of the detacher. After the suture thread has been brought out of the incision, the detacher is drawn out of the initial incision, and a 40 × 7 needle is introduced between the two incisions on the smaller side of the rectangle, parallel with the eyebrow, along the deep subcutaneous plane.
Related posts:
 Correction of the tear trough deformity with hyaluronic acid
 Orbital aging and harmony in orbital rejuvenation
 Lower lid blepharoplasty with fat grafts for correction of the tear trough
 Alloplastic augmentation to improve blepharoplasty and midfacial results
 No touch lower blepharoplasty
 Is the transpalpebral approach to the upper and midface rejuvenation a safe method?
Stay updated, free articles. Join our Telegram channel

Full access? Get Clinical Tree


