9 The Transaxillary Approach
Summary
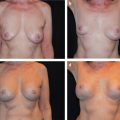
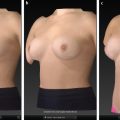
This chapter outlines in detail use of the endoscopic approach to transaxillary breast augmentation. Specific aspects of technique that provide the ability to maintain precise control of breast implant pocket creation and device placement are provided. This approach allows for successful and consistent outcomes in patients regardless of tissue type and type of breast implant used.
Key Points
Incision design—centered in axillary apex, contained within hair-bearing skin.
Initial dissection—superficial in subcutaneous plane to lateral border of pectoralis major muscle.
Muscle dissection Part I—optical cavity created to make uniform space in preparation for the main pectoralis major release.
Muscle dissection Part II—the pectoralis major muscle is divided by correlating external landmarks to internal anatomy. Endoscopic visualization allows precise division of muscle relative to the level of IMF, to maintain or drop the level of IMF as indicated.
Postoperative care reinforces the IMF and prevents the implant from moving back up into the tunnel used for placement.
9.1 Incision Planning
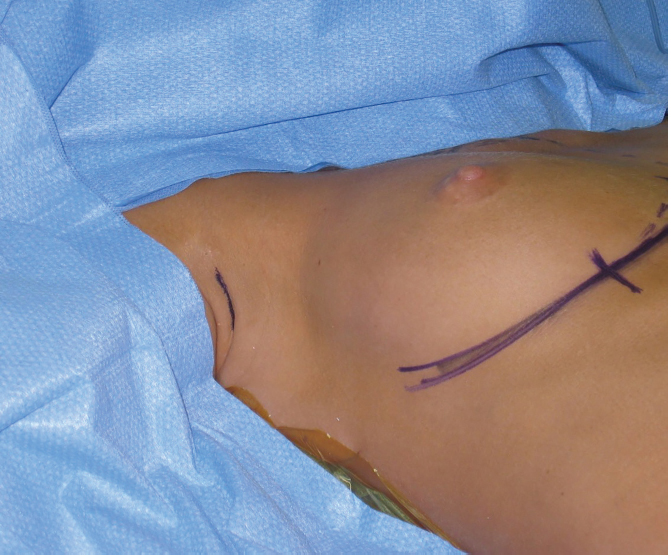
Although many different incision types have been described for breast implant placement using a transaxillary approach, there are three types of incision access preferred by the author. The first is a short 2.5- to 3-cm incision in the axillary apex, preferred by the author only for saline implant placement, oriented within an existing skin crease. This incision is always located within the hair-bearing skin (Fig. 9‑1). This incision approach is too short for safe use in the placement of silicone gel devices.
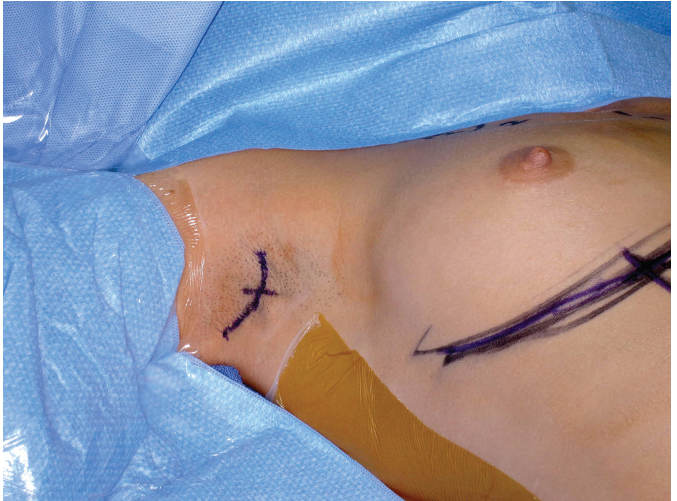
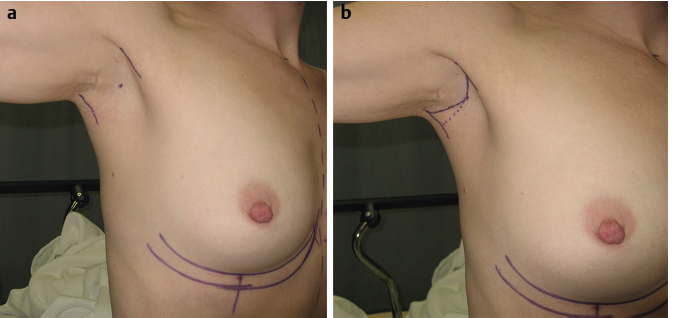
Alternatively, a second approach that can be used for saline and silicone gel implant placement is to use a longer incision, typically measuring approximately 5 cm in length. As with the first option, the goal is to have all or most of this incision within the hair-bearing skin of the axilla. The author prefers this longer incision for silicone gel implant placement, where as the longer incision is needed to prevent damage to the prefilled silicone gel implant during placement. This incision is too long to be concealed within an existing skin crease and thus must be oriented superiorly in its posterior half to lessen visibility in the early postoperative phase (Fig. 9‑2).
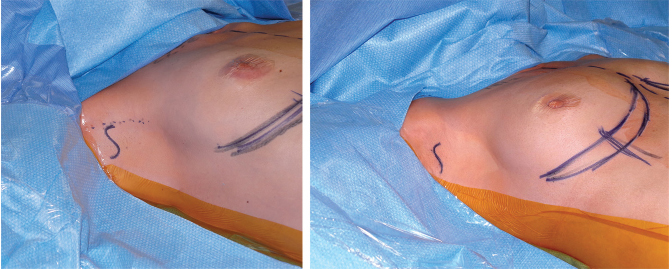
The third option is an “open S”–shaped incision that is preferred by the author only if the hair-bearing skin area is extremely narrow and for placement of some highly cohesive shaped silicone gel implants (Fig. 9‑3). In the author’s view, this incision is frequently the most visible of the three alternatives and is therefore used on a more limited basis.
9.2 Initial Dissection
9.2.1 Instruments
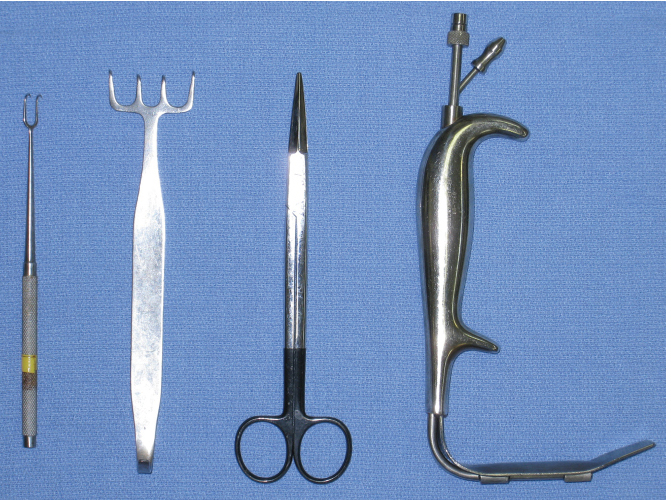
The instruments recommended for this procedure include an electrocautery pencil with Colorado needle tip, double wide skin hook, Freeman 4-prong skin hook, straight facelift scissors (blunt-tipped), and a 1-inch-wide, nonserrated fiberoptic retractor with smoke evacuation capability (Fig. 9‑4).
9.2.2 Marking Landmarks
The short incision is marked in an existing skin crease in the axillary apex. All incision options used by the author are planned around the dominant skin crease in the axilla. The author prefers to mark the incision location preoperatively with the patient sitting. The landmarks are used to keep the incision within the hair-bearing skin, confirmed prior to incision placement with the patient positioned for the procedure under general anesthesia. The longer incision is also marked with the patient awake in the sitting position, first placing reference marks on the posterior edge of the anterior muscle border and the anterior edge of the posterior muscle border of the axilla. The axillary apex is then marked with a dot (Fig. 9‑5a). The incision is extended anteriorly to just short of the posterior edge of the pectoralis major muscle. If the “S-shaped” option is used, the anterior extension is extended inferiorly to stay behind the posterior edge of the pectoralis major muscle. The incision is extended posteriorly from the axillary apex mark, angled superiorly to prevent the incision from being visible if the patient’s hands are placed on her waist. If the “S-shaped option is used, the central limb of the S is centered in the dominant skin crease and tails superiorly to follow the area of hair-bearing skin. This is confirmed in the preoperative holding area prior to the start of the procedure (Fig. 9‑5b, Video 9.1).
9.2.3 Details of the Procedure
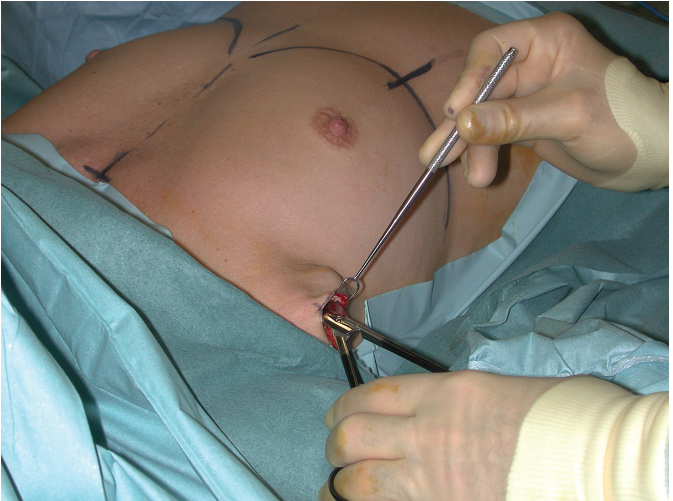
The initial incision is made using a scalpel into the deep dermis, extended into the immediate subcutaneous plane using the Colorado needle tip electrocautery. The initial dissection is directed anteriorly toward the lateral border of the pectoralis major muscle, with care taken to stay in the immediate subcutaneous plane.
For the short incision approach, this is performed initially with the cautery, using a double-wide skin hook for retraction, and is continued to the lateral edge of the pectoral muscle using straight, blunt-tipped facelift scissors (Fig. 9‑6). The undersurface of the lateral edge of the pectoralis major muscle is grasped between the thumb and forefinger of the nondominant hand, with the scissor inserted just beneath the muscle edge into the subpectoral space. The scissors are in a plane superficial and parallel to the anterior surface of the rib cage so that inadvertent penetration into the thoracic cavity is not possible.
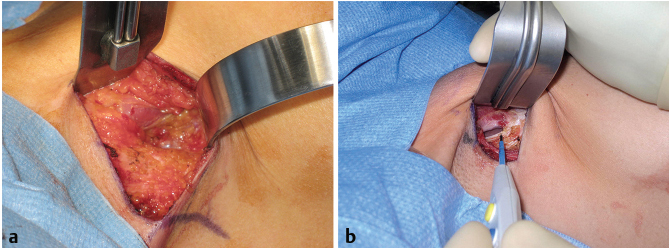
For the longer incision and S-shaped approaches, several short crosshatch marks are made prior to opening the incision to ensure proper alignment and ease of closure. After incision creation, a four-prong Freeman hook is used for retraction as the immediate subcutaneous plane is developed. The correct plane of dissection is repeatedly confirmed as it is developed toward the lateral edge of the pectoralis major muscle. The Freeman hook is then replaced with a 1-inch fiberoptic retractor as the lateral edge of the pectoral muscle is approached. This retractor is then used to identify the immediate undersurface of the lateral edge of the pectoralis major muscle. This allows for direct entry into the subpectoral space using the electrocautery under direct vision at all times. This approach provides optimal visibility of entry into the subpectoral space (Fig. 9‑7 ; Video 9.2).
9.2.4 Pitfalls
The critical issue for the initial dissection phase is to keep the dissection plane in the immediate subcutaneous plane to the lateral border of the pectoralis major muscle. This serves to consistently avoid damage to the intercostobrachial nerve and the lymph node bearing–tissues of the axilla. Dissection in the immediate subcutaneous plane results in creation of a thin skin flap that must not be damaged by the electrocautery used for dissection. Careful dissection in this phase prevents bloodstaining and facilitates subsequent aspects of the procedure.
9.2.5 Pearls
There are trade-offs inherent in the selection of the incision using this approach. The short incision option, 2.5 to 3 cm in the axillary apex, in an existing skin crease is an option for saline implant placement. This approach has the advantage of leaving the least visible external scar, but allows for less direct visualization of the distal portion of the immediate subcutaneous dissection and entry into the subpectoral space. The more narrow dissection tunnel, with experience, does have the advantage of less morbidity adjacent to the incision if it can be created consistently without bleeding issues. Experience has shown that this is possible on a consistent basis and has led the author to continue to use this approach routinely for saline implant placement.
Alternatively, the longer incision approaches allow for direct visualization of all aspects of the initial dissection, including entry into the subcutaneous space. This allows for a consistently bloodless field. The four-prong Freeman hook, replaced by the 1-inch fiberoptic retractor, allows for consistent visualization, with retraction performed to prevent damage to the redundant skin flap created by the superficial dissection plane. There is, however, infinitely more reassurance required for patients in the early postoperative phase with respect to the appearance and ultimate outcome of the incision. This experience has led the author to use the longer incision approaches for silicone gel implant placement only, where the added incision length is needed for successful placement of the prefilled devices that would otherwise not be possible through the alternate short incision approach described for the placement of initially empty saline implants that are inflated after placement.
Related posts:


Stay updated, free articles. Join our Telegram channel

Full access? Get Clinical Tree


