3 Lower extremity reconstruction
INDICATIONS
Contaminated or infected ulcer in a diabetic patient
An acute or subacute trauma to the lower extremity resulting in soft tissue defect with or without underlying fractures
Other lower extremity wound etiologies, such as autoimmune, venous stasis, or ischemic causes or following tumor resection
Pneumatic extremity tourniquet and padding Handheld Doppler and sterile Doppler probes Two sterile setups (one for pre- and one for post debridement) and instrument trays Culture swabs (two sets – pre- and post debridement) Methylene blue and hydrogen peroxide Curettes (pre debridement) Rongeurs (pre debridement) Osteotomes (pre debridement) (Versajet™ hydrosurgery system) Pulse lavage and 3 liters of normal saline Optional Products (Integra, Apligraf) Dermatome and mesher and mineral oil for split thickness skin graft Negative pressure wound therapy machine Dressings Plaster splint material Compression dressings Offloading shoewear |
INTRODUCTION
Plastic surgeons often help reconstruct or salvage lower extremities that have been severely traumatized, whether by chronic disease processes or by an acute injury. The goal of lower extremity reconstruction is to heal the soft tissues over vital structures, such as bone, nerve, tendon, and vessel and to provide a durable, pain-free, and functional limb for ambulation. The focus of this chapter is diabetic and traumatic lower extremity reconstruction.
Diabetic foot wounds are troublesome for the patient and care provider alike. Diabetic patients are prone to developing foot wounds secondary to neuropathy and loss of protective senses, biomechanical abnormalities, and tissue ischemia. The most common location for diabetics to develop foot ulcers is the plantar forefoot. Foot ulcers tend to be chronic and recurrent and may go unnoticed by affected individuals until the wounds are large or infected. Diabetic foot wounds are associated with increased risk for limb loss. Regular surveillance and primary prevention of foot ulcers in diabetic patients is vital; however, when wounds develop, early and aggressive therapy should be initiated. Thorough vascular examination with handheld Doppler and noninvasive testing should be done prior to any reconstruction. Vascular surgery should be consulted for input regarding the need for bypass or endovascular surgery. Closure is usually delayed up to 2 weeks after bypass to ensure adequate blood supply prior to reconstruction.
With thorough knowledge of wound pathophysiology, familiarity with topical agents, and expertise in surgical reconstruction, the plastic surgeon is uniquely qualified to assess healing potential and provide surgical debridement and staged closure of diabetic foot ulcers. Numerous techniques are available for the plastic surgeon to close diabetic foot wounds. The reconstructive procedure chosen should be the simplest indicated for each particular wound location and characteristic. Paramount to successful treatment of diabetic foot ulcers is a thorough initial neurovascular and biomechanical examination. Infected wounds should be debrided of all nonviable tissue and culture-directed antibiotics initiated. Liberal use of x-rays or magnetic resonance imaging aids in evaluation of biomechanical abnormalities, foreign bodies, and the presence of osteomyelitis. For stable, clean wounds, optimization of the limb’s vascular status should be pursued prior to reconstruction. A multidisciplinary approach is needed to effectively treat all aspects of the diabetic foot pathology, including pedorthotists, prosthetists, infectious disease, endocrine, medicine, podiatry, orthopedics, vascular surgery, wound nursing, and plastic surgery.
With respect to acutely traumatized lower extremities, the majority are first treated by orthopedic surgeons, who prioritize bony stabilization. Many studies have demonstrated the importance of early intervention to preserve soft tissues and cover open fractures in preventing complications, such as infection, delayed wound healing, or amputation. A multidisciplinary approach utilizing orthopedic, trauma, vascular, and plastic surgery teams is crucial to achieve the goal of preserving a functional lower limb. Treatment considerations include assessing the degree of vascular injury, contamination, fracture patterns and the amount of comminution, and the size of the soft tissue defect. Ideally, bones will be stabilized, aggressive wound debridement will be performed, and soft tissue reconstruction will then follow. Close communication with the physician treating the bony injury is critical to avoid unnecessary amputations as often plastic surgery capabilities in wound coverage are not divulged early in the treatment period.
Other wound etiologies include venous stasis, autoimmune processes, and ischemia. Reconstruction of these wounds typically starts with debridement, followed by simpler techniques for wound closure. If bypass is required, this should be done first, and debridement and reconstruction should be performed at least 2 weeks after bypass. Partnering with rheumotology is paramount for the autoimmune wounds. Wound nurses can be helpful with venous stasis patients who require compression dressings to promote healing.
This chapter outlines a stepwise approach to the surgical treatment of lower extremity wounds, beginning with diabetic foot ulcers and followed by soft tissue reconstruction of the traumatized lower extremity.
DIABETIC FOOT WOUND RECONSTRUCTION
Preoperative markings
Doppler and trace the course of the anterior tibial/dorsalis pedis artery and the posterior tibial artery with its medial and lateral plantar branches. Handheld Doppler can be used to evaluate anterograde flow in either the anterior or posterior tibial arteries by listening for signal in one vessel while compressing the other. Compression prevents retrograde flow through communicating branches.
Intraoperative details of debridement
Place patient supine on the operating room table for all wounds except wounds to the posterior heel or Achilles.
Wrap upper thigh with 3–5 layers of soft cotton roll substitute.
Place an appropriately sized pneumatic tourniquet on the upper thigh over the cotton padding. Set the tourniquet to 285 mmHg but do not inflate. The tourniquet is placed as a safety measure only. Tourniquets should be avoided in vascular patients.
Swab the wound with aerobic and anaerobic culture swabs. Label these cultures as “predebridement.” These pre-debridement cultures should be obtained prior to the prep.
Prep and drape the foot and ankle circumferentially to the knee.
Wipe the prep solution off the wound with a saline-moistened laparotomy pad.
Apply methylene blue to the wound using a Q-tip or laparotomy pad until the wound is coated with a thin layer of blue staining. If the wound has a sinus tract, a small amount of methylene blue can be injected into the sinus tract with a blunt angiocatheter. This will stain the tissue to ensure that the debridement is complete. Follow this maneuver with hydrogen peroxide, which will facilitate the staining of the tissues with the dye.
Using a scalpel, sharply excise the edge of the wound until healthy, bleeding tissue is noted. Excise at least a depth of 5 mm so that any penetrating biofilm is excised adequately.
If Versajet™ (Smith & Nephew, London, UK) hydrosurgery system is available, debride the base of the wound until healthy, bleeding tissue is noted. Be sure to remove all bluestained tissue.
If Versajet is unavailable, use curettes or a knife to debride the base of the wound, ensuring all blue-stained tissue is removed.
If bone is involved in the wound, use rongeurs to debride the bone, making sure to send the bone to both microbiology for culture and pathology for determination of osteomyelitis (pre-debridement). Any uneven bone edges should be smoothed with either a bone rasp or pineapple mechanical burr, using water irrigation during the process to avoid thermal injury.
Obtain hemostasis using judicious electrocautery.
Pressure irrigate the wound with a minimum of 3 L of normal saline.
Put on new sterile gloves. Place new sterile drapes.
For the remainder of the case, use clean instruments.
Swab the wound again for aerobic and anaerobic cultures (post-debridement). It is best to obtain tissue for culture.
If bone is involved in the wound, use a rongeur to biopsy the bone and send for culture (post-debridement).
If the wound was grossly infected or had bacterial growth on previous post-debridement cultures, the wound should not be closed at this time. Place either wet-to-dry dressings or a negative-pressure wound therapy (NPWT) device and plan for return to the operating room in next couple of days for staged closure.
If the wound has no growth from previous post-debridement cultures, it is ready for closure.
Apply a plaster posterior splint with the foot in 90° dorsiflexion, taking care to pad the heel well if reconstruction was performed.
Postoperative details
Patients should maintain non-weight-bearing status on the affected extremity. Postoperative x-rays can be helpful in osteomyelitis patients, particularly after large bone resections, so that the new bone anatomy may be delineated. Limb elevation is encouraged to reduce edema. Limitations of ambulation and mobility place patients at risk for thromboembolic events. As such, mechanical and chemoprophylactic measures should be taken to reduce the risk of deep vein thrombosis (DVT). Antibiotics are tailored according to operative cultures. NPWT dressings should be changed cleanly at the bedside every 3 days to assess wound healing. Serial operative debridements spaced 24–72 hours apart are performed until all necrotic tissue and odor are absent from the wound.
FOREFOOT PLANTAR ULCERS: ACHILLES LENGTHENING, FILLET OF TOE FLAPS
Forefoot plantar ulcers typically develop under metatarsal heads and are associated with increased pressures during gait as a result of stiffness of the Achilles tendon (triceps surae) and equinus deformity. Often, if the ulcer does not directly involve the bony prominence, tendo-Achilles lengthening or gastrocnemius recession along with thorough soft tissue debridement of the ulcer are sufficient to allow healing by secondary intention. Patients who are unable to dorsiflex beyond neutral with the knee in either the flexed or extended position should undergo tendo-Achilles lengthening, whereas patients able to dorsiflex beyond neutral only with the knee flexed demonstrate stiffness of the gastrocnemius portion of the tendon and should undergo gastrocnemius recession. It is important to avoid excessive lengthening because this may lead to calcaneal gait and heel ulcers.
When forefoot wounds involve one or more phalanges, it can be helpful to preserve the soft tissues of each toe for the purposes of flap closure. Depending on the anatomy, the fifth toe may be small, and this tissue may not be enough to use for closure.
Preoperative markings
Identify the insertion of the Achilles tendon on the posterior calcaneal tuberosity.
Mark the medial and lateral edges of the Achilles tendon.
Mark three points along the central raphe of the tendon at 3, 6, and 9 cm proximal to the calcaneal insertion (percutaneous tendo-Achilles lengthening).
Mark the distal extent of the gastrocnemius muscle belly (gastrocnemius recession).
Intraoperative details of percutaneous tendo-Achilles lengthening
The patient may be positioned supine on the operating room table.
The foot and leg are prepped and draped circumferentially to the knee.
Elevate the leg and gently dorsiflex the foot.
Using a #15 scalpel, make the first stab incision at the 3-cm mark in a longitudinal fashion.
Turn the blade 90° medially and hemisect the tendon.
Make a stab incision at the 6-cm mark and turn the blade laterally to hemisect the tendon.
Make a stab incision at the 9-cm mark and turn the blade medially again to hemisect the tendon.
Maximally dorsiflex the foot until the tendon is released. Indentations along the edge of the tendon corresponding with each stab incision will be palpable when the hemisections are complete.
Close each stab incision with a single simple stitch using 3-0 or 4-0 Prolene® (Ethicon, Somerville, NJ).
Apply sterile dressing to each incision and a plaster posterior splint with foot in 90° dorsiflexion, taking care to pad the heel.
Intraoperative details of gastrocnemius recession
The patient may be positioned supine on the operating room table.
The foot and leg are prepped and draped circumferentially to the knee.
Elevate the leg and dorsiflex the foot.
Make a 5-cm posteriomedial longitudinal incision, beginning just distal to the gastrocnemius indentation and extend proximally.
Dissect through subcutaneous tissues to the deep fascia, taking care to preserve saphenous vein.
Incise the deep fascia longitudinally.
Bluntly dissect the soleus muscle from the gastrocnemius tendon medially to laterally, taking care to protect the sural nerve if identified deep to the fascia at this point.
Transversely transect the gastrocnemius tendon completely. The tendon edges will separate 1–2 cm, indicating complete release.
If the plantaris tendon is felt medially, it should be transected as well.
Close the deep fascia with 2-0 Vicryl® (Ethicon).
Close the skin incision with 3-0 Prolene in a vertical mattress fashion.
Apply sterile dressings and a plaster posterior splint with foot in 90° dorsiflexion, taking care to pad the heel.
Postoperative details
Patients are kept non-weight bearing for 1 week, then in a CAM (controlled ankle motion) walker boot for the next 5 weeks.
Intraoperative details of a toe fillet flap
Prep, drape, and debride the wound as previously described, removing all necrotic tissue.
Measure the size of the wound for proper flap planning.
Plan to take your flap from a toe adjacent to the wound.
Map the medial and lateral plantar digital neurovascular bundles.
Make a plantar longitudinal incision and elevate the flap beginning distally off the distal phalanx and flexor tendons back to the metarsophalangeal joint (MPJ). Follow the neurovascular bundles back to the adjacent web spaces.
Make a connecting incision to the wound, to be covered if needed.
Disarticulate the toe at the metatarsal phalangeal joint and use the dorsal skin to flap down and cover the donor site. Ensure removal of the nail plate, nail bed, and any phalangeal bone within the flap tissue.
Carefully place the remaining flap over the wound, making sure to not cause excess tension or pressure on the neurovascular bundles.
Use skin sutures to secure the flap to the wound.
Postoperative details
Avoid compression on the local flap. Viability of the flap should be regularly monitored with frequent capillary refill checks to ensure there is no excessive pallor or congestion.
MIDFOOT PLANTAR ULCERS: PRIMARY CLOSURE, SKIN GRAFTING, LOCAL FLAPS
The medial plantar midfoot is normally a non-weight-bearing region. Soft tissue defects in this area can be easily treated with skin grafting; however, in diabetic patients, plantar ulcers of the midfoot generally occur in the setting of Charcot deformity and bony arch collapse. Skin grafts provide inadequate soft tissue coverage and are prone to breakdown when ulcers are associated with exostosis or other bony prominences but are easy and reliable options for non-weight-bearing regions. After midfoot stabilization and exostectomy, pressure points may be fully neutralized, and small ulcers can heal by skin graft or secondary intention. Although wounds may close by secondary intention, this can result in an unstable scar and recurrent breakdown. Due to the relatively inelastic quality of plantar foot skin, only small ulcers tend to be amenable to primary closure, and more generally local flaps, including V-Y and rotation flaps, are employed for durable wound coverage and replacement of “like tissue with like.” Appropriate utilization of pedal local flaps requires knowledge of normal vascular anatomy and angiosomes. Perforating vessels should be identified and marked with a handheld Doppler. In addition, rotation flaps, although a random pattern, may be based on blood flow from axial vessels.
Intraoperative details of primary closure (rare)
Prep, drape, and debride the wound as previously described.
The weight-bearing region of the plantar foot has thick glabrous skin with fibrous subcutaneous adhesions. To close a plantar foot wound primarily without tension, judicious undermining of skin flaps using electrocautery or sharp dissection may be necessary.
Interrupted vertical mattress sutures using 2-0 Prolene on a CT-1 (Ethicon) taper needle are placed to evert skin edges and obtain tension-free wound edge approximation. Avoid excessive pressure on the skin edge with forceps.
Dry, sterile dressings are applied. Antibacterial ointments or petroleum-moistened gauze dressings can cause maceration and are avoided on the plantar foot incision.
Apply a plaster posterior splint with the foot in 90° dorsiflexion, taking care to pad the heel and non-weight-bearing areas postoperatively.
Intraoperative details of split-thickness skin grafting
Clip the hairs and prep the upper thigh (donor site).
Prep, drape, and debride the wound as previously described.
Measure the dimensions of the wound; ensure there is no denuded bone or tendon exposed.
Mark the size of the skin graft needed on the donor site.
Assemble the power dermatome with appropriate size guard, setting the thickness of the graft at 0.014–0.018 in.
Optional step: Infiltrate the donor site with 1% lidocaine with 1:100,000 epinephrine diluted in normal saline.
Wipe away the prep solution from the thigh with a saline-dampened laparotomy pad.
Lubricate the donor site and dermatome with mineral oil.
Have an assistant apply traction to the donor site to create a flat, even donor surface.
Using slow/steady pressure on maximum power, harvest the split-thickness skin graft. If using the thigh as a donor site, always harvest the graft from a more superior position to further conceal the graft if the patient wears shorts or a skirt (female).
Place the graft on a dermal carrier and mesh the skin graft using the mesher in a 1:1.5 ratio or “piecrust” the graft with a #11 scalpel.
The thigh can be closed primarily if the width of the skin graft is small enough to allow for skin closure. Primary closure of thigh donor sites should be done if at all possible as they heal with much less pain. Alternatively, if the patient is a female and there is redundant abdominal wall tissue, a mini-abdominoplasty may be performed and skin graft harvested from the specimen.
Apply the skin graft to the wound bed, minimizing the separation of the interstices.
Secure the skin graft with either skin staples or 3-0 running Monocryl® (Ethicon) or chromic suture.
Apply a nonstick barrier such as Mepitel® (Molnlycke, Gothenburg, Sweden), xeroform, or Adaptic® (Systagenix, San Antonio, TX) to the skin graft, followed by NPWT if desired.
Apply a plaster posterior splint with the foot in 90° dorsiflexion, taking care to pad the heel.
Apply sterile, semi-occlusive dressing to the skin graft donor site.
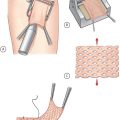
Intraoperative details of the V-Y advancement flap
Prep, drape, and debride the wound as previously described.
To maintain a bloodless field and allow for easy identification of perforators, flap dissection is performed under tourniquet control.
Elevate and gravity exsanguinate the extremity for 2 minutes.
Inflate the tourniquet to 285 mmHg in patients who have not undergone a distal bypass procedure.
Orient the V flap in a manner such that it will advance in the direction of greatest skin elasticity, incorporating any known cutaneous perforators and respecting known angiosome boundaries.
The wound may need to be excised along the axis of the V flap to increase the width of the flap, which will increase the blood supply to the V flap.
Incise skin and subcutaneous tissues down to and including plantar fascia.
If necessary for flap mobility, judiciously undermine the flap in the subfascial plane, releasing fascial septations but preserving perforating vessels.
Advance the flap to oppose wound edges without tension.
Deflate the tourniquet and obtain hemostasis.
Close the skin with 2-0 Prolene in an interrupted vertical mattress fashion, beginning with the distal flap.
Apply a sterile dressing.
Apply a plaster posterior splint with the foot in 90° dorsiflexion, taking care to pad the heel.
Commonly, only 1–2 cm is gained for a V-Y flap advancement procedure in the plantar foot.
Related posts:
Stay updated, free articles. Join our Telegram channel

Full access? Get Clinical Tree


