27 Vertical Mastopexy Augmentation
Summary
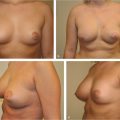
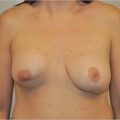
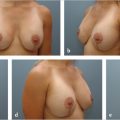
This chapter provides a detailed overview of short scar vertical mastopexy augmentation which is the author’s favored approach to correcting mild-to-moderate ptosis with involutional atrophy.
Key Teaching Points
Vertical mastopexy augmentation is a powerful tool for mild-to-moderate degrees of ptosis correction.
It is safely performed in conjunction with subpectoral augmentation to preserve breast blood supply.
Central inferior gland plication aids in shaping a conical breast mound.
If used in severe ptosis correction, a horizontal skin resection is essential to prevent pseudoptosis.
The vertical limb length should be kept to no more than 7 to 8 cm depending on patient height.
27.1 Introduction
With the vertical mastopexy augmentation technique, excess skin is excised through a vertical ellipse extending from the inframammary crease to the upper portion of the new areola. A horizontal incision is avoided (unless severe ptosis is treated). Vertical breast incisions usually heal with an acceptable, non-hypertrophied scar and are among the least noticeable incisions in breast surgery.
The technique has a number of advantages:
It limits further distortion of areolar shape and reduces the risk of postoperative areolar diameter stretching and asymmetry that is more common with the periareolar purse-string approach.
Breast augmentation provides additional breast fullness, especially centrally and in the upper breast, while inferior parenchymal plication helps to cone the shape of the breast.
Limits the length of the mastopexy incisions.
Limits the risk of nipple numbness due to the minimal nature of parenchymal dissection associated with the technique.
27.2 Patient Selection
Vertical mastopexy augmentation is my preferred technique for patients with mild-to-moderate ptosis and hypomastia. Candidates for this procedure require augmentation to provide central projection and upper pole fill in order to correct involutional atrophy or developmental hypomastia. Ideally, they should have a modest amount of lower pole breast tissue, which can be imbricated into the breast to further enhance the production of a more conical shape and achieve some degree of autoaugmentation. With regard to the amount of ptosis corrected, this procedure will correct mild-to-moderate ptosis with ease, elevating the nipple–areola complex up to 5 cm quite reliably. Greater degrees of correction begin to run the risk of creating too long an inferior vertical scar length, which creates the impression of a pseudo ptotic-looking breast with derotation of the nipples in a cephalad direction. Correction of this deformity requires a transverse skin resection to be added to the procedure.
Surgical Plan
Preoperative markings to designate the new nipple position and circumference of the areola.
Displacement of the breast medially and laterally before drawing a vertical line from the lower portion of the new areola to a point 1 cm above the inframammary fold.
Glandular incision for implant insertion.
Dual-plane placement of the implant under the pectoralis major muscle above and subglandular tissue below, with parenchymal closure.
The areola is left in situ and upper and lower areas are deepithelialized.
Transposition and inset of the nipple–areola to the new position.
Closure with adjustment of vertical scar as necessary.
27.3 Markings and Technique
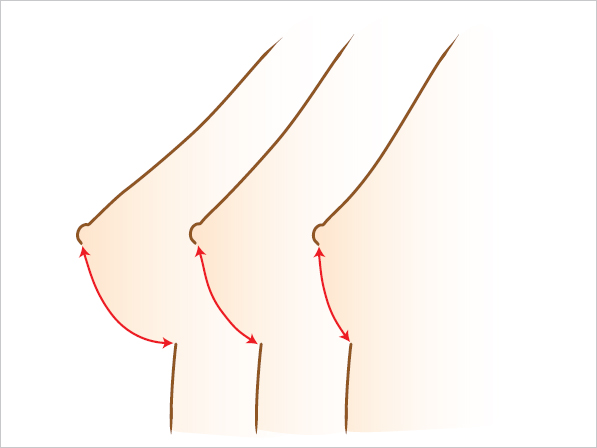
The nipple–areola is located on the midbreast line 1 to 2 cm above the projection of the inframammary crease in patients with breast volumes of 150 to 250 cc. This distance varies with larger or smaller breast volumes: slightly more than 2 cm for smaller breasts 100 to 150 cc; 1 cm for breasts 250 to 350 cc; it is positioned at the inframammary crease for larger breasts. As breasts become larger, the distance from the inframammary fold (IMF) to the nipple is progressively longer (▶Fig. 27.1).
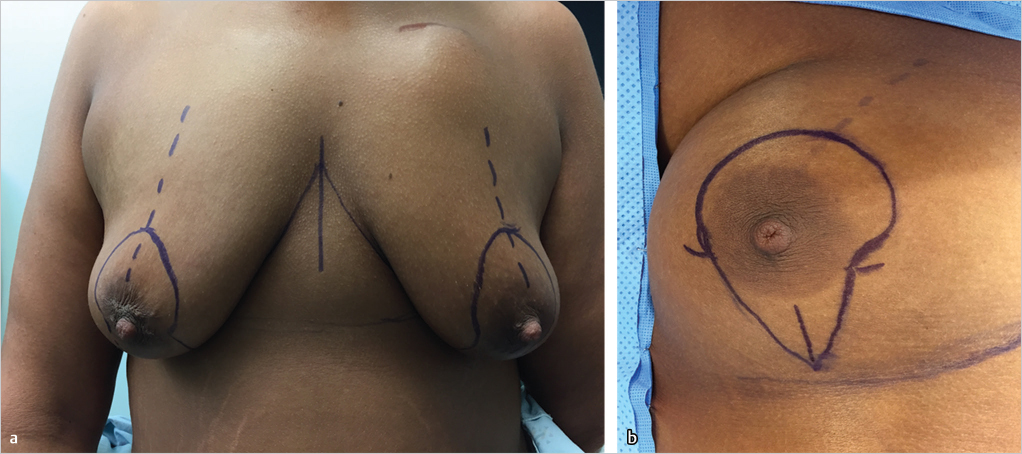
27.3.1 Preoperative Markings
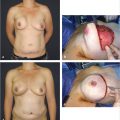
Preoperative markings are made with the patient standing. The uppermost point of the new areola inset is marked, and an open C-shaped incision is marked, ending just below the areola. The breast is displaced medially and laterally, and perpendicular lines are dropped toward the inframammary crease in the midbreast line. These are joined by an inverted-U incision with its base 2 to 3 cm above the original inframammary crease.
Technical Pearl
When performing this procedure with augmentation, transverse tension across the vertical closure is always more of a problem. For this reason, I always err on the side of placing the medial and lateral vertical incision lines closer together to reduce tension at the end of the procedure (▶Fig. 27.2).
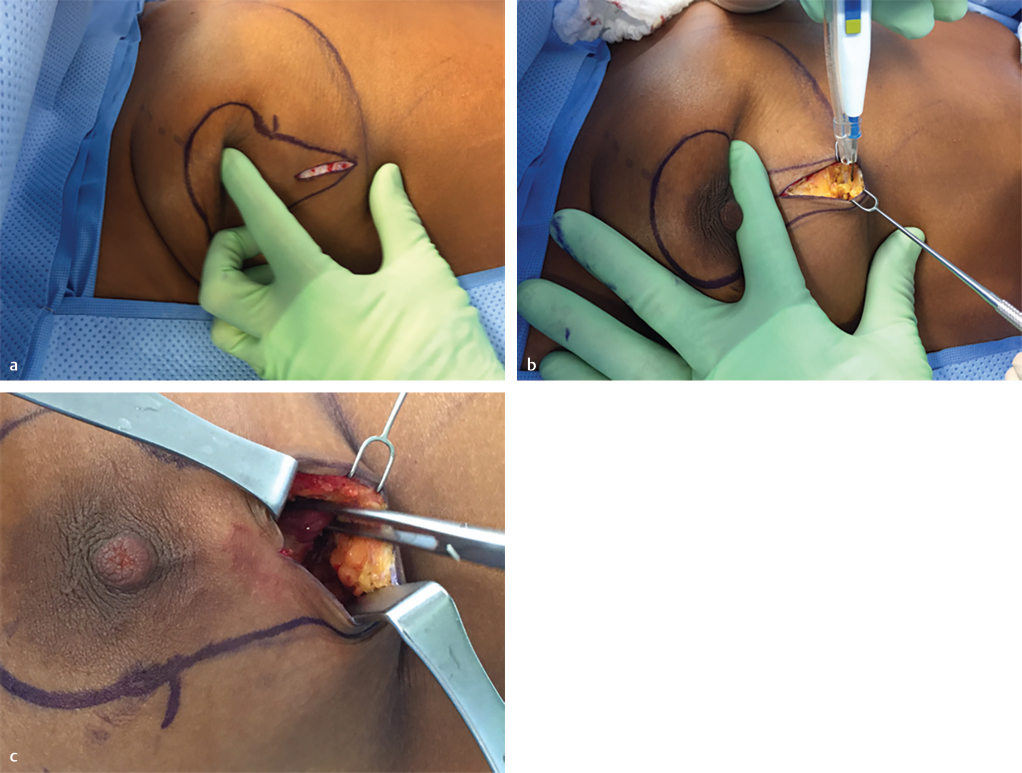
27.3.2 Glandular Incision for Implant Insertion
Given that tension across the breast will change dramatically with insertion of the implant, I do not deepithelialize or remove any skin until the implant has been placed and I can gauge how much tension there will be across the planned incision lines. For this reason, when making the initial approach to the augmentation component, I simply make a vertical incision in the skin of the lower pole of the breast. The skin edges are lifted to expose the gland at the inframammary crease and limited horizontal dissection is carried out beneath the skin to expose about 5 cm of breast tissue at the crease. This breast tissue is then pulled in a cephalad direction and dissection is carried out around the underside of the breast to expose the inferolateral border of the pectoralis major muscle which is grasped with an Allis tissue forceps (▶Fig. 27.3).
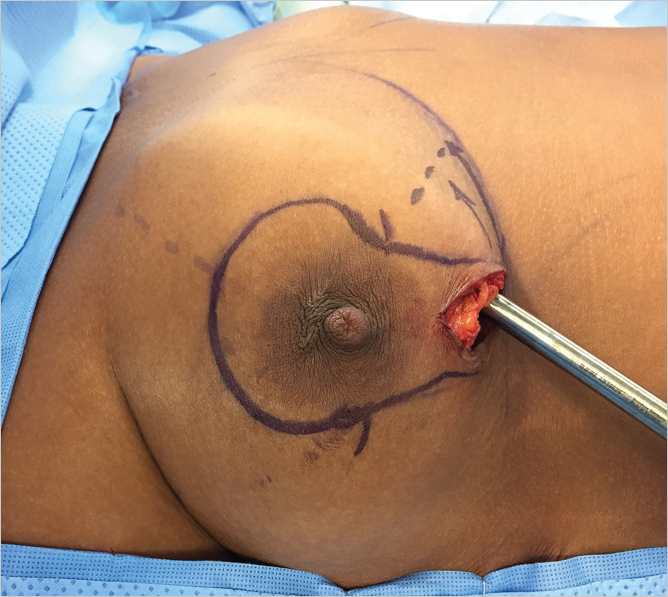
27.3.3 Preparation of the Subpectoral Implant Pocket
Dissection of the subpectoral pockets is carried out in the usual fashion as described earlier in the section on breast augmentation. This is done with a combination of gentle blunt dissection using an Emory or Agris-Dingman dissector and electrocautery dissection using lighted fiberoptic retraction (▶Fig. 27.4)
27.3.4 Temporary Sizer Insertion
With the pocket defined, a temporary inflatable size is inserted and inflated with it the appropriate volume based on preoperative 3D breast imaging or breast dimension measurement. This allows for an assessment of the tension across the suture lines prior to definitive skin removal (▶Fig. 27.5).
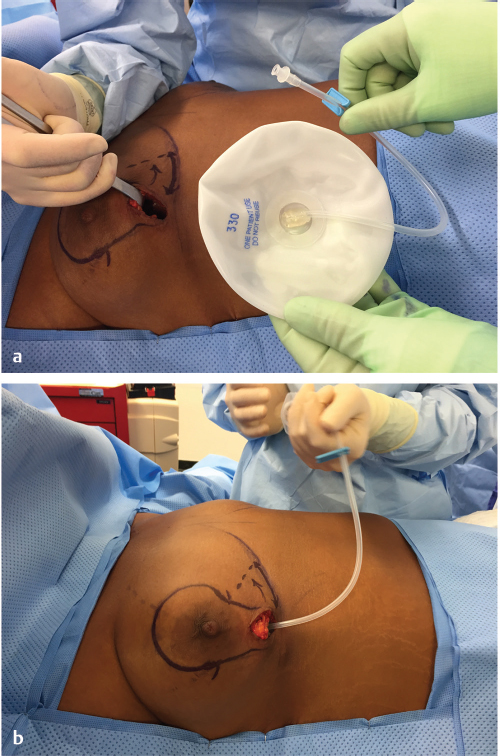
27.3.5 Implant Insertion
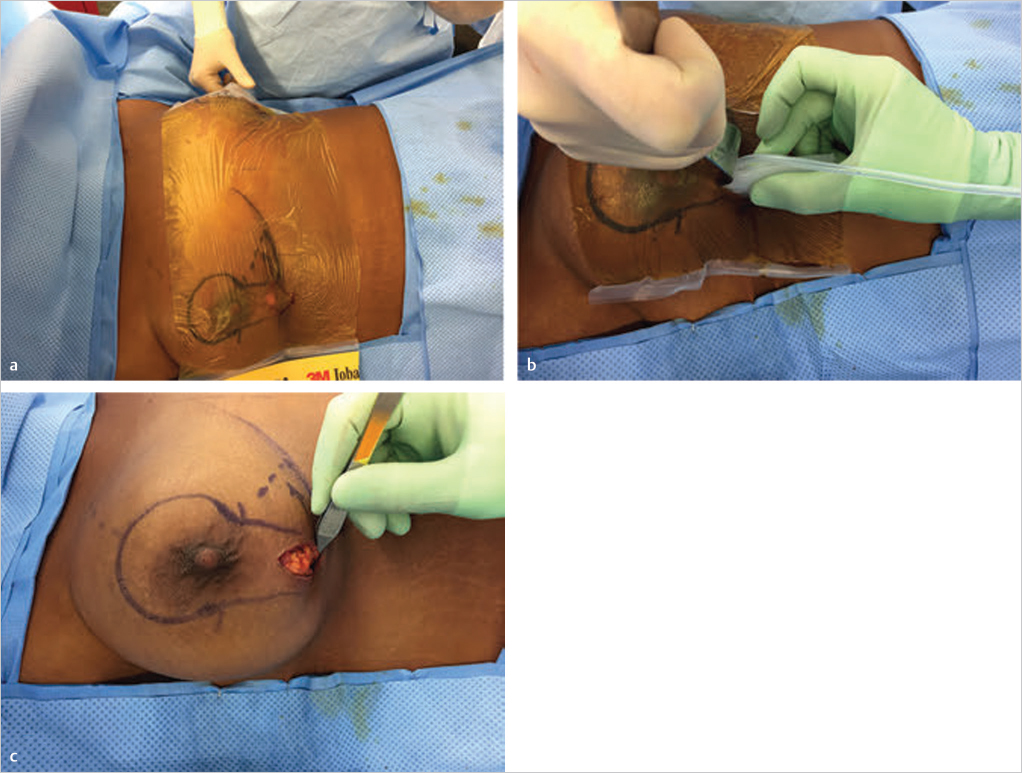
The technique of implant insertion depends on the nature of the implant used. Usually I prefer a gel implant, and this is inserted using a Keller funnel as described in the breast augmentation sections. If a saline-filled implant is used, I first cover the operative field with a povidone-impregnated Ioban drape, making a vertical incision in the drape for access to the breast. The deflated rolled up saline implant is inserted through this window and then inflated within the breast pocket following which the fill tube is removed. Once the implant has been placed, the breast parenchyma is pulled over the lower pole of the implant and is sutured to the chest wall using interrupted absorbable sutures (▶Fig. 27.6).placed, the breast parenchyma is pulled over the lower pole of the implant and is sutured to the chest wall using interrupted absorbable sutures (▶Fig. 27.6).placed, the breast parenchyma is pulled over the lower pole of the implant and is sutured to the chest wall using interrupted absorbable sutures (▶Fig. 27.6).placed, the breast parenchyma is pulled over the lower pole of the implant and is sutured to the chest wall using interrupted absorbable sutures (▶Fig. 27.6).
27.3.6 Skin Incision and Flap Elevation
With the augmentation completed, attention can be turned to the vertical mastopexy component of the procedure. The nipple–areola diameter is marked with a surgical marker and incised. The markings are checked against the tension achieved by the augmentation, and at this point if necessary, the markings can be revised to accommodate the change in skin tension (▶Fig. 27.7a). The tailor-tacking approach can be helpful with assessing the amount of skin to be excised.
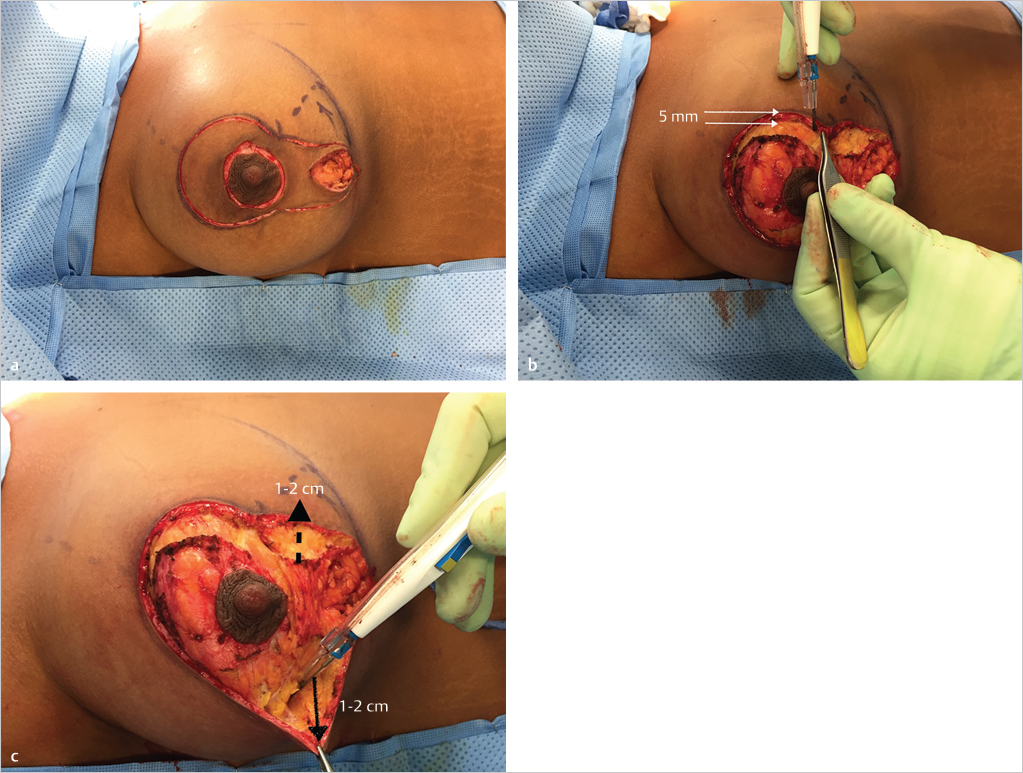
The dermis of the periareolar inset is incised 5 mm within the skin margin to provide a dermal cuff for incorporation of the periareolar Gore-Tex cartwheel suture that will be used to reduce areolar stretching (▶Fig. 27.7b).
Medial and lateral skin flaps are raised along the borders of the vertical limbs of the mastopexy incorporating approximately 1-cm thickness of breast tissue at most. Dissection is only carried out about 1 to 2 cm laterally and medially in order to allow for mobilization of these vertical pillars toward the midline for closure (▶Fig. 27.7c).
Related posts:
 25 Decision Making in Mastopexy Augmentation
 26 Periareolar Mastopexy Augmentation
 29 Prevention and Management of Complications in Mastopexy Augmentation
 28 The Wise Pattern Mastopexy Augmentation
 16 Subfascial Inframammary Breast Augmentation
 54 Prevention and Management of Complications in DIEP Flap Reconstruction
Stay updated, free articles. Join our Telegram channel

Full access? Get Clinical Tree


