25 Abdominoplasty, panniculectomy, and belt lipectomy
*Abdominoplasty video available at http://goo.gl/A4NIhn
INDICATIONS
Removal of excess abdominal skin while restoring the structural integrity of the anterior abdominal wall
Rectus muscle diastasis
INTRODUCTION
Abdominoplasty offers patients aesthetic improvement of body contouring, as well as the restoration of the defining structures of the abdominal wall. By correcting abdominal wall laxity and resecting excess skin and tissue, abdominoplasty restores the abdomen to a more desirable aesthetic form. When circumferential contouring is desired, a body lift may be considered especially in the massive weight loss patient. Table 25.1 indicates special equipment needed for the procedure.
Jackson-Pratt drains, size 19F, 1 per side |
PREOPERATIVE MARKINGS
The patient should be marked in the standing position in the preoperative holding area.
Midaxillary lines and a horizontal waistline should be marked to ensure a symmetrical outcome.
For the lower border of the resection, the suprapubic line above the mons pubis is extended laterally in the groin crease. This line must be greater than 5 to 7 cm superior to the vulvar commissure. From there, lines are extended toward the anterior superior iliac spine (ASIS) to stay within the bikini line. 1 , 2
An estimate of the superior border of resection may be marked preoperatively. However, an exact superior border of the resection must be drawn intraoperatively once the flap has been raised, the umbilical stalk freed, and the patient positioned properly to determine the appropriate amount of the resection.
INTRAOPERATIVE DETAILS
Incise the inferior elliptical border using a #10 scalpel. Extend the incision through the dermis with monopolar electrocautery on the pure cut setting, leaving the majority of dermis on the lower skin flap.
Note: Some surgeons prefer to inject a tumescent solution consisting of 25 mL 1% xylocaine with 1:100,000 epinephrine diluted in 1 L normal saline along the incision lines prior to the initial incision to ensure hemostasis and provide additional anesthesia. 2
Carry the incision down through subcutaneous tissue and Scarpa fascia, ensuring hemostasis at all times. The application of hemaclips may be required to ligate perforator vessels to achieve excellent hemostasis.
Identify the anterior rectus sheath.
Raise a flap superficial to the anterior rectus sheath up to the level of the umbilical stalk.
Replace the abdominal flap and turn attention to the umbilicus. Using two single-prong hooks at the 12-o’clock and 6-o’clock positions, raise the umbilicus. Incise around the umbilicus with a #15 scalpel. Mobilize the stalk using sharp dissection, down to the rectus fascia.
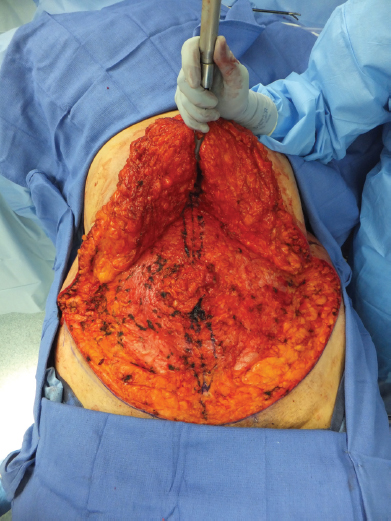
Once the stalk is mobilized, extend the flap superiorly to the level of the xiphoid process, beginning at the upper border of the resection. Be sure to stay centrally and preserve as many lateral perforators of the upper abdominal flap as possible. Irrigate the wound copiously and inspect for hemostasis.
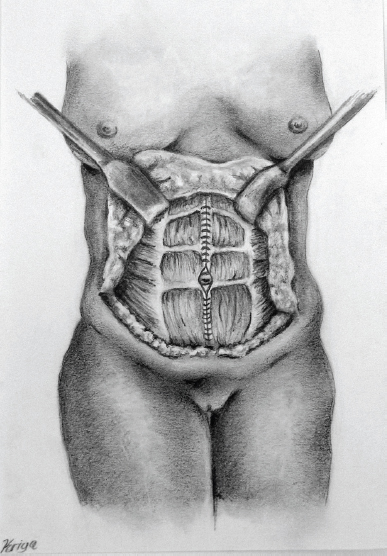
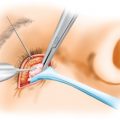
Mark vertical lines for fascial plication (see Figure 25.1). The purpose of these lines is to approximate the medial edges of the rectus abdominis muscles, which have separated with weight gain over time, causing diastasis and loss of structured contour. Place fascial plication sutures in a figure-of-eight fashion using a size 0 Ethibond Excel® (Ethicon, Somerville, NJ) suture. Imbricate the suture lines with a second layer to ensure smooth plication (see Figure 25.2). To further enhance the definition of the waistline inferiorly, additional plication sutures may be placed within the external oblique fascia laterally. Again, irrigate the wound copiously and inspect for hemostasis. It is important to check the airway pressures with the anesthesia team prior to this plication. Any significant change in pressure should be addressed, and the removal of plication sutures should be considered.
Flex the operating table at the level of the patient’s hips to ensure adequate mobilization of the abdominal flap and to verify and adjust the superior border of resection.
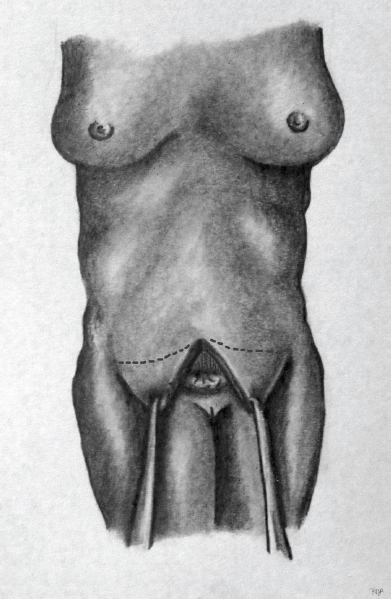
Drape the upper abdominal flap over the lower border incision in a “vest-over-pants” fashion to determine the final margin of excision from the upper flap (see Figure 25.3). The preoperative marking for the superior border must be adjusted according to the portion of the flap remaining in excess when the patient is placed in a flexed position. 3
Excise this skin and subcutaneous tissue with a scalpel and electrocautery.
At this point, place three 3-0 Monocryl® (Ethicon) sutures in the rectus fascia and through the dermis of the umbilical stalk at the 2-o’clock, 10-o’clock, and 6-o’clock positions. These sutures should be protected and left attached. The tails should be clamped with small clamps and retained until the umbilical incision is created.
Place temporary or permanent tacking sutures in the Scarpa fascia and skin of the midline of the abdominal flap to secure it to the lower flap.
Mark the final position of the umbilicus within the abdominal flap by placing a right-angle clamp on the umbilicus beneath the skin flap, aiming the clamp toward the anterior abdominal skin flap. Locate this position on the skin of the abdominal flap. Place a heart-shaped incision approximately 1 cm cephalad to this mark. Incise this mark with a #15 scalpel and carry the incision down through all the layers of the abdominal flap.
Using the three 3-0 Monocryl sutures from the umbilical dermis, secure the umbilicus to the equivalent positions in the umbilical incision of the abdominal flap.
Make a small incision in the 12-o’clock position of the umbilicus. Inset the deep, central corner of the heart into this incision in the stalk with 3-0 Monocryl sutures.
Place several additional interrupted 3-0 Monocryl sutures in the umbilicus to secure it to the abdominal flap.
Place half-buried, horizontal mattress sutures using 5-0 Ethilon® (Ethicon) circumferentially around the umbilicus.
Place a 15F Jackson-Pratt drain at the lateral corners of the wound on either side, exiting within the pubic hair region. Secure the drains externally using a 3-0 Ethilon suture.
Close the wound using 2-0 Monocryl suture in an interrupted fashion to close the Scarpa fascia, followed by 3-0 Monocryl suture in an interrupted fashion for the dermal layer. Close the skin using 4-0 Monocryl suture in a running subcuticular fashion. Reinforce the closure using Dermabond® (Ethicon).
Place a standard abdominal binder over light surgical dressings immediately following the procedure to allow for healing of the plication sutures and to reduce the risk of seroma formation.
Related posts:


Stay updated, free articles. Join our Telegram channel

Full access? Get Clinical Tree


