23 Breast augmentation
INDICATION
Desire for aesthetic improvement in breast size, shape, or symmetry
INTRODUCTION
Breast augmentation is one of the most commonly performed cosmetic surgery procedures in the United States. These procedures are typically well tolerated by patients and offer them the opportunity to dramatically improve the appearance of their breasts. There are many different options regarding implant type, including saline, silicone, smooth, and textured implants. Some implants are round; others are shaped anatomically. Breast implants may be inserted through inframammary fold incisions, periareolar incisions, or axillary incisions or even through the umbilicus; we prefer the inframammary fold approach and describe it in detail in this chapter. Table 23.1 lists the equipment for the procedure.
Breast implant Antibiotic irrigation (composition) Sterile injectable saline Separate IV tubing setup for injectable saline 3-way stopcock 60-mL syringe |
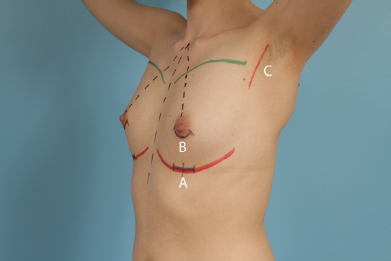
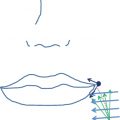
PREOPERATIVE MARKINGS (FIGURES 23.1 AND 23.2)
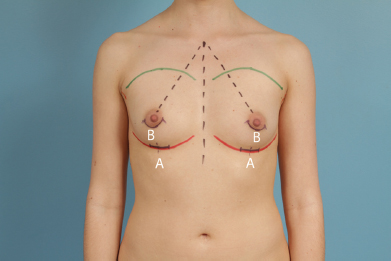
Midline from sternal notch to xiphoid.
Inframammary fold.
Sternal notch to nipple.
Upper breast border.
If the inframammary approach is desired, mark the incision below the nipple in the inframammary fold. The marking should be placed slightly below the inframammary fold as it tends to ride up after the implant is placed. If the periareolar approach is desired, mark the inferior border of the areola. If the axillary approach is utilized, mark the incision slightly posterior to the anterior axillary line so that the scar will be hidden by the anterior axillary fold. In all three approaches, the length of the incision is determined by the size of the implant. Silicone implants in general require larger incisions than saline implants.
INTRAOPERATIVE DETAILS
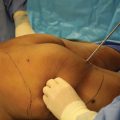
Position the patient supine on the operating table with arms extended to 75°–90°. Pay special attention to shoulder position; it should be symmetric, with both shoulders at the same height.
Prep and drape the patient in the standard fashion.
If using the inframammary approach, make an incision in the previously marked line in the inframammary fold using a #15 blade, and carry the incision through the dermis into the subcutaneous tissue.
Place a double-prong skin hook into the incision and, using the electrocautery held at a 45° angle to the skin, dissect down to the pectoralis major away from the inframammary fold.
Remove the double-prong skin hook and place an Army-Navy retractor into the incision. Continue dissection to the surface of the pectoralis major.
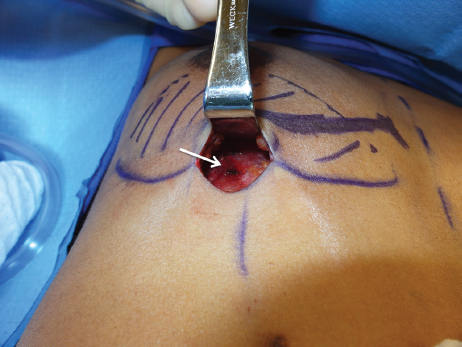
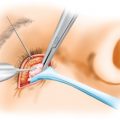
Elevate breast parenchyma off the surface of the pectoralis major muscle up to the level of the nipple (Figure 23.3). Note: When using the periareolar approach, after incising the skin, dissection may proceed through the parenchyma to the surface of the pectoralis or through the subcutaneous tissues in the lower pole of the breast to the pectoralis. After the pectoralis is reached, the remaining steps of the procedure, including step 6, are the same as for the inframammary approach.
Using electrocautery, cut through the inferior attachments of the pectoralis major muscle to reach the loose areolar plane beneath.
Place a narrow Deaver retractor into the incision beneath the pectoralis major muscle and release the inferior attachments of the pectoralis muscle.
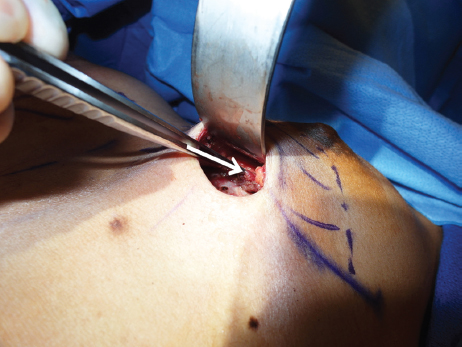
Continue dissection medially beneath the pectoralis muscle until the medial insertions of the muscle are reached (Figure 23.4).
Continue dissection superiorly beneath the pectoralis muscle until an adequate sized pocket has been created to accommodate the implant
Continue dissection laterally until the first layer only of the lateral fascia is divided.
Use bipolar cautery to ensure meticulous hemostasis, then irrigate copiously with antibiotic irrigation
The circulating nurse should then open the implant package, and the scrub nurse should pour antibiotic irrigation over the implant.
The surgical team should change gloves before handling the implant, and gloves without powder should be utilized.
If the implant is a saline implant, the tubing should be connected to the valve, and 20 mL of sterile saline should be injected into the implant.
The implant should then be evacuated of air, as well as the previously inserted saline.
Three Army-Navy retractors are then placed into the breast, and retraction should occur in three different vectors of force to spread the incision.
A saline implant may be rolled up and inserted into the breast; a silicone implant should be grasped firmly with one hand and rotated into the incision while pushing with the other hand.
After insertion, the saline implant should be filled with injectable saline to the determined fill volume and the tubing removed from the implant.
The head of the bed should be elevated, and the breasts may be observed. Often, it is necessary to apply digital pressure to the lateral aspect of the implant pocket to complete dissection. It is important to perform this after the implant has been placed rather than at the beginning of the procedure to avoid overdissection.
The incision is then closed in layers: 3-0 Vicryl® (Ethicon, Somerville, NJ) in the breast parenchyma, 4-0 Vicryl in the dermis, and 4-0 Monocryl® (Ethicon) in a running subcuticular stitch. The incision may be dressed with a Steri-Strip™ (3M, St. Paul, MN) or Dermabond® (Ethicon).
A surgical brassiere or a 6-inch Ace™ (3M) wrap is placed on the patient’s chest.
Related posts:


Stay updated, free articles. Join our Telegram channel

Full access? Get Clinical Tree


