24 Mastopexy
INDICATIONS
Breast ptosis due to:
Changes in body weight
Pregnancy and breast-feeding
Hormonal changes
Congenital deformities
Soft tissue quality
INTRODUCTION
Ptosis of the breast is the result of parenchymal volume decrease in combination with a reduced ability of the skin envelope and the supporting structures to retract. The resulting deformity and sunken position of the breast on the chest wall can be classified according to Regnault 1 :
Grade I: nipple lies still at the level of inframammary fold (IMF)
Grade II: nipple lies below the IMF but above the most dependent part of the breast
Grade III: nipple is at the most dependent part of the breast parenchyma, much below the IMF
Pseudoptosis is characterized by an increased areola-IMF distance, where the majority of the breast tissue has descended below the IMF, but the areola still lies above it.
To find the best technique suitable for each individual, it is important to assess the ptosis degree, the breast volume, the nipple position, the size of the areola, as well as redundancy of the skin envelope. From the surgical or technical side, consideration must be given to the skin incision and subsequent scar camouflage, the positioning of the pedicle of the nipple-areola complex, the positioning of the new IMF, and finally the projection, especially in the superior and medial parts.
The history of mastopexy procedures has evolved parallel with procedures of reduction mammoplasty, and all developed techniques were designed to treat ptosis of the breast. The modern techniques aim to produce shorter scars, achieve more parenchymal support, and allow greater longevity. 2 The large variety of different techniques can be divided into three groups, which are all named by their incisions respectively and their resulting scars: the periareolar techniques, the vertical techniques, and the inverted T techniques.
The surgical goals of mastopexy procedures are (1) a reliable transposition of the areola, (2) a re-creation of a pleasing shape of the breast, and (3) production of short scars, wherever possible. Table 24.1 indicates the special equipment needed.
Different areolar markers of standard sizes (38–48 mm, depending on cultural differences) Skin hooks Redon-Drains or Jackson-Pratt drains Stable, braided sutures for subcutaneous stabilization Nonabsorbable monofilament suture for purse-string technique Resorbable, monofilament suture material for skin suture |
PREOPERATIVE MARKINGS
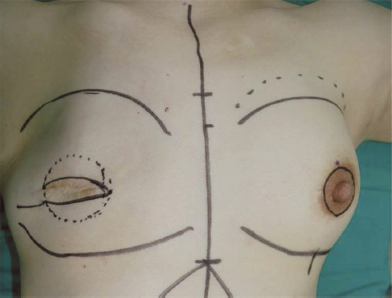
Periareolar techniques
Midline from sternal notch to umbilicus.
Bilateral IMF.
Line from sternal notch to bilateral areola and definition of future nipple position, which should range from 19 to 21 cm.
Mark the incision pattern around the nipple site, which can be planned as a concentric, an eccentric, or a crescent incision. 3 – 8 The eccentric pattern is preferred currently to achieve maximal elevation of the areola 9 (Figure 24.1).
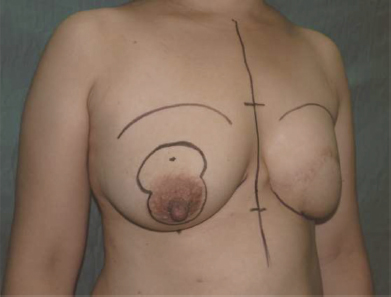
Vertical techniques
Midline from sternal notch to umbilicus.
Bilateral IMF.
Create an oval circle approximately 2 cm above the eventual nipple site, gently curving around each side.
Mid-clavicular bilateral line from clavicle to upper abdomen, then move the breast with the hand to both sides to mark the medial and lateral incisions to approximately 3.0–4.0 cm above the IMF, where both lines join together (Figure 24.2).
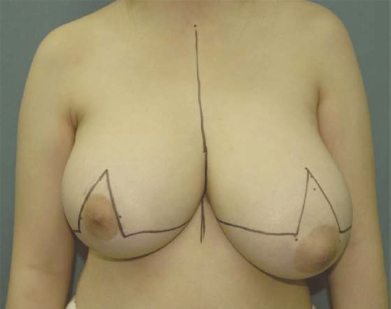
Inverted T techniques
Midline from sternal notch to umbilicus.
Bilateral IMFs with medial and lateral end points, as well as marking the middle point.
Distance from sternal notch to new nipple position; consider adding approximately 10% of this length due to the pendulum rule 10 to avoid a higher location than planned.
Around this point, a Wise keyhole pattern is drawn with an oval (usually around 5.0 cm) around the areola. The angle of the vertical lines of the inverted T is determined by shifting the breast from medial to lateral and defining it on the mid-clavicular line. The length of this future areola-IMF distance should be 5.0–6.0 cm.
The endpoints of the vertical lines are connected to the lateral and medial end points of the IMFs (Figure 24.3).
INTRAOPERATIVE DETAILS
Periareolar technique
The periareolar approach (so-called Benelli technique 11 ) is the favorable technique for cases with mild ptosis of the breast, which is limited to grade I ptosis. 3 , 5 , 6 , 9 It results in the shortest possible scar pattern, which can be placed at the border of the pigmented areola skin and provide a pleasing scar camouflage. The sensation and blood supply of the areola are well preserved by preserving the subdermal plexus during deepithelialization of the periareolar skin. Even though there are many variations described, this technique is still named after Benelli and his 1990 “round block” technique. 11
During positioning of the patient in supine position, look for symmetric position of the shoulders and arms as well as straight alignment of the pelvis.
After skin disinfection with a transparent solution, the draping should be precisely symmetric. Proximally the acromions, laterally the anterior axial folds, and caudally the umbilicus should be exposed for orientation purposes.
Redraw the marking lines.
To achieve maximal tension of the skin and to reduce bleeding, the breast can be secured at its base with a tourniquet. The authors favor a simple sterile glove that has good elasticity, can be tied easily, and holds its position sufficiently.
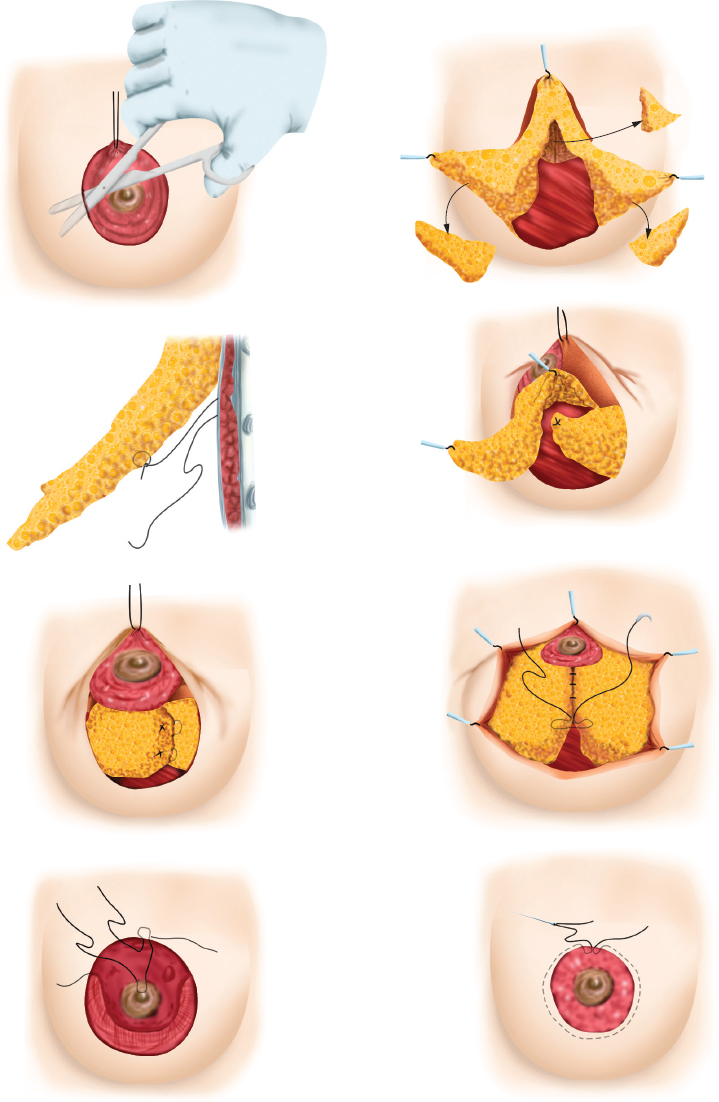
With the selected areolar marker (cookie cutter), the areola is marked.
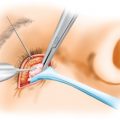
The skin incision is made at this marking and the periareolar oval marking, then deepitheliazation of this area is performed.
Undermine the breast skin at the lower pole while leaving the areola on a superiorly based dermoparenchymal pedicle. Remove the tourniquet.
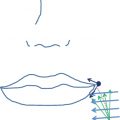
The glandular tissue beneath the areola is then split vertically, and two superiorly based winglike flaps are created. Careful control of bleeding is necessary.
Each glandular flap is then sutured with nonabsorbable material to the periosteum of the fourth or fifth rib opposite the breast. This creates a crisscross sling of the parenchyma, decreasing the breast base and increasing the projection as a kind of internal brassiere (Figure 24.4).
Implant of a Jackson-Pratt drain on each side.
A nonabsorbable purse-string suture is placed intradermally around the deepithelialized oval area. The purse string is tightened until the desired diameter of the future areola is achieved, usually 30–38 mm.
Use absorbable monofilament suture for the final skin closure. The wrinkling resulting from the redundant skin of the outer skin circle has to be adjusted; it usually resolves within a few months. 12 , 13
The skin is disinfected again. Steri-Strip™ (3M, St. Paul, MN) tapes are placed to secure the sutures and to take some tension from the skin. Dry gauze, tape, and special dressing, which allows for continuous support of the nipple-areola complex, are also placed.
ADVANTAGES
Short scar
Scar camouflaged at border of areola
Related posts:


Stay updated, free articles. Join our Telegram channel

Full access? Get Clinical Tree


