19 Managing Asymmetry and Congenital Anomalies
Summary
Breast asymmetry and congenital anomalies are distressing conditions that may have a significant impact on patient well-being, and the ability to fit in clothing. The most common etiology is developmental but may also be a sequel of previous surgery. This chapter focuses on the following presentations: asymmetrical breast hypoplasia, unilateral hypomastia with contralateral mammary hypertrophy and ptosis, asymmetric mammary hypertrophy, bilateral tuberous breasts, nipple inversion, pectus excavatum, and Poland’s syndrome.
A proper diagnosis is of paramount importance, before correcting any problems. Age of menarche and telarche are recorded, and a focused personal and family history is taken, especially history of breast cancer or masses. Clinical examination involves assessment of breast, chest wall, and upper extremity development. Patient input is important, and expectations pertaining to size and appearance are extensively discussed at consultation. Correction usually involves surgical intervention, which may be quite challenging, and sometimes may require staging or subsequent revisions. Often, combinations of various aesthetic techniques, described in detail in the book, are used such as breast augmentation, breast reduction, mastopexy, and augmentation mastopexy.
Some of these problems defy categorization and a simple solution. The goal is to re-create symmetrical lower poles and good upper pole fullness and symmetry and achieve high patient satisfaction.
Key Teaching Points
Most common etiology of breast asymmetry is developmental, followed by iatrogenic causes.
Patient input is important, and expectations should be thoroughly discussed at the time of consultation.
Surgical correction is challenging and subsequent revisions are common.
A combination of various techniques is usually performed including breast augmentation, mastopexy, and reduction.
The goal is to create symmetrical lower poles and good upper pole fullness and symmetry.
19.1 Breast Asymmetry
19.1.1 Bilateral Breast Hypoplasia with Asymmetry
Surgical Plan
Breast measurements are recorded that include breast width at its widest point, nipple to inframammary fold distance, and sternal notch to nipple distance.
Assessment of breast parenchyma and skin is performed:
This is performed with deflection of the skin, and observation for resistance.
Pinch test: This is performed at the superior and medial portion of the breast, between the examiner’s thumb and index finger. A result of less than 2 cm, is most commonly an indication for placement of the implant in the subpectoral plane.
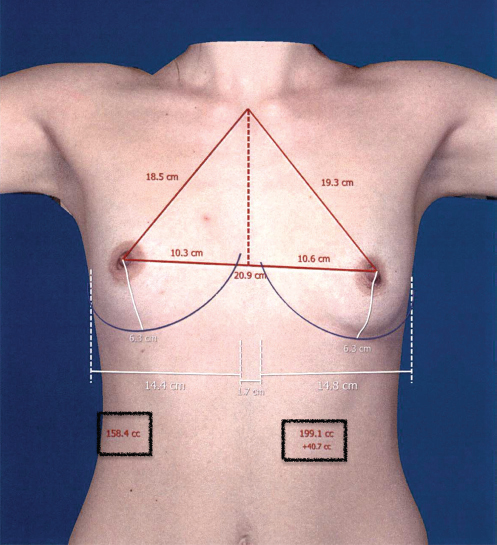
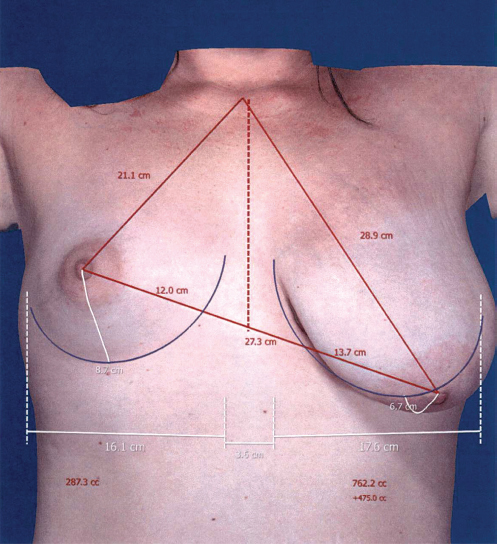
VECTRA 3D imaging and simulation system is used. The device takes a three-dimensional photograph that can then be visualized in the monitor, with the addition of breast measurements. Differences between the two breasts, such as breast volume, and sternal notch to nipple distance may be depicted (▶Fig. 19.1).
Using different implant shapes and sizes, a simulated postsurgical result is produced, allowing the patients to have a visual image of the outcome (▶Fig. 19.2).
The main steps of the procedure are (1) make the incision and aim cephalad with attention not to violate Scarpa’s fascia, (2) creation of a dual plane, (3) identify the pectoralis major muscle edge and incise, (4) create a subpectoral pocket with care not to elevate the pectoralis minor muscle, (5) place tester implants, (6) exchange the tester implants for the formal implants, (7) closure of the wound in layers.
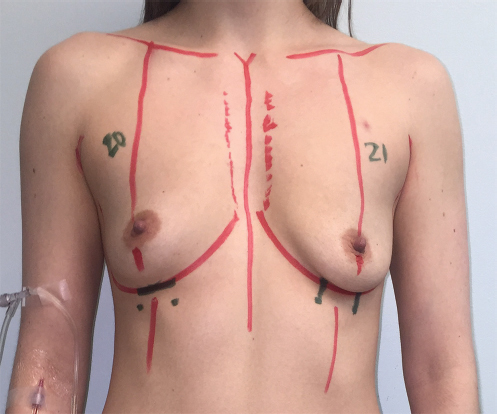
Markings
The patient is marked in the upright standing position, and the following markings are made:
Midline, from sternal notch to xiphoid.
Inframammary fold (IMF).
Superior, medial, and lateral borders of the breast. The medial borders are marked 1.5 cm lateral to the midline, so as to prevent synmastia.
Breast meridian.
Marking of the incision. For an inframammary approach, the marking is placed below the IMF, centered at the breast meridian, most often 4 cm in length, 2 cm medial, and 2 cm lateral to the meridian (▶Fig. 19.3).
Technique
Inframammary approach with different sizes—smooth round silicone implants, partial subpectoral placement, and differential dual plane creation.
The patient is brought to the operating room and placed in the supine position on the operating table with the arms extended up to 90 degrees and well secured to the arm boards. Local anesthesia containing a mix of lidocaine and Marcaine with epinephrine is injected into the marked incision and as a breast block.
Technical Pearl
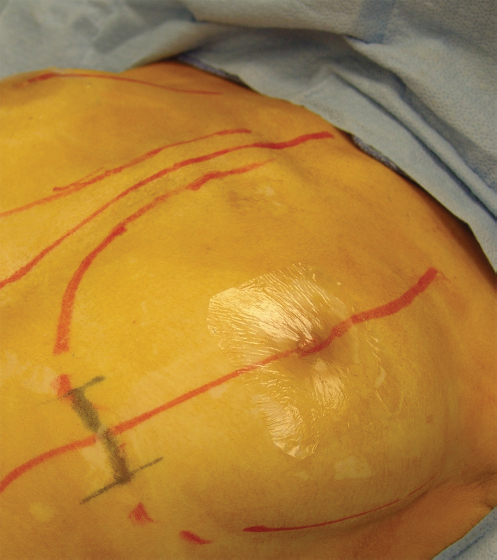
Tegaderm is placed on top of the nipple–areola complex to reduce bacterial contamination for capsular contracture reduction (▶Fig. 19.4).
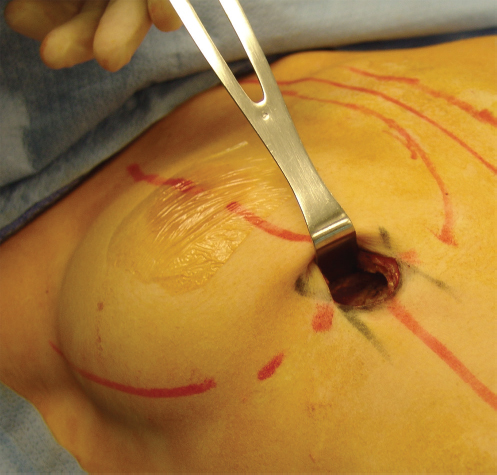
The inframammary incision is made sharply through the dermis and the superficial layer of the fat until Scarpa’s fascia is encountered. A double skin hook is placed followed by an Army-Navy retractor and dissection is continued cephalad with electrocautery taking care not to violate Scarpa’s fascia. The breast tissue is divided, and the pectoralis muscle fascia is identified. Suprafascial dissection is carried accordingly to create types I and II dual plane dissection (▶Fig. 19.5). After dual plane dissection, the pectoralis muscle is grasped and divided until the areolar space under the muscle is identified. A lighted retractor is then placed below the pectoralis major muscle and strong upward traction is placed so as to separate the pectoralis major from the pectoralis minor muscle. The initial fiber incision is made medially, where pectoralis minor is absent. Pocket dissection is performed with the monopolar electrocautery and no blunt dissection is performed. Submuscular dissection proceeds from medial to lateral in a clockwise fashion for the left breast and in an anticlockwise fashion for the right breast, until the pocket is of appropriate size. Care is taken to avoid any contact with the ribs so as to decrease postoperative pain. Care is taken to disinsert the inferomedial origin of the pectoralis major muscle so as to achieve adequate expansion of the lower pole.
Technical Pearl
Care is taken to not disinsert the sternal fibers of the muscle.
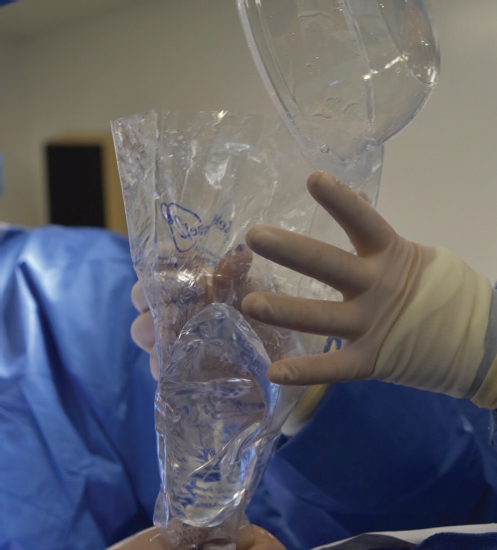
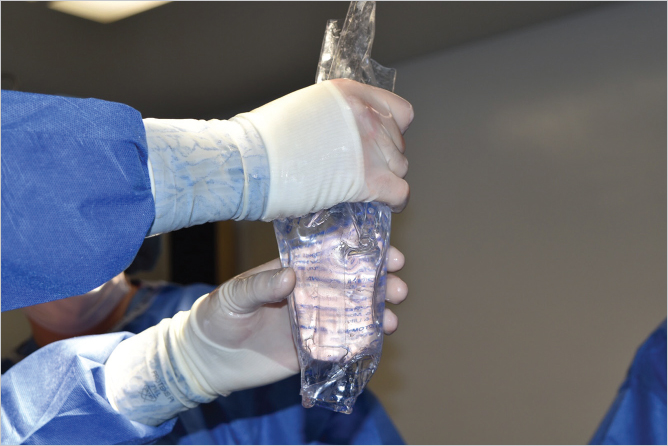
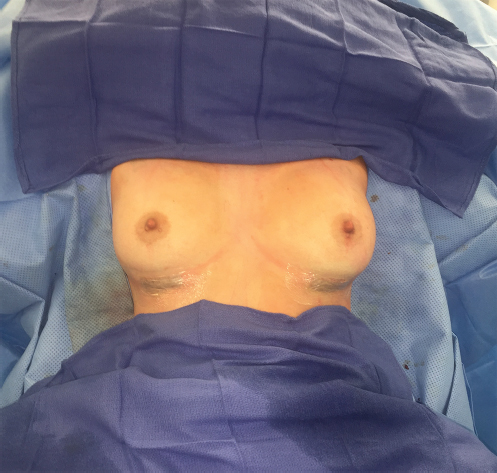
Meticulous hemostasis is achieved. Tester gel implants are placed, and the patient is placed in the upright, seated position. If there are areas for additional dissection, these are marked. The pockets are irrigated with triple antibiotic solution. The formal implants are then placed in a sterile manner using the no touch technique. The implant is transferred to the Keller funnel avoiding any contact with the operating table or the surgeon’s gloves (▶Fig. 19.6). A Deaver retractor is useful to facilitate placement of the implant. (▶Fig. 19.7). Closure is performed in three layers: 2–0 Vicryl is used for the breast parenchyma, 4–0 Monocryl for interrupted deep dermal sutures, followed by a running subcuticular 4–0 Monocryl suture. The patient is placed again in an upright seated position for final appreciation (▶Fig. 19.8).
Results
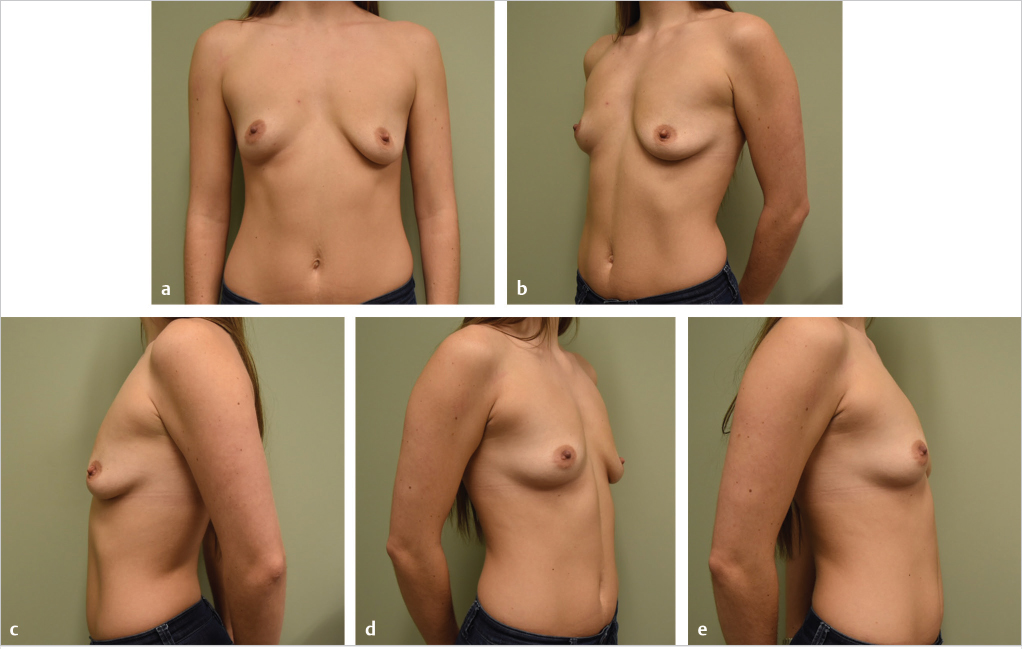
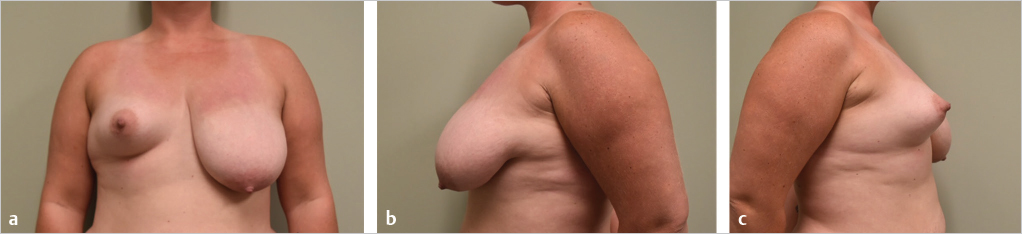
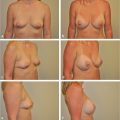
This 26-year-old woman presented with hypomastia and asymmetry (▶Fig. 19.9). The right breast was smaller, less ptotic, and the right nipple was higher than the left. She requested breast augmentation. A bilateral submuscular breast augmentation was performed through an inframammary incision. Dual plane type I was used on the right, and dual plane type II was used on the left. Furthermore, a 405-mL smooth round silicone implant with moderate projection was used on the right, while a 360-mL smooth round silicone implant with moderate projection was used on the left. She is shown 10 months postoperatively (▶Fig. 19.10).

Unilateral Breast Ptosis/Hypertrophy with Synchronous Contralateral Breast Hypoplasia
Surgical Plan
The planning is similar to the previously described hypoplastic breast, with the addition of the markings and execution of the augmentation mastopexy of the ptotic breast.
Markings and Technique
Synchronous Augmentation Mastopexy and Breast Augmentation
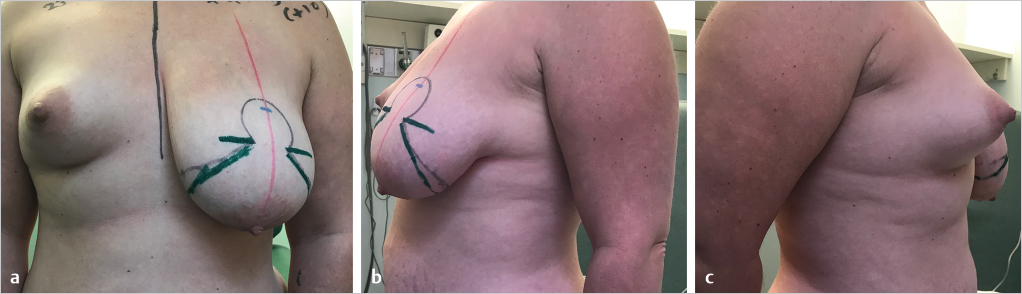
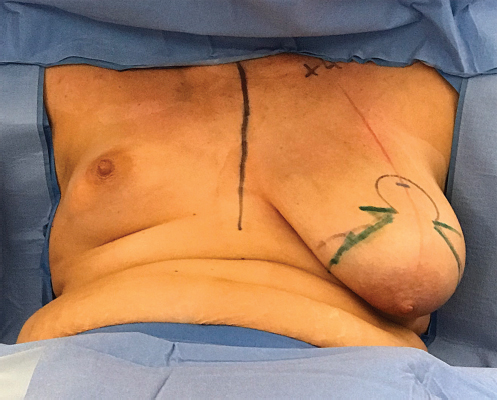
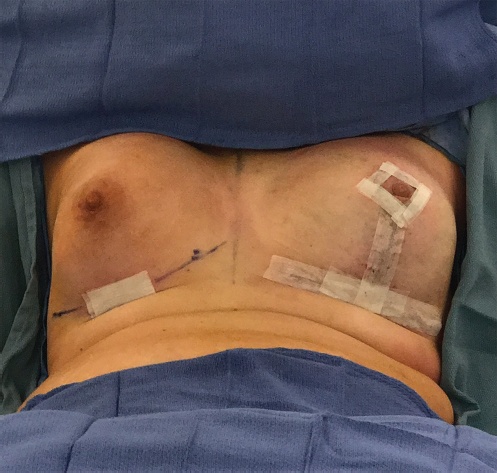
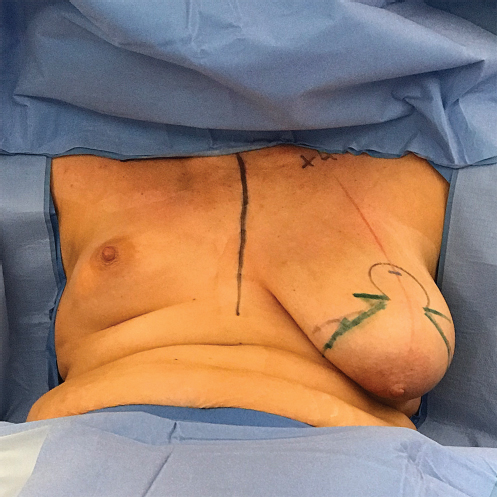
Preoperative markings are similar to those previously described for breast augmentation, and augmentation mastopexy (Chapter 24). Finalized markings are shown (▶Fig. 19.11). The patient is brought to the operating room and placed in the supine position on the operating table with the arms extended up to 90 degrees and well secured to the arm boards. Both shoulders should be at the same height. The patient is sat up to evaluate the preoperative status (▶Fig. 19.12). The operation commences with the ptotic breast. An augmentation mastopexy is performed using the Wise pattern technique with a short horizontal scar as described in Chapter 24. A small implant is used in the ptotic/hypertrophied breast to achieve superior pole fullness. This is followed by augmentation of the hypoplastic breast as previously described in this chapter. After conclusion of the procedure, the patient is placed again in an upright, seated position for final appreciation (▶Fig. 19.13). The before (▶Fig. 19.14) and after, on-table results (▶Fig. 19.15) are shown for comparison.

Results
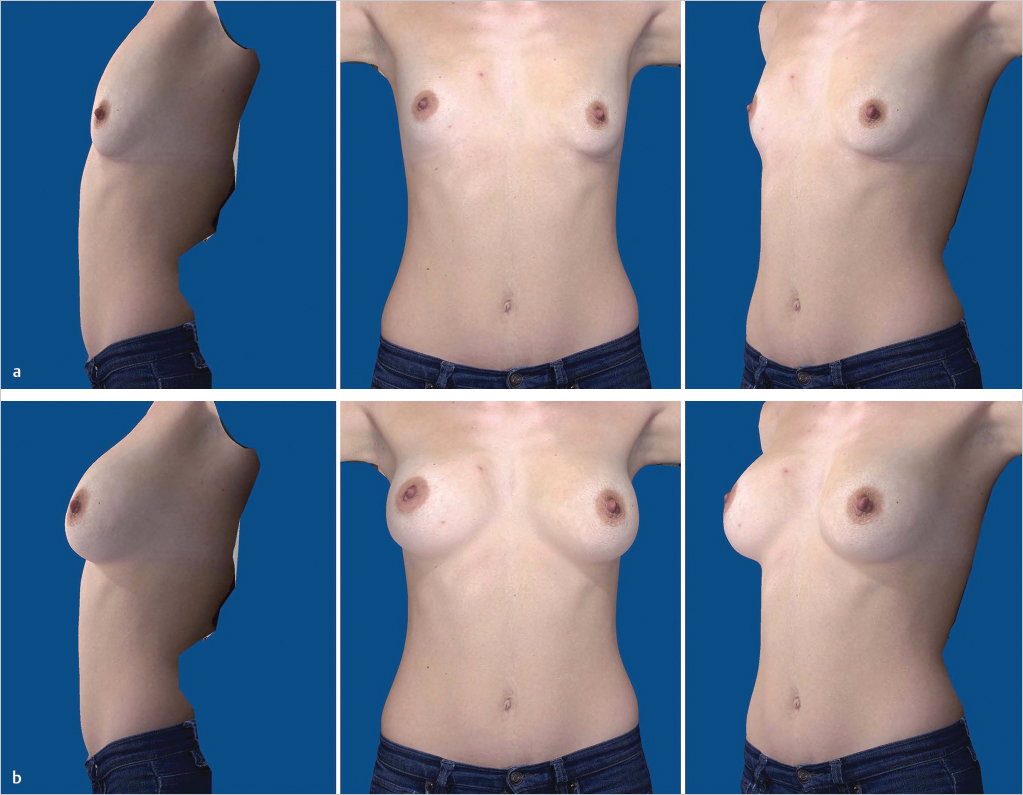
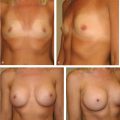
This 33-year-old woman had significant breast asymmetry with right mammary hypoplasia and left mammary hypoplasia and ptosis (▶Fig. 19.16). She preferred the size of her left breast.
A left superior pedicle augmentation mastopexy was performed with a 210-mL smooth round moderate-profile silicone implant and a 200-g breast resection. This was followed, at the same operative setting, by a right subfascial breast augmentation with a 520-mL smooth round silicone implant with full projection. Implant sizes and amount of tissue to be excised were chosen based on the VECTRA 3D imaging and simulation system used at the time of consultation (▶Fig. 19.17).
She was pleased with the early postoperative outcome (▶Fig. 19.18).

Related posts:
 16 Subfascial Inframammary Breast Augmentation
 12 Implant Technology
 14 Augmentation Mammaplasty with Cohesive Gel Implants
 15 Subpectoral Breast Augmentation (Inframammary Approach)
 17 Transaxillary Approach to Endoscopic Breast Augmentation
 11 Preoperative Evaluation of the Breast Augmentation Patient
Stay updated, free articles. Join our Telegram channel

Full access? Get Clinical Tree


