14 Augmentation Mammaplasty with Cohesive Gel Implants
Summary
This chapter explores the technique of breast augmentation with cohesive gel implants. With their textured surface and anatomical shape, these devices require a modified approach to augmentation. Preoperative assessment, operative approach, and outcomes are addressed.
Key Topics
Implant choice.
Measurements.
Projection.
Measuring and marking technique.
Incision placement.
Pocket location.
Approach to operative planning.
Surgical technique.
Postoperative care.
Key Teaching Points
Measurements of the implant should closely match the patient’s preexisting soft tissue framework.
Suprascarpal dissection should be used to enter the breast to prevent implant descent.
Breast shape can be accurately assessed only while a patient is in the upright position.
Incision length is greater with cohesive implants so as to avoid damaging or fracturing the gel on insertion.
Antibacterial pocket lavage is essential.
Correct implant orientation is critical.
The Keller funnel usage greatly facilitates implant insertion with minimal gel stress.
Massage and displacement exercises are contraindicated for anatomically shaped devices.
Observations
Anatomically shaped cohesive gel breast implants afford the surgeon to have direct control over the shape of the breast in a manner that is not always possible with other types of round silicone or saline implants. By appropriately applying clinical measurements with sound clinical judgment, a complementary relationship between the implant and the native breast can be created to produce consistently outstanding clinical results.
When breast augmentation is planned with anatomically shaped cohesive implants, the procedure follows the same basic operative steps as those used with round implants; however, several additional factors must be considered to successfully use these devices to have good effect and avoid complications. This chapter outlines these important factors.
14.1 Planning
14.1.1 Implant Choice
Because of the stiffer cohesive gel contained within the anatomical implant envelope, this device cannot fold and wrinkle under the influence of the overlying soft tissue the way that an underfilled, smooth, round gel implant can. As a result, the implant directly shapes the breast.
Technical Pearl
Consequently, it is imperative that the measurements of the implant closely match the patient’s preexisting soft tissue framework to ensure that they work together to create a pleasing result.
The leeway provided by an underfilled gel device is missing with anatomical implants, and the implant must match the patient’s breast to a more exacting degree. For this reason, each style of cohesive anatomical gel implant available from various manufacturers is produced using a matrix concept in which devices of differing widths, heights, and projections are available in various volumes to meet the needs of a wide variety of patients. When applying these matrices, the surgeon must perform a series of measurements on the patient to ensure that the implant fits the patient’s breast and that it will also satisfy the patient’s preoperative expectations for postoperative breast size and shape.
14.1.2 Measurements
Width
The intended diameter of the postoperative result after breast augmentation is estimated with the aid of a slide rule. This will help determine the width of the implant to be used (▶Fig. 14.1).
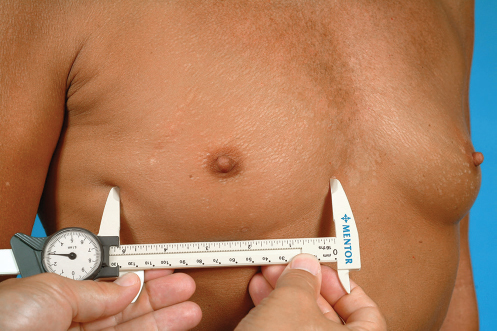
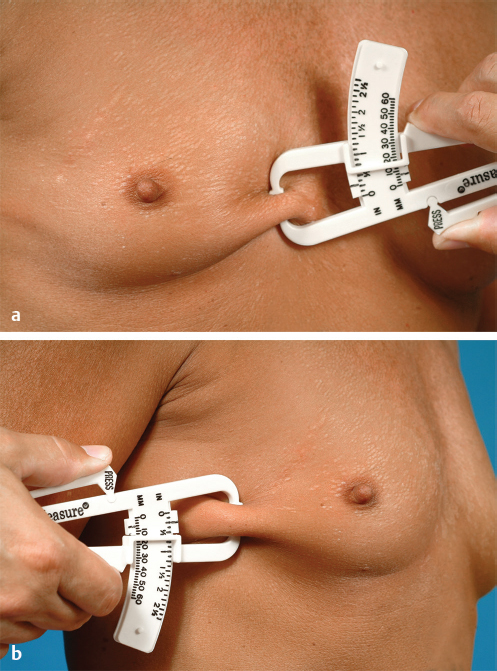
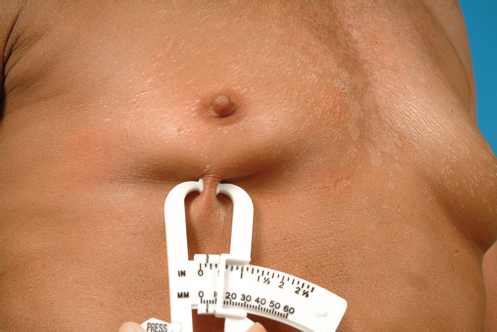
Once this measurement is recorded, the soft tissue pinch thickness of the breast both medially and laterally is determined with the aid of skinfold thickness calipers. By taking half of these two measurements (because the skin is folded on itself) and subtracting them from the measured overall breast width, the approximate minimum width of the implant needed to fill this space is calculated. This measurement has a tolerance of approximately 1 cm over the measured implant width and 5 mm under. In other words, the measured implant width can be exceeded by approximately 1 cm without adversely affecting the final result, but should not be diminished by more than 5 mm or the implant width will not adequately fill the breast (▶Fig. 14.2).
Height
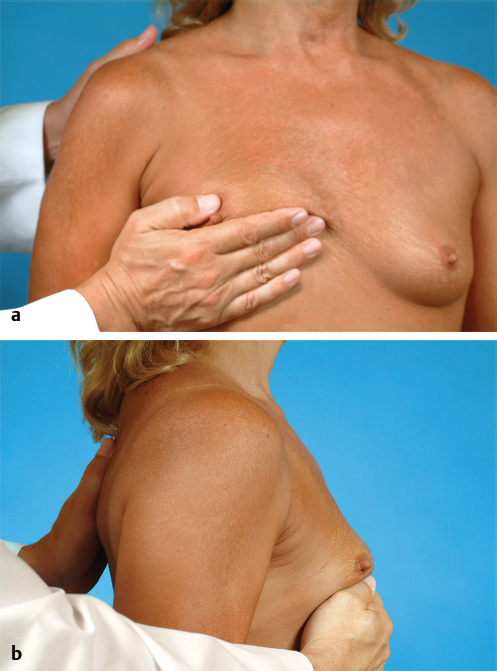
The breast is gently lifted against the chest wall. The break point of the upper pole can be seen. This point represents the upper limit of the breast and therefore the top or upper border of the breast implant (▶Fig. 14.3).
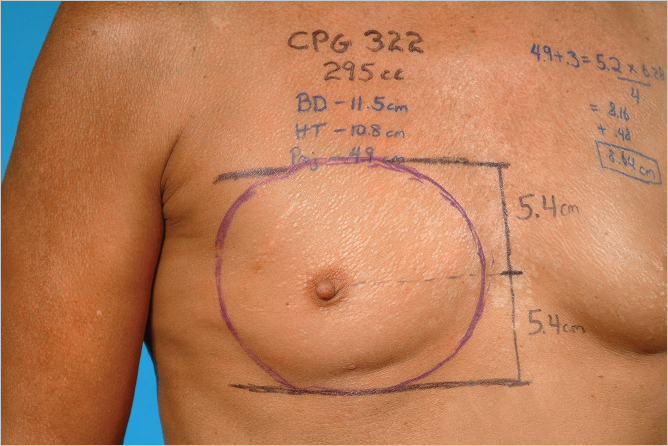
The proposed postoperative position of the inframammary fold is marked. Once the position of the inframammary fold has been set, the height of the breast implant can be estimated by measuring the distance between the fold and the upper break point of the breast. In this instance, the height of the implant measures 10.8 cm (▶Fig. 14.4).
This measurement also has a tolerance of approximately 1 cm, meaning that this distance can be exceeded or reduced by approximately 1 cm and the implant will still fit the patient and provide an acceptable aesthetic result. Additionally, if a more pronounced upper pole contour is desired, intentionally exceeding this measurement can create a fuller upper pole because of the excessive height of the implant.
14.1.3 Projection
Generally, a tighter, less-compliant breast skin envelope is not able to stretch to accommodate a mid-profile to high-profile implant; therefore, one of the low-profile options is best used in these patients. Alternatively, in patients with a loose skin envelope, a more projecting implant will be required to adequately fill the breast. By matching the elasticity of the patient’s skin to the proper projection, the best complementary relationship between the implant and the breast will be created, and the result will be optimized.
14.2 Markings
Preoperative markings are made to guide incision placement and the dimensions of the pocket. When using cohesive anatomical gel implants, it is imperative that the dimensions of the dissected pocket match the dimensions of the implant to ensure a snug fit of the implant in the dissection space and help prevent postoperative implant rotation. By marking the proposed implant location, inadvertent overdissection of the pocket can be prevented.
Of particular importance is the identification of the location for the inframammary fold. In many patients, the location of the fold does not change, and the elasticity of the skin is sufficient to accommodate the newly increased volume of the breast without the incision riding up onto the lower pole. However, in other patients, particularly those who present with a short fold-to-nipple distance, a new fold must be created lower down onto the upper abdomen. Accurately locating and preserving the level of this new fold is important in setting the overall foundation of the augmented breast. To properly locate the level of the new fold, the postoperative position of the nipple after the insertion of an implant must first be estimated. This nipple position will be elevated as a result of the volume of the implant that is inserted under the breast. Once this position has been identified, the exact position of the implant and the location of the inframammary fold can be set.
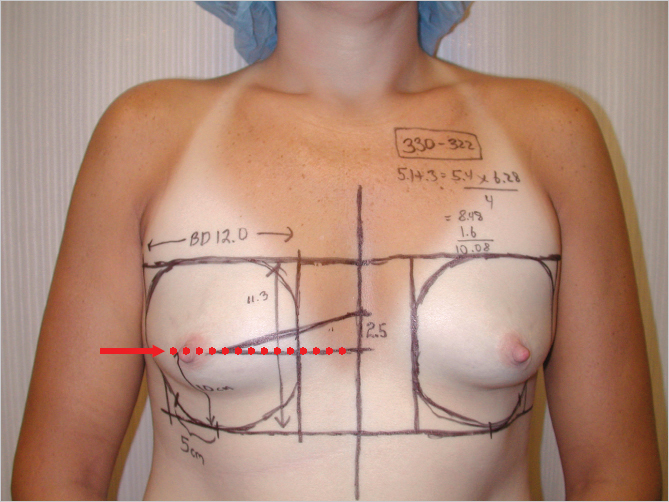
To estimate the postoperative position of the nipple after breast augmentation, first the resting position of the nipple is identified. With the patient’s arms at her side, a mark (red line) is made on the midline presternal skin that is parallel to the resting position of the nipple (▶Fig. 14.5).
The patient is then asked to raise her arms and place her hands behind her head. The nipple will rise as a result of this maneuver, and the new level of the nipple is similarly marked (yellow arrow) on the presternal skin. In this case, the nipple position is raised 2.5 cm as a result of raising the arms behind the head (▶Fig. 14.6).
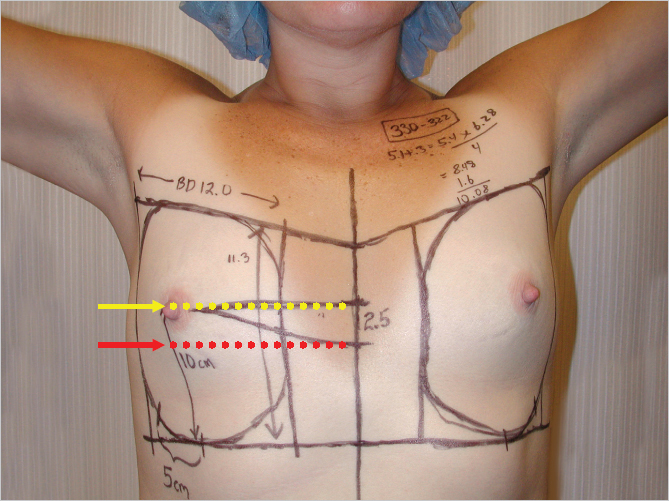
With the patient’s hands back down at her sides, the midpoint between these two nipple positions is marked (black line) to represent the anticipated location of the nipple after breast augmentation. In patients with somewhat inelastic skin, the actual nipple position may be overestimated slightly by this maneuver, and in patients with an elastic skin envelope, the degree of nipple lift may be mildly underestimated. In all instances, however, the predictive value of this sequence is sufficient to allow clinically relevant decisions to be made regarding the eventual positioning of the implant.
Technical Pearl
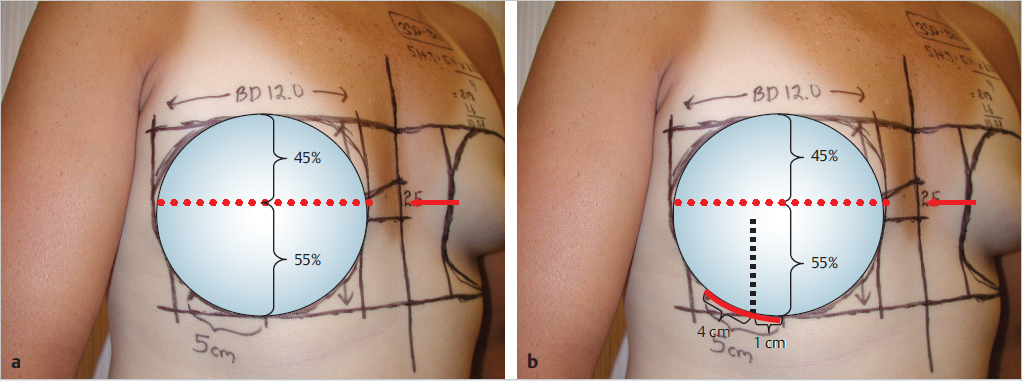
Once the nipple position has been estimated and set (red arrow), the implant is positioned by placing 45% of the implant height above this point, and 55% below it.
This relationship will create a very aesthetic contour to the augmented breast. These measurements can be calculated using the listed height of the implant as the denominator (▶Fig. 14.7).
With the position of the bottom of the implant determined, the location of the inframammary fold can now be set. This is accomplished by drawing a parallel line even with this point and across the chest wall to identify the most inferior extent of the implant, and therefore the location of the inframammary fold incision.
Technical Pearl
When using cohesive anatomical gel implants, the incision must be large enough to allow insertion of the implant without damaging or fracturing the gel.
PU gel fracture refers to a unique feature of cohesive anatomical gel devices that may occur when excessive pressure is applied during insertion through a limited incision. The force may create a persistent deformation in the structure of the gel that can potentially be seen through the skin. It is unknown whether this crack in the gel can weaken the shell and lead to eventual shell rupture. In this case, a 5-cm incision is marked so that 1 cm extends medial to a line dropped down from the lateral border of the areola and 4 cm extend laterally.
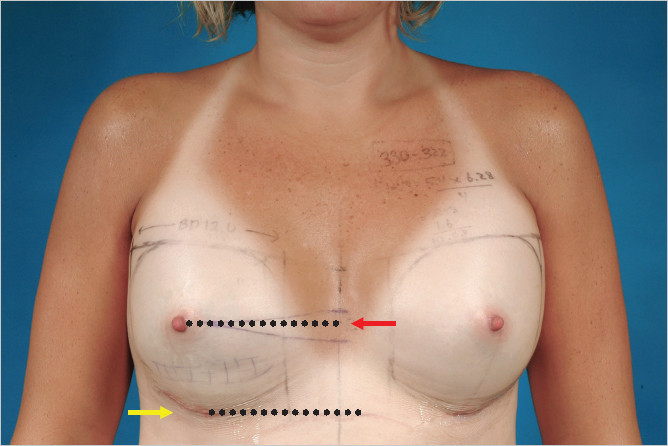
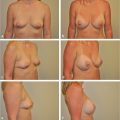
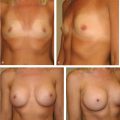
For other incisions, this line will mark the limits of inferior pocket dissection to be certain the position of the inframammary fold is properly set. The patient is shown immediately postoperatively, after placement of a 330 cc, style 322 midheight, midprojection, anatomically shaped contour profile gel (CPG) implant (Mentor) in the subglandular plane. The nipple height is elevated to a point roughly halfway between the resting and arms’ elevated positions noted preoperatively. The inframammary fold incision lies directly at the inferior extent of the lower pole breast contour, as planned (▶Fig. 14.8).
Once the level of the fold has been determined, the ability of the skin envelope to stretch to accommodate the projection of the device must be assessed. This is done by placing the breast under maximal upward stretch and measuring from the level of the fold up to the nipple. This distance often measures up to 9 to 10 cm. By measuring the length of the arc of the proposed implant from the inferior base up to a point that corresponds to the lower 55% of the height of the implant, the ability of the soft tissue envelope to accommodate this distance can be assessed.
The contribution of the soft tissue must be taken into account during this process. The thickness of the soft tissue envelope of the lower pole is measured with the aid of the skinfold calipers. The skin, fat, and parenchyma are folded over in the midaspect of the lower pole, and this thickness can be determined as an aid to calculating the soft tissue requirements needed to effectively wrap around the lower pole of the selected implant (▶Fig. 14.9).
Technical Pearl
A useful approximation is to add 8 mm of length to the arc measurement for every 5 mm of soft tissue thickness in the lower pole of the breast.
In this fashion, the dimensions of the soft tissue envelope required to wrap around the lower pole of the implant can be estimated. If the chosen fold location provides enough soft tissue to accommodate the lower pole of the device, no additional changes are required. However, if the length of the lower pole skin envelope under stretch is not long enough to easily accommodate the implant, either a smaller implant with less projection must be chosen or the fold must be lowered further to provide more skin to cover the lower pole.
14.2.1 Quick Calculation for Arc Length
A quick calculation to determine the length of the arc of the lower pole incision for an anatomically shaped implant is to add 3 mm to the projection of the device. This length is multiplied by 6.284 (2π) and divided by 4. This technique assumes the arc is that of a circle, which is roughly accurate, and uses the formula for the circumference of a circle (2πR), where R is the radius of the circle, divided by 4 to give one-fourth the length of the circumference. Therefore, to calculate the arc length of a 330 cc, style 322 CPG implant, 3 mm is added to the listed projection of 5.1 to total 5.4 mm. Next, 5.4 is multiplied by 6.284 and divided by 4 to give an arc length of 8.5 cm. If the soft tissue pinch thickness is 5 mm, then 8 mm is added to this measurement for a final arc length of 9.3 cm. This is the amount of skin that must be present in the lower pole, measured from the inframammary fold to the nipple under stretch to allow the lower pole of the breast to easily wrap around the lower pole of the implant.
Related posts:


Stay updated, free articles. Join our Telegram channel

Full access? Get Clinical Tree


