13 Revision Breast Augmentation
Summary
Nearly every major published study on primary breast augmentation including the manufacturer post market approval studies show complications in the 15–35% range with the most common complications being visible stretch deformity, wrinkling and rippling, capsular contracture, malposition of all types and hyper-animation deformity.
These primary drivers for revision will be presented along with a variety of documented methods for repairing and revising these complex patients. Pearls and pitfalls will also be described with each application and revision technique.
Key Points
The primary drivers for breast revision are presented.
Stretch deformities with accompanying wrinkling and rippling are among the most common and difficult deformities to correct.
Capsular contracture is the most common complication in breast implant surgery; revision with and without acellular dermis is outlined.
Symmastia is the least common malposition encountered, but it may be the most challenging to repair with one surgery.
Repair techniques, pearls, and pitfalls are described with each revision technique.
13.1 Stretch Deformity, Wrinkling, and Rippling
There are a number of consistent complications in secondary breast surgery that remain the primary drivers for revision. These include capsular contracture, malposition, wrinkling and rippling, and stretch deformity of the lower pole. Many of the methods of repair are similar and will be shown, clarified, and presented.
13.1.1 Incision Planning
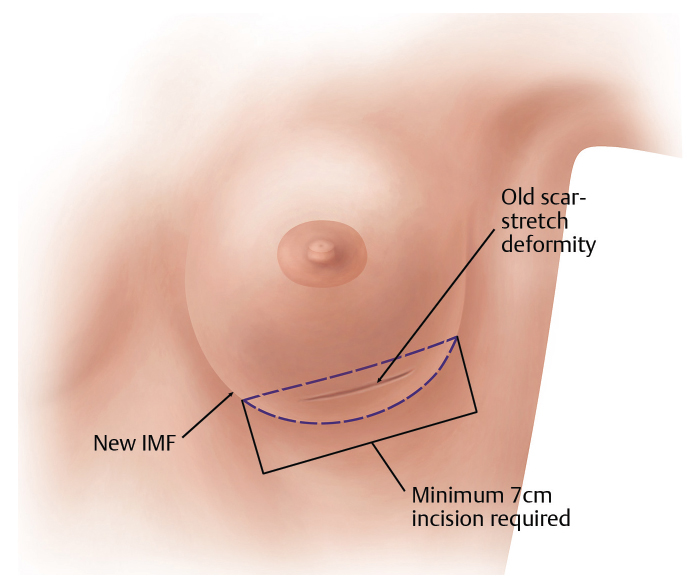
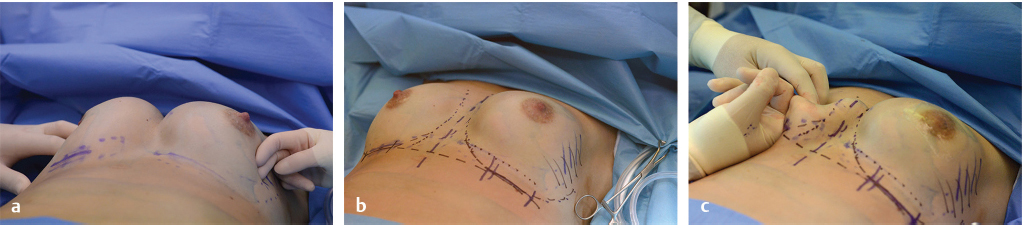
The incision planning for revisional breast surgery for these conditions depends on a variety of factors such as prior incision placement, and whether there are additional complications or deformities present, but in general an inframammary approach is preferred. With an accompanying stretch deformity, it is usually beneficial to resect redundant lower pole skin to help restore symmetry to the contralateral side and restore optimal nipple to fold proportions, and to have equal distances from the nipple to inframammary fold (IMF) bilaterally. A minimum of a 7-cm-long incision is typical to facilitate exposure and perform the procedure well, particularly if an acellular dermal matrix is used (Fig. 13‑1).
Definitions and Semantics
Stretch deformity resulting in a “bottoming out” appearance of the breast is defined by an increase in distance from a preoperative nipple to IMF (N-IMF) distance to postoperative distance, with the fold remaining in its prior exact position from the time of the primary operation (Fig. 13‑2).
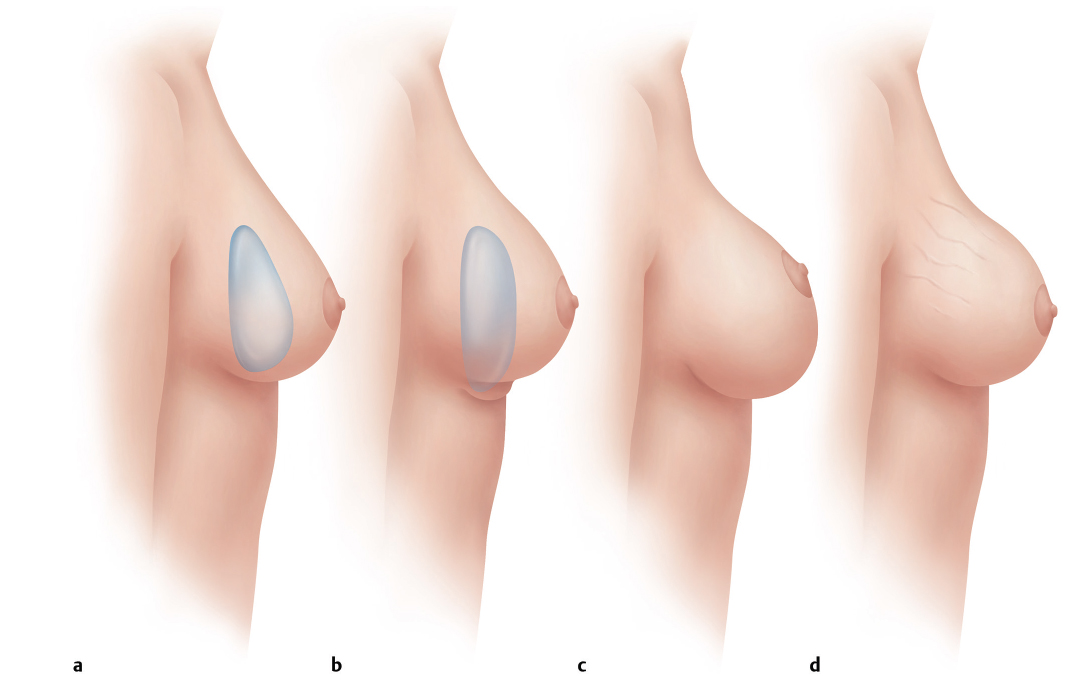
Fold malposition occurs when the implant drops down below the prior IMF location (since the primary operation). This will also result in an increase in the new N-IMF distance; however, the scar rides up on the lower pole of the breast if an inframammary incision was previously used (see section “Inframammary Fold Malposition”).
Surgical techniques for correction of all three of these complications—bottoming out/stretch, wrinkling/rippling, and capsular contracture—contain many of the same surgical techniques. When approaching patients with these complications, it is important to do as much as we can surgically to improve the result so as to decrease the chance of further recurrence or incomplete correction. Therefore, changing planes to add more coverage over the device, exchanging saline for silicone devices, and using standard techniques are all important. New surgical scaffolds or acellular dermis are often helpful in further supporting the breast soft tissues as an internal bra, hammock, or sling as well as providing a tenting effect over the device to decrease visibility.
The technical differences when correcting or improving these problems will be specifically addressed in each section of this chapter, but because the overall techniques are similar they will be presented together with variances noted.
After defining the exact nature of the deformity, and these key relationships, incision planning is performed to set the final incision in the new IMF. The new implant size and shape may also play a part in the new IMF position. These relationships of implant size range and ideal N-IMF have been determined. A 7-cm incision, or larger if a skin resection is planned, is then confirmed intraoperatively with the skin on maximal stretch. Redundant skin or skin removal to match the N-IMF distance bilaterally should be marked out and included in the initial incision wedge. This is one distinction between a stretch deformity and IMF fold malposition. If a stretch component is present, a wedge of additional skin should be resected to rebalance the breast and create a “hand-in-glove” volume to skin match.
13.1.2 Initial Dissection
Instruments
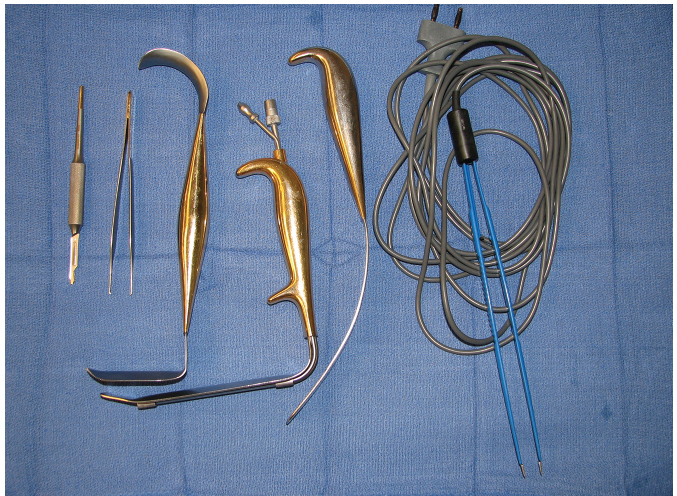
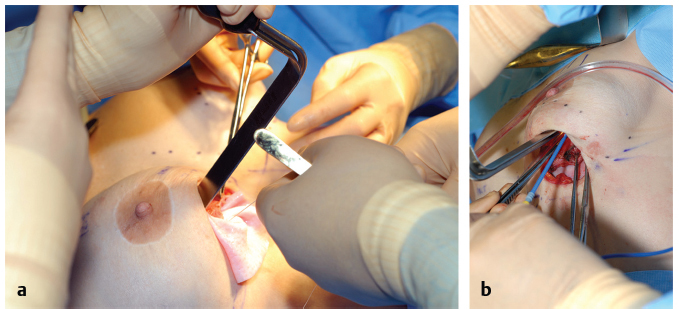
Five specialized instruments are recommended for this procedure. These include a double-ended breast retractor, an implant spatula, a fiberoptic nonserrated lighted retractor with smoke evacuation capability, a monopolar hand-switching electrocautery, and a good overhead lighting and preferably a fiberoptic headlight (Fig. 13‑3).
Markings and Landmarks
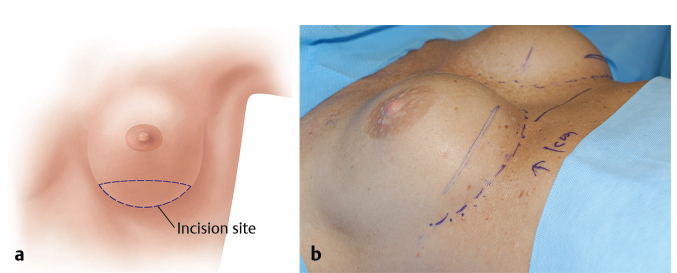
The incision is made ellipsing the prior incision, in the planned location of the prior IMF, or other ideal planned location based upon the new implant to IMF measurement guidelines (Fig. 13‑4).
Incision Length
The length of the incision is somewhat dependent on the style and size of implant. However, for these revision procedures and in particular when using acellular dermis as a support, reinforcement, or as a hammock or sling internally, the procedure can be likened to operating through a “mail slot” (Fig. 13‑5). The greater the visibility, the easier and more efficient may the technique be performed. New funnels, sleeves, or skin protectant sticky drapes should be considered both to decrease implant contamination when passing through the skin, and improved ability to pass an implant through a shorter incision without contamination. This is a requirement for textured devices as the textured surface can more easily imbed skin contaminants and bacteria.
Details of the Procedure
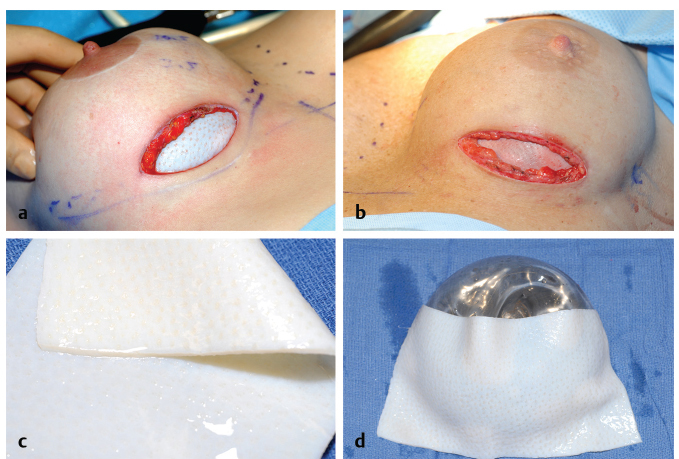
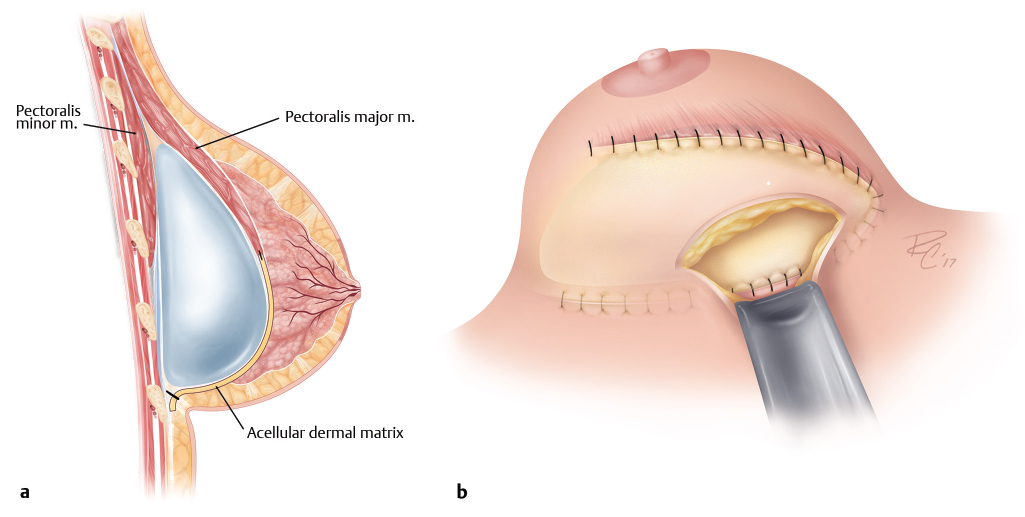
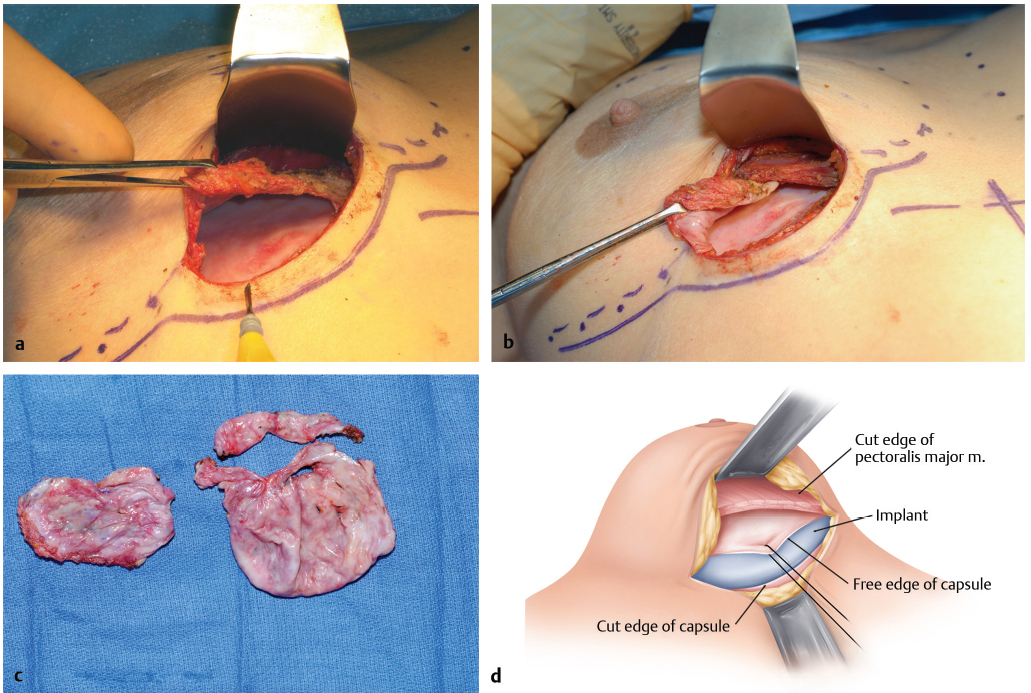
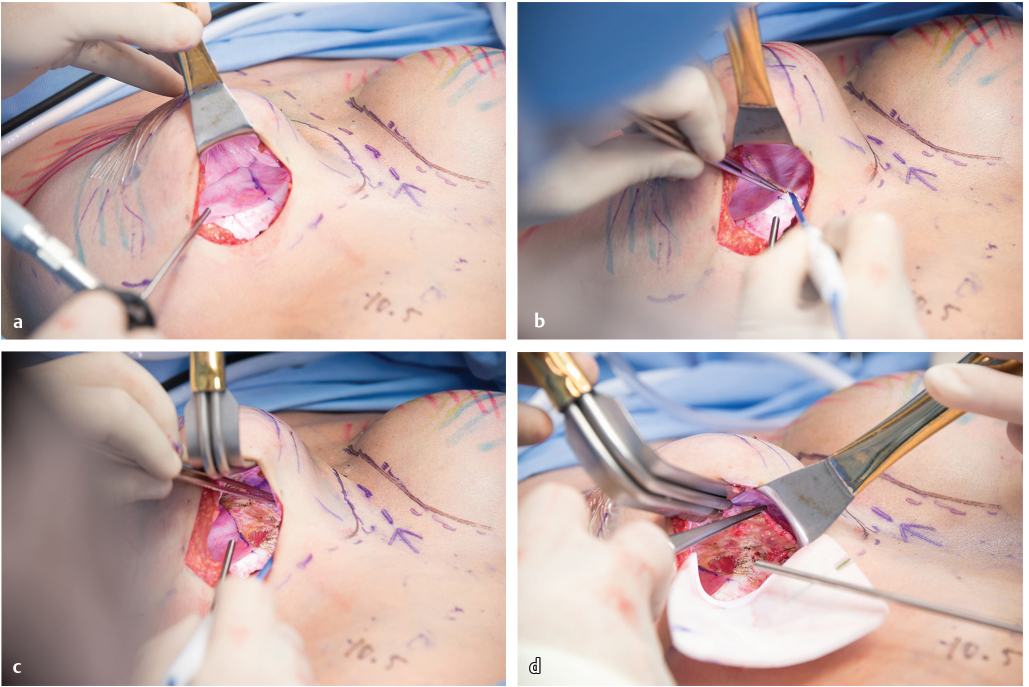
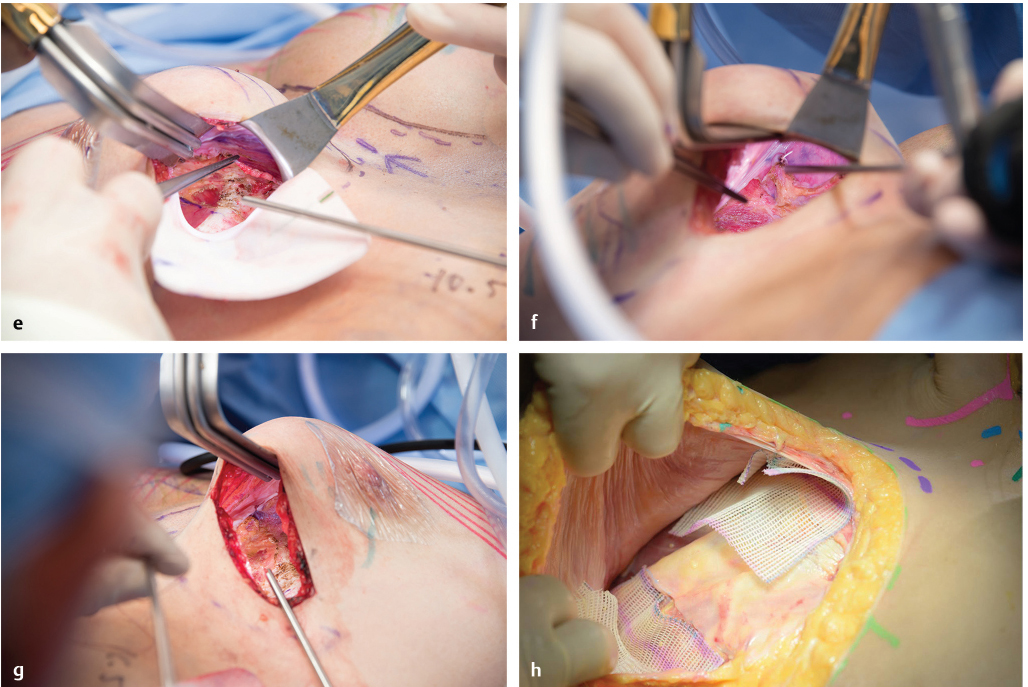
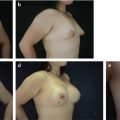
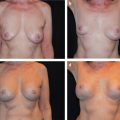
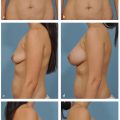
For capsular contracture and wrinkling/rippling procedures, the skin incision is made with a #no.15 blade scalpel and initial dissection is carried through the dermis with electrocautery. Vessels encountered including perforators are prospectively cauterized. Next, for prior sub-muscular implants, with the original implant left in position, dissection is carried down to the superficial breast capsule. Prior placement of tumescent fluid including a dilute 1:1 million epinephrine may also decrease bleeding and help facilitate the capsulectomy. Dissection is then initiated in the cranial direction and to the caudal border of pectoralis major muscle. In the instance of capsular contracture or an older calcified capsule, all of the capsular tissue or capsule below the border of the pectoralis major is resected. In the case of wrinkling and no contracture, it is preferable to keep the capsule intact to provide an additional layer of support and thickness anteriorly. Radial capsulotomy is then performed with preparation of the pocket symmetrically as needed. New implants are then placed, or alternatively a trial implant may be used while an acellular dermis or scaffold is sewn into position with protection of the device with a spatula retractor. The scaffold or acellular dermis is then further inset at the IMF and its sling effect supports the implant, decreasing visible wrinkling. Both experimentally and clinically, the capsule does not appear to form on the deep surface or underneath acellular dermal tissue and thus circumferential capsular contracture is inhibited (Fig. 13‑6 , Fig. 13‑7). Currently our algorithm is to utilize scaffolds for lower pole support and fold reinforcement and acellular dermis for the treatment of capsular contracture.
Lower Pole Stretch Deformity
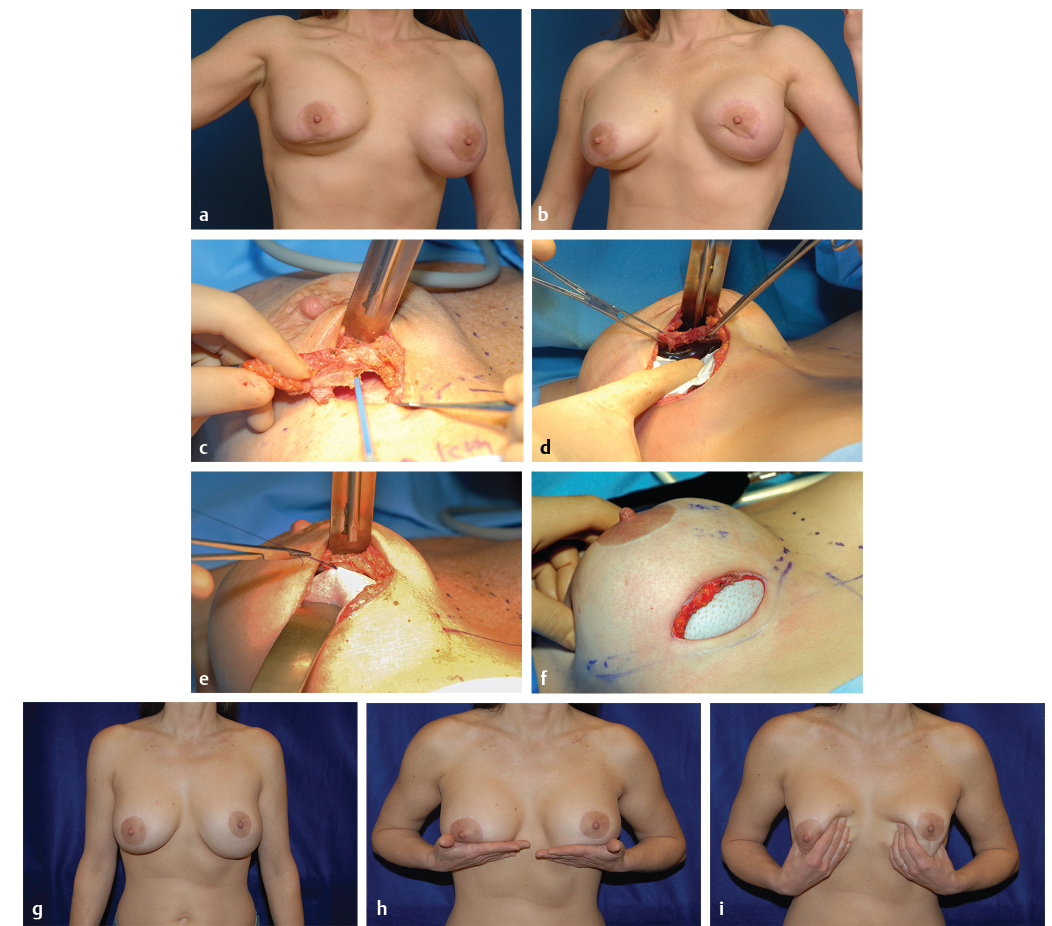
Preoperative markings are confirmed, with any redundant or asymmetric skin planned out in the resection in the new IMF. The skin incision is made by de-epithelializing the redundant skin in the lower pole. A skin incision is then made at the inferiormost portion of the incision retaining the de-epithelialized component above. The initial dissection is carried through the dermis with the electrocautery. Vessels encountered including perforators are prospectively cauterized. Next, if an acellular dermis is to be used, with the implant left in position, dissection is carried cephalad to the inferior border of pectoralis major. Capsulotomy is then performed in the region of the fold, estimating the redundant amount of capsule to be resected. Preferentially surgical scaffold or acellular dermis is then sutured into position along the inferior pectoralis margin, and on top of and anterior to the fresh capsular surface, and finally inset into the region of the IMF. The redundant de-epithelialized dermis may be used to further support the IMF region (Fig. 13‑8).
Pitfalls
It is very common when addressing a complication and performing a breast revision to potentially create a new problem or deformity while trying to correct or enhance another. Take care not to over-dissect the medial and lateral pockets creating a symmastia or lateral malposition. Standard revision techniques for the treatment of wrinkling/rippling, stretch deformities, and capsular contracture have very high recurrence rates, thus reinforcing the soft tissues with a surgical scaffold or acellular dermis or placing these materials as an interposition will provide the best alternative to break the cycle of revision and decrease further recurrence or incomplete, suboptimal repairs.
Pearls
Keeping the implant in position as long as possible initially greatly facilitates the capsular dissection and defining pectoralis muscle border. A spatula retractor is particularly helpful during this initial dissection as well. Estimating the redundant skin and capsule that has stretched is sometimes tricky and can be facilitated by knowing the ideal N-IMF relationships with specific volume of implants. The new acellular dermal materials provide a significant adjunct and further reinforce the soft tissues in minimizing further deformity, as well as decreasing recurrent capsular contracture.
13.1.3 Pocket Preparation and Capsular Flap Dissection
The implant is manually displaced cephalad and an approximate level of the new, revised, or planned location of the new IMF is determined and a capsulotomy performed. The free edge of the capsule is left intact, and the redundant lower capsule below the fold is resected.
The new location of the IMF may be estimated with the patient in an upright or partial upright position, with her implant or an implant trial in position and the fold marked internally with a surgical marker or methylene blue and a 22-gauge needle.
If the patient has a concurrent capsular contracture or calcification, or at the surgeon’s discretion, the anterior capsule is resected to the inferior border of the pectoralis major muscle, or capsule removed completely. If this is undertaken, strong consideration for acellular dermal support should be made, which will further define and support the fold, support the weight of the device, help mitigate future stretch deformity, provide additional coverage in the often thinned lower breast pole, and decrease circumferential capsule formation.
If there is no evidence of capsular contraction, capsulotomy at the apex of the pocket may be performed and the vascularized capsule used as an additional layer of support for the device. Dissection is then carried out superficial to the capsule to the lower pectoralis margin and acellular dermis sewn to the muscle border similar to using this material in a breast reconstruction model.
Pitfalls
These three complications are among the most difficult to treat in breast surgery. Every technique to decrease recurrence and minimize or eliminate the deformity should be considered including exchanging saline for gel devices, capsular flaps, or neo-subpectoral pockets, and adding scaffold for breast support or acellular dermal tissue. In addition, all materials do not have the same elasticity, so it is important to understand the specific characteristics of the material you are using.
Pearls
Adequate incision size is critical. When resecting additional skin for bottoming out deformities, incision length is not an issue but in other instances, a minimum of 7 cm should be planned. Keeping the original implant in position for the early portion of the dissection greatly facilitates the procedure. Ideal N-IMF folds may also be estimated preoperatively based on the final implant size chosen, specifically determining the distance on stretch.
13.1.4 Closure
The standard inframammary closure may then be performed in three layers closing the superficial fascia with a running or interrupted absorbable suture such as 2–0 Vicryl followed by a subdermal 3–0 Monocryl suture and a running 4–0 Monocryl subcuticular suture as previously described. Barbed 3–0 Monoderm quill suture may also be used subcutaneously in a running two-layer fashion, which expedites the closure which we have used in more than 1,200 patients without wound healing issues of this transverse scar. In the bottoming out deformity, the de-epithelialized dermis may also be used to support the closure.
For wound care, the incision is covered with Steri-Strips or a sterile band aid gel strip that provides epithelial hydration and a waterproof barrier may be used.
13.2 Capsular Contracture
13.2.1 Capsular Contraction
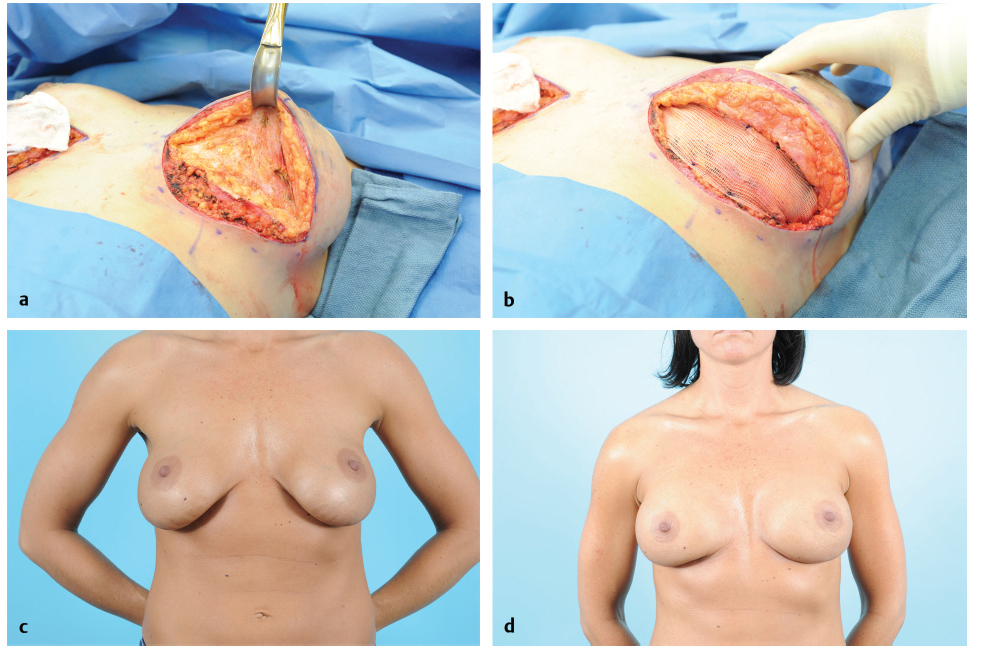
The surgical approach and correction of capsular contracture is similar to those previously described and used for correcting wrinkling and rippling. The important difference is in the pathology of the capsule. In general, capsular tissue should be looked at as “pathologic” often formed by Biofilm or a subclinical infection, and should be removed with total capsulectomy or near total when possible (vs. a stretch deformity where the redundant capsule may be used for further support). Following total capsulectomy (Fig. 13‑9), consideration for replacement with an acellular dermis should be entertained, particularly in patients with a history of multiple recurrent capsules. The abnormal capsule may then be “replaced” with an acellular dermis as a pectoral extension similar to its use in breast reconstruction (Fig. 13‑10).
Dissection for Capsular Contracture Cases
The skin incision is made with a no. 15 blade scalpel and initial dissection is carried through the dermis with electrocautery. For prior submuscular implants, the original implant is left in position as long as possible with dissection carried down to the superficial breast capsule. Dissection is then initiated in the cranial direction and to the caudal border of pectoralis major muscle. Dissection continues deep to the muscle with all of the capsular tissues or as much as possible resected, as shown in Fig. 13‑9.
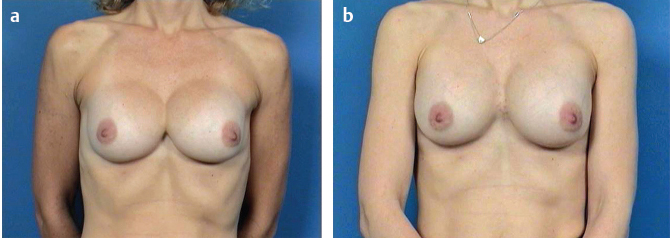
In the case of a prior subglandular implant, total capsulectomy with implant removal is recommended and a site change typically performed with or without addition of an acellular dermis as a pectoral extension. Shown in Fig. 13‑10 is a patient on 1-year follow-up with three times recurrent capsular contracture treated with capsulectomy and an acellular dermal matrix as a pectoral extension with completely soft breasts.
Insetting and closure are performed as described earlier in the “Stretch Deformity, Wrinkling, and Rippling” section.
13.2.2 Special Techniques
Capsular Flap: Neosubpectoral Pocket
Background
The capsular flap, or neo-subpectoral pocket, is a powerful tool in revision breast surgery and should be a part of the surgical armamentarium of all plastic surgeons. It is used in situations in which a patient has had a prior breast augmentation in the submuscular position, and is most helpful in patients with medial malposition (symmastia), IMF, or lateral malpositions. A new space is made superficial to or on top of the prior breast capsule and back beneath the pectoralis muscle, the capsule is collapsed, and a new implant is inserted into a new partial submuscular virgin pocket.
Incision Planning
The prior incision if periareolar or a new inframammary incision is made ellipsing the prior scar. Again, an adequate incision length is imperative to adequate visualization: a minimum of 7 cm.
Details of the Procedure
As previously discussed, keeping the prior implant in position as long as technically possible is important. Dissection is carried down to the anterior capsular surface with Bovie cautery. Elevation of the subcutaneous space is then performed with the aid of double-ended retractors. Upon reaching the inferior edge of the pectoralis major muscle, a new dissection plane between the capsular surface and beneath the muscle is made. Pushing down on the capsule and underlying implant with a moistened Ray-Tec sponge and stroking the dissection plane with the cautery in the blended coagulation mode with pressure and tension help develop the tissue planes. Rotate back and forth medially and laterally with adequate visualization; lighted retractors are critical. Upon reaching the apex of the implant, capsulotomy near the IMF is performed and the implant removed. If a ruptured gel implant is suspected, it is helpful to preoperatively place a large OpSite or Ioban sticky drape to avoid silicone contact with the skin.
Alice clamps may then be placed on the muscle edge, and the new pocket is completed cranially. Care is taken not to over-dissect the neopocket, particularly if a new shaped, textured implant is to be placed. Resection of redundant capsule at the fold is undertaken to keep the capsule tight against the chest with minimal redundant or extra tissue. The new device is then placed and positioned into the new partial submuscular pocket above and on top of the prior anterior capsule.
Pitfalls
Early capsulotomy and removal of the implant makes the surgical dissection more difficult. Using the cutting current versus coagulation mode will increase the chance of an inadvertent capsulotomy, which dramatically affects the ease of the procedure if a ruptured implant is present. Early over-dissection of the new space defeats the purpose and power of the procedure to hold the implant in position and help avoid future malposition. If a severe capsular contraction or calcification is present, this procedure should not be performed and the capsule should be resected.
Pearls
This is a very powerful procedure to learn and use. More advanced techniques include rotating the flaps for coverage and using the posterior capsule or only partial portions of the capsule to define the medial or lateral borders versus elevating the entire capsular surface. If an implant is in the subglandular space, a portion of the capsule may be retained for coverage, but a completely new submuscular pocket is made using a capsular flap or neo-subpectoral pocket technique.
Video 13.1 depicts the current implant capsule with the typical shiny capsular surface. Video 13.2 shows the neopocket that has been dissected off the superficial surface of the implant capsule still remaining beneath the pectoralis major muscle. The video then goes between the two spaces. This new anterior capsular flap is sutured down to the posterior capsule and chest wall with the new implant placed above this reflected anterior capsule and back beneath the pectoral muscle. In patients who have good soft-tissue thickness anteriorly, this is a powerful tool to aid in the correction of implant malposition. In very thin patients, posterior capsular flaps may be used; these are described in detail at the end of the chapter.
Subglandular Coverage for Wrinkling and Rippling
In cases where a patient will not accept a submuscular implant or where there is no muscle from prior surgery or congenital absence, there are some alternatives. This technique may not produce as significant an improvement as the pectoral extension, reconstructive technique but still may provide improvement. Again minimizing the inherent device wrinkling using an implant with a higher fill volume will provide an advantage. In addition, a surgical scaffold or acellular dermis may be inset either prepectoral or intracapsular, but sutured to the chest wall and placed on some tension to provide for less visible wrinkling through the material versus what the onlay may provide on its own just from the thickness and barrier of the material itself. In these instances, an 8 × 16 cm piece or larger may be oriented vertically and positioned over the device. The medial aspect of the breast typically is the thinnest and thus the material may be placed more medial to maximize coverage, although this may vary patient to patient.
Pitfalls
There are not sufficient patient data to advocate this approach, but it may be beneficial in providing some coverage and improvement in patients with marked thinning. There are relatively few alternatives except for autologous tissue transfer or fat grafting. Simple onlay alone may not provide adequate coverage or cosmetic improvement.
Pearls
Secure the acellular dermis to the chest wall to provide a tenting effect. Drains and adequate filling of the space on some tension are important to increase adherence and integration and revascularization of the matrix material.
13.3 Malposition
13.3.1 Medial/Symmastia
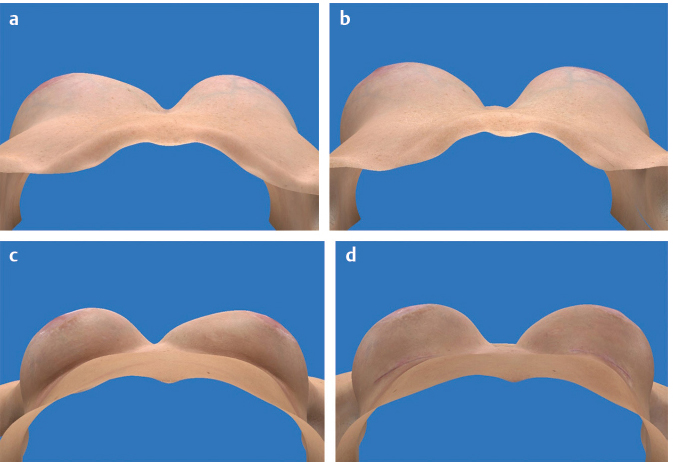
Implant malpositioning can be a source of significant deformity following breast augmentation. Malposition can be superior, inferior, lateral, or medial to the breast mound. When malposition is medial to the mound, it is described by a special term: symmastia (Fig. 13‑11).
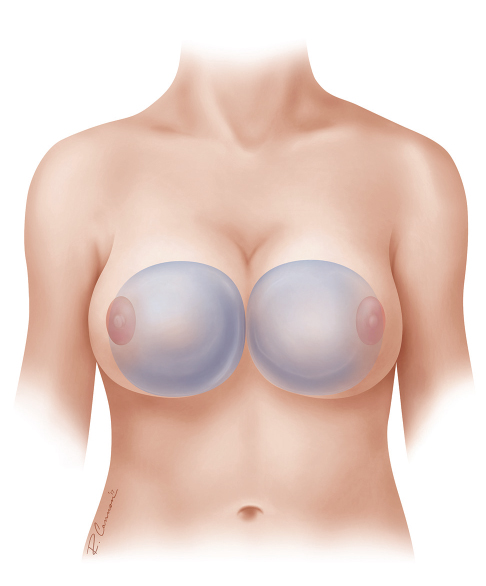
Symmastia can occur in a variety of severities. In its most mild, two separate implant pockets remain, but one or both implant pockets cross the midline (Fig. 13‑12). In more severe situations, presternal skin is tented at the midline, and in the most severe situations, the left and right breast implants share a common pocket (Fig. 13‑13).
Thin and attenuated tissues put patients at risk for this malady. Even mild forms of pectus excavatum can substantially increase the risk by allowing passive medial migration due to the angle and forces upon the rib cage. On the surgeon’s part, excessive medial dissection or division of the pectoralis origins can be contributory.
The problem seems to be more frequently found with implants that were too large for the patient’s breasts, as defined by published tissue-based planning systems. Symmastia also appears to be more commonly related to incisions that limited surgeon visualization, such as a periareolar incision in the setting of a small areola.
The surgeon should be alert to identify that the most severe symmastia cases frequently include concomitant inferior malposition. Treatment options depend on the current and proposed pocket location of the device (see Fig. 13‑13b). If the device is subglandular, the problem is most expediently resolved with a conversion to a new partial retropectoral pocket (if there is concomitant inferior malposition) or dual plane (if tissue pinch at IMF > 5 mm and without inferior malposition). Although one could choose to allow the implants to remain in the subglandular pocket with either a capsulorrhaphy or creation of a neo-subglandular pocket, the ease, durability, and predictability of a site change to a retropectoral pocket make that a frequent choice.
If submuscular already, options are remaining submuscular or creating a new subglandular pocket. Although converting to a subglandular pocket is tempting, the surgeon should remind himself or herself of the myriad of advantages offered by the submuscular pocket, particularly for the patient with symmastia, in that frequently these patients are thin and benefit from tissue coverage, and because the muscle almost by definition is no longer attached to the sternum.
If one does choose to move the implant to the subglandular position, one should be cautioned to leave a very wide intramammary distance. For if there is a submuscular symmastia, then by definition the pectoralis is no longer attached to the lateral border of the sternum. Unless the dissection stops lateral to the sternum, one may find the new subglandular pocket ultimately communicating with the submuscular pocket that created the symmastia.
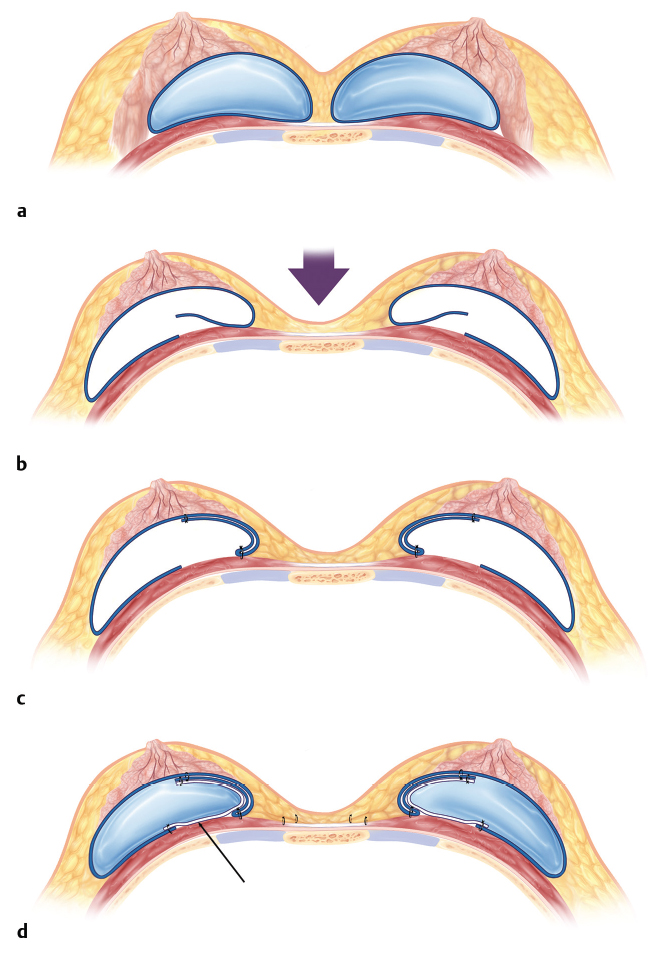
Most frequently, tissue coverage is such a priority that submuscular symmastia is retained as submuscular, either by leaving the implant in the existing pocket and closing off its medial extent with a capsulorrhaphy or by creating an entirely new pocket between the anterior capsule wall and the overlying breast/muscle tissue, known as a neo-subpectoral pocket.
Capsulorrhaphy can be difficult in cases of symmastia because both the anterior and posterior capsular walls are often very thin overlying the sternum, which is the area in which the repair must be the strongest. The capsule overlying the sternum itself is particularly thin, and unlike capsule overlying costal cartilage, the sternum is too thick to pass a needle through. Capsulorrhaphy also demands that sutures be placed in precise, regular locations in order to create a smooth and accurate boundary, which is very difficult to do when tissues are thin and inconsistent.
On the other hand, the neo-subpectoral pocket is a new pocket that is behind the muscle and gland, but in front of the old capsule. Its perimeter margins are defined by the dense adhesions between capsule and overlying tissue. The smoothness and extent of the pocket is created simply by surgeon dissection. Sutures are used to obliterate the old capsular space, but they can be placed at irregular intervals, allowing the surgeon to choose locations in which the tissue quality is best.
Because the edges are not defined by multiple sutures, there is less puckering seen right after surgery, and generally the result looks better sooner. There appears to be less discomfort, perhaps because of fewer sutures around the sensitive chest tissues.
In patients who are extremely thin, occasionally dermis on capsule, a neo-subpectoral pocket is impossible, using the patient’s posterior capsule (Fig. 13‑14). This is useful both for medial and lateral malposition deformities. The ideal new pocket border is marked internally and a vertical incision is made 3–4 cm medial to this new pocket border and tapered at the apex of the breasts medially. The capsule is sutured with a 3–0 absorbable material draping it up onto the anterior capsule. This has the unique advantage of further thickening the anterior surface. In addition, a surgical scaffold or acellular dermis may be used to further thicken and reinforce this repair and sutured in with a 2–0 absorbable suture. We have used posterior capsule over the past 15 years in over 300 patients, and similar to the neo-pocket, the repair is extremely strong and further supports the repair having the best chance to break the cycle of revision (Fig. 13‑15 , Fig. 13‑16).
Related posts:


Stay updated, free articles. Join our Telegram channel

Full access? Get Clinical Tree


