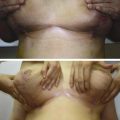
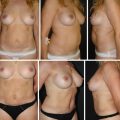
Fig. 8.1
(a) ‘Vertical lozenge, (b) ‘oval vertical with superior hooding’, (c) ‘round with superior hooding’, (d) ‘T-shaped with superior hooding’, (e) ‘oval horizontal with superior hooding’, (f) ‘protruded navel/outie with or without superior hooding’
The surrounding abdominal adipo-dermal flap transitions into the umbilicus through a characteristic periumbilical concavity that is deepest at the 12 o’clock position and less pronounced in the lateral and inferior periumbilical aspects. This ‘horseshoe’ shaped distribution of the fatty tissue is believed by Rozen and Redett to be an essential aesthetic feature ensuring overall abdominal beauty [9].
However, the presence of an exceedingly small size, an outward skin protrusion or an umbilical hernia is unanimously considered unattractive [10, 11].
The most appealing umbilicus – despite ethnic and cultural variations – is supposed to be small in size, with a vertical or T-shape and superiorly hooded. In a recent study on international multiethnic bikini models, the most appreciated navel shape was confirmed to be the vertical oval with superior hooding (82 %) and the least appreciated were the horizontal oval (29 %) and the protruding shape (47 %) [12].
Usually, surgeons position the umbilicus by retrieving the original projection of the umbilicus stalk and reimplanting the umbilicus into the lowered abdominal flap with the patient in neutral position. This approximates in patients with normal height (145–178 cm) to an average distance of 15 cm from the pubic symphysis [13] or to Fibonacci’s ‘golden ratio’ of 1.618 of the distance xiphoid-umbilicus to umbilicus-abdominal crease [12].
In the author’s opinion, proper positioning needs to take into account: (1) the height of the patient, (2) the initial natural position of the umbilicus, (3) the amount of mobilization and lowering of the abdominal flap, (4) the management of residual tension of the lowered flap using quilting sutures and (5) the fixation of the periumbilical abdominal flap on the fascia. All these factors influence the stability of the abdominal reshaping and determine the final outcome and shape of the umbilicus.
8.3 Transposition of the Original Umbilicus Versus A
8.3.1 Neo-umbilicus: Pros and Cons
‘The umbilicus is simply a scar and it would appear to be elementary especially for a plastic surgeon to replace one scar by another despite the sacred and almost mystical significance of the first’ (Yves-Gérard Illouz) [14].
Ever since Vernon’s first transpositions of the umbilicus [3], a wide variety of designs for both umbilicus dissection and insets have been developed.
Baroudi initially described insetting the ovally excised umbilicus through a 2.5 cm horizontal incision in the abdominal flap that was conically defatted around the new umbilicus site [15]. He then revised his technique – adding two buried 3.0 non-absorbable sutures from the umbilical stalk to the fascia for pedicle shortening and a vertical skin incision for a more aesthetically pleasing umbilicus inset [10].
In the following, many more techniques were described – highlighting the ongoing quest for an optimal aesthetic solution but also the lack of a consensus between surgeons:
Avelar published a star-shaped incision [16], Juri et al. described the V-shaped incision [17] and Massiha combined a circular umbilical incision with a trilateral incision in the abdominal flap [18]. There are also reports of inverted U-shaped flap insets [19], inverted-V chevron umbilicoplasty [20] or Y-shaped deepithelialized skin flaps [21].
The fixation of the umbilical stalk onto the fascia is believed to shorten it sufficiently. This manoeuvre also improves the transition between the navel and the surrounding abdominal flap and enhances the periumbilical concavities. However, in case of elongated umbilical stalks, a shortening is mandatory in order to avoid a ‘pleating’ of excess skin and a ‘pseudo’-herniation resulting in an unpleasant appearance. Akbas reported his solution to the problem through a vertical elliptical skin excision, embedding of the elongated stalk in the rectus abdominis muscles and suturing the abdominal skin at the 3, 6, 9 and 12 o’clock position to the fascia followed by a supra-umbilical liposuction – hereby improving the midline definition [6].
Visconti added four cardinal 3.0 absorbable stitches to his omphaloplasty, and performed an inferior-based triangular incision on the abdominal skin combined with a navel excision in a triangular shape with the apex pointing downward [12].
The author believes that despite thorough technical execution, many of the ‘umbilical transposition’ techniques are bound to the following challenges:
Circular or elliptic excisions of the umbilicus often lead to scar retraction with subsequent stenosis and reduction of the size of the navel – which is commonly perceived as unaesthetic.
Placing the scars for the umbilical inset on the periphery of the navel reveals them to the observer – especially in case of a hypertrophic scar reaction.
Maintaining the umbilical stalk and its vascularization sometimes proves to be difficult – especially when a long umbilical stalk, large hernias or a wide diastasis are encountered.
The efficiency of hernia repair or diastasis correction may be jeopardized because the surgeon needs to control the compression of the umbilical stalk vessels and may not perform fully sufficient continuous closure.
Techniques burying a long umbilical stalk within the plication of the rectus abdominis muscle or fixating it to the fascia risks a delayed protrusion of the umbilical stalk with a ‘cauliflower-like’ appearance.
For the above reasons, the author has modified his personal technique for a routine excision of the umbilicus at its abdominal wall root followed by a full ‘rotated Y’ neo-umbilicoplasty.
8.4 Neo-umbilicoplasty Through a ‘Rotated Y’ Design
Based on the initial 4-flap design described by Cló et al. [11] and Lee et al. [22], the author designed and now routinely uses a ‘rotated Y’ design.
Get Clinical Tree app for offline access

- 1.
Dissection: after the routine dissection of the abdominal flap, the umbilical pedicle is excised and diastasis correction is performed with inverted X-stitches of PDS 0 absorbable monofilament sutures. Similar to the Tiryaki’s triple spring sutures, this technique provides both horizontal tightening and vertical shortening of the abdominal fascia.
- 2.
Placement: the patient is placed in neutral – not 30° flexed – position, the abdominal flap is fully advanced and central closure is temporarily performed with staples. This temporarily puts the abdominal flap under pronounced tension, mimics the ‘high tension suture’ effect and allows for umbilical placement approximately 1–1.5 cm higher on the abdominal flap. Then, the correct placement of the neo-umbilicus in the midline is defined and the initial position of the umbilical stalk is retrieved on the abdominal wall and transcribed onto the advanced flap. The skin incision is performed according to a ‘rotated Y’ design with the upper branches measuring 1.0 cm and the lower branch measuring 0.5 cm.
- 3.
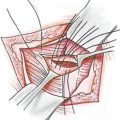
Defatting: the triangular skin flaps are defatted fully until the dermal level and slightly beyond their respective bases – creating the deep central depression of the umbilicus. Care is taken to ensure a smooth transition from the ‘horseshoe’ shaped fatty volume of the surrounding abdominal flap to the deep centre of the umbilicus (Fig. 8.2). Furthermore, it is important to defat the superior skin flap 2–3 cm until the supra-umbilical zone in order to transition smoothly to the epigastric area that was treated through liposuction.