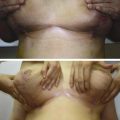
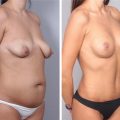
Fig. 5.1
(a–f) Preoperative pictures are taken usually in six cardinal views. If a complementary liposuction is going to be performed, a posterior view is added. All pictures include the area from infra-mammary folds to mid-thigh, demonstrating the abdominal contour, waistline, the extent of the abdominal wall laxity and skin to be resected
The marking starts with a midline drawing from the xiphoid to umbilicus and to the anterior vulvar commissure with the patient standing, which will serve also as a reference line to facilitate symmetry and to better appreciate any excess of tissue on either side. Two paramedian vertical lines are also drawn 5–6 cm off the midline symmetrically (Fig. 5.2).
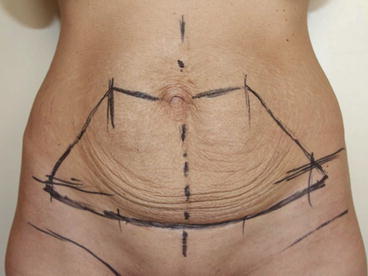
Fig. 5.2
The marking starts with a midline drawing from the xiphoid to the umbilicus and to the anterior vulvar commissure with the patient standing. Two paramedian vertical lines are also drawn 5–6 cm off the midline symmetrically. Holding the pannus upwards, a curvilinear incision is marked in the natural inferior skin fold. A seagull shape superior line is designed at the level of the upper border of the belly button. This superior horizontal line is first drawn gently upwards, peaking up around 5–6 cm away on both sides from the midline at the paramedian lines, then curves downwards towards the lateral endings of the inferior incision line, usually close to the anterior superior iliac spines
Holding the pannus upwards, a curvilinear incision is marked in the natural inferior skin fold, extending in length slightly beyond the lateral skin folds with the patient in a lateral hip-flexed position. A seagull shape superior line is designed at the level of the upper border of the belly button through the both lateral sides. This superior horizontal line is drawn gently upwards, peaking up around 5–6 cm away on both sides from the midline at the paramedian lines, then curves downwards towards the lateral endings of the inferior incision line, usually close to the anterior superior iliac spines.
The amount of the skin to be removed is double-checked by the surgeon grasping the skin and confirming that the upper and lower incisions meet. The definitive markings for the real amount of tissue resection are done on the operative table. The patients are dressed with thromboembolic deterrent stockings before they are called to the operating room (OR).
Points to Remember
Six different cardinal views are necessary in preoperative photography.
The incision shouldn’t extend beyond the bikini lines.
The skin excess above the umbilicus should be observed (or checked) preoperatively.
A seagull shape incision is planned in order to create the necessary paramedian skin gap and the following inferomedial tension.
5.2.2 Positioning and Planning
The surgery is usually performed under general anaesthesia. If multiple operations are performed like facial procedures or breast interventions, the authors usually perform the abdominal surgery as first procedure except of liposuction.
In the OR, the operating table is checked to insure that it can be flexed prior to induction of anaesthesia. The patient is placed in a supine position with silicone pillows under the knees to prevent nerve compressions during the surgery.
Afterwards, the symmetry of the body and the arms is verified, a rolled towel of 5–10 cm diameter is positioned behind the back of the patient at the level of the scapulae in order to decrease the unnatural backwards leaning of the thorax on the operating table and the arms are loosely secured by wrapping them with gauze. A Foley catheter is inserted, sequential pneumatic compression devices are placed and if indicated anticoagulants are used.
To ensure symmetry a 2-0 silk suture is placed in the midline at the level of the xiphoid. Vertical parallel lines at 5, 10 and 15 cm are drawn and a symmetrical upper incision line with a seagull shape is obtained at the crossing of the vertical lines using the silk suture. The same drawing is performed for the lower planned incision (Fig. 5.3a, b).
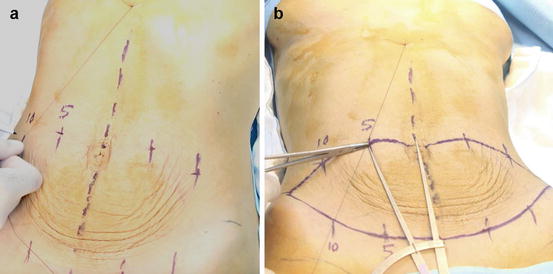
Fig. 5.3
(a, b) The seagull incision: Note that the bilateral curves of the upper marking will result in a relative paramedian skin gap. At the operation table with the patient in the supine position, the previous markings are reverified using a 2-0 silk suture placed in the midline at the level of the xiphoid and vertical parallel lines at 5, 10 and 15 cm. The symmetry of the upper seagull shape incision and the lower incision are ascertained
Preoperative preparations end by infiltrating 0.5 ml of 1:1000 epinephrine and 10 ml of 2 % lidocaine solution in 100 ml saline solution directly through the incision lines.
Points to Remember
The operating table is checked to insure that it can be flexed prior to induction of anaesthesia.
A rolled towel is placed under the back at the level of each scapula bones to mimic natural standing position.
Vertical parallel lines at 5, 10 and 15 cm are drawn and a symmetrical upper incision line with a seagull shape is obtained at the crossing of the vertical lines using the silk suture. The same drawing is performed for the lower planned incision.
5.2.3 Inverse Incision and Superior Flap Elevation
First, the upper incision above the umbilicus is made. A slightly bevelled incision through the cutis is made through the superior seagull shape marking, while pulling the skin only downwards in order to achieve proper cutting angle (Fig. 5.4).
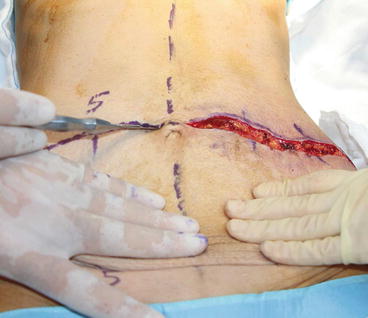
Fig. 5.4
The slightly bevelled incision while pulling the skin only downwards will ensure the scar-edge elevation and an appropriate skin closure with good scar healing at the end of the surgery
Then, the blade bevels more to lie at 30° to the surface of the flap, so the Scarpa’s fascia portion of the flap is about 1 cm shorter than the skin portion. This manoeuvre will ensure the scar-edge elevation and an optimal skin closure with good scar healing at the end of the surgery. The bilateral upwards curves of the incision are designed to create a relative paramedian skin gap and median skin excess.
The supra- and subscarpal fat is transversed until the surgeon reaches the abdominal wall. The large vessels are suture-ligated and the rest of the dissection is done by electrocautery or harmonic scalpel, leaving the fine areolar tissue and their lymphatics over the fascia. This is thought to diminish the rate of seroma formation [12].
The upper abdominal flap is undermined up to the xiphoid, resembling a narrow midline tunnel, maintaining the intercostal blood supply sufficiently to achieve rectus muscle repair and anterior sheath plication (Fig. 5.5).
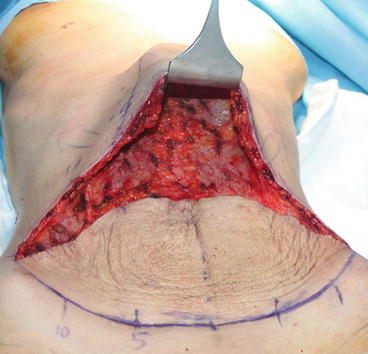
Fig. 5.5
The lack of lateral dissection and the previously created paramedian skin gap will ensure an extra pull towards the midline and create a defined coke bottle appearance at the end of the procedure
The lack of the lateral dissection and the minimal dissection of costal margins creates a lateral tension at the closure of the skin. This, in conjunction with the tension created by the paramedian skin gap due to the seagull incision will pull the waist towards the midline and help the surgeon create a coke bottle appearance [13].
The median convexity of the seagull incision helps also to create a relative median skin excess from the start of the operation. This tissue excess will later be used to fashion the rectus muscles illusion.
5.2.4 Navel Dissection and Inferior Flap Elevation
Once the upper flap is elevated, a cold towel is placed into the dissected tunnel and around the flap in order to decrease capillary bleeding (Fig. 5.6). An upside-down heart-shape is drawn around the umbilicus with a diameter of 1–1.5 cm, and then it is freed from the lower skin flap with 15 blade scalpel (Fig. 5.7a–c).
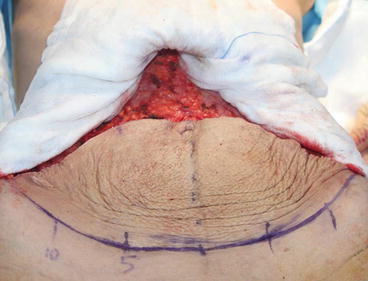
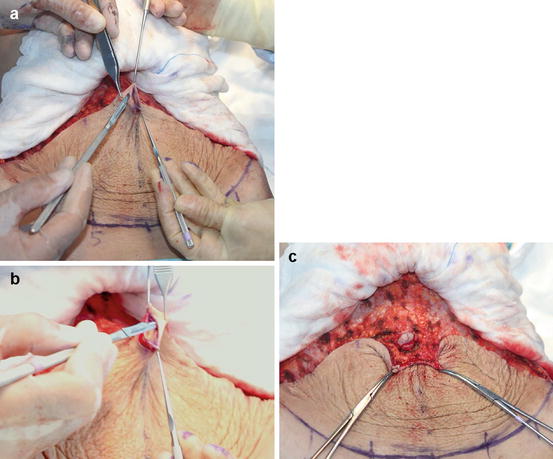
Fig. 5.6
Cooling of the superior flap in order to reduce the blood loss
Fig. 5.7
(a–c) A heart shape is drawn with a diameter of 1–1.5 cm and the umbilicus is freed from the lower flap
Once the navel is separated, the surgeon changes his position from the right side of the patient to the left side, which will make the lower dissection much easier for right-handed surgeons (Fig. 5.8). The lower flap dissection is performed in the same way downwards to the inguinal region. Extra attention is paid to the haemostasis for perforators around the umbilicus, which are numerous and one of the most important sources of postoperative haematoma (Fig. 5.9). The inferior dissection is continued past the planned level of the final closure in order to lift the thigh region and to rejuvenate the inguinal area as well (Fig. 5.10).
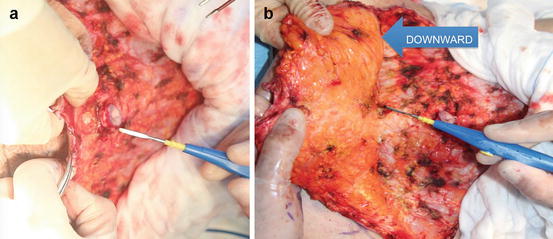
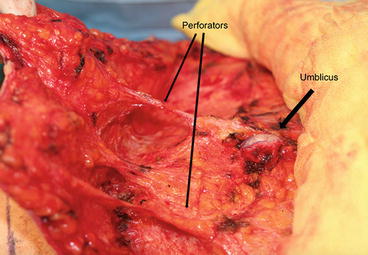

Fig. 5.8
(a, b) The surgeon changes his position from the right side of the patient to the left side, which will make the lower dissection much easier for right-handed surgeons. (The opposite is valid for left-handed surgeons, who shall start from the left and change to right for lower dissection.)
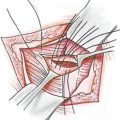
Fig. 5.9
Extra attention is paid to the haemostasis for perforators around the umbilicus, which are numerous and one of the most important sources of postoperative haematoma
Fig. 5.10
Lower flap dissection finished. Note that dissection is continued past the planned level of the final closure, in order to lift the thigh region
In this fashion, the dissection of both flaps is completed very fast and easy because of short flap length superiorly and inferiorly as well as the excellent control over the surgical area. It is also comfortable for the assistant to retract the flaps and to control the haemostasis (Fig. 5.11).
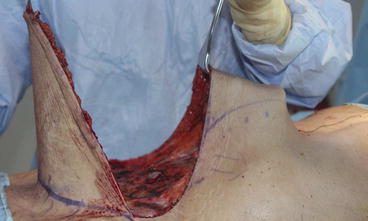
Fig. 5.11
Upper and lower flaps elevated in much shorter time and minimal effort due to the ease of dissecting two shorter superior and inferior flaps instead of one long superior flap
Points to Remember
Bevelled incisions for reduced closure tension and better scar healing.
Inverse seagull incision without lateral dissection for creating the lateral skin gap.
Upper flap elevation without lateral dissection to increase the lateral tension.
Navel dissection and lower flap elevation past the planned closure line.
A very fast and easy dissection because of short flap length and excellent control.
5.2.5 Spring Sutures: Horizontal-Vertical Plication
It is important to note that the expansion of the abdomen due to the “musculofascial” laxity is a three-dimensional deformation, which happens in the horizontal as well as the vertical plane. A definitive treatment of this condition necessitates a horizontal-vertical plication of the abdominal wall. The authors use a triple continuous over-and-over suture, which resembles a spring, or a helical coil, in order to tighten the fascia in horizontal as well as the vertical plane. The horizontal-vertical plication serves two purposes. First of all it is curing the three dimensional abdominal laxity in an anatomical way. Second, it shortens the abdominal wall vertically and elongates the median part of the superior flap.
To do this, the diastasis is noted and an ellipse is marked on the anterior rectus sheath from the xiphoid to the pubis. The widest portion of the ellipse is located at the level of the navel, with a width of around 6–10 cm according to the laxity (Fig. 5.12).
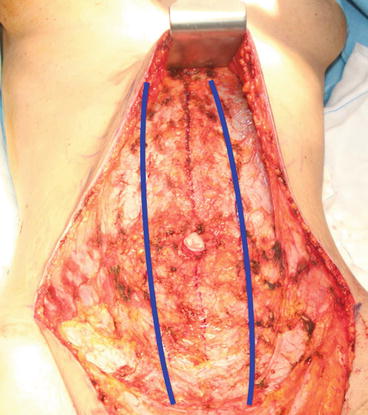
Fig. 5.12
The diastasis is noted and an ellipse is marked on the anterior rectus sheath from the xiphoid to the pubis, the widest portion being around 6–10 cm according to the laxity
Starting from the upper end of the superior midline tunnel, a triple helix is created with 1-0 polypropylene. These buried sutures start with taking a bite at the left lateral edge of the diastasis, then the right side, repeating three times to create a triple helical loop around the tread itself, fashioning a spring of Prolene (Fig. 5.13a–e). As the knot is tied, the fascia is fastened in the horizontal as well as the vertical plane (Fig. 5.14a, b). These separate triple helical spring sutures are used as many as needed above and then below the umbilicus down to the pubis all along the midline. This will ensure a three-dimensional tightening of the fascia but also shorten the vertical height of the abdominal wall, which in turn will elongate the median part of the superior flap. This will increase the tissue excess which was initially created by the median convexity of the seagul incision. This tissue eminence will later be used to fashion the rectus muscle folds illusion (Fig. 5.15a, b).
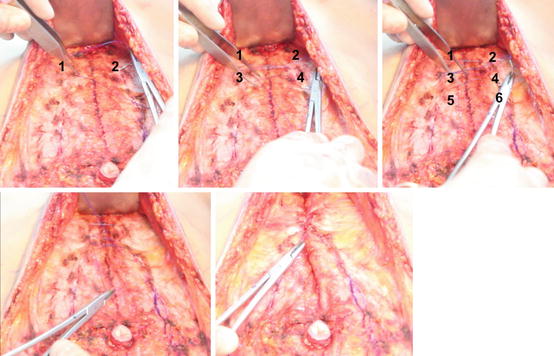
Fig. 5.13


(a–e) Starting from the upper end of the superior midline tunnel, triple helix sutures are created with 1-0 polypropylene for the plication of the abdominal wall. These buried sutures start with taking a bite at the left lateral edge of the diastasis, then the right side, repeating three times to create a triple helical loop around the tread itself, fashioning a spring of Prolene. When tying the knot, the abdominal wall will be plicated not only in the horizontal but also in the vertical plane
Related posts:

Stay updated, free articles. Join our Telegram channel
Full access? Get Clinical Tree
