Fig. 6.1
Evolution of mandible reduction surgery. Mandible reduction surgery has evolved from (a) simple resection of the angular portion to (b) contouring of the total mandible shape as the desire for a slim and small face has increased
Patient Assessment
Preoperative patient evaluation consists of physical examination and radiologic evaluation. The degree of protrusion of the mandible, asymmetry, masseter muscle hypertrophy, and amount of the subcutaneous fat should be evaluated by the physical examination at initial consultation.
Frontal Plane
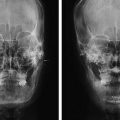
Using the PA cephalogram and 3D CT, the degree of protrusion or flaring of the mandible angle, symmetry, convexity of the body, deviation, and shape of the chin should be examined. The amount of angle and inferior border resection are determined after checking the course of the inferior alveolar nerve. A panoramic view is helpful in determining the amount of ostectomy of the mandibular angle and body, as well as the position of its ostectomy line.
Sagittal Plane
Using the lateral cephalogram, the gonial angle and the mandibular plane-sellar nasion angle (MP-SN angle) should be identified. The ideal gonial angle is within the range of 105–115°, and the MP-SN angle is 30–40°.
Transverse Plane
Three-dimensional CT or the cervical-vertex view is used to identify the transverse shape of the mandible. The angle of divergence and convexity of the mandible are observed. In cases with an inward-curled angle with a convex transverse shape, sagittal resection of the body will help to reduce the width of the mandible more effectively.
Surgical Technique
The general procedure is as follows (Fig. 6.2.):
- 1.
Mandibular reduction is performed under general anesthesia. Either nasotracheal or endotracheal intubation can be used. The authors generally use endotracheal intubation.
- 2.
The patient is positioned supine with a transverse roll beneath the shoulders to extend the neck. The entire face is prepped with Betadine solution. The oral cavity and the teeth are brushed with dilute aqueous Betadine solution. The operative field is draped to assist with intraoperative evaluation of symmetry. Surgery is performed in the intraoral area in a dark field; hence, wearing a headlight is helpful in performing the surgical procedure.
- 3.
A mouth gag is placed between the upper and the lower teeth. The incision line is designed using gentian violet solution. A buccal vestibular incision design is made from the ramus extending anteriorly to the first molar or second premolar while leaving a 7- to 8-mm mucosal cuff. This mucosal cuff helps to close the suture in an easy manner. The operative field is infiltrated with 0.25% lidocaine with 1:200,000 diluted epinephrine solution.
- 4.
Through a subperiosteal elevation with the periosteal elevator, the lateral aspect of the mandibular body is exposed. The dissection continues superiorly along the vertical ramus to adequately expose the area of resection. The masseter fibers are stripped from the lower border of the body, angle, and posterior border of the ramus with an angle stripper to secure a good operative field. Subperiosteal dissection prevents bleeding from the masseter muscle. During the dissection the mental nerve, the marginal mandibular branch of the facial nerve, the retromandibular vein, and the facial artery should be protected.
- 5.
Using a specialized angle retractor, the mandibular angle is hooked, and the desired level of the osteotomy line is marked on the bone with gentian violet solution or sterilized pencil. The marked line is then checked with dental mirrors. In general, the upper limit of osteotomy should not be beyond the occlusal plane, and the anterior limit should not violate the chin. If the osteotomy goes vertical beyound occlusal plane, there is a increased risk of condylar fracture. Usually the anterior limit is right under the mental foramen. But the upper and anterior limit of osteotomy can be adjusted case by case.
- 6.
Before the main osteotomy procedure is performed, “guarded” oscillating saw is used to mark the proposed osteotomy line [7]. The guarded saw has a small oscillating saw blade that is shielded at distances of 2, 3, 4, 5, or 6 mm (Chap. 4). The size of the guarded saw to be used is determined by considering the amount of resection to be performed in the mandibular body and the path of the inferior alveolar nerve, that is, the distance between the lower mandible border and the route of the nerve. By using these guarded oscillating saws, it is possible to perform the bony resection precisely in a more uniform fashion. More importantly, by using a guarded saw, unintentional overresection can be avoided, and the possibility of nerve injury can be decreased.
- 7.
After the osteotomy is initiated with a guarded saw, larger oscillating saws were serially used to complete the bone resection. After ostectomy is done with full thickness, the bone segment moves freely. In this step, thorough full-thickness ostectomy can cause soft tissue injury in medial surface of the mandible, so surgeon should pay attention in order not to place oscillating saw too deeply.
- 8.
After ostectomy, the attachment of muscle to the medial part of the mandible usually remains. A large elevator or Bovie electrocautery is used to divide any remaining medial pterygoid muscle fibers from the medial surface of the osteotomized segment, allowing its removal.
- 9.
Finally, a high-speed bur is used to remove any additional bone from the lateral cortex and to make a smooth transition. This procedure prevents the chance of secondary angle.
- 10.
An identical procedure is performed on the contralateral side. Here any preoperative asymmetry in the degree of angle prominence should be taken into account and a relatively greater or lesser amount of mandibular bone resected.
- 11.
The bilateral wounds are irrigated by saline and hemostasis secured. The wounds are closed in two layers (periosteum and mucosa) with a 4–0 absorbable suture. Bilateral suction drains are left in place overnight. Compression with a facial bandage is used.
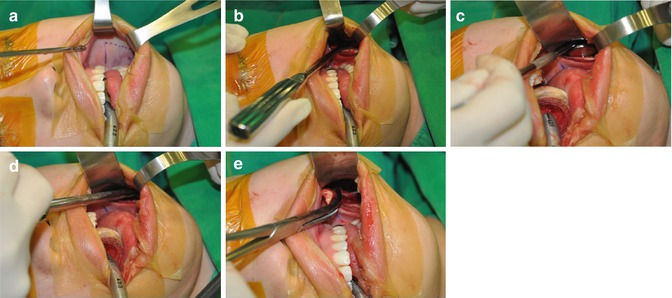
Fig. 6.2
Operative procedures. (a) The incision line is designed. (b) Subperiosteal elevation with periosteal elevator. The lateral aspect of the mandibular body is exposed (c) The desired level of the osteotomy line is marked on the bone with a marking pencil. The marked line is checked by use of dental mirrors. (d) Long curved ostectomy is performed. A 110° oscillating saw is used for the ostectomy. (e) Dividing the attachment of muscle to the medial part of the mandible. A large elevator or Bovie electrocautery is used to divide any remaining medial pterygoid muscle fibers from the medial surface of the osteotomized segment
Key Technical Points
- 1.
Important anatomic structures must be respected. Preoperative evaluation of inferior alveolar canal by panoramic view and CT can help surgeon know the course of inferior alveolar canal and the exact distance from the inferior border of mandible to the canal. According to the preoperative evaluation, surgeon should prevent opening of the canal and direct injury to inferior alveolar nerve.
- 2.
The surgeon should determine the position and quantity of mandibular bone to be removed before surgery and perform osteotomy accurately by the plan.
- 3.
The superior limit for resection is usually the occlusal plane; the anterior limit is the convergence of the mandibular oblique line with the lower mandibular border.
- 4.
The resected segment typically has an elongated semilunar shape instead of being triangular; when removed, it leaves a gently curved lower mandibular border. The oblique height of this segment is typically in the range of 10–20 mm, with length ranging 30–70 mm.Related posts:

Stay updated, free articles. Join our Telegram channel

Full access? Get Clinical Tree