Lateral plication of the platysma can substitute medial plication in all cases, no matter the severity of the case, with several advantages. This article presents a useful method, called lateral overlapping plication of the platysma (LOPP). In addition to the simplicity of the procedure, it has other advantages over medial plication of the muscle, because it is an incisionless procedure and requires less undermining that when using medial plication. The procedure has other advantages that are discussed this article.
Key points
- •
Lateral plication of the platysma, when following some essential rules, can substitute with advantages for medial plication in all cases, no matter the severity of the case.
- •
Lateral overlapping plication of the platysma (LOPP) is done by a linear opening on the platysma muscle, over a line indicated by the second premolar tooth and strongly overlapping the muscular edges of the incision.
- •
Mild submandibular gland ptosis is treated by muscular overlapping, which tightens the platysma over the gland, pushing it up.
- •
Partial resection of the submandibular gland is done easily and safely through the LOPP platysma incision.
- •
LOPP has advantages over medial line plication: it is incisionless, is less undermining, treats submandibular gland bumps prophylactically, provides easy and safe access to submandibular gland, and needs less defatting.
Editor Commentary: While teaching in Brazil, I had the pleasure to reunite with Raul. It was then that he described his approach to the neck which I found fascinating. His submandibular lateral approach to the platysma muscle and the submaxillary gland is a departure from the other authors’ techniques and is worth considering when the anatomy and the well described technical steps are followed. I was excited to see Raul’s impressive results in neck contouring achieved without a submental incision .
The LOPP neck lifting
Incisions
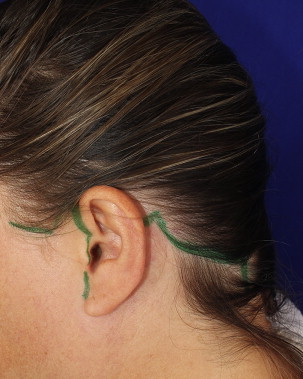
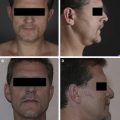
By adopting the LOPP method, surgeons abandon the submental incision, which is never necessary with the LOOP neck lift. The entire approach to the neck is done through the lateral access. Surgeons can use the incision used routinely. I usually begin an incision below the sideburn on the temporal area; then, the incision follows the border of the tragus and on the retroauricular area comes downward on the hairline for a small segment and finishes inside the hair ( Fig. 1 ). The posterior incision can be shorter in younger people, but short incisions, finishing just posteriorly above the ear lobule, as short scars style, usually are not enough to take off the large excess of skin resulting from the procedure.
Undermining and Defatting
The undermining in this procedure is done in two separated parts. The medial third of the face is detached on the areolar plane until 1 cm below the mandibular border, liberating the chin attachments of the skin when necessary. The cervical undermining is done over the platysmal fascia and the fat is left adhered to the skin flap. For didactic purposes, I describe three lines to delimit the borders of the cervical area, which are exposed in this way. The first line marks the posterior border of the platysma muscle, that I call “P”; the second is parallel to the jawline and 1 cm caudal to it; the third, the anterior line, is guided by the second premolar tooth and is called “A.” Over this line, the muscle is opened to perform the overlapping plication. All the area included inside the three lines is detached over the platysma fascia. The cervical detachment is done from P to A. On necks with a light degree of laxity, the undermining can stop on line A, but in more severe cases the detachment continues on the same plane to more adequately release the skin to be pulled. The platysma is exposed and I try to leave as much adipose tissue as possible adhered to the skin flap ( Fig. 2 A ).
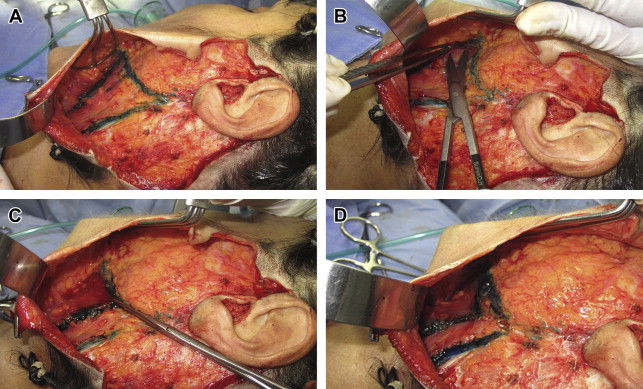
The procedures to lift the deep tissue of the midface— submuscular aponeurotic system (SMAS) plication, SMAS lifting, or SMASectomies—have to be done before the neck detachment (I usually use a SMASectomy in a majority of cases). When the SMAS is pulled, the fat tissue close to the jaw is pulled together and is raised, changing position. If the SMAS traction is done after cervical undermining, the fat close to the mandible can be positioned too high and create a new jawline higher than desirable. When necessary, an open lipectomy by scissors or liposuction can be done on the skin flap, and, on the medial area, this first defatting is done on the supraplatysma level. The sternocleidomastoideo area can also be defated in order to obtain a thinner neck. This procedure is always done after the work on the SMAS. To better estimate the amount of fat to be resected, I pull up the skin flap to imitate the new neck shape. A suction lipectomy under the platysma on the medial area is easily and safely done through the opening of the muscle on line A.
Tightening the Platysma with an Overlapping Plication
Taking the line A as a guide, I make a vertical incision approximately 3 to 4 cm on the platysma, beginning at 1 cm below the mandibular border and running in the sense of its fibers (see Fig. 2 B), which creates two edges of muscle, one posterior and one anterior. This line is far from the marginal nerve. This incision gives access to the subplatysmal plane. A small blunt detachment of approximately 1 to 2 cm is required to loosen it and enable traction of the muscular edge thus created (see Fig. 2 B).
The overlapping maneuver is done using an Allis forceps to pull the anterior edge of the muscle backward and cephalic. Some attempts have to be made, changing the position of the forceps, until the better spot to perform the traction and the fixing suture is determined (see Fig. 2 C). The anchoring is done by advancing the platysma border by pulling strongly with the forceps and fixating it with a 2-0 Vicryl (Ethicon, Summerville, New Jersey) suture on the platysma, where it arrives, but always right below the mandible, near its angle. The platysma muscle tissue below the mandibular angle is firm and deeply adherent and, therefore, makes for a great anchoring point. The tensile strength adjustment and the tightening of the platysmal tissue right below the mandibular border immediately produce a great definition of the mandibular line (see Fig. 2 D).
Submandibular Gland Treatment
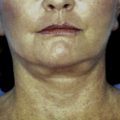
The submandibular gland (SMG) ptosis, or the gland’s caudal displacement, seems to occur due to a slackening of the structures that support the gland caudally, such as the deep fascia of the neck, of which the gland’s capsule is an extension, and the platysma muscle. Because of the ptosis, the gland becomes slightly more perceptible, especially in thin people. Some investigators reported their own experience in suspending it or partially removing the gland to treat this unaesthetic visibility of the gland; however, they all used a submental incision to approach the gland and they emphasize the complexity of the procedure: little exposure of the surgical field, difficulty to control possible bleeding, and, mainly, the complex anatomy of the area, being close to important vascular and nerve structures. Some experienced surgeons do not advocate a surgical approach to the area due, among other inconveniences, to its complexity and high complication rate.
In my opinion, there are many patients in whom the indication of some treatment to diminish the visibility of gland is unquestionable, but surgeons have been avoiding the procedure due the complexity of performing a partial gland resection. The LOPP method tightens the platysma over the gland and improves subplatysmal structures’ support, including the SMG, functioning in a prophylactic way, avoiding the gland bump that may occur after a cervical lift. At the same time, the LOPP procedure provides safe and easy access to the gland through the muscular incision, thereby making a partial resection of the gland much easier than a complex approach through a submandibular incision.
- •
With a pair of Allis forceps, the posterior edge of the incision made on the platysma is pulled back, and a small detachment on the subplatysmal tissue easily exposes the gland that sticks out ( Fig. 3 A ).
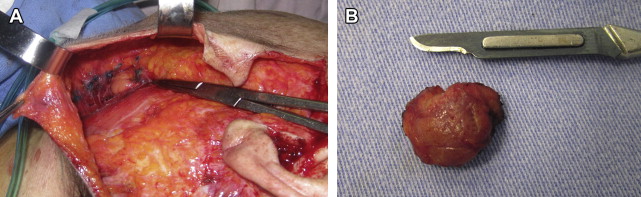
Fig. 3
( A ) To expose the SMG, the posterior edge of the muscular opening is pulled posteriorly, and a blunt dissection is done to release the gland of the tissue that covers it. ( B ) A small portion of the glands tail, a little bit more than 1 cm, is excised using electric knife.
- •
The gland is infused with Klein solution—the same solution used to infiltrate the face, containing epinephrine. It is strongly advised to wait a few minutes after infusion before cutting in order to obtain a hemostatic effect, because the gland is prone to much bleeding.
- •
The capsule is opened and an intracapsular dissection is performed.
- •
Next, the gland is held with a pair of long forceps, leaving out at least 1 cm of the tail, exposing the part to be cut.
- •
The excision is done with an electric knife, always removing just a little more than 1 cm of the gland’s tail (see Fig. 3 B).
- •
One or two sutures shaped as an 8 must be done with absorbable suture on the gland’s body to stop any possible bleeding and help avoid further bleeding.
- •
The capsule is also closed with a figure-of-8–shaped raffia suture to embed the gland in its capsule.
- •
After closing the capsule, the overlapping plication is done on the platysma (see Fig. 2 C, D).
Digastric Muscle and Other Subplatysmal Structures
In some cases, the tightening obtained by medial plication causes a cephalic displacement of the platysma at the medial line, which is of a different proportion on the lateral area. Because the medial portion rises more than the lateral, where the subplatysmal structures, SMG, and digastric are located, they become more evident. By tightening the platysma laterally, this finding is noticed less often because the pressure over the subplatysmal structures is closer to these structures than when performed medially.
Platysmal Bands
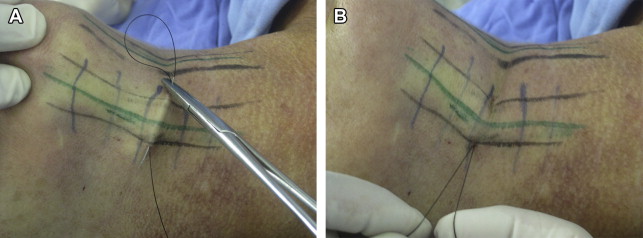
The platysmal bands are marked with patients awake and standing up and can be treated easily by two methods, the closed platysmotomy, as I describe elsewhere, using strong multibraided threads with needles ( Fig. 4 A,B ), and using the platysma incision on line A to cut the marked muscle band with a scissor, making 6 or 7 small horizontal cuts (see Fig. 4 C–E). These methods have showing effective results on my patients, without recurrence and in light cases can be used as an isolated procedure to treat primary or recurrent bands (see Fig. 4 F).
Related posts:
 Nonexcisional, Minimally Invasive Rejuvenation of the Neck
 Progressive Tunnelizations in Neck Face Lift Detachment
Lore’s Fascia a Strong Fixation Point for Neck Rejuvenation Procedures
Progressive Tunnelizations in Neck Face Lift Detachment
Lore’s Fascia a Strong Fixation Point for Neck Rejuvenation Procedures
 Managing the Components of the Aging Neck
 Multidimensional Evaluation and Surgical Approaches to Neck Rejuvenation
 Neck Lift Technique
Stay updated, free articles. Join our Telegram channel

Full access? Get Clinical Tree


