Chapter 40 State of the Art of Extensor Tendon Rehabilitation
Outline
The extensor tendons lie directly under the skin with very thin subcutaneous tissue above. In most parts, the tendons are thin and flat. The extensor tendons have smaller excursion than the flexors and the forces generated by extensor muscles are weaker. The extensor mechanism (e.g., the structures of the extensor tendons on the dorsum of the digits) consists of multiple tendon slips intertwined and intimately covering the dorsum of the phalanges.1
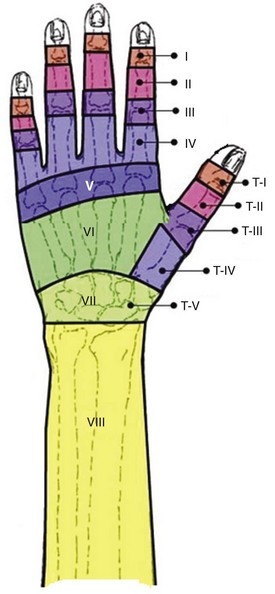
The extensor tendons do not have a synovial sheath system, but at the wrist level (zone 7) (Figure 40-1), the extensors are restricted by the extensor retinaculum that forms six fibro-osseous compartments within which 12 extensor tendons pass, which also help to prevent bowstringing. Adhesion formation after extensor tendon injuries is not uncommon, but because the requirement of tendon excursion is low and adhesions form under largely moveable skin, adhesions often do not pose an important problem for function of the extensor tendons. The extensor retinaculum at the wrist functions as a pulley, keeping the wrist and finger extensor tendons close to the axis of the carpus during motion. At this location, dense adhesions may occur between extensor retinaculum and the tendons, that hinder tendon movement.
The architecture of the extensor tendon is complex, especially at the proximal phalanx and middle phalanx level (zones 3, 4, and 5). Here the extensor tendon gives off the central slip and lateral bands and connecting fibers, forming a broad expansion over the dorsum and lateral aspects of the proximal phalanges with complex intertwined tendon fibers.2 The fibers of this extensor apparatus connect to the tendons of both the interosseous and lumbrical muscles. The central slip is the direct distal extension of the extensor digitorum communis (EDC) tendon. Extensor tendons on the dorsal side of the hand (zone 6) are separated tendons, but they have connections through the juncturae tendinum.3 The juncturae tendinum coordinate the opening of the hand via the extension of thumb, digits and wrist, as well as assist in force redistribution through the extensors.4
General Guidelines FOR Care after Extensor Repairs
The Initiation of Therapy: Timing
No studies have discussed specifically the optimal timing to initiate motion of the extensor tendons. Following flexor tendon repair, investigators have proposed initiating active flexion at postsurgical day 3 to 5, based on experimental evidence.7 Though it is unsure whether we can extrapolate the conclusions from the flexor tendon research to the extensors, we generally adopt these conclusions, because of a paucity of investigation on extensors in this regard.
Ideally, postoperative mobilization should be initiated when the therapist has a wide margin of safety between the tendon gapping strength and the load required to initiate tendon gliding.5 Active tendon gliding has to overcome resistance caused by (1) friction between tendons and their surrounding structures; (2) resistance resulting from joint stiffness, edema, and adherence to surrounding tissues; and (3) resistance of antagonist muscles.5 In zone 7, the tendon encounters additional resistance from the restrictive extensor retinaculum, that covers the tendons tightly.
Patient Referral Information
Detailed and specific information about the patient, the injury, and operative procedures performed are helpful in deciding protocols for individual patients. A copy of the operative report is invaluable in this regard. The therapist needs to know the mechanism of injury, level and severity of the tendon injuries, and structures repaired. It is also important to know the type of tendon repair and the strength of the repair. The surgeon should inform the therapist if the tendon is frayed, if there is the possibility of a postoperative infection, or if tissues were seriously damaged. All these factors greatly influence the extent and amount of scar and the probability of tendon adherence or repair rupture. Associated injuries of bones, nerves, blood vessels, and skin should also be taken into account in deciding protocols that best suit the patient. Information on the use of skin grafts and the location of repaired blood vessels is of great importance since pressure over these areas should be avoided by careful design of a splint. Finally, therapists should obtain information regarding pertinent medical conditions that may influence wound healing or the normal progression of tendon healing.7
Record Keeping
Active and passive range of motion of the hand should be regularly measured and recorded. Improvement of range of motion is an indication for the effectiveness of therapy and helps to decide if a protocol needs modifications. Function is assessed by measuring passive and active range of motion of the joints. Extensor pollicis longus (EPL) function, after a transfer of the extensor indices to the EPL tendon, can be measured by the distance of thumb elevation from the surface of a table on which the hand is placed flat.8 In addition, the Kapandji thumb rule by giving a score (0-10 score; 0: to the metacarpophalangeal joint level of the index finger, and 10: to the distal palmar crease of the little finger) to how far the thumb can reach different parts of the fingers can be used to score thumb opposition.9
Rehabilitation Methods in Each Zone: Finger Extensors
Zones 1 and 2 (Mallet Finger)
Zones 1 and 2 extensor tendon injuries may involve avulsion fracture from the base of the distal phalanx or present as tendon disruption alone, leading to mallet finger deformity. A full-time splint is usually applied for 6 to 8 weeks with the DIP joint held in extension for both types of mallet finger.10 After the initial 6 to 8 week splinting period, the splint should still be worn at night and during strenuous activities for 2 to 6 weeks. Several types of splint are available: foam-padded aluminum splints, molded plastic splints, and thermoplastic splints. With splinting, most acute injuries achieve a success rate of around 80%.11 Therapy after this splinting period is not always continued.10,12 Patients returning to their daily activities directly after splint removal may risk a tendon re-rupture or develop a DIP joint extension lag. The entire course of therapy can be divided into the following phases:
First Phase (6 to 8 Weeks): Therapy During Splinting Phase
After a mallet finger injury, a splint is applied to hold the distal interphalangeal (DIP) joint in extension.13 It is preferable to apply a custom made splint to position the DIP joint in submaximal extension, that is, maximum extension that does not produce skin blanching. However, circulation is more often compromised by too much pressure of the splint rather than too much DIP joint hyperextension.
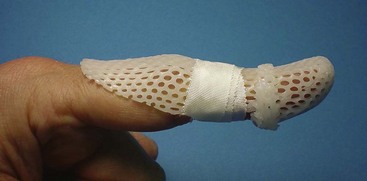
The splint should not include the proximal interphalangeal (PIP) joint and should allow full PIP joint flexion. Nonelastic adhesive tape should securely fix the splint to the volar skin of the middle part of the finger. In the supple and hypermobile fingers, a mallet finger injury encourages development of a swan neck deformity. This can be prevented by adding a 30° extension block for the PIP joint as part of the splint (Figure 40-2).
Second Phase (6/8 to 10 Weeks): Initial Exercises Without Splint
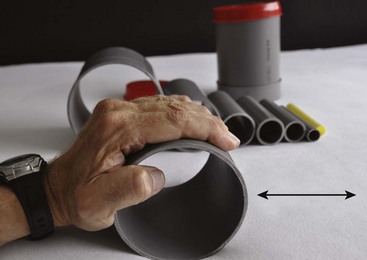
Only when there is no extension lag at the DIP joint can the patient be allowed to start actively flexing the DIP joint and gently increasing the flexion force. The active exercises are done 3 to 5 times a day out of the splint. The amount of DIP joint flexion can be controlled by using a large diameter cylinder (Figure 40-3). With the hand on top of the cylinder rolling it forward allows some DIP joint flexion and rolling it backward provides a passive assistance for DIP joint extension. The patient then lifts the hand and holds this position for 5 seconds, similar to place-hold active exercise. General instructions are to do the exercises slowly and stay within pain limits. The splint is worn between exercises and at night. Only when patients understand the exercises should they do them independently at home.
Zone 3: Central Slip Lesion (Boutonnière Deformity)
Closed injuries are often missed in the acute stage because the triangular ligament initially maintains the dorsal positions of the lateral bands, helping to maintain extension of the PIP joint. Only when the triangular ligament yields and allows the lateral bands to slip volarly will the lack of PIP joint extension become apparent due to the developing boutonniere deformity.14–16 Chronic boutonnière deformity leads to flexion contracture of the PIP joint.
Treatment protocols include immobilization, passive early mobilization with a dynamic splint and immediate controlled active mobilization of the PIP joint.17–19
Maddy and Meyerdiercks advocate immobilizing the PIP at 0° of extension with a static finger-based splint for 3 to  weeks followed by another 3 weeks of active flexion and assisted extension with a finger-based dynamic extension splint.20
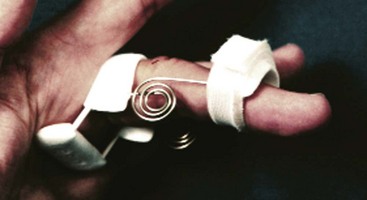
The dynamic extension splint in this study was a custom-made spring coil finger-based splint, much like a Capener splint (Figure 40-4). At 3 weeks, when the dynamic splint was fabricated, a structured program with three exercises was given to the patient: active DIP flexion with the PIP blocked manually in extension, active PIP flexion with the MP blocked in extension, and composite active MP, PIP, and DIP flexion, with the splint extending the PIP joint between repetitions of each exercise.
Some authors start the early controlled mobilization using a prefabricated spring coil dynamic PIP extension splint (Capener) as early as 10 to 14 days postoperatively, following immobilization of the PIP joint in extension with a static splint.21 Both groups initiated active DIP flexion exercises with the PIP held in extension within the first week. However, with extensive dorsal tissue damage or severed lateral bands the DIP, exercises were postponed until 4 weeks post-operation.
Because the intent is to passively extend not against the resistance of a flexion contracture but as an assist to healing extensors, the spring coil does not need to be very strong, and a lower force type can be chosen or fabricated. The goal of the splint is to achieve maximum extension at rest with the lowest possible force and at the same time make active flexion easy to perform. The position of full PIP extension (possibly 10° of hyperextension) in both the static and the dynamic splints is critical for a successful outcome.23
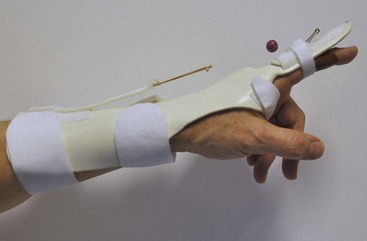
The dynamic splinting can also be hand based,22,23 or extending across the wrist. The wrist is usually placed in 30° extension, metacarpophalangeal (MCP) joints in slight flexion, and interphalangeal (IP) joints fully extended24,25 (Figure 40-5). The DIP joint is allowed to actively flex to release the tension on the central slip and to ensure some gliding of the intact lateral bands. During the first week of active PIP joint flexion, the PIP joint is allowed to flex up to 30° either by putting a stop on the outrigger line, by adding a volar splint or by the patient grasping a large cylinder. PIP joint flexion is increased by 15° each week.
At week 4, active PIP joint extension is started. The patient continues to use a small finger extension splint, such as a neoprene splint, during the day to support extension. At week 5, achieving 90° of active PIP joint flexion is the goal. Starting at week 6, light activities of daily living are allowed. Resisted finger motion is started at week 8. If the PIP joint has less than 60° of passive flexion, corrective flexion splinting can be applied by bandaging the fingers in flexion for periods of 10 to 15 minutes, several times a day. We emphasize that the above program is progressed only when the patient maintains full active PIP joint extension. If the patient does not have full extension, the period of splinting in extension should be prolonged, and more emphasis should be given to extension than to flexion. Walsh and colleagues22 compared the dynamic extension splint with static splinting and the results suggested an earlier return to work with less frequent therapy visits for the dynamic extension splint group.
Early active digital extension is also used after surgical repair of the extensor tendon in this zone. This method advocated by Evans is known as Short Arc Motion.17 In the active motion protocol, for the first 4 to 6 weeks, the digit is immobilized in a finger based static splint in full extension with the MCP joint excluded. Every hour the patient is allowed to perform intermittent limited active flexion and extension exercises using a template splint (Figure 40-6). The patient actively flexes to the limits of the template splint and actively extends to full extension. The template splint supports only the PIP and DIP joints and allows for 30° active PIP and DIP joint flexion in the first 2 weeks, increasing 10° flexion each week.26 Exercises are performed 4 to 6 times a day. At 6 weeks, both splints are discontinued, and exercises of full range of active motion are started.
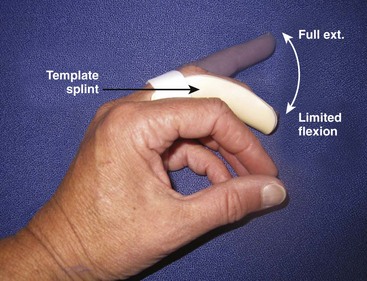
Figure 40-6 Limited active flexion and full extension exercises of the PIP and DIP joints using a template splint.
Evans and Thompson17,26 calculated that the amount of force added on the repair was 3 N during early active motion, which is well within the strength of most suture techniques (about 20 N in the first week)6 and the 30° flexion limit keeps the force within a safe zone.
Focusing on zones 2 and 3, the studies of Hung,27 Saldana,28 and Newport29 do not support the idea that dynamic splinting has benefits over static splinting. Therefore some regard static splinting to be as effective and should be the standard care for simple extensor tendon lacerations distal to the MCP joint, given its simplicity and lower cost.
Zone 4: Proximal Phalanx
In this zone, injuries to the tendon often cause no functional loss because the wide extensor hood covers more than half of the proximal phalanx. However, when the tendon is repaired, due to the large contact area to the underlying bone, it creates a substantial risk of adherence. which restricts gliding of the extensor hood. Therapists need to be aware of this extra risk and start active gliding exercises as soon as possible. Protective tendon gliding can be provided with a dynamic extension splint as in zone 3 injuries, or using gentle active exercises similar to the short arc motion method advocated by Evans.17
Zones 5 and 6: MCP Joint and Dorsum of the Hand
Lacerations of the extensor tendons in zones 5 and 6 are often treated with an early motion protocol using a dynamic splint.27 Within 2 to 5 days postoperatively, a dorsally based dynamic splint is applied holding the wrist in 30° to 40° extension and dynamically extending the MCP joints to full extension via an outrigger (loops around the proximal phalanx). At this time active flexion of the MCP joints is allowed to 20° to 30° for index and middle fingers, and 35° to 40° for the ring and little fingers while the IP joints are actively extended. The second exercise is to flex the IP joints while maintaining extension of the MCP joints (active hook fist). Exercises are done 5 times every 2 hours in the first 2 weeks, and after that 10 times every hour. For patients needing more support because they experience unrest during sleep or exhibit a tendency toward development of an extensor lag, a volar splint may be used to keep the fingers in extension at night. At week 2, active flexion of MCP joints is allowed to 45°, week 3 to about 60° and week 4 to 90°. At week 4, place-and-hold exercises for full finger extension are started and at week 6 the splint is discontinued. Strengthening exercises are started around week 7 and at 12 weeks the hand can be used normally. Patients are progressed on this timetable only if no extensor lag is observed.
For isolated EDC injuries in zones 5 and 6, the immediate controlled active motion (ICAM) technique can be used, as described by Howell and colleagues.30 This method allows immediate active controlled motion by using a yoke splint which places the injured finger in MCP joint extension slightly greater than the adjacent fingers, and a second splint is applied to hold the wrist in 20° to 25° extension. The ICAM protocol has the following three phases: (1) Days 0 to 21—Two splints are worn full time and active composite finger flexion exercises are started. (2) Days 22 to 35—The patient continues to wear the yoke splint at all times but removes the wrist splint only for wrist exercises. (3) Days 36 to 49—The wrist splint is discontinued but the patient continues wearing the yoke splint while using the hand but removes it for active finger motion exercises. In Howell’s report 81% patients achieved excellent results for both digital extension and flexion.30 Only five patients developed a lag and there were no tendon ruptures.
The Norwich regimen31 designed for zone 5 and 6 extensor tendon rehabilitation is an active protocol using a volar immobilization splint, which hold the wrist in 45° extension, the MCP joints in 50° flexion, and the IP joints in full extension. Two exercises are performed for 4 weeks, 4 times a day, with 4 repetitions each time (“the rule of four”). After loosening the digital straps the following exercises are performed: combined active MCP and IP joint extension (lifting the extended digits off the splint) and active MCP joint extension with IP flexion (making a hook fist within the splint) (Figure 40-7). When extension lag persists, the splint can be worn at night or part of the day, with a V-shaped insert holding the MCP and IP joints at 0° (Figure 40-8).

Stay updated, free articles. Join our Telegram channel

Full access? Get Clinical Tree


