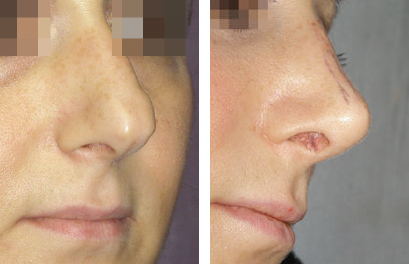
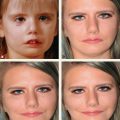
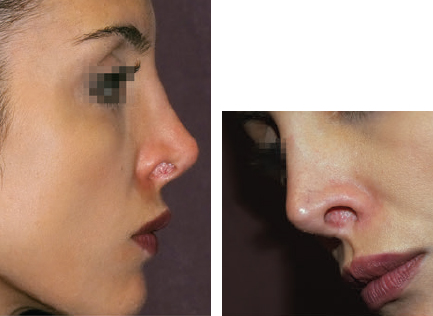
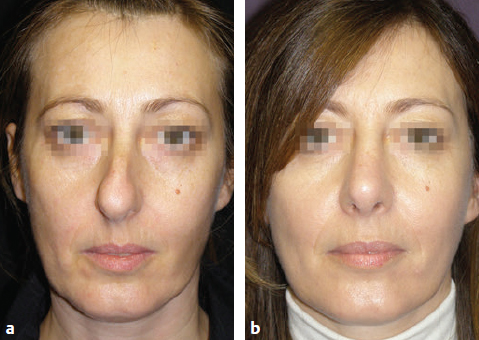
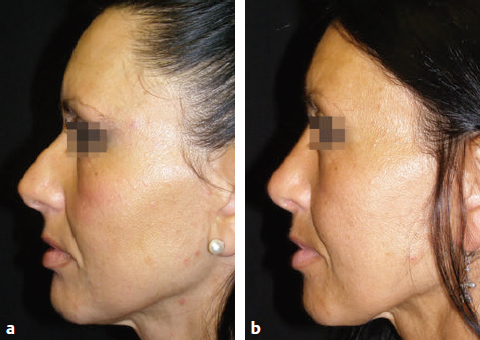
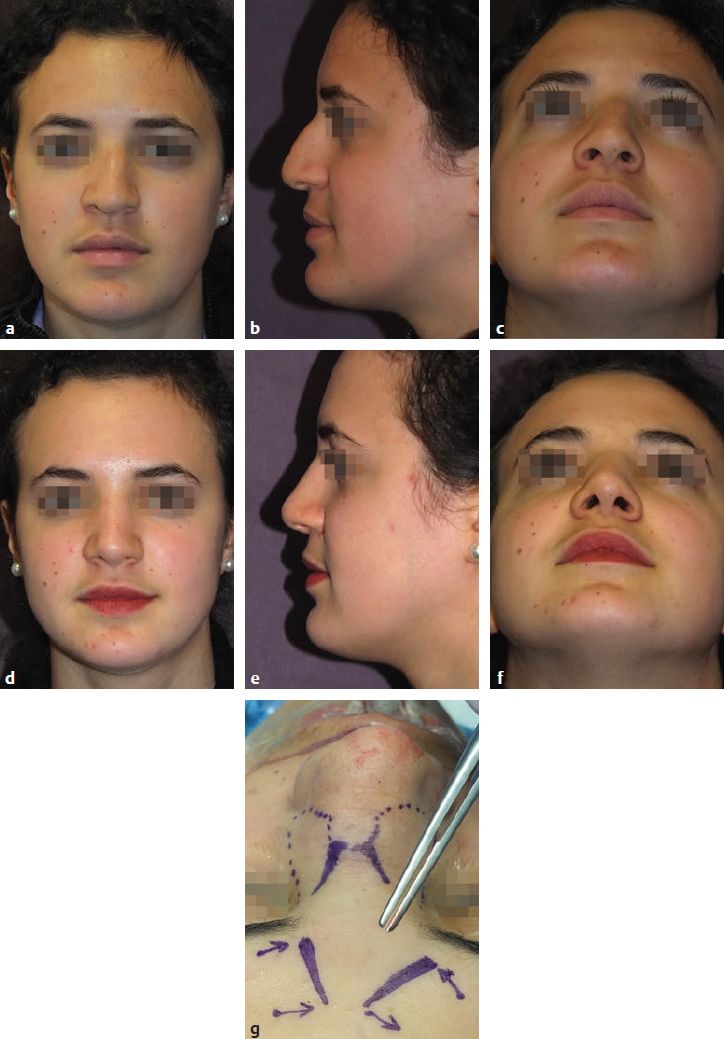
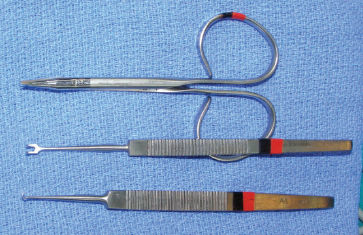
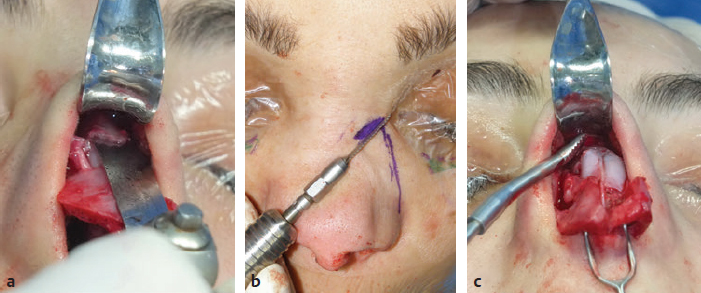
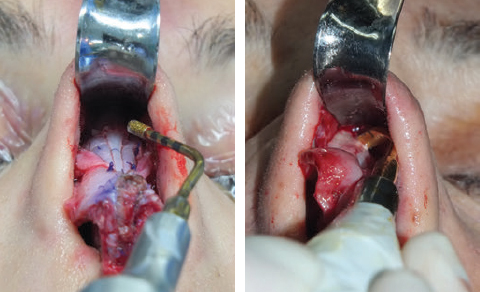
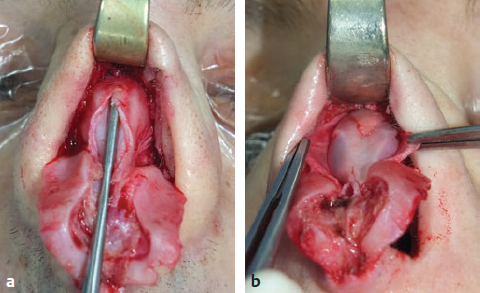
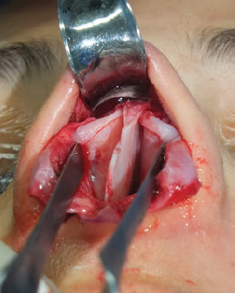
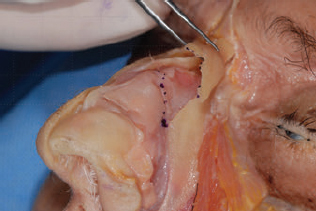
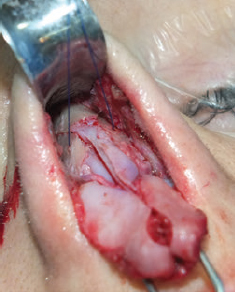
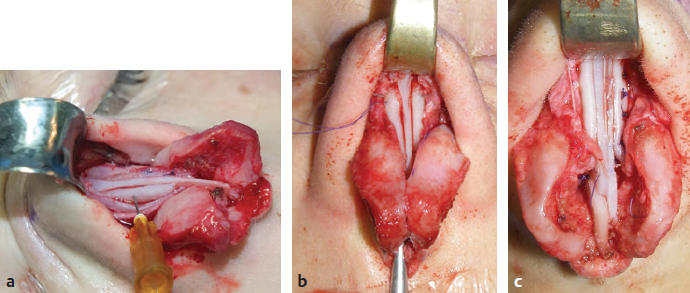
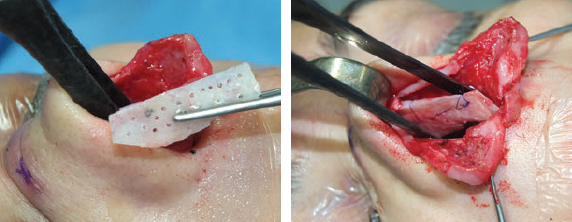
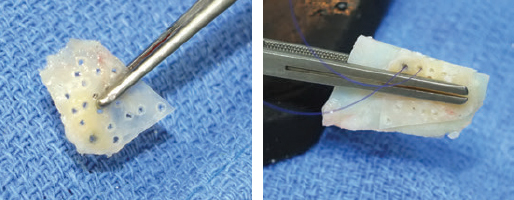
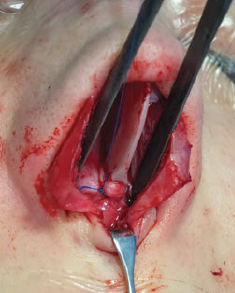
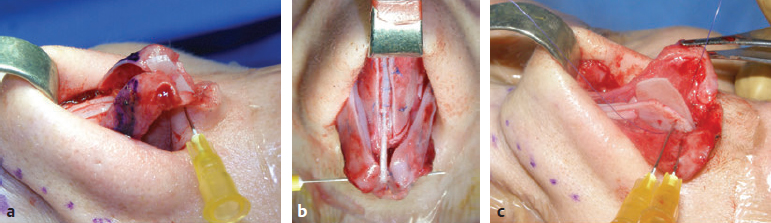
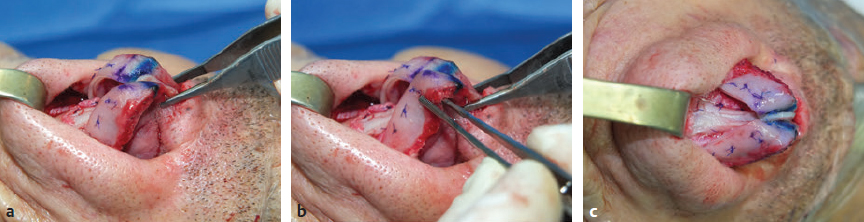
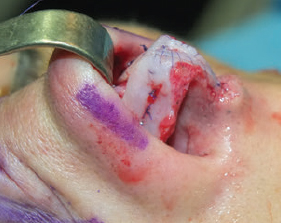
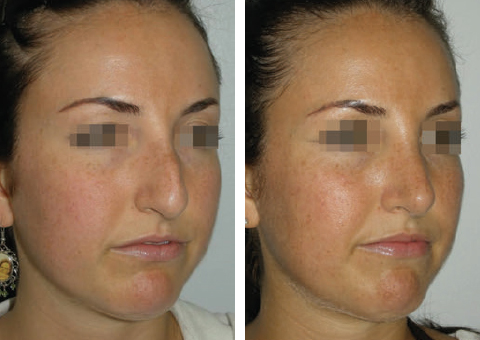
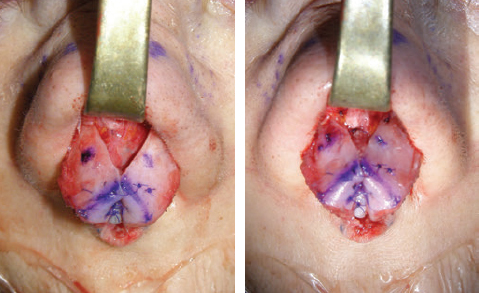
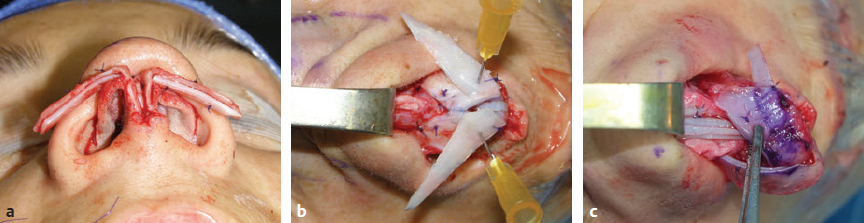
CHAPTER Rhinoplasty is considered the most demanding procedure in plastic surgery. The surgeon must contend with myriad nuances in a limited space where millimeters matter, and every maneuver affects other aspects of the outcome.1 Performing rhinoplasty successfully with consistent results requires an adequate workload of cases; a sound knowledge of anatomy, including functional anatomy; and a methodical study of a vast body of literature. Rhinoplasty surgeons must be perennial students, constantly reevaluating their results over time and keeping abreast with the constant influx of innovations. Obviously, the best approach to secondary rhinoplasty is preventing its occurrence, and this calls for a properly executed primary surgery. Flaws may still occur, but these imperfections should require only minor revision rather than complete rebuilding of the nasal structures. Two mainstay concepts are key in primary rhinoplasty: 1. There is no standard operation for every patient. Every individual has different deformities and different facial features, so each operation must be individually planned and customized (the role of computer imaging is of patent importance). 2. A routine reduction operation often leads to progressive deformity and impairment of function (Fig. 23.1). Concepts of beauty have shifted toward a desire to enhance a naturally elegant look with a tall dorsum and a straight sidewall. Thus rhinoplasty should no longer center around resection of bone and cartilage, but rather on a rebalancing reduction with simultaneous augmentation of other components of the nose. Repositioning and restructuring are key. Most surgeons, myself included, consider this easier to achieve with an open approach.2–5 Fig. 23.1 Common stigmata of aggressive excisional rhinoplasty, including alar notching from excessive cephalic trim and saddling from overresection of the dorsum. This chapter addresses several important steps in applying this concept: • Preoperative planning and patient selection, including identification of those anatomic variants that render certain patients prone to specific complications. • Important technical issues in surgery of the tip, dorsum, septum, and valves, including their relevance in preventing postoperative complications. • Appropriate techniques for managing complications and unfavorable results if they do occur. Such techniques are “reconstructive” as well as “structural.” These techniques are not universal, but they reflect the views and guidelines that guide my practice. Summary Box Common Issues in Primary Rhinoplasty • Low radix • Individual shape and symmetry of nasal bones • Narrow middle vault or short nasal bones • Convex, concave, asymmetrical, or weak lateral crura • Malposition of lower lateral cartilages • Tip support (lower lateral cartilages and distal septum) • Septal deviation • Alar base width • Thin or thick skin Entries in italics should be specifically noted. Potential complications in rhinoplasty can be greater in patients with specific anatomic issues; such variants must be identified and recognized preoperatively. Otherwise, problems may occur, either by commission (such as excessive excisional maneuvers) or from omission (by failing to perform necessary maneuvers on specific structures). I usually examine a nose, both visually and by palpation, from top to bottom, beginning at the radix and extending to the nasal bones, upper lateral cartilages, lower lateral cartilages, and columella. I assess the following views: • Frontal • Three quarters • Profile • Nasofrontal and nasolabial angles • Dorsal height and width • Tip projection and symmetry • Alar width and shape • Degree of columellar show This external examination is followed by a functional assessment, delicately assessing the internal valve with the aid of a long and thin speculum, focusable headlight, and cotton applicators, looking for weakness or tendency of the upper laterals to collapse on forced inspiration. I then assess the external valve by judging the strength and shape of the lateral crura, the tendency for alar malposition, and specific spots of weakness of the sidewall on strong inspiration. I also review the septum and turbinates, although such examination has to be complemented by a computed tomography (CT) scan, which I review and discuss with the patient on the second consultation. Finally, I assess the thickness and quality of the skin envelope. Specific individual anatomic variants can often be picked up by such examination (Box 23.1). The number of such variables is so vast that a detailed analysis of each of them is beyond the scope of a single chapter. However, some common variables are particularly concerning, because they are not always immediately evident but predispose, if unrecognized and thus not treated appropriately, to an unfavorable result. The prevalence of such “anatomic hazards” in prospective rhinoplasty patients was well summarized in Constantian’s landmark paper6 identifying the four most common anatomic variants. In my rhinoplasty practice, approximately 40% of which is currently composed of secondary cases, the findings are essentially similar: 1. Malposition of the lateral crura 2. A low radix 3. A narrow middle vault, which has functional as well as aesthetic significance To those three, I would add: 4. The issue of length and individual shape of the nasal bones 5. Identifying which part of the nose is most problematic toward achieving correct proportions among nasal components7 (accomplished through measurements, an aesthetic eye, or both) Some degree of malposition (cephalic rotation of the lateral crura) is common, usually combined with a boxy or bulbous tip. Although the lateral crura normally parallel the alar rim only in their anterior portion and then diverge from it (Daniel’s designated “turning point”8) at an angle between 30 and 45 degrees, malposition starts when such divergence occurs at a greater degree. This condition often creates an alar ridge that extends to the rim, progressing to the semblance of parentheses on frontal view and even paralleling the midline septum in extreme cases. Lateral crural malposition usually stands out to the trained examiner’s eye, although strict measurements and angles may be misleading.8 It is confirmed by alar collapse on forced inspiration, indicating insufficiency of the external valve. What the patient usually sees is a “ball” at the nasal tip, circumscribed by the ridges because of cephalically oriented alar rims. Patient education is essential regarding the need for lateral crural support or relocation to provide a restructured sidewall, rather than an ill-advised excision (Fig. 23.2). • Nasofrontal angle and low or high radix. • Length of nasal bones: The shorter, the more prone to inner valve collapse. • Width of nasal bones: Bones may actually be wide or may appear so when the hump is taken down; not all will warrant osteotomies. • Shape and symmetry of nasal bones: The shape and symmetry of each nasal bone is best evaluated in a CT scan; asymmetrical mobilization of nasal bones by individualized opening or closing osteotomies may be necessary. • Bony-cartilaginous hump: Whether it is true or apparent dictates the possible need for tip support and radix fill to achieve proper proportions. • Width of the middle vault and its relevance to the need of reestablishing a proper internal valve and dorsal contour after osteotomy. • Shape, width, length, and symmetry of the lower lateral cartilages, watching for cephalic malposition and diverse relationships between lateral, middle, and medial crura segments. • Tip support and shape of the columellar–lobular angle: Correlates with the strength and shape of the lateral, middle and medial crura, and distal septum. • Proportions in nasal profile, length, and projection: Determining whether the tip needs to be projected, the radix raised, or the dorsum reduced, or any combination (and in which ratio) guides reestablishment of correct balance and proportions. • The quality of the skin: Only aggressive restructuring will achieve detail with thick skin; whereas special care combined with new instrumentation and camouflage are necessary for optimal contour at the keystone in thin-skinned patients. Fig. 23.2 Preoperative (a) and 1-year postoperative (b) of a patient for whom lateral crural transposition with lateral crural struts corrected the evident cephalic malposition of the alar cartilages. Asymmetrical spreader grafts (left wider than right) and bilateral spreader flaps were used to balance the narrow middle vault after an asymmetrical osteotomy. Misrecognition of a low radix and thus excessive removal of what is considered the true hump (which is at least in part apparent) leads to the vicious circle of over-reduction, increasing tip hyperprojection and often a redundant skin envelope, which cannot contract over an over-reduced framework. These patients typically complain of a “bottom-heavy nose” and need to be convinced of the importance of restructuring the low radix and upper third, rather than reducing the volume of the lower third, which would worsen the problem (Fig. 23.3). A narrow middle vault is more evident in patients with short nasal bones. The surgeon must determine whether the nasal bones need to be narrowed (hump removal will reduce nasal height and highlight the visual perception of excessively wide bones) ans whether the middle vault should be widened, usually by spreaders, autospreaders, or a combination of both in varying proportions (see Fig. 23.2). The surgeon must determine the desirable width of the aesthetic dorsal lines and the status of the internal valve, which will warrant careful examination by a Cottle or modified Cottle maneuver (by gently lifting the upper lateral cartilage individually with a small cotton-tipped applicator).9 Obstruction of the internal valve may exist to some degree preoperatively or can be produced or worsened by lowering the cartilaginous hump with resection of the horizontal portion of the septal T that joins with the medial edge of the upper laterals. Preoperative recognition of a narrow middle vault, especially when coupled with short nasal bones, is a red flag for the need for spreader grafts (Video 23.1). The length of the nasal bones relates to the previously mentioned point—short bones with a narrow middle vault should alert the surgeon to the risk of an inverted-V deformity and inner valve collapse. Preoperative analysis of the shape of each individual nasal bone (not the nasal bone proper, but nasal bone in combination with the frontal process of the maxilla, where a lateral osteotomy should begin) is important in achieving an ideal result. Studying the bony configuration of each side of the nose (orientation and obliquity of each bony sidewall from the maxillary platform and in relationship to each other) by careful observation, as well as by the axial CT progressive sequence, allows the surgeon to devise a proper plan, including whether to involve only one or both bones and regarding opening or closing osteotomies or osteoplasty (i.e., changing the shape or contour of nasal bones without infracturing) (Fig. 23.4; Video 23.2). These concepts are innovative and time-consuming but warrant close attention, because they make changes in bone configuration more predictable, more stable, and less susceptible to imperfections. The surgeon must determine whether the nose has proper proportions preoperatively. Stated differently, the surgeon should consider whether the dorsum is tall or low and whether the tip projects properly. Analyzing existing proportions will often imply modifications to the three elements, (1) radix, (2) dorsum, and (3) tip, according to computer simulation and patient desires, but the limits of contractility of the skin envelope over the framework must be considered to prevent over-reduction and a polly beak. There is no golden formula here, only personal experience and learning from one’s mistakes. Fig. 23.3 Preoperative (a) and 1-year postoperative (b) appearance of a woman for whom conservative radix grafting improved the balance of the proportions of the nose while preserving the proper height of the dorsum. Fig. 23.4 (a–c) This 19-year-old woman had nasal bone asymmetry and a radix deficit, as well as a lack of tip support and tip definition. (d–f) Improved appearance 9 months after asymmetrical osteotomy associated with osteoplasty, radix augmentation with fascia, a septal extension graft, spreader flaps, and tip sutures. (g) The right bone will move laterally and the left medially (oriented from the top of the patient’s head). After the examination the surgeon must consider how the patient’s requests will relate to the clinical picture and thus whether they will be obtainable. In most instances, they are. Surgeons should clearly explain the patient’s anatomy and the surgical plan so the patient can understand the logic behind it and the time the surgery will require. I use many photos of similar cases, including intraoperative photos and video clips. Patients rarely have an issue seeing intraoperative images. However, even the most detailed explanations and thorough photos make little sense to patients if not coupled with an accurate computer simulation. This helps verify whether the patient’s goals are realistic and within the surgeon’s capabilities and functions as the best communication tool for an honest contract between the patient and surgeon. I take a full array of photos in all views, including “mid–three quarters” and “mid-Waters” views. I then perform the imaging and discuss it with the patient on the second preoperative consultation. Although three-dimensional simulation programs are available, I prefer two-dimensional imaging for its simplicity and convenience. During my consultation, I make a point of listening to the patient to form a judgment on his or her suitability as a candidate. I elicit a rank of priorities by asking, “Which single thing bothers you most?” I record those concerns specifically in the order stated by the patient. Many surgeons have stressed the importance of a realistic attitude on the patient’s part, devoid of excessive perfectionism. Obsessive, unstable, and overdemanding patients can usually be recognized, and surgery can thus be avoided.10,11 The surgeon must understand and agree with the concerns the patient expresses and determine whether the surgery required to address them is justified. Good clinical judgment, attention to possible red flags, and previous experience are important. Again, timing is essential. I usually plan two preoperative consultations (computer imaging is discussed in the second one), sometimes three consultations for those patients for whom I have concerns. Fig. 23.5 The finesse that contemporary rhinoplasty requires is facilitated by smaller and finer instruments. Some key elements matter significantly during the procedure: good lighting (headlight with variable focus capability), adequate magnification (×2.5 loupes), and full-size patient photos, including CT printouts and simulations. The preoperative plan is written in a checklist format. If the preoperative analysis is correct, deviation from that preoperative plan should not be necessary in primary rhinoplasty. In recent years, I progressively have adopted much smaller instruments, especially small double hooks; very fine, sharp scissors; and very small, sharp dental elevators (Fig. 23.5). The hooks, used singly or in pairs, are very useful to delicately expose the rim incisions, whereas the small, sharp scissors are excellent for making precise tunnels for alar contour grafts. The dental elevators are best suited for raising perichondrium with finesse where necessary. For osteotomies, I have not used guarded osteotomes for several years and have downsized the width of my osteotomes, which are prevalently straight and vary from 2 to 4 mm. Powered instruments and piezoelectric inserts have practically substituted all use of osteotomes in my practice (Figs. 23.6 and 23.7). Commercially available self-sustaining columella retractors are excellent tools that free an assistant’s hand. Grafts should be cut on a rigid, nonslippery platform (e.g., a hard silicone mat or a sterilizable black rubber platform of appropriate thickness) and gently beveled with a knife blade. I consider dyed PDS sutures to be durable and strong enough for most applications. I reserve the use of Prolene for fixating the distal septum to the nasal spine, generally with a drill hole, for suturing the nasal bones after osteotomy and, at rare times, for tip sutures on especially robust alar cartilages. Both Prolene and PDS come on a rounded needle to prevent the potential stress-breakage points on the transfixed cartilage at the three angles of a triangular shaped point. I frequently palpate the dorsum with a wet fingertip after replacing the skin. Fig. 23.6 Common powered instruments for primary rhinoplasty. (a) Oscillating saw (to remove the bony cap). (b) Reciprocating saw (for medial or medialoblique osteotomies). (c) Powered rasp. Fig. 23.7 Specific piezoelectric inserts can be used for osteoplasty (i.e., shaping the contour of the nasal bones). Other inserts are useful for precise osteotomies. Although the concept of dissecting the nose on the correct plane may seem obvious, it warrants attention. Most authors agree on dissecting the lower lateral cartilages on the standard supraperichondrial plane, although some suggest a subperichondrial approach.12 I have found this essentially unnecessary. After tip dissection, the usual suggested practice is to carry out a subsuperficial muscular aponeurotic system (SMAS) dissection of the dorsum and then join it to a sub-periosteal dissection at the bony edge. This allows the best preservation of available skin thickness at the delicate keystone area. In some patients, the skin at the keystone is thin, which usually calls for subsequent camouflage. I have found that raising individual right and left osteoperichondrial flaps as described by Cerkes13 often solves this issue. This technique represents a breakthrough development in achieving precision in surgery of the dorsum. The rationale is to raise precisely the perichondrium of the cartilaginous dorsum on each upper lateral after having split it in the midline and then join it in a single plane by meticulous dissection with the ipsilateral periosteum below each nasal bone. A full perichondrial-periosteal flap is elevated on both sides, which can usually be carried well cranial to the keystone area (Video 23.3). Using this technique provides several benefits: • Precise, unhindered visualization of the bony and cartilaginous cap, and especially of the anatomy at the keystone area. This will allow precise manipulation of cartilage, including autospreader flaps, and bone, especially by use of power tools and piezoelectric instruments. • A separate layered closure over the dorsum and the crucial keystone area (Fig. 23.8). In essence, the usual sub-SMAS dissection of the dorsum is not joined to a subperiosteal dissection at the bony edge, but is instead carried up to the radix. The subperichondrial dissection then begins right at the septal angle, exposes both upper laterals, and is carefully joined to a subperiosteal dissection at the edges of the bony cap (as shown in Video 23.3). Although such osteoperichondrial flaps tend to differ individually in thickness and continuity, they can be used proficiently in most cases. The lowering of the hump will cause redundancy of flaps and facilitate closure, at times even requiring some resection of the edges to prevent excess. I do not find reinserting a thinned bone graft at the keystone necessary, because that area is typically appropriately contoured by osteoplasty (i.e., bone reshaping rather than just osteotomy) and precise cartilage reduction, detailed later in this chapter. Precise suturing of the flaps in the midline usually reestablishes a proper dorsum contour. Fig. 23.8 Splitting the subperichondral-subperiosteal flap in the midline (a) and joining the subperichondral and subperiosteal flaps in one single, widely dissected, unit on both sides (b) provides excellent exposure of the anatomy of the keystone area and facilitate its treatment. As well described by Rohrich et al,14 incrementally reducing the dorsum by addressing its individual components allows precision and control in hump reduction, reducing the likelihood for irregularities, overresection or underresection, and inverted-V deformities (Video 23.4). The main goal is separation of the upper laterals from the septum, incremental reduction of the dorsal septum proper, and controlled reduction of the bony cap. Reestablishment of proper dorsum lines follows, facilitated by spreader grafts, spreader flaps, or a combination. The upper laterals are thus purposely left tall and not resected at the same level as the dorsal septum (Fig. 23.9). Fig. 23.9 Splitting the dorsum into its components allows the surgeon to address the septum, upper laterals, and bony cap individually and precisely. Fig. 23.10 The upper lateral cartilages often extend under the bony cap at the keystone for a remarkable distance. (This image is provided courtesy of Dr. Charles East.) Cadaver studies have revealed the structure of the dorsal hump and the considerable overlap of the bony vault on top of the cartilaginous vault to be a true bony cap at the keystone area, on top of the extension of the upper laterals below the nasal bones.15 Because “there is no bony hump, just a bony cap,”15 and the “hump” is, in essence, cartilaginous, the bony cap must be reduced first and the cartilaginous hump reduced after (Fig. 23.10; Video 23.5). Once the bony cap is fully exposed after component separation of the cartilaginous dorsum and incremental reduction of the septum, the surgeon assesses the shape of the bony cap and determines how to proceed regarding the following: • Extent of lowering of the bony cap • Need for osteotomies • Need for reshaping (i.e., bone contouring) The need for osteotomies depends on the extent of lowering of the bony dorsum and its width. Contour refinement of the bones (osteoplasty) is not commonly addressed in rhinoplasty literature.16–18 Although conventional, well-sharpened osteotomes and rasps work well in most instances, I have been seeking better control and precision in managing the bony vault. Asymmetrical lines of osteotomies, destabilization and collapse of the nasal bones, palpable irregularities of the bony dorsum, residual bony spicules, and lateral sharp edges are common findings in revision rhinoplasty. All irregularities are essentially a result of poorly controlled manipulation of bone. Precise planning of the osteotomy lines and use of finely tuned, narrow, and well-sharpened osteotomes help to prevent such problems; however, a greater role is now played by more sophisticated instrumentation. Powered tools (oscillating and reciprocating saws) offer a distinct advantage over chisels, osteotomes, and hand rasps, because they can configure a straight and controlled osteotomy line rather than a potentially jagged fracture line, as often occurs when an osteotome strikes bone with blunt force.17 This is even more evident in the brittle nasal bones of older patients. The same advantage of better contouring is offered by burrs and power rasps over conventional hand rasps (see Fig. 23.6). The concept of three-dimensional sculpting of nasal bones has been carried another step forward even more recently by the introduction of piezoelectric instrumentation18 (see Fig. 23.7). Already well established in maxillofacial surgery, piezoelectric-powered ultrasonic instrumentation is rapidly gaining status both in sculpting nasal bones, thus shaping the bony vault without osteotomies when possible (osteoplasty), and in allowing all osteotomies to be carried out under direct vision with dedicated inserts. Final contouring of bone irregularities after osteotomies, which is difficult to do with conventional rasps because of bony instability, can be performed easily. Although adequate exposure (when full osteotomies are carried out by piezoelectric instruments this becomes, in essence, a complete degloving of the nasal osseous vault) is needed, this technique may offer superior results and better precision in treating any bone deformity of the osseous vault, after a preoperative CT analysis (Video 23.6). As previously mentioned, nasal bones should be assessed individually regarding shape, width, and symmetry. This is best done through a CT scan study, ideally with three-dimensional reconstruction. Proper assessment will dictate the need for bilateral or unilateral osteotomies, symmetrical or asymmetrical, opening or closing, and whether they are combined with osteoplasty (bone contouring) to improve irregularities or excessive convexity (Fig. 23.11). Osteoplasty, possibly performed by power tools or piezoelectric instrumentation, will often obviate the need of double-level osteotomies. An asymmetrical bony platform (i.e., some degree of congenital facial asymmetry) must be taken into consideration: it is actually far from uncommon and should be noted, considered in the equation of bony mobilization, and pointed out to the patient to prevent postoperative issues. Another factor that affects predictability of bone positioning is suturing nasal bones together by drilling holes in the nasal bones. This new concept adds predictability and obviates dependence on the splint for bone stability (Fig. 23.12). The essence in addressing the cartilaginous middle third and septum is preventing the lateral wall from falling medially when the wide, T-shaped septal dorsal edge is removed, thus rendering the internal valve incompetent. Aesthetic dorsal lines in continuity, dictated by the desired width of the edges of the bony vault, must be reestablished with varying combinations of spreaders, autospreaders, or both2,4,19 (Fig. 23.13). Myriad options are available. Spreaders and autospreaders may be used differentially (for example, a spreader plus autospreader on one side, and a single spreader on the other) depending on the asymmetry between the right and left side (Video 23.7). Septal deviations must be controlled in a stable fashion, which often requires spreaders or a perforated ethmoid plate segment, which serves as the best rigid splint for correcting deviation (Figs. 23.14 and 23.15; Video 23.8). The whole concept of achieving symmetrical and aesthetic dorsal lines is founded on achieving a straight midline septum.20 Fig. 23.11 Preoperative (a) and 2 months postoperative (b) views of a patient who had asymmetrical osteotomies. Opening osteotomies were performed on the left, with the bone held open by a spreader graft wedged appropriately high, and closing osteotomies were performed on the right side. (c–e) A preoperative study of the CT scan facilitated proper planning. (c) The axial scan shows asymmetrical inclination of right and left nasal bones. (d) The three-dimensional surface rendering offers an interesting view of the nasal contours, highlighting the deformity and the deviation. (e) The view taken from above shows that the right bone will have to be mobilized medially and the left bone laterally and a spreader inserted high on the left side. Performing a primary rhinoplasty “only” does not rule out the need for founding the nasal middle and distal third, once the bones have been dealt with appropriately, on a straight, solid, residual L-strut (Video 23.9). This means, in practice, that some deviations will require properly splinting the septum, whereas others may warrant replacing the distal septum completely with a caudal septum replacement graft (i.e., a “partial extracorporeal” technique).21 In other cases, the septum must be completely removed and a new septum rebuilt with a full extracorporeal technique, as pioneered and popularized by Gubisch.22 When full exposure and correction of a deviated distal septum is necessary, the vertical segment of the L-strut must be stably fixated to the nasal spine (midline fixation or split for fixation to one side) by suturing with permanent sutures through drill holes with 4-0 Prolene (Fig. 23.16). Fig. 23.12 Direct suturing of the nasal bones adds stability to the final bone position after osteotomies and avoids dependency on the dorsum splint. Fig. 23.13 Spreader grafts and spreader flaps can be used in varying combinations to achieve the desired aesthetic dorsal lines. (a) Bilateral spreader grafts. (b) Bilateral spreader flaps. (c) Asymmetrical combination of both. Fig. 23.14 A splint of ethmoid bone, appropriately thinned by burr and then perforated multiple times by a small drill is ideal to correct and stabilize a weak or deviated septum in situ. Fig. 23.15 Splinting a weak portion of septum, which must be replaced as a partial extracorporeal septoplasty or a distal septum replacement graft, can be done on the table before insertion. Fig. 23.16 Fixation of a straightened or replaced distal septum to the nasal spine should be done in a stable fashion by drilling a hole in the spine. Splitting the spine and suturing it to one side is another option. As previously mentioned, misrecognition of a low radix is unfortunately common in rhinoplasty and will lead to sequelae of errors and disproportion. Although the usual configuration is that of a limited depression at the radix proper, a spectrum of variations extend to the low upper or middle third of the dorsum and thus need to be acknowledged and addressed. Primary grafting is necessary, typically with crushed cartilage or soft tissue elements. I prefer Daniel’s described technique,23 harvesting deep temporal fascia and using it with a rolled “ball-like” configuration or as a diced cartilage and fascia (DCF) construct for more significant and distally extended augmentations (discussed later in this chapter). A considerable amount of time and attention should be spent on the tip during a rhinoplasty. The great variability of shape, dimensions, contour, and strength of the lower lateral cartilages correlates directly with tip shape and are often evident to the trained eye before the operation begins. An obvious advantage of the open approach is direct visualization of these anatomic variations. Many surgical maneuvers are available to reconstruct a symmetrical, well-structured, aesthetic tip.2,4,24 A solid foundation should be provided for efficient tip support. Then shape should be given by a combination of sutures and appropriate restructuring of the sidewall, when necessary. In the open approach, which I prefer, columellar strut, tongue-in-groove, or septal extension grafts are the most commonly used methods to build a solid and reliable tip base25,26 (Fig. 23.17). Proper tip position may need to be adjusted by rearranging differentially the length of the lateral and medial crura according to the popular concept of the tip tripod proposed by Sands and Adamson27 and including maneuvers such as lateral crural overlap and lateral crural steal when suitable28 (Fig. 23.18). An appropriate tip shape, which usually is considered to resemble a mildly splayed open “diamond configuration,” is aided by an incremental use of sutures.24 Many key authors have defined personal suture algorithms, which should be studied and integrated in one’s practice as best possible.29,30 Adopting a consistent personal algorithm in suture refashioning of the tip simplifies one’s surgery and reduces the potential for confusion. The columellar-lobular angle and middle crura should also be addressed when necessary, and usually some camouflage is needed to finalize the contour (Fig. 23.19). Fig. 23.17 The three most commonly used methods to build a solid foundation for tip support. (a) Columellar strut. (b) Tongue-in-groove. (c) Septal extension grafts. Fig. 23.18 (a,b) The lateral crural steal maneuver lengthens the medial crural at the expense of the lateral crural, tensioning the latter. A septal extension graft, as shown, is usually used to project the tip first. (c) Suture techniques to provide appropriate tip shape follow. Fig. 23.19 Final camouflage will often prevent long-term visibility of possible irregularities of the tip contour. Possible materials to be used are cephalic trim segments, intercrural soft tissue, fascia when harvested for other reasons, and the T-shaped septal contour resected during hump reduction (as shown). Fig. 23.20 An efficient way of securing a stable, well-projected tip is combining a septal extension graft and lateral crural steal. The lateral crural are “worked” progressively on the septal extension segment, and the new domes are shaped by multiple tip sutures. Finally, an elegant though strong sidewall should be sought to provide an adequate external valve with a lateral elevated ridge that continues from tip to ala without notching (thus without the perception of a ball tip) and with a proper orientation of the caudal versus cephalic margins of the lateral crura.31 Multiple techniques serve this purpose: • Turn-under flaps • Mattress sutures • Tensioning the lateral crura • Lateral crural struts • Onlay and inlay grafts The detailed description of these techniques is beyond the scope of this chapter. In essence, however, the key principle remains that of a structural rearrangement rather than a reduction operation. A “droopy” tip, which is indirectly supported by the dorsal hump, often appears to hang from the visible septal angle on the three-quarter and profile views. The perceived hump is often apparent rather than true. Reducing the hump without reestablishing appropriate tip support would lead to an even greater drooping. The dangerous vicious circle becomes evident here: taking down the hump (which should have been considered as, at least in part, an apparent hump) leads to further tip deprojection, and eventually to a polly beak deformity. Obviously, providing adequate support by grafting is required, together with the reestablishment of a proper tip break point.25,26 Although many measurements have been reported for assessing proper projection from diverse facial parameters, my preference is to use an aesthetic eye. The relationship of the alar cartilages complex to the septal angle is paramount. Weak alar cartilages will not project above the septal angle, and thus an unsightly double break will result in a profile view. Strong cartilages will project at or above the septal angle. Fig. 23.21 Cephalic trim should be limited to that necessary to help provide proper tip configuration and restricted to the paradomal region. The goal is to leave as much width as possible to provide long-term stability. Obviously, appropriate suturing techniques will be required. Fig. 23.22 Different techniques can be used to correct cephalic malposition of the alar cartilages and provide a straight, well-oriented sidewall. (a) Transposition. (b) Articulated grafts. (c) Turn-under of the cephalic portion of the lower laterals and caudally extended struts. The height of the septal angle also comes into play regarding whether it is appropriate, excessive, or insufficient. A combination of septal extension graft and lateral crural steal works well (Fig. 23.20). Undesirable shortening of the nose and alar retraction may result from excessive tip rotation, commonly secondary to vigorous cephalic trim of the lateral crura.32,33 (see Fig. 23.1). As commonly seen in many secondary cases, pinching of the nasal tip and external valve collapse is also often a result of overzealous cephalic trim, although the threshold for pinching varies widely because of varying cartilage strength among patients (Video 23.10). Measurements are less important than maintaining as much width of the lateral crura as possible, although some conservative trimming may need to be done, especially just cranial to the domes (a “paradomal” trim). Current rhinoplasty thus aims to preserve as much lateral crural cartilage as possible to prevent structural compromise and alar retraction. This requires additional suturing and repositioning techniques, with increase in duration of surgery, but this is justified by the added structural stability (Fig. 23.21; Video 23.11). As described earlier, a condition of lateral crural malposition, although variably defined, should be identified preoperatively and then treated. If the problem is just seen as tip bulbosity and treated by aggressive cephalic trim, collapse of the sidewall, pinching, and the impression of a ball tip will invariably follow. Available techniques involve transposition of the lower laterals, usually combined with lateral crural strut suture reshaping and onlay articulated grafts or caudally extended underlay crural struts2,31,34 (Figs. 23.22 and 23.23). A valuable adjunct in such cases is the use of alar contour grafts, which should be considered in most primary rhinoplasties to ensure support of the alar rim and for prophylaxis in the external valve area.35 A description of the functional issues that are inseparably linked to the execution of cosmetic rhinoplasty is beyond the scope of this chapter but is discussed in Chapter 26, Postoperative Nasal Airway Obstruction. Attention to the airway is often not properly provided during primary rhinoplasty36,37 and thus becomes an issue later. Four elements may play a role, individually or in combination, regarding function in rhinoplasty: nasal septum, turbinates, internal valves, and external valves. The septum warrants proper diagnosis and treatment, because lateral osteotomies narrow the airway. Hypertrophied turbinates require treatment, with the goal of avoiding mucosal resection.38 The importance of reestablishing the internal valve has been previously discussed regarding the middle vault. External valve issues, with lateral wall collapse on inspiration, are not exclusive to secondary rhinoplasty, but can be identified often in primary cases, with malposition, or with weak lateral crura. They should be treated with one of the available methods for sidewall restructuring.
23
Rhinoplasty
Avoiding Unfavorable Results and Complications in Rhinoplasty
Identifying Anatomic Variants Preoperatively
Malposition of the Lateral Crura
Low Radix
Narrow Middle Vault
Length and Individual Shape of Nasal Bones
Identifying Proper Proportions
Preoperative Planning and Patient Assessment
Intraoperative Considerations
Practical Tools for Surgery
Dissecting the Nose on the Correct Plane
The Dorsum
The Importance of Component Separation and Incremental Reduction
Taking Down the Hump: A Decapping
Osteotomy and Osteoplasty
Symmetry, Asymmetry, and the Shape of Individual Bones: Individual Bone Manipulation
The Cartilaginous Middle Third (Internal Valve) and the Septum

The Radix
The Tip
Building a Reliable Nasal Tip Base, Tip Position, Tip Shape, and Sidewall
Recognizing an Underprojected Tip
Avoiding Excessive Trim
Recognizing and Managing Malposition of the Lower Lateral Cartilages
Septum, Turbinates, and Valves
Plastic Surgery Key
Fastest Plastic Surgery & Dermatology Insight Engine