Renal Machine Perfusion and Preimplantation Renal Allograft Biopsy
Michael J. Goldstein
Yuriy Yushkov
RENAL MACHINE PERFUSION
Definition
The process of placing a donated kidney on a machine designed to perfuse a solution continuously through it for the purposes of organ preservation and clinical transplantation
Purpose
To maintain cellular viability
To define organ quality
To improve immediate and long-term organ function
To improve organ survival
Background
Folkert O. Belzer1 perfused the first kidney for human transplantation in August of 1967.
This renal perfusion machine had a pulsatile pump, organ chamber, and arterial and venous reservoirs.
A membrane oxygenator was added (built by the Waters Company) to this first perfusion machine. It consisted of a silastic envelope in which the fluid was oxygenated and moved with a rocking motion.
The kidney underwent hypothermic machine perfusion with a solution called cryoprecipitated plasma (CPP) produced by filtering thawed plasma to remove unstable proteins.
This machine was very large and required a forklift for transport.
It was used clinically until 1974.
MACHINE TYPES
There are five types of devices for renal perfusion currently commercially available:
IGL Waters Medical Systems: RM-3 and WAVES
The RM-3 is the oldest model out of five and has been on the market for more than 15 years. The device provides perfusion for either single or dual kidneys using physiologically based pulsatile perfusion and uses an integrated membrane oxygenator.
WAVES is a new transportable, single-kidney pulsatile perfusion device designed by IGL Waters Medical Systems. The unit has four lithium batteries validated for more than 12 hours functional time. The kidney is completely immersed into solution.
Organ Recovery Systems (ORS): LifePort® Kidney Transporter and LifePort® Kidney Transporter 1.1
The LifePort® Kidney Transporter and the new ORS model LifePort® Kidney Transporter 1.1 are portable renal perfusion devices.
These devices have more than 24 hours of battery life, and the renal graft is immersed in cold solution. The LifePort® Kidney Transporter 1.1 has the option to oxygenate the perfusion solution. The display permits to enter donor blood type and UNOS number. The machine has GPS for easy tracking in transportation. The devices perform graft pulsatile perfusion.
Organ Assist B.V.: Kidney Assist device
The Kidney Assist is a portable pulsatile perfusion device that permits kidney continuous perfusion and easy to transport. The device has not been Food and Drug Administration (FDA) approved in the United States.
The perfusion solutions used in these devices are based on Belzer’s University of Wisconsin (UW) solution. The RM-3, WAVES, LifePort® Kidney Transporter, and LifePort® Kidney Transporter 1.1 are available worldwide; the Kidney Assist is available only in Europe.
CANNULAS AND CANNULATION TECHNIQUES
There are five types of cannulas:
Cannulas for straight arterial cannulation
Metal cannulas for straight cannulation available with diameter from 2 to 14 mm (FIG 1)
Similar disposable cannulas are also available.
Cho and Krolman metal clamps sizes 6 × 6 mm, 10 × 15 mm, 10 × 25 mm, and 10 × 30 mm
ORS SealRing disposable cannulas sizes 7 × 20 mm and 10 × 35 mm
ORS universal cannulas with split base jaw sizes 3 mm, 5 mm, 7 mm, and 9 mm
Disposable plastic cannulas made by Krolman with Yushkov split jaw with different diameters: 5 mm, 6 mm, 7 mm, 8 mm, 9 mm, and 10 mm.
PERFORMANCE OF KIDNEY ANATOMIC ASSESSMENT
Establish your systematic approach. Work from superior to inferior along the aorta. An adequate aortic cuff facilitates cannulation on the renal perfusion device (FIG 2). A small cuff of inferior vena cava (IVC) is left on the left renal vein.
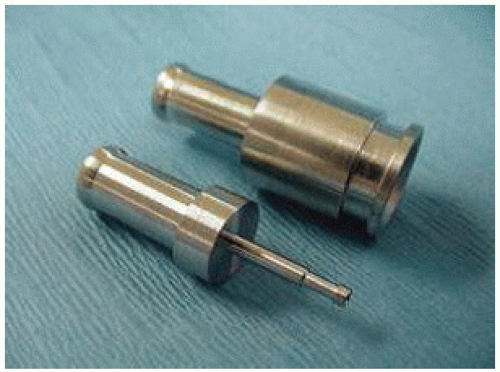
FIG 1 • Metal cannulas for straight cannulation available with diameter from 2 to 14 mm. Similar disposable cannulas are also available.
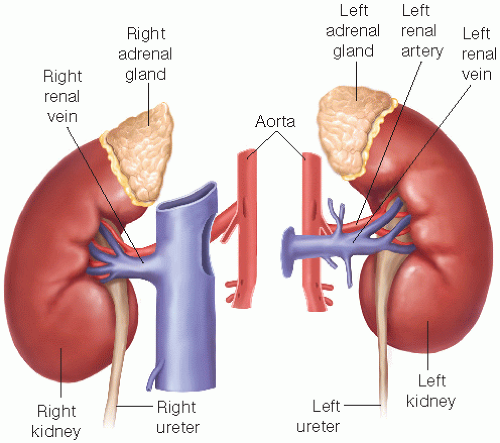
FIG 2 • Splitting the kidneys during the procurement procedure. Adequate aortic cuff facilitates cannulation for the renal perfusion device.
Identify potential polar location of arteries.
Evaluate the aortic cuff for the renal artery or multiple arteries. The surgeon should be comfortable with several types of cannulas.
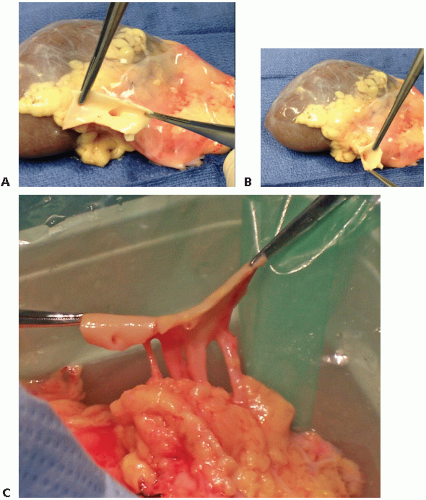
Common or split cuffs for two or more arteries (FIG 3C)
Identify surgical damage and trauma
Transected arteries (FIG 4A)
Lacerated artery
Arterial intimal dissection (FIG 4B)
Intramural hematoma
Evaluate for early arterial bifurcation
Identify the presence of arterial plaque and describe for
Severity: mild, moderate, or severe
Texture: soft, hard, or ulcerated
Number and quality of renal veins and describe
Presence of cuff on left renal vein
Presence of full vena cava on right renal vein
Perform a ureteral assessment
Length and number of ureters
Amount of surrounding fat and vascular supply
Kidney and parenchymal abnormalities
Size, shape, color, quality of flush
Presence of horseshoe kidney
Cysts, masses, capsule tears, hematomas, lacerations
RENAL ARTERY CANNULATION
Standard Arterial Cannulation with Complete Aortic Cuff
Isolate the renal artery and vein.
Visually inspect and palpate the renal artery to determine if there is plaque inside the lumen of the artery.
Inspect the orifice of the artery. If there is a partial occlusion, make sure that plaque is not broken during cannulation, which may lead to partial blockage of the renal artery or its branches.
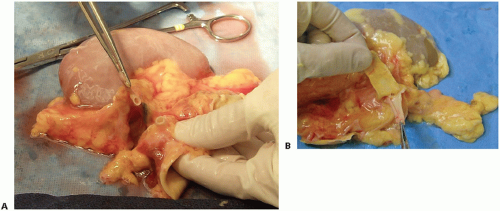
FIG 4 • Identification of surgical damage on the allograft. This can include transected arteries (A) and arterial intimal dissection (B).
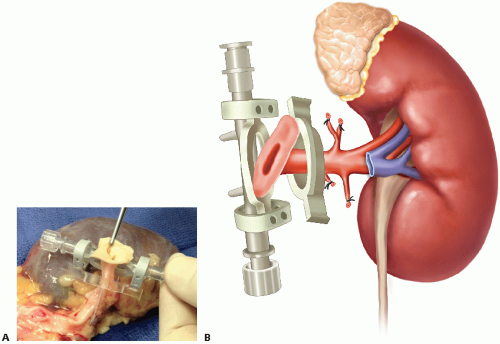
Place the aortic cuff with the attached artery through the base of the seal ring or Cho clamp (FIG 5A,B). Although other cannulas may be used, these cannulas are selected with a complete aortic cuff to minimize instrumentation of the arterial orifice or lumen.
Place the aortic cuff flat on the base of the seal ring or Cho clamp, keeping the renal artery in the middle of the base of cannula (FIG 6A,B). The upper part of the clamp should be able to completely cover the cuff without occluding the renal artery orifice.
Arterial Cannulation with Small or Partial Aortic Cuff
If the seal ring or standard Cho clamp cannot provide a seal due to lack of a complete aortic cuff, a different cannula must be selected.
Cannula selection should be made with consideration for the least arterial intimal instrumentation as possible. In order from least to most invasive are the small Cho clamp, Yushkov clamp, ORS universal clamp, or straight cannula.
To aid in the cannulation, small monofilament stay sutures can be placed to evert the renal artery or small rim of aortic cuff.
It is important to ensure that the artery is not partially obstructed by the side of clamp to minimize changes inflow and measurement of the renal resistance measurement.
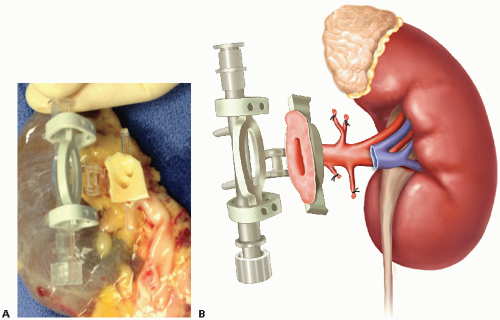 FIG 6 • A,B. Place the aortic cuff flat on the base of the seal ring or Cho clamp, keeping the renal artery in the middle of the base of cannula. |
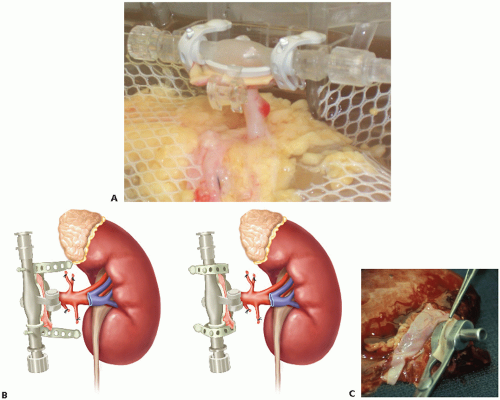 FIG 7 • Close the seal ring by applying tension on the lateral rubber straps (A and B) or close the Cho clamp by spring-loaded tension (C). |
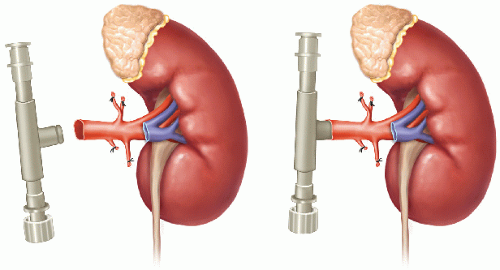 FIG 8 • Arterial cannulation without aortic cuff or transected renal artery. The cannula is placed through the arterial orifice and secured to the artery with a circumferential suture ligature or umbilical tape.
Stay updated, free articles. Join our Telegram channel
Full access? Get Clinical Tree
 Get Clinical Tree app for offline access

|
