Procedures in Dermatologic Diagnosis and Therapy
Abel Jarell
Peter C. Schalock
There are many procedures commonly used by dermatologists that can be incorporated into the practice of all medical providers. Most dermatologic procedures require only a handful of supplies, and the techniques are relatively easy to master without extensive training. This chapter details the indications and techniques for the procedures most commonly used on the skin such that any provider can feel confident to perform them.
KOH Preparation for Examination for Fungal Elements
For the many dermatologic conditions that produce scale, superficial dermatophytosis should be considered. This question can be readily addressed with a potassium hydroxide (KOH) preparation. A 10% potassium hydroxide solution will digest the keratin in the tissue but leave most fungal forms intact for visualization under a microscope. This diagnostic method is used to confirm the presence or absence of fungal forms, including hyphae, spores, and pseudospores. It is important to note that even though certain fungi have characteristic appearances on microscopic examination, the exact species cannot be determined without a culture. When determination of a species is necessary, the organism can be cultured. Be aware that results may take 3 to 4 weeks for fungal growth to occur.
To obtain a specimen for examination, cleanse the surface of the skin with either an alcohol prep or soap and water. Allow the skin to dry. A #15 Bard-Parker blade is optimal for scraping to lift scale off the surface of the skin, taking care to scrape in a horizontal movement without cutting into the skin. See Figure 3-1 for an illustrated depiction of the procedure. The scale can either be swept onto a microscope glass slide with the blade, or the scale that is adherent to the edge of the blade can be directly wiped onto the slide. Alternatively, in especially robust flaky and dry scale, one microscope slide may be used to scrape the scale onto another microscope slide. In specimens that are moist owing to maceration of the area, for instance, in the toe web spaces, smear the moistened scale onto the slide.
After an amount of scale that can be visualized under the microscope has been obtained, use a coverslip to sweep all of the scale onto the center of the slide into a pile. The coverslip should be gently placed over the scale and a drop of KOH 10% solution is applied to the outer edge of the coverslip on the slide and allowed to spread throughout the underside of the coverslip by capillary action. An additional drop or two may be necessary, as well as slight pressure applied to various points on the coverslip to effect a complete spreading of the
KOH solution, thereby enveloping the pile of scale. Stains such as methylene blue may be added to aid visualization. It is helpful to flatten the scale by applying moderate pressure with a fingertip to the coverslip. A small flame from a lit match or a lighter helps hasten the chemical reaction. The amount of heat should be enough to warm the underside of the glass slide but not enough to cause boiling of the KOH solution. This usually takes less than 5 seconds. It is best to allow 3 to 5 minutes for the chemical reaction to complete before viewing. Wipe the underside of the slide to remove any blackened carbon if it has been created by the heating flame, and place the slide on the microscope stage for viewing. To the novice, the microscopic exam can be an exercise in patience. Thoroughly and methodically scan the slide, sometimes focusing up and down to distinguish edges and shapes. A positive KOH preparation is demonstrated in Figure 3-2.
KOH solution, thereby enveloping the pile of scale. Stains such as methylene blue may be added to aid visualization. It is helpful to flatten the scale by applying moderate pressure with a fingertip to the coverslip. A small flame from a lit match or a lighter helps hasten the chemical reaction. The amount of heat should be enough to warm the underside of the glass slide but not enough to cause boiling of the KOH solution. This usually takes less than 5 seconds. It is best to allow 3 to 5 minutes for the chemical reaction to complete before viewing. Wipe the underside of the slide to remove any blackened carbon if it has been created by the heating flame, and place the slide on the microscope stage for viewing. To the novice, the microscopic exam can be an exercise in patience. Thoroughly and methodically scan the slide, sometimes focusing up and down to distinguish edges and shapes. A positive KOH preparation is demonstrated in Figure 3-2.
 Figure 3-1 KOH preparation. Step-by-step depiction begins with scraping of skin using a No. 15 blade to obtain specimen. |
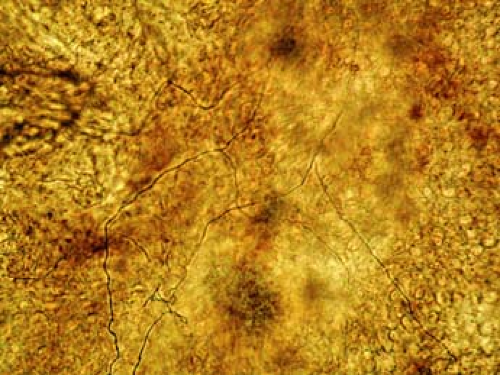 Figure 3-2 Positive KOH preparation. This slide demonstrates fungal forms. Note that they are often subtle and can be easily confused with cellular parts and other debris. |
Scabies Preparation
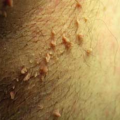
The suspicion of scabies infestation is often high when a patient presents with a persistent itchy rash, often subtle with only few scattered red papules and excoriations. The index of suspicion is elevated when the patient reports a worsening of symptoms at night, when there has been a previous infestation either in the patient or a close contact, and when the patient is a nursing home resident. The diagnosis of scabies infestation can often be easily confirmed with the scabies preparation. However, false-negative results are common owing to poor technique or improper lesion selection.
The scabies preparation is a simple technique only requiring mineral oil, a scalpel or small curette (2 to 4 mm), glass slide, coverslip, and a light microscope. The cutaneous finding of a burrow, which is the tunnel that the female mite excavates within the epidermis to dwell and lay her eggs, is an ideal lesion to examine for scabies identification. Clinically, a burrow is typically in the range of 0.1 cm to 1.0 cm and appears as a wavy, sometimes threadlike lesion that is often white or somewhat gray. The preparation is performed by scraping away this lesion, often located in the web space of the fingers or sometimes on the scrotum in men or areolae in women. Local anesthetic with lidocaine is not necessary as the lesions are not typically tender, and the overlying burrow skin is without sensation. The scraping in this case is more aggressive than for KOH preparation, often drawing blood. The lesion is then wiped onto a glass microscope slide, engulfed in a drop of mineral oil, and finally mounted with a coverslip. This specimen can be examined under low power for either adult mites, eggs, or fecal pellets, also known as scybala. Any of these findings confirms the diagnosis, as in Figures 3-3 and 3-4.
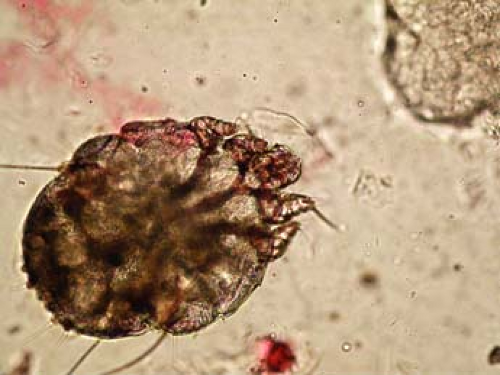 Figure 3-3 Positive scabies preparation. Note the organism of Sarcoptes scabei var. hominis. |
The following procedures in this chapter generally require written consent from the patient; however, this requirement may vary by institution and by local regulations. It should be explained to the patient that when the procedure is performed, there are risks that include, but are not limited to, bleeding, infection, nerve damage, scar formation, danger to underlying structures, failure to make the diagnosis, lesion recurrence, and pain. The risks are low, but vary by patient, procedure site, and reason for performing the procedure. Table 3-1 presents suggestions for type of biopsy to perform based on the suspected type of lesion being sampled.
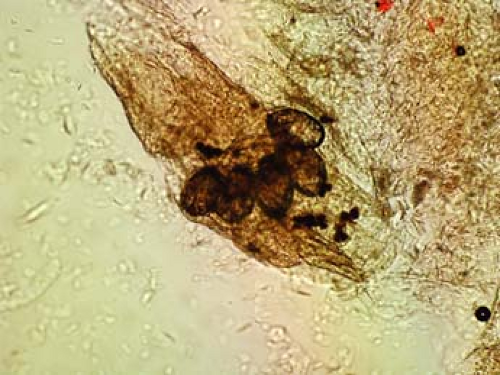 Figure 3-4 Scabies eggs from scraping of skin burrow. |
Shave Biopsy
Establishing the diagnosis by shave or tangential biopsy is appropriate for a variety of lesions, especially lesions that are raised, pedunculated, or easily palpable. It can be used for flat, macular, or very rarely subcuticular nodules, but more care is required. Because of its relative ease, it is the procedure most frequently used for obtaining tissue.
The shave biopsy, along with all of the following procedures, should be performed with a “clean technique.” This does not require the use of sterile gloves or a sterile field; however, take precautions to prevent infection. The clean procedure is one in which a quick wipe-down of the area to be shaved is performed (usually with an alcohol swab, Betadine prep, or chlorhexidine-soaked gauze). The provider performing the procedure should wear clean gloves that need not be sterile.
The procedure begins by choosing the site to be biopsied. Local anesthesia is obtained with lidocaine with or without epinephrine, often less than 1 to 2 cc around and under the lesion. Flatter lesions can be elevated and made more accessible for shaving by simply infiltrating underneath the lesion with local anesthetic, thereby creating a wheal underneath the lesion. For a raised lesion, enough of the lesion should be surrounded by blade so as to sharply remove it from its base. Typical cutting devices for the shave biopsy include the No. 10 or
15 blade scalpel or a flat razor. Either of these cutting tools is appropriate for the shave biopsy and selection is user dependent. Most will agree that the highly malleable straight flat razor blade on a handle (i.e., Dermablade) is much easier to use in general, but a No. 15 blade offers better accessibility to lesions in tighter locations, i.e., the medial canthus.
15 blade scalpel or a flat razor. Either of these cutting tools is appropriate for the shave biopsy and selection is user dependent. Most will agree that the highly malleable straight flat razor blade on a handle (i.e., Dermablade) is much easier to use in general, but a No. 15 blade offers better accessibility to lesions in tighter locations, i.e., the medial canthus.
Related posts:

Stay updated, free articles. Join our Telegram channel

Full access? Get Clinical Tree


