1Mohs Micrographic Surgery
The two major goals of Mohs micrographic surgery (MMS) are to provide the highest possible cure rate for the treatment of cutaneous malignancies while also ensuring that the malignancy is removed in the most conservative or tissue-sparing manner possible. While these two tenets of this procedure seem straightforward, there is a considerable amount of attention to detail and process quality that is required to provide the service patients expect from MMS. In this chapter, we outline processes and techniques that will lead to successful, reproducible execution of the MMS.
Keywords: Mohs surgery, micrographic surgery, skin cancer treatment, tissue sparing, complete circumferential peripheral and deep margin assessment, initial Mohs stages/layers, subsequent Mohs stages/layers, process improvement
Capsule Summary and Pearls
•Mohs micrographic surgery (MMS) provides the highest cure rates in the most tissue-conserving manner for most skin cancers.
•Success of the procedure relies on proper tumor selection and careful execution of the technique.
•When excising a Mohs surgical specimen, several refinements in technique can ease tissue processing, accurate tumor mapping, and ultimately reconstruction of the resultant defect.
•Awareness of the surgical and tissue processing issues that may lead to artifacts on the tissue specimen can assist the surgeon in avoiding false positive readings.
1.1 Before the First Stage
1.1.1 Tumor Selection
Mohs micrographic surgery (MMS) is best suited for the treatment of malignancies that grow in a contiguous manner, meaning that they grow in a manner where the entirety of the tumor is part of a singular mass with no part being physically separated from the primary site of growth. Properly trained providers most commonly use MMS for the treatment of all subtypes of basal cell carcinoma (BCC) and cutaneous squamous cell carcinoma (cSCC), but the procedure is also commonly used for nearly all cutaneous adnexal malignancies—dermatofibrosarcoma protuberans (DFSP), cutaneous leiomyosarcoma, extramammary Paget’s disease (EMPD), atypical fibroxanthoma (AFX), melanoma in situ (MMIS), and, in some cases, for invasive melanoma, Merkel cell carcinoma (MCC), and other far less common cutaneous malignancies.1 The unifying feature of all malignancies treated successfully with MMS is that these tumors are contiguous, thereby allowing the surgeon to detect the totality of the microscopic, often subclinical, extent of the tumor while properly carrying out the procedure.1
Selection of the most appropriate treatment is very important for producing the best results for the patient. While MMS may be utilized for nearly all forms of cutaneous malignancy, it is important to be discerning with respect to which malignancies are treated with the procedure as there are several other alternatives for the treatment of skin cancer beyond MMS, each with its own merits and drawbacks. MMS, while not a more aggressive or arduous procedure for the patient when compared with a standard excision, is a labor-intensive procedure for the physician and the MMS team, often consisting of several individuals in addition to the physician including nurses and histotechnicians. Acknowledging this, MMS is often reserved for malignancies with any of the following features:
•Malignancies in which there is risk of disfigurement or functional loss, such as those on the head and neck, hands, feet, and genitalia.
•Malignancies that have recurred or have been incompletely treated with other treatment modalities.
•Malignancies in immunosuppressed patients, particularly for cSCC in chronic lymphocytic leukemia (CLL) and solid organ transplant patients.
•Large malignancies in any body site.
•Malignancies in patients in whom the tumor border is poorly defined, often due to severe background actinic damage or subclinical tumor growth that may occur, for example, in infiltrating tumors.
•Malignancies exhibiting aggressive growth features clinically and histologically.
•Malignancies in sites where healing is challenging and a maximally conservative technique will reduce the burden of wound healing for the patient, such as in previously irradiated fields and on the legs in patients with peripheral vascular disease or diabetes.
When selecting the most appropriate treatment for skin cancer, it is important to also recognize that a skin biopsy, particularly because of its superficial nature, can misrepresent the true nature of a skin cancer. It has been shown that while carrying out definitive treatment for skin cancer, the skin biopsy underrepresented the aggressive nature of a skin cancer in up to 33% of cases, while tumors were revealed to be less aggressive than the biopsy in 17% of cases.2 Further, tumors that are not amenable to completion of treatment under local anesthesia will be challenging to complete in the outpatient setting with MMS, but MMS can be used in many of these cases as a component of multidisciplinary care for particularly advanced skin cancers such as those invading bone, foramina of the skull, or the orbit. Therefore, the clinician’s judgment, taking into sum all patient factors including clinical and possible radiologic examination, pathologic correlation with that examination, and a discussion with the patient about their goals for treatment, is still the best tool for selecting a plan for skin cancer management.
1.1.2 Documentation of Site
Cure rates are higher when the procedure is done in the correct location. It seems obvious, but in patients with small lesions or significant background actinic damage, or when anatomically inaccurate verbiage is used to describe the original biopsy site, it can, at times, be difficult to identify the correct site for surgery. Further, patients are often unable to accurately recall the correct site of a biopsy, with one study showing the rate of misidentification of the biopsy site by patients at 16.6%.3 It is therefore important to have a clearly defined process for identifying the correct site for surgery. Utilizing photography from the time of biopsy is a best practice for avoiding wrong site surgery.3 Photographs at the time of a skin biopsy should have the planned biopsy site clearly marked and should be taken from far enough away to include anatomic landmarks that can facilitate localizing the site when surgery is eventually carried out. One HIPAA (Health Insurance Portability and Accountability Act of 1996) compliant and relatively simple way to accomplish biopsy site photography is to take a picture of the marked biopsy site with the patient’s mobile phone and ask them to bring their phone with them to their surgical visit if the biopsy reveals a malignancy requiring further treatment.4,5
In addition to utilizing photography, or when no photograph of the biopsy site is available, providers can use their clinical judgment to identify the biopsy site with confirmation by the patient using a mirror or a photograph on a tablet. Family who are present with the patient, particularly those who have assisted the patient with wound care for the biopsy site, can also be a resource for confirming the correct location for surgery.
If the correct site cannot be confirmed, the surgeon is left with a few options. First, the procedure can be cancelled with the patient returning to the referring provider for site confirmation or monitoring. Alternatively, a frozen section biopsy can be obtained from the most likely candidate location with definitive treatment being done on the same day if the biopsy confirms a skin malignancy. A frozen section biopsy can be carried out by obtaining a biopsy by any technique the surgeon feels will not adversely affect the subsequent definitive procedure if the biopsy is positive and will yield a cosmetically appropriate wound if the site is found to be free of cancer. The biopsy specimen is then processed by vertical sectioning (rather than the tangential sectioning typical of MMS) through the center of the biopsy specimen, stained, and interpreted to confirm the presence or absence of malignancy.6
Occasionally, there is an obvious biopsy site or obvious residual tumor with adjacent skin that is clinically suspicious for being involved by skin cancer but not definitely involved. In these cases, we have developed the practice of outlining the definite tumor or biopsy site with a solid line and outlining the area that is suspicious, but not certainly involved, with a dotted line. When confirming the site with the patient, we will explain that we will only start with the area marked with the solid line, but that we are suspicious that their cancer may be larger in the area of the dotted line. This helps manage our patients’ expectations by letting them know that we are doing everything we can to be conservative, but that their cancer may be larger than they thought previously (Fig. 1.1).
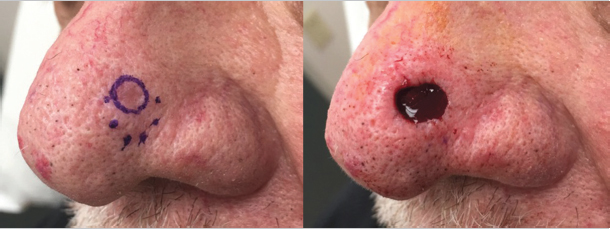
Fig. 1.1 Initial marking of a tumor showing the area that is certainly involved with a solid line and the area that is suspicious for involvement with a dotted line. Illustrating where you are concerned the tumor may extent prior to starting surgery can help patients prepare mentally for a defect that is larger than they may anticipate.
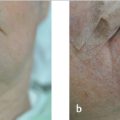
Once the correct surgical site has been marked and confirmed, photography and clinical examination can be used to document the site that will be operated upon as well as the native presurgical state of the patient’s anatomy. Photographic documentation and discussion of the patient’s presurgical state can assist with eventual reconstruction planning as well as protect the treating physician from being implicated as the cause of any asymmetries, deformities, or palsies that the patient has prior to the planned surgical procedure. Additionally, during this time, it can also be helpful to mark relevant anatomic boundaries prior to the instillation of anesthesia if these boundaries will be helpful during reconstruction planning. A common example where this is helpful is marking the white roll of the lip as the edema from surgery and injected anesthesia can make this landmark more challenging to visualize reliably, especially in older patients with a less well-defined vermilion border (Fig. 1.2a, b).

Fig. 1.2 (a,b) Marking anatomic boundaries preoperatively can be helpful in identifying these boundaries following MMS during reconstruction planning. These boundaries are often distorted by edema following tumor removal.
1.1.3 Time-Out
1.2 Procedures before the First Stage
1.2.1 Curettage
Curettage is a common procedure in dermatology often used as a definitive treatment for superficial skin cancers in noncosmetically sensitive areas. At the outset of MMS, curettage is done to grossly define the breadth and depth of the skin cancer, but the procedure is carried out differently from curettage done in the course of malignant destruction. Prior to MMS, curettage is carried out more gently in a manner to avoid unnecessarily disrupting the surrounding epidermis in skin that is clinically uninvolved by skin cancer. This is often accomplished with reusable dermal curettes, which are typically less sharp and therefore more specific for tumor than single-use disposable curettes, which tend to be overly sharp for this purpose. Generally, working from the center of a lesion out to the periphery, the tumor shells out relatively easily providing firmer tactile feedback to the surgeon when normal dermis is encountered both peripherally and at the deep margin. Once this rigid feedback is encountered at all margins, and no soft skin cancer remains to be removed, curettage is stopped and the operative site is cleansed with gauze to remove any fragments of skin cancer that may have been freed by curettage but remain on or near the surgical site. This gauze is then discarded in order to avoid reintroducing these fragments of skin cancer to the operative field and increasing the risk of a false-positive histologic margin due to a displaced tumor fragment (▶Video 1.1).
There are several benefits to curettage prior to the first layer of MMS:
•Site confirmation as tumor in a correctly identified surgical site will typically readily curette away.
•Removal of the bulk of the malignancy gives the surgeon a better concept of the gross breadth and depth of the tumor.7 Curettage can confirm the surgeon’s clinical impression of the size of a malignancy, but it can also inform the surgeon that the malignancy is either larger or smaller than originally thought, thereby sparing the patient unnecessary subsequent layers or allowing for a more conservative procedure, respectively.
•“Floaters” and other artifactual tumor on the Mohs margins can be reduced by curettage. By removing the gross tumor, tumor fragments are less likely to be displaced into the peripheral or deep margin during tissue processing, thereby reducing the chance of false-positive tumor at the margin and making histologic interpretation less challenging.
–False-positive tumor displacement into the deep margins during relaxing cuts or specimen division is referred to as a “push-through” error (Fig. 1.3a).
–Residual tumor in the center of the specimen that hinges into the deep margin following specimen division thereby causing a false positive on the deep margin is referred to as a “fall over” error (Fig. 1.3b).
•Tissue relaxing for the purposes of tissue processing is facilitated by removal of the central bulk of the tumor by curettage.
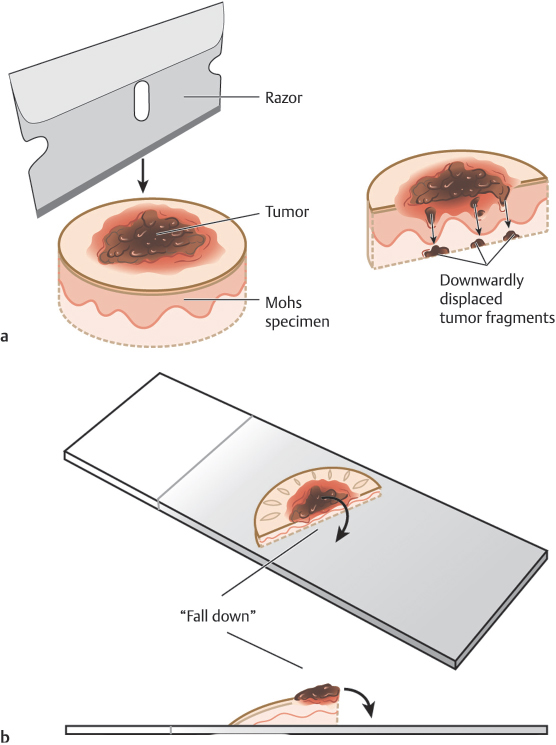
Fig. 1.3 (a,b) Curettage can assist in reducing the risk of histologic errors later in the procedure, particularly push-through artifact where gross tumor is pushed into the deep margin during processing and fall over artifact where gross tumor falls into the deep margin from the center of the tumor in divided specimens.
There are also pitfalls to the curettage process:
•Fibrous, infiltrative, incompletely excised, and recurrent malignancies will not curette well, so curettage is unreliable in these settings for defining the gross extent of the tumor.
•Curettage in areas where skin is particularly weak or thin and prone to tearing, such as an aged eyelid affected significantly by solar elastosis, may inadvertently remove normal, uninvolved tissue and introduce skin tears that can make tissue orientation and subsequent reconstruction more challenging.
•If care is not taken with the procedure or if overly sharp disposable curettes are used, then the process of curettage may damage surrounding uninvolved epidermis and make the Mohs excision larger than necessary to achieve a cure.
1.2.2 Sharp Debulking
The benefits of sharp debulking prior to the first layer of MMS are similar to those seen with curettage. Namely, removing the tumor bulk will reduce the chance of malignant tissue becoming dislodged from the tumor mass during excision and tissue processing and ending up on the examined histologic margins of the MMS specimen. When tumor cells become dislodged in this manner, it can increase false-positive interpretations or make histologic interpretation more challenging as the surgeon works to determine if the tumor is at the margin. Typically the deep margin in these cases, where specimen division or relaxing cuts push malignant tissue into the margin, is a true or false positive.
The primary pitfall of taking a debulking specimen is that the surgeon is at risk for inadvertently taking too wide or too deep a debulk, thereby making the final Mohs excision larger than necessary. This risk can be minimized through careful technique (▶Video 1.2).
1.3 The First Stage
1.3.1 Essentials of the First Stage
Recall that the two principal goals of MMS are oncologic cure and maximal tissue conservation, in that order. With that said, the goal with each stage of MMS should be to conservatively remove the malignancy in its entirety. Clinical examination by the Mohs surgeon to identify the clinically obvious extent of the tumor is the best tool for determining the size of the first stage. This examination can be augmented as previously discussed by the use of curettage prior to the first stage. It is important to reiterate that while the surgeon may have suspicion that the tumor may be larger than it appears, only the clinically obvious extent of the tumor should be removed with the first stage with the surgeon using histology of the MMS margins to either confirm or refute the initial clinical suspicion. Using this technique may result in an additional stage being necessary, but it also allows for maximal tissue conservation.
The first stage consists of complete removal of the entire gross tumor as well as a 1- to 2-mm margin of clinically normal skin immediately around and deep to the tumor (▶Video 1.3). For very large or aggressive tumors, a larger initial margin may be useful to reduce the number of stages needed for tumor clearance. This rim of clinically normal tissue is needed to prove negative margins as well as to allow for monitoring of tissue processing quality by the surgeon, as will be discussed later. If care is taken while excising Mohs stages to make the tissue specimen easier for the surgeon or the histotechnician to process, the histologic section will be processed faster, and will be of higher quality and easier to interpret. Following is an outline of the first stage with suggestions for facilitating tissue processing and optimizing quality.
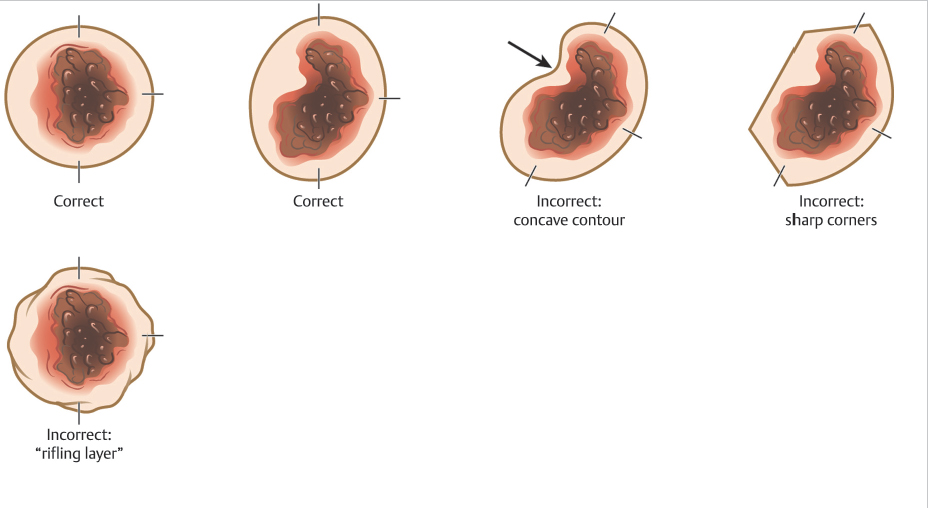
The first stage begins with a very superficial incision or score around the tumor at a 90-degree angle relative to the skin surface. This incision defines the margin of the specimen that will be processed. To aid in subsequent tissue processing, the border of the Mohs layer should consist of smooth, rounded, convex contours. Sharp corners, concave shapes, and start-stop chatter (rifling layers) are more challenging to relax and flatten into the proper plane for tissue processing. These imperfections in the Mohs excision can create areas where the epidermis is missing, thus making that section of the specimen uninterpretable and necessitating additional stages of surgery that may have been avoidable. Further, start-stop chatter can also cause the introduction of false tissue scores that can make tumor localization challenging (Fig. 1.4).
The initial incision for the Mohs excision is made superficially because the goal is to leave the specimen in perfect orientation relative to the site on the patient where it is being removed so tissue orienting marks can be precisely placed on the specimen and patient. These orienting marks can be made by different techniques and in different patterns based on surgeon preference and tumor size and shape (Fig. 1.5). The key when placing orienting marks is to ensure that, if tumor is present, the surgeon will be able to precisely localize the residual tumor on the patient based on these marks. Therefore, the marks are placed prior to incising through the full thickness of the dermis in order to ensure that the mark on the specimen side corresponds exactly to the mark on the patient side. Orienting marks are most commonly made by making a shallow nick with the scalpel in the tissue. This nick should be deep and large enough to be readily found if a subsequent stage is required, but not so large and deep as to interfere with reconstruction. The pattern of tissue nicks is highly variable among surgeons. The surgeon must select the technique they feel will allow them the greatest ability to locate and selectively excise residual tumor using histologic maps. One key is that, regardless of what technique is used, the orienting marks should be asymmetric. By making the marks asymmetric, the surgeon can reorient the specimen to the patient if any tissue handling error occurs during tissue processing, such as a dropped specimen or a mislabeled map, because the specimen will only “fit” on the patient’s defect one way much like an asymmetric shaped peg will only fit into its corresponding hole in the correct orientation.
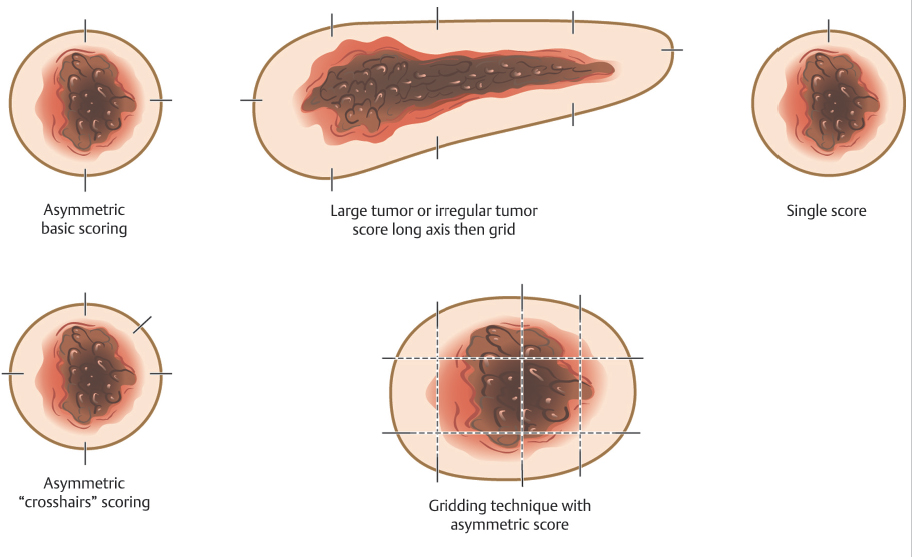
Fig. 1.5 Common patterns for placing tissue orientation marks.
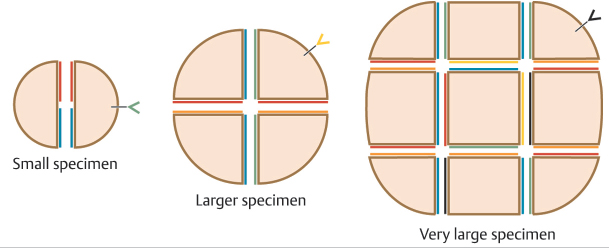
Surgeons use several techniques to make orienting marks. Some use gentian violet in order to avoid tissue scores, but gentian violet has a tendency to lose its sharpness on the skin (“bleed”) and can be washed away by surgical preps and blood between stages, thus negatively affecting precision of tumor location. More commonly, surgeons use orienting nicks in the tissue as discussed earlier. Common asymmetric patterns include a single score in one location and three scores in a 12, 3, and 6 o’clock position or similar asymmetric orientation. Alternatively, many providers will place four scores in a symmetric crosshairs orientation, though this does require more care to maintain orientation as the symmetry of the scores does not allow reorientation if there is a tissue handling error during tissue transfer, grossing, or processing. When tissue nicks are placed, it is helpful to place them in line with the most likely vector of closure, so the nicks will be excised with standing cones and not confound epidermal approximation during wound closure. Larger tumors are best scored with a “gridding” technique that allows the highest possible resolution for residual tumor in the deep margin within the larger field of these tumors. In this technique, scores are placed such that the tissue can be divided into graph paper–like squares during tissue processing. Another method of marking very large tumors is the use of skin staples around the defect margins matching staples in the specimen excised. Staples can also be useful for orienting deep margin tumor resection without a skin edge with the staples used to outline the margins of the specimen excised (Fig. 1.6).
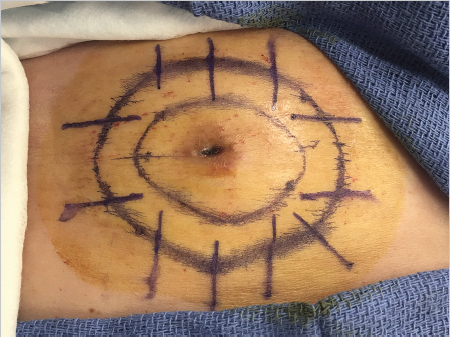
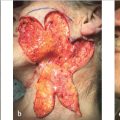
Fig. 1.6 Large tumors, such as the dermatofibrosarcoma protuberans pictured, are best oriented with marks placed in a grid pattern so residual tumor at deep margins can be easily resolved and accurately removed. Large tumors such as these are best marked redundantly with gentian violet and tissue scores.
When placing scores, the surgeon must balance resolution of tumor location during tissue analysis with the fallibility introduced by placing several orienting scores in the specimen. The ability of the surgeon to precisely identify, on the patient, where residual tumor remains for selective re-excision in a subsequent stage is improved if the tumor is near an orienting score. Therefore, the more scores a surgeon places in the specimen, the greater their ability to precisely locate the residual tumor on the patient. Scores, however, introduce potential error into the MMS because each score produces an area where epidermis may be incompletely laid down into the sectioning plane. If the score results in failure to visualize focal residual tumor on a margin because of incomplete epidermal lay-down, then cure rates can be negatively affected. The decision for how many scores are necessary to accomplish the goals of MMS is therefore left to the surgeon to determine based on confidence in individual practice laboratory techniques and ability to localize tumor within a specimen with more or less scores.
Next, a beveled incision is used to incise into the skin, and into deeper tissues, if necessary, to the desired depth of the excision below the grossly evident depth of the malignancy. This beveled incision is accomplished by taking several passes around the specimen within the superficial initial incision, at approximately a 45-degree angle in most cases, until the correct depth is reached. Excising the tissue with a bevel eases the process of laying the epidermal edge flat into the same plane as the deep margin during tissue processing as the epidermal edge travels a smaller distance and encounters less torsional resistance when the tissue is beveled relative to a 90-degree excision (Fig. 1.7). The amount of bevel needed varies based on the anatomic site of the tumor (as the dermis is more or less rigid in different sites) and the depth of the tumor (shallow, dermis-only layers need a greater degree of beveling as do tumors that are deeper than they are wide).8 It is common, for example, on distal nasal and nasal alar lesions to take a transdermal layer in an effort to facilitate a better outcome with a skin graft or second intention healing, but such transdermal layers typically need more extreme beveling in order to facilitate high-quality tissue processing due to the stiffness of the dermis (▶Video 1.4). This has been referred to as the partial-thickness layer technique.8,9
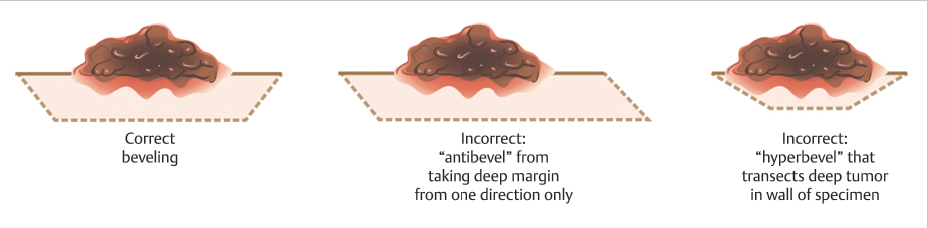
Fig. 1.7 Demonstration of appropriate bevels. Having too little bevel can cause difficulty with tissue processing, while too much bevel may inadvertently transect the tumor within the wall of the specimen.
Finally, once the beveled incision at the periphery of the specimen is complete, the specimen is removed from the patient by making a flat incision across the deep margin of the specimen at a depth just below the deepest extent of the tumor. In some cases, this depth may be intradermal. In others, it may be deeper at any level down to and including periosteum. Errors that can be made during incision of the deep margin include the following (Fig. 1.8a–e):
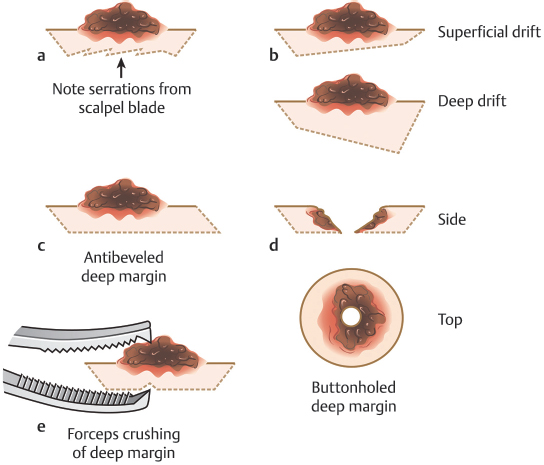
Fig. 1.8 Pitfalls with the deep margin on an initial Mohs stage. (a) A jagged deep margin. (b) Drifting superficially or deep within the deep plane. (c) Antibeveled deep margin. (d) A buttonholed deep margin. (e) Grasping the deep margin too firmly with toothed forceps producing a hole in the deep margin.
•Making an incision that is not flat: A jagged deep marginal incision will increase the likelihood of dropout areas, leading to the possibility of false negatives.
•Making an incision that drifts more superficially or more deeply across the deep margin:
–Shallow drift: Risks more stages by inadvertently incising into the deep margin of the tumor.
–Deep drift: Unnecessary tissue waste, volume loss, and possible damage to deeper structures such as nerves or vessels.
•Creating an antibevel that interferes with tissue relaxing by incising the entirety of a deep margin across the specimen from one direction.
•Incomplete or buttonholed deep margin:
–Creates an area of uninterpretable deep margin “dropout” by incising into the curetted deep margin of the specimen or creating extra notches mimicking those planned for orientation.
•Grasping the tissue too firmly with toothed forceps while removing the specimen can create triangular impressions in the deep margin that impair assessment of the complete deep margin:
–Toothed forceps may also transfer malignant tissue from the tumor to the deep margin if care is not used to only use one side of the forceps on the tumor side and the other on the deep side while grasping the tissue.
1.3.2 Incomplete Excision and Recurrence
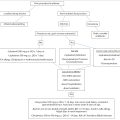
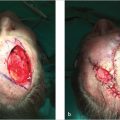
The process of taking a first Mohs stage from a site that has been previously excised or is recurrent following a prior excisional procedure presents unique challenges. An incompletely excised tumor is one where an excision has been attempted and the pathology revealed persistent malignancy at a lateral or deep margin. Having information about whether the residual tumor is present at lateral or deep margins, or having the slides from the original excisional specimen available for review, can be helpful when planning subsequent MMS. The issue created by an incompletely excised or recurrent tumor is that the malignancy may no longer be contiguous and/or may be obscured by scar clinically and histologically. This is why cure rates for MMS are highest when MMS is the first treatment selected for a tumor.10,11 In our practice, we will typically execute a “mapping layer” in the cases of incomplete excision as the first stage of MMS (Fig. 1.9). A mapping layer essentially consists of a narrow re- excision of the entirety of the scar from the prior procedure to include tissue below the deep margin of the prior procedure. This complete re-excision of the deep margin below the prior scar is essential to prove negative deep margins with MMS. The deep margin of a prior excision can be identified both clinically and histologically by visualizing scar rather than normal subcutaneous fat on the deep margin. In cases of recurrence and incomplete excision, it is only possible to prove clear margins by complete histologic assessment of the prior surgical margins. This requires careful re-excision of the prior procedure and understandably causes additional tissue loss and occasionally large defects that may have been avoided if MMS was used for primary treatment of the malignancy.
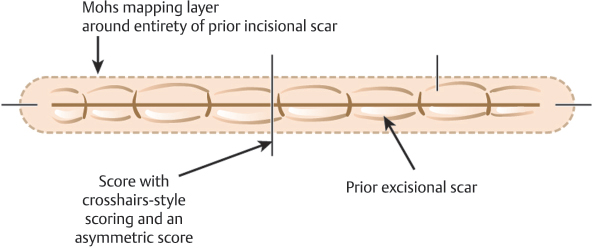
Fig. 1.9 Mohs mapping for a previously excised tumor (Mohs for a prior incomplete excision).
1.4 Tissue Processing
1.4.1 Tissue Transfer
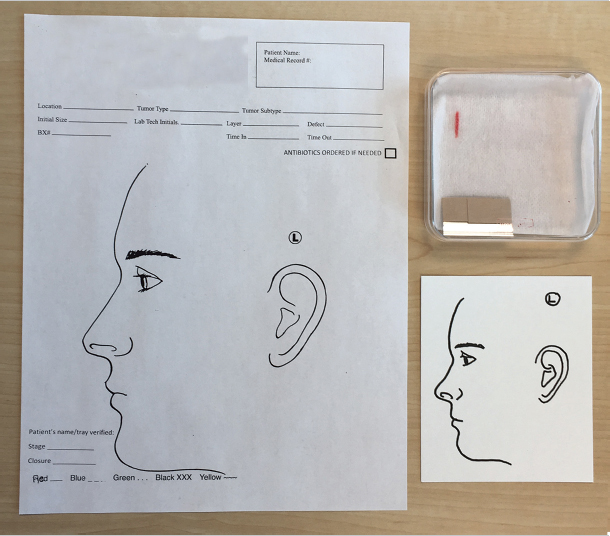
Once the MMS specimen has been excised, it is placed on a transfer medium for transport to the grossing table. The medium used is variable among Mohs practices and may consist of cardstock or paper with or without anatomic drawings drawn or preprinted, filter paper, nonadherent pads, or saline-soaked gauze. Further, some practices use Petri dishes to house tissue and the aforementioned transfer medium to transport tissue to the laboratory for processing. Regardless of the transfer medium selected by an individual surgeon, some things are consistent between practices:
•Most media have a mechanism for identifying the location of orienting marks, or at least the 12 o’clock position, on the excised tissue. This can be accomplished with detailed drawn maps on preprinted cards or a simple ink mark on a nonadherent pad or gauze (Fig. 1.10).
•There must be a mechanism for identifying the patient and site or accession number to avoid confusing specimens with one another in the lab (Fig. 1.10).
•Once processing is complete, a mechanism must be used to track which frozen tissue specimen corresponds with which patient in case further sections are required. Some surgeons use color-coded slide labels and optimal cutting temperature (OCT) medium, while others label by order within the cryostat.
1.4.2 Relaxing Incisions and Dividing
The goal of relaxing incisions is to bring the entirety of the epidermal margin into the same plane as the deep margin of the specimen. Understanding that the epidermal edge must move into the same plane as the deep margin by rotating about a pivot or “hinge” point prior to tissue freezing is one of the critical elements of tangential sectioning of MMS12,13 (Fig. 1.11). If the entirety of the epidermal edge of a specimen is not moved into this plane, then it cannot be examined microscopically and the opportunity for missing a positive margin and recurrence of malignancy is increased.14
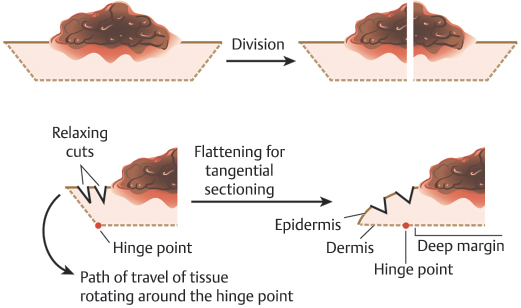
Fig. 1.11 Illustration of tissue being rotated around the “hinge point” in order to produce tangential sectioning.
Practices may use any of the following options for relaxing the tissue or a combination of these, as we do in our practice. The first step to allowing the epidermal edge to move into the proper plane is debulking and curettage as discussed previously. Removal of the central mass of malignant tissue allows the epidermal edge to fall into the proper plane more easily and also reduces the opportunity for malignant tissue transfer to the margins during processing with resultant false positives. Next, radial and circumferential relaxing incisions can be made in the tissue. For both types of relaxing incisions, it is important to avoid incising completely through a specimen into the dermal face or deep margin of the specimen as this can result in “push-through” artifact, where tumoral cells are pushed by the blade into the margin of the specimen, thereby making histologic interpretation more difficult and possibly causing false positives. Radial incisions are incisions in the tissue oriented perpendicular to the wound edge pointing toward the center of the specimen. Radial incisions should not incise all the way to the epidermal margin of the specimen in order to avoid introducing false tissue scores at the margin. Circumferential incisions course parallel to the wound edge within the specimen. These allow the epidermal edge to move into the deep margin via an accordionlike motion
Based on surgeon preference, MMS specimens can be divided before freezing and sectioning or can be processed as a single piece.15,16 There are merits and drawbacks to both approaches. There is obvious time efficiency gained in the lab when a specimen is processed as a single piece, provided the histotechnician is facile with getting the entire epidermal margin properly relaxed into the deep plane. If getting the entirety of the epidermis is challenging for the Mohs histotechnician resulting in lost time or recuts, then the efficiency of a single piece may be lost. A divided specimen is always required if the excised tumor is too large to fit on a microscope slide. Mohs surgeons may also choose to divide specimens to further increase the ease of getting the epidermis properly laid down as the division serves as an additional relaxing procedure for the specimen. There are some potential pitfalls that can occur at this stage of tissue processing:
•Tumoral tissue from the superficial part of the specimen may roll or fall down onto the plane of the deep margin potentially causing a false positive on the deep margin.
•The deep margin in divided specimens may be incompletely laid down into the plane of section, thus not allowing histologic assessment of the entirety of the deep margin.
•Excessive downward pressure on the specimen while freezing the tissue into the planar orientation for tangential sectioning may inappropriately press tumoral tissue closer to the deep margin and predispose to false positives.
•Excessive facing into the frozen tissue block due to suboptimal epidermal relaxation can inadvertently cut into the gross tumor when it may not have been present in the true margin if the specimen had been sectioned more conservatively.
–The surgeon can often visualize that a block has been cut too deeply by observing that superficial structures of the skin are present in the central, or deep, portion of the tumor. Additionally, the peripheral epidermal edges will begin to show tangential sectioning with a honeycombed network of rete ridges being visible in sections cut too deeply into the tissue block.
1.4.3 Tissue Inking
Permanent tissue dyes are used to color code the tissue specimen so that the anatomic orientation of the tissue specimen is known (▶Video 1.5). This inking is consistent with a simultaneously created tissue map that shows a drawing of the specimen with all orienting marks, often set in the context of nearby anatomic structures. When tissue inking is completed, the specimen should correspond to the Mohs map in only one orientation so that the surgeon will be able to accurately map any residual tumor based on the ink visible on the histologic slides.8 Several techniques can be carried out to ensure inking assists maximally in tissue orientation and tumor identification (Fig. 1.12):
•Ink should be applied sparingly to avoid excess ink running into and falsely marking more than one margin or tissue nick.
•Inking should, whenever possible, follow a predetermined convention for all cases, for example, blue indicates the superior part of the tumor, red the inferior part, and green the lateral asymmetric score. On the other hand, one mnemonic used is: green to the grass, blue to the sky, red to the right. The editors use a blue ink to indicate the 6 o’clock position and red ink to indicate the 3 o’clock position, which allows proper orientation even without inking the 9 or the 12 o’clock positions.
•Inking should be done in a manner that reinforces asymmetry of the tissue specimen to avoid mapping errors.
•Attempt to avoid using the same color in two different sections of the same specimen to avoid confusion during tumor mapping.
•In divided specimens, particularly large specimens with several pieces, ink the deep margin where the division occurred in a manner to identify the specimen on the map and not allow different specimens in the same map to be confused with one another.
•In deep margin-only specimens, the sides of the specimen, or nicks in the sides of the specimen, may be inked in a manner to illustrate their orientation relative to the patient anatomically.
•Some advocate inking on cardstock and retaining this cardstock until the end of the surgical day in case there are questions about inking that can be answered by referencing the saved inked and oriented transfer cardstock.8