Furlow Palatoplasty
T. Guy Thorburn
DEFINITION
Furlow Palatoplasty is widely used technique for repair of either cleft palate (CP) or submucous cleft palate (SMCP). It can also be used in revision palate repair. Some surgeons who routinely use a Sommerlad repair for complete CP will instead use a Furlow for SMCP.
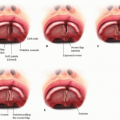
The technique is based on the concept of lengthening the soft palate by use of “Double-opposing Z-plasties.” This involves mirror-image Z-plasties to the oral and nasal layers while also retropositioning and reconstructing the levator muscle mechanism by keeping the levator palatini muscle on each side attached to the limb of the Z-plasty that moves posteriorly (FIG 1).1
ANATOMY
The key functional issue in CP or SMCP is that the levator muscle mechanism is not in continuity on the two sides. In addition, the fibers become tethered to the posterior border of the hard palate. Successful functional palate repair therefore requires repair of the “levator sling” as well as just closure of the tissues across the cleft.
The tethering to the hard palate seems to be an equal problem in differing types of cleft, whether unilateral or bilateral cleft lip and palate, cleft palate only, or SMCP.
Tip: the oral layer of the soft palate is more elastic than the nasal layer, and the elasticity increases as you move from the hard palate-soft palate junction toward the uvula. This means that the oral layer Z-plasty will tend to inset better with slightly wider flaps (closer to 80-90 degrees), whereas for the nasal layer, 60 degrees is sufficient. On the oral layer, the tissue elasticity is even greater in the posterior part of the palate, so the posterior limb is best designed slightly wider (around 90 degrees) as it will narrow after incision.
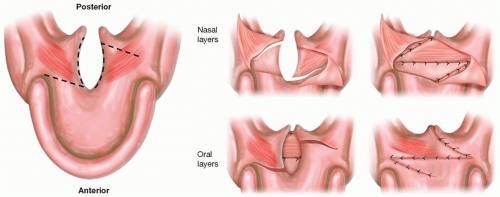 FIG 1 • Schematic diagrams of the Z-plasties of both oral and nasal layers before and after inset. |
PATIENT HISTORY AND PHYSICAL FINDINGS
The initial assessment of the newborn with a cleft involving a palate would usually be alongside a pediatrician and will include:
Pregnancy and birth history (including information from any antenatal testing), gestation, birth weight, and Apgar scores.
Initial assessment of cleft type and any related anomalies, including any airway concerns suggesting Robin sequence.
Medical history, drug history, and allergy history.
Family history of clefts, other major health problems, or anesthetic problems and any genetic diagnosis.
Feeding history including bottle type (eg, squeezy bottle, free flow, Haberman, etc.), current weight, maximum percentage weight loss and number of days to regain birth weight, and volume/duration/frequency of feeds.
Physical examination to assess the upper airways, cleft type, cleft width, and how much deficiency there is of surrounding tissues, as well as any related anomalies or
dysmorphic features. The pediatrician would then complete a fully newborn examination, looking in particular for related health issues such as cardiac, respiratory, renal, or neurological signs.
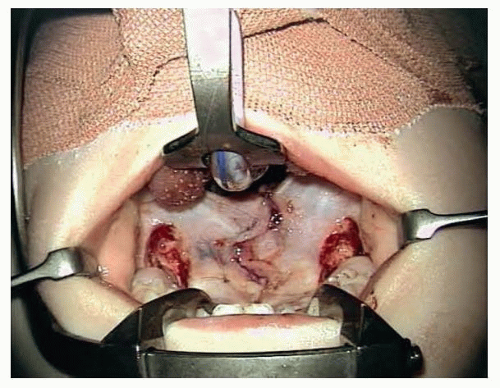 FIG 2 • The variation described by Randall utilizing lateral releasing incisions (von Langenbeck) for wider or more complete cleft palate. |
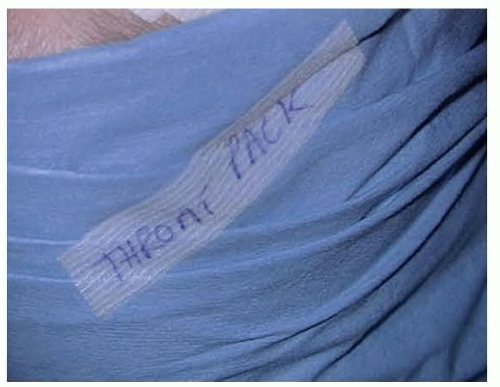 FIG 3 • Applying a sticker across the head drapes as a warning that the throat pack is in place, so that the drapes cannot be removed without first removing the sticker. |
IMAGING
No routine preoperative imaging is required for typical clefts. For older children presenting with SMCP or velopharyngeal incompetence (VPI), assessment with a speech lateral videofluoroscopy helps to assess the position of the levators and relative size of the soft palate to the size of the pharynx.
Standardized preoperative clinical photos should be taken as these are invaluable when assessing outcomes many years later.
SURGICAL MANAGEMENT
Preoperative Planning
A key aspect of successful cleft palate repair is in optimizing the patient prior to surgery. A pediatrician is a crucial member of the Cleft team. Although there is much discussion of age at palate repair, different team protocols vary from around 3 months old to 15 months or more. Very young babies will tend to be more susceptible to airway compromise around the time of surgery. Delaying repair until much older and speech has developed has been associated with poorer speech outcomes, particularly related to articulatory errors.
Tip: our team protocol is for palate repair around 8 to 12 months (corrected for prematurity), but our emphasis is much more on ensuring the child is well and thriving in the run-up to surgery. If they are not growing along their expected percentiles (with growth plotted on the appropriate chart for syndromic children), then we would want to address this before surgery. We will also routinely postpone for about 4 weeks if children have upper respiratory tract infections. By following this approach, we have seen a significant reduction in fistulae and concerns with speech function.
Routine blood tests or cross match samples are not required, unless the child is known to have a specific risk factor.
For children, with cardiac or respiratory problems, an upto-date echocardiogram or sleep study may be relevant.
Positioning
A south-facing Rae uncuffed or microcuffed tube is used. The taping of the tube needs to be secure but avoiding taping the mouth closed or limiting access. Taping in a V shape along the line of the mandible avoids displacing the tapes when the gag is opened.
The child is placed supine on a warming blanket, with the head at the very end of the operating table. A large horseshoe gel head ring is placed under the shoulders and around the head to provide support without overextending the neck.
A head drape is applied, and the face is prepped.
Tip: we use a clear plastic drape [3M Steri-Drape Fluoroscope Drape 90 ×110 cm] over the trunk, which allows the anesthetist to see their endotracheal tube and circuit without disturbing the surgical field. We avoid any adhesive drapes near the endotracheal tube as these have the potential to catch and dislodge the airway.
The table is tilted to a slight head-up position. An operating microscope is used for the procedure. The height of the table is adjusted once the microscope has been brought in to place (adjusted according to whether the surgeon prefers to sit or stand).
A modified Dingman mouth gag is placed.
A throat pack is placed, and a marker sticker put across the drapes as a reminder to ensure it is removed at the end. The sticker is placed so that the drapes cannot be removed without needing to disturb the warning sticker (FIG 3). The throat pack is also included in the scrub nurse count as an additional precaution.
The nose and mouth are rinsed with aqueous chlorhexidine solution.
Approach
The width of the cleft is measured, and any unusual features are noted.
The incisions are marked with pen and ink. Depending on tissue condition and tension, the limbs of the oral Z are usually about 8 to 10 mm long. The angles are usually 80 to 90 degrees (slightly wider on the limb in the posterior soft palate) (FIG 4).
Tip: for a right-handed surgeon, the oral layer Z is typically marked with the posteriorly based limb (where the muscle remains attached to the flap but has to be dissected from the nasal layer) on the left. This will tend to give the easiest access to the hardest part of the dissection.
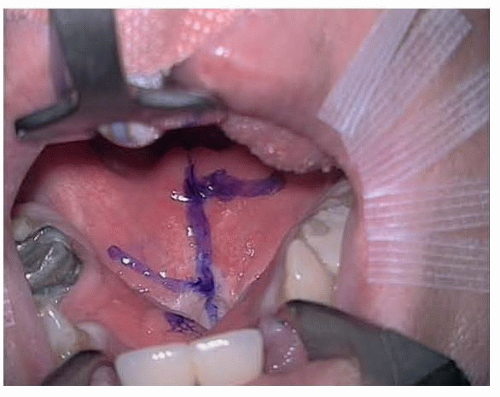 FIG 4 • Oral layer markings for a standard Furlow palatoplasty. Note the angles of the Z are wider than for the skin, approaching 80 to 90 degrees.
Related posts:Stay updated, free articles. Join our Telegram channel
Full access? Get Clinical Tree
 Get Clinical Tree app for offline access

|