and Ziv Gil2
(1)
Division of Otolaryngology Head and Neck Surgery and Maxillofacial Surgery, Tel Aviv Sourasky Medical Center, Tel Aviv, Israel
(2)
The Head and Neck Center Department of Otolaryngology Head and Neck Surgery, Rambam Healthcare Campus, Haifa, Israel
Keywords
EndonasalExpanded endoscopicMinimally invasiveSkull basePituitaryClivusCraniofacial10.1 Introduction
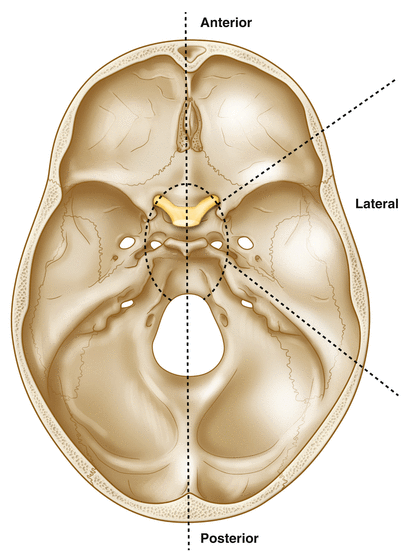
The skull base is located in a confluence of vital anatomical structures that affect our ability to perform safe and efficacious surgery. Generally, the skull base can be divided into four parts, as depicted in Fig. 10.1: anterior, lateral, posterior, and central. Traditionally, tumors located in each of these compartments were approached by different open approaches, necessitating skin incisions and craniotomy. Since its first description, the endonasal approach has become the principal method for resection of tumors involving the anterior and middle skull base. This approach provides access to the planum and suprasellar region via two nostrils. With this approach, extradural and intradural tumors can be resected endoscopically in a single procedure. In the sagittal plane, four basic endonasal modules (Fig. 10.2) are used for extirpation of skull base neoplasms:
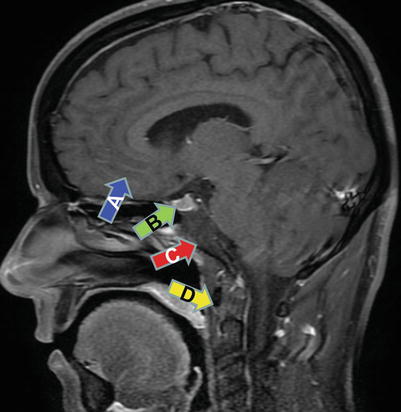
The transcribriform approach
The transsellar-transplanum approach
The transclival approach
The transcervical approach

Fig. 10.1
The four parts of the skull base: anterior, lateral, posterior, and central

Fig. 10.2
In the sagittal plane, four basic endonasal approaches—transcribriform (a), transsellar-transplanum (b), transclival (c), and transcervical (d)—are used for extirpation of skull base neoplasms
In the coronal plane, the endoscopic retromaxillary/transpterygoid approach to the pterygopalatine fossa and its extension to the infratemporal fossa also can be utilized (Fig. 10.3). By combining these six modules, it is possible to excise complex tumors that involve multiple compartments.
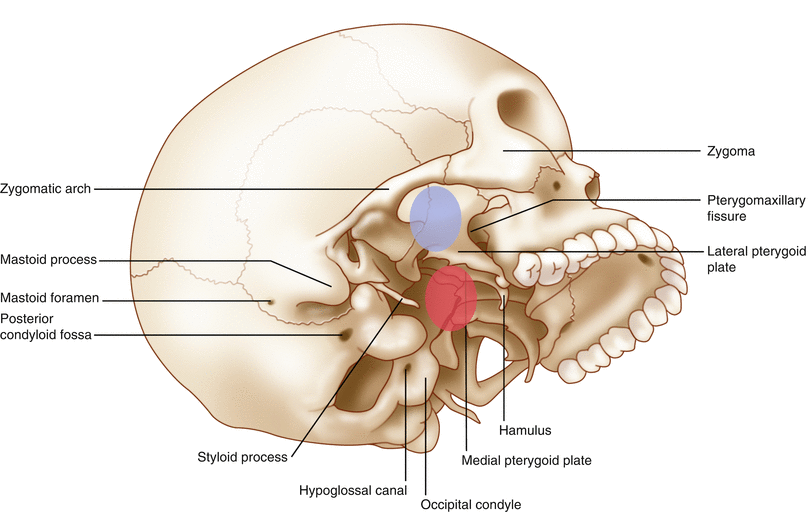

Fig. 10.3
In the coronal plane, the endoscopic retromaxillary (red)/transpterygoid approach to the pterygopalatine fossa and its extension to the infratemporal fossa (blue) also can be utilized
This chapter describes the technique for endonasal ablation of tumors located in the paranasal sinuses, anterior and middle skull base, and cervical spine.
10.1.1 The Inferior and Superior Limits of the Endonasal Approach
The endonasal approach is limited by our ability to look and work around corners. In the sagittal plane, the superior aspects of the frontal sinus may be difficult to approach; extirpation of tumors in this area depends on the configuration of the dissection tools and the surgeon’s abilities. The superior reach of the frontal sinus can be extended by drilling out the agger nasi cells and the frontal beak. The inferior reach is delineated by the nasopalatine line, which connects the inferior edge of the nasal bone with the posterior edge of the hard palate (Fig. 10.4).
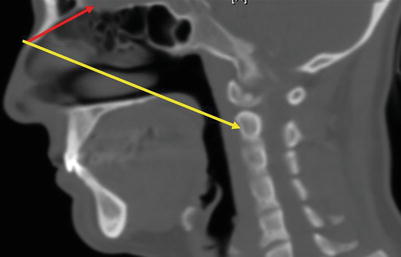

Fig. 10.4
The inferior reach of the endonasal approach is delineated by the nasopalatine line (yellow), which connects the inferior edge of the nasal bone with the posterior edge of the hard palate. Nasofrontal line appears in red
10.2 Surgical Technique
10.2.1 The Expanded Endoscopic Approach
The surgical technique practiced by the author is performed via the expanded endoscopic approach. These procedures are performed with the patient in the supine position and under general anesthesia. The head is usually placed on a donut in a neutral position, with a slight rotation to the right. Both surgeons stand on the right of the patient. This position allows simultaneous operation via the two nostrils. Verification of anatomical landmarks is routinely achieved by an intraoperative navigation system. If a high-flow cerebrospinal fluid (CSF) leak is expected, a lumbar spine catheter is inserted for drainage. If harvesting of fascia lata or fat is indicated, the left thigh or abdomen is scrubbed and draped. Patients are treated with a perioperative prophylactic antibiotic regimen. After anesthesia, pledgets soaked with 0.02 % oxymetazoline are placed into both nares.
10.2.2 Approach to the Sphenoid Sinus and Planum
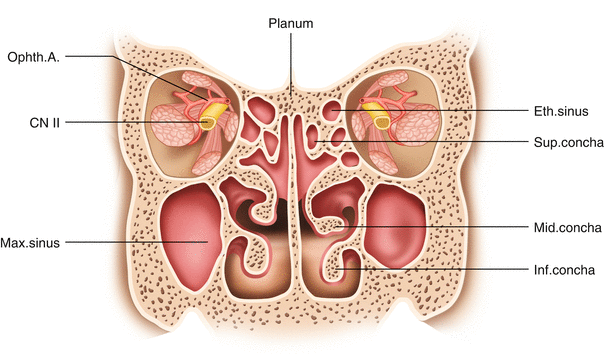
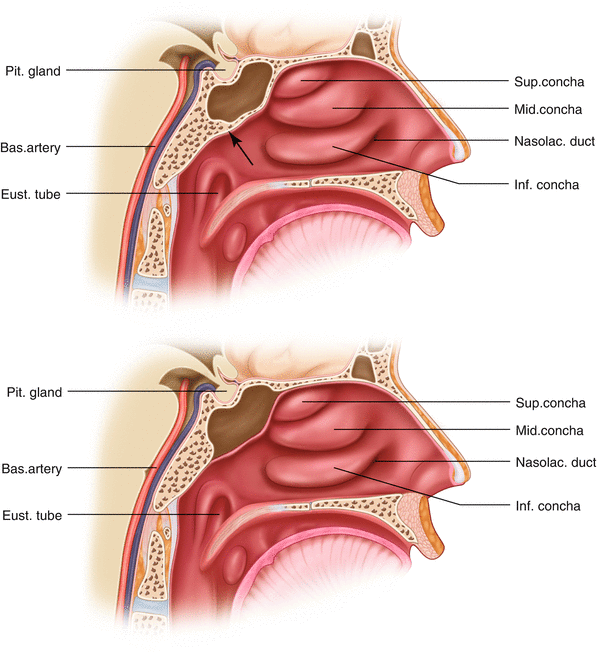
This module is performed to access the sphenoid sinus planum and suprasellar region. It is also performed for any approach that requires wide exposure of the middle skull base. The procedure is usually performed with the patient supine and under general anesthesia, with the head in neutral position with 10° rotation to the right. The endoscope is positioned superiorly at 12 o’clock just below the nasal valve. Figure 10.5 shows the main anatomical landmarks in the nasal cavity.
The following steps are utilized in the left nostril in this order:

1.
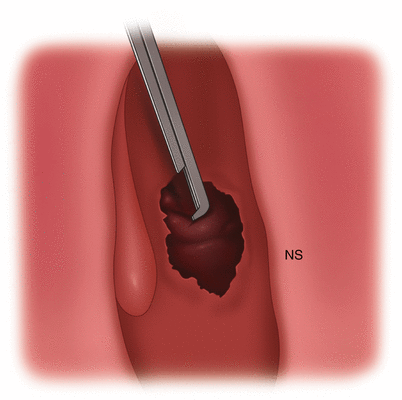
After injection of the mucosa of the septum and middle turbinates with adrenaline, the inferior turbinate is outfractured and lateralized with a Freer dissector (Fig. 10.6).
2.
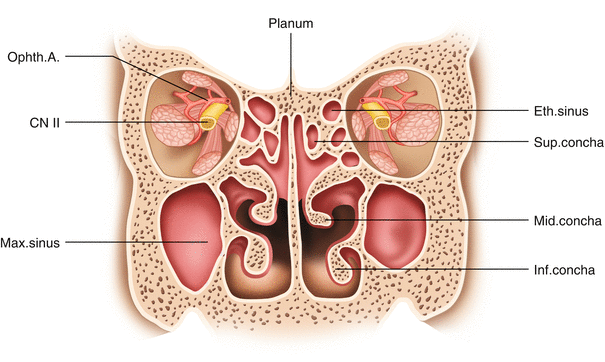
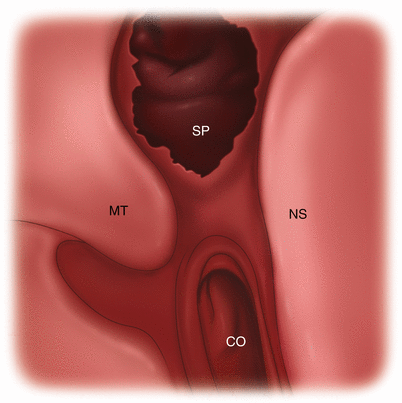
After inspection of the nasal cavity, the middle turbinate on one side is mobilized and incised at the upper third with a micro–through-cutting forceps (Fig. 10.7). This simple procedure allows wide exposure of the posterior nasal septum, vomer, and sphenoid ostium.
3.
At this stage, when indicated, a nasal septal flap (NSF) is elevated and pushed into the choana. This flap, which is based on septal branches of the sphenopalatine artery, should be as wide and long as possible. The flap should be established on the side contralateral to the lesion. The NSF is further discussed in the Reconstruction section near the end of this chapter. A correction of a deviated nasal septum is performed at this stage if indicated.
4.
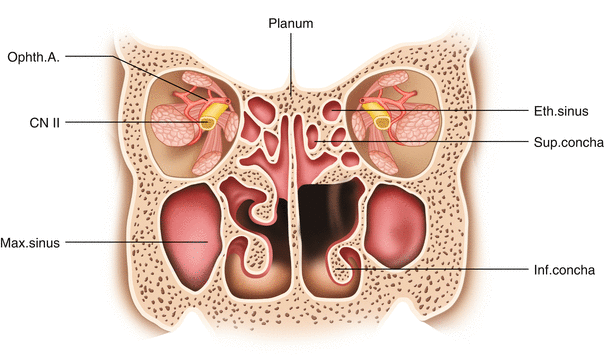
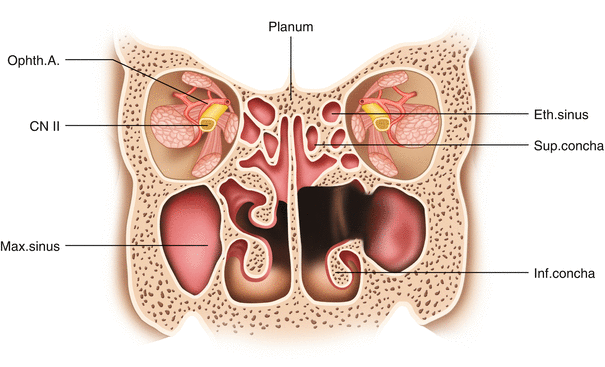
Next, a large maxillary antrostomy is performed (Fig. 10.8). This procedure is performed to prevent scarring of the ostiomeatal complex, which imminently leads to maxillary sinusitis. Also, a wide antrostomy allows simple identification of the lamina papyracea during the rest of the operation. Here, a Freer dissector is used to separate the uncinate process. The uncinate is then resected with a through-cut punch and a backbiter punch. Care is taken not to injure the branches of the sphenopalatine artery at the posterior part of the middle maxillary wall. The antrostomy is enlarged with a backbiter punch up to the level of the nasolacrimal duct.
5.
The next step is identification of the sphenoid ostium. With the use of a Freer dissector, the sphenoid ostium is located medial to the tail of the superior and supreme turbinate, about 1.5–2 cm above the arch of the posterior choana and about 1 cm medial to the superior turbinate. A navigation system can assist safe identification of the sphenoid sinus and its ostium. The sphenoethmoidal recess is enlarged with a Kerrison punch from 9 to 5 o’clock, and the cavity of the sinus is identified (Figs. 10.9 and 10.10).
6.
Using a similar technique when the endoscope is positioned in the left naris, the sphenoid ostium is identified and both ostia are combined to form a wide central sphenoidotomy (Fig. 10.11).
7.
At this stage, the four-hand, two-nostril technique can be implemented. One surgeon is holding the endoscope in the right nostril and the second surgeon is using suction in the right nostril and the punch or drill in the left nostril.
8.
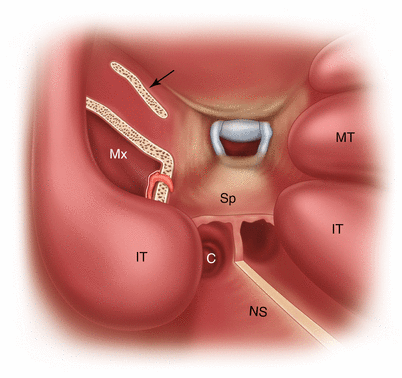
Next, monopolar diathermy is used to incise the septum posterior to the posterior septal cartilage. The vomer can be gently removed and stored, if not involved by cancer (Fig. 10.12).
9.
The sphenoid rostrum is drilled out and a wide sphenoidectomy is performed. Care is taken to prevent injury to the NSF and the sphenopalatine artery, while drilling caudally and laterally (Fig. 10.13).
10.
After inspection of the sphenoid sinus, its mucosa is removed with a micro vial in order to achieve hemostasis. Failure to extirpate all the mucosa of the sinus can damage the ability of the NSF to adhere to the bare bone after its reconstruction. Hemostasis is achieved with a bipolar and irrigation with 40 °C saline.
11.
To achieve wider exposure of the middle skull base, a posterior and anterior ethmoidectomy is performed bilaterally and the posterior area of the cribriform plate is gently drilled superiorly without violating the dural seal. It is very easy to injure the thin, eggshell structure of the cribriform plate, so dissection in this area should be performed meticulously with a diamond drill or Kerrison punch in order to prevent inadvertent CSF leak.
12.
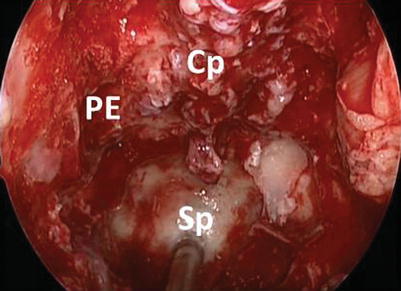
A complete sphenoidectomy is accomplished, along with removal of the entire ethmoidal cells lateral and anterior to the sphenoid sinus. The lateral margins of the sphenoidotomy are extended to the level of the medial pterygoid plates. The approach is completed by drilling of the septa inside the sphenoid sinus and removal of their attachments to the planum and the optic and carotid prominences (Fig. 10.14).
13.
When this stage is completed, the cavity of the sphenoid sinus is exposed from carotid to carotid posterolaterally, from the planum superiorly to the clivus inferiorly, and from orbital apex to orbital apex laterally (Fig. 10.14).

Fig. 10.5
The main anatomical landmarks in the nasal cavity

Fig. 10.6
The left inferior turbinate is outfractured and lateralized with a Freer dissector

Fig. 10.7
The middle turbinate on one side is mobilized and incised at the upper third with a micro–through-cutting forceps, allowing wide exposure of the posterior nasal septum, vomer, and sphenoid ostium

Fig. 10.8
Removal of the uncinate process and a maxillary antrostomy prevents scarring of the ostiomeatal complex and allows simple identification of the lamina papyracea

Fig. 10.9
(a–c) Three steps in identification of the sphenoid ostium. CO choana, IT inferior turbinate, MT middle turbinate, NS nasal septum, SER sphenoethmoidal recess, So sphenoid ostium, ST superior turbinate

Fig. 10.10
The sphenoid ostium is enlarged with a Kerrison punch from 5 to 9 o’clock in the right nostril, and the cavity of the sinus is identified in the left nostril from 3 to 7 o’clock. NS nasal septum

Fig. 10.11
With the endoscope positioned in the left naris, the sphenoid ostium is identified and both ostia are combined to form a wide central sphenoidotomy. CO choana, NS nasal septum, Sp sphenoid sinus

Fig. 10.12
Monopolar diathermy is used to incise the septum posterior to the posterior septal cartilage. The vomer can be gently removed and stored. Arrow indicates the attachment to the middle turbinate stump to the anterior skull base. CO choana, IT inferior turbinate, MT middle turbinate, Mx maxillary sinus, NS nasal septum (removed), Sp sphenoid sinus. Arrow indicates the stump of the middle turbinate

Fig. 10.13
The sphenoid rostrum (arrow) is drilled out and a wide sphenoidectomy is performed, taking care not to injure the nasal septal flap and the sphenopalatine artery

Fig. 10.14
The septa inside the sphenoid sinus are drilled, and their attachments to the planum and the optic and carotid prominences are removed. The cavity of the sphenoid sinus is then exposed from carotid to carotid posterolaterally, from the planum superiorly to the clivus inferiorly, and from orbital apex to orbital apex laterally. Cp cribriform plate, PE posterior ethmoids, Sp sphenoid bone
10.2.2.1 Surgery of the Sella and Posterior Sphenoid Sinus Wall
14.
After the endoscopic endonasal approach (EEA) is completed, attention is turned to identifying the structures at the superior and posterior walls of the sphenoid sinus (Fig. 10.15). The sella is identified at the center of the surgical field. Immediately above the sella, there is the tuberculum sella, followed by the optic strut and the planum sphenoidale. The clivus is identified below the sella. The optic protuberance and internal carotid artery (ICA) are located lateral to the sella. Between the ICA and the optic nerve, the optic-carotid recess (OCR) can be identified. The OCR is an important landmark for the transplanum approach because the optic canal is located above it and the cavernous sinus segment of the ICA is located below it. The connection between the deep part of the OCR and the anterior clinoid process forms the optic strut. The orbital apex is superior and lateral to the OCR.
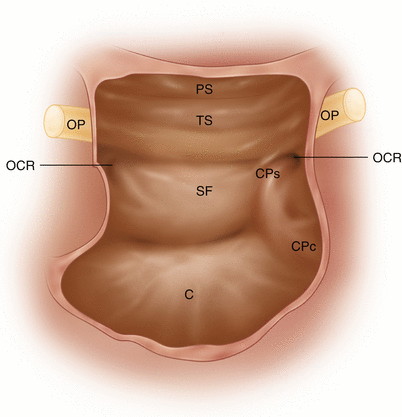
Fig. 10.15
The superior and posterior walls of the sphenoid sinus include the sella floor (SF), the tuberculum sella (TS), the optic strut (OP), and the planum sphenoidale (PS). The clivus (C) is identified below the sella. The optic protuberance and internal carotid artery are lateral to the sella. Between the internal carotid artery and the optic nerve is the optic-carotid recess (OCR). CPc carotid prominence clivus, CPs carotid prominence sphenoid, PE posterior ethmoids
10.2.2.2 Sellar and Suprasellar Craniotomy
15.
To allow access to the planum sphenoidale, the posterior cribriform area should be meticulously thinned down, allowing access to the anterior part of the planum. Care is taken to prevent inadvertent CSF leak at this point.
16.
The anterior-superior portion of the craniotomy is performed between the tuberculum sella and the posterior border of the cribriform plate.
17.
The craniotomy includes the sella, with or without the suprasellar structures, which include the tuberculum sellae, the chiasmatic strut, and the planum sphenoidale (Fig. 10.16).
18.
The tuberculum sella is isolated, thinned down with a high-speed endonasal drill, and carefully fractured with a dissector and Kerrison punch. Drilling is then extended anteriorly to the planum sphenoidale. The skull base is eggshelled, and the craniotomy is gently performed with a Kerrison while preserving the dura.
19.
The exposure can be extended bilaterally toward both OCRs, inferiorly toward the sellar floor, and anteriorly to include the cribriform plate and olfactory groove.
20.
The dura mater is opened with a diamond knife in a U-shaped incision. The incision is extended with angled microscissors from the tuberculum sellae to the cribriform plate, exposing the arachnoid mater, which is gently dissected from the dura.
21.
The optic chiasm and optic nerves should be identified at this stage, in the center of the operation field (Fig. 10.17).
22.
The anatomical structures located below the optic chiasm include the optic nerve, ICA, posterior communicating artery, pituitary stalk, superior hypophyseal artery, and hyperopia. The suprachiasmatic compartment includes the A1 and A2 segments of the anterior cerebral artery, the anterior communicating artery, the terminal lamina, and the gyrus rectus of the frontal lobe. The Huebner recurrent artery can be visible superior to the optic chiasm.
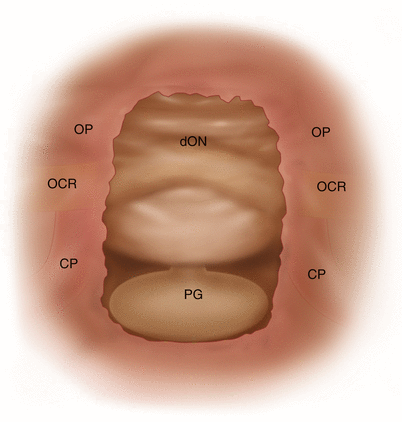
Fig. 10.16
The suprasellar structures include the tuberculum sellae, the chiasmatic strut, and the planum sphenoidale. dON dura over the optic nerve, PG pituitary gland
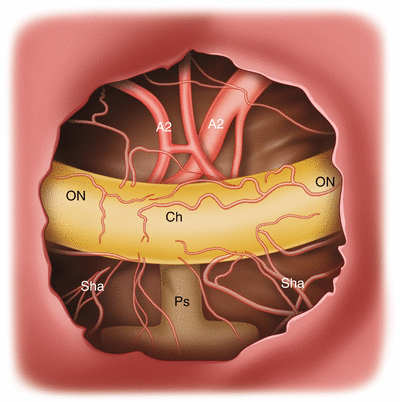
Fig. 10.17
The optic chiasm (Ch) and optic nerves (ON) should be identified at this stage, in the center of the operation field. Ps pituitary stalk, Sha superior hypophyseal artery
10.2.3 The Transplanum, Perichiasmatic Approach
This approach allows resection of tumors located in front of the optic chiasm, including tuberculum sellae or planum meningiomas. The approach may be extended intracranially through three additional corridors (Fig. 10.18):
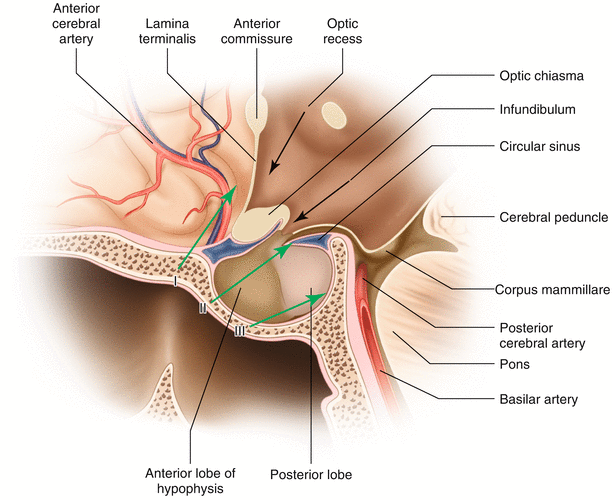
Suprachiasmatic approach, between the chiasm and the anterior carotid artery through the lamina terminalis en route to the third ventricle.
Infrachiasmatic approach, between the optic chiasm and the pituitary gland.
Infrapituitary approach, passing beneath the pituitary gland toward the dorsum sella. This approach provides a corridor to tumors located behind the pituitary gland and may require superior transposition of the gland and resection of the posterior clinoids and posterior wall of the sphenoid sinus.

Fig. 10.18
The transplanum approach may be extended intracranially through three additional corridors: (1) the suprachiasmatic approach, (2) the infrachiasmatic approach, and (3) the infrapituitary approach
10.2.4 The Endoscopic Transnasal Transcribriform Approach
This module is performed for removal of tumors in the nasal cavity and anterior skull base and when endoscopic craniofacial resection is indicated [1]. On the lateral border of this approach lies the lamina papyracea on each side, the anterior border is the anterior wall of the frontal sinus, and its posterior limit is the sphenoid sinus and planum.
23.


After the roof of the sphenoid and planum are identified (see above), posterior and anterior ethmoidectomy is performed in a posterior-to-anterior direction with the use of 0° and 30° endoscopes. The lowest part of the anterior skull base is the cribriform plate, which is located in the midline between the sphenoid and frontal sinuses (Fig. 10.19). In the pediatric patient, the cribriform is flat and the sinuses are missing (Fig. 10.20).
Stay updated, free articles. Join our Telegram channel

Full access? Get Clinical Tree


