Key Words
free flap, radial forearm, anterolateral thigh, fibula, latissimus dorsi, rectus abdominis
Synopsis
Free tissue transfer (“free flap”) reconstruction is commonly used to address defects of the body after trauma or tumor resection. A wide variety of tissue flaps exist, and flap selection should be based on requirements for coverage at the recipient site. Flaps can be designed to include skin, fat, fascia, muscle, bone, tendon, nerve, and various combinations of these tissue types. Successful flap reconstruction relies on thorough pre-operative patient assessment, wound management, understanding of flap anatomy, meticulous microsurgical technique, and vigilant post-operative flap monitoring. A comprehensive review of every flap described in the literature is beyond the scope of this chapter. Instead, we focus on 5 common free flaps that can be used for virtually any defect of the body and that should be part of the armamentarium of a reconstructive plastic surgeon. These are the radial forearm, anterolateral thigh, fibula, latissimus dorsi, and rectus abdominis flaps. Step-by-step guides to harvesting each flap are outlined and illustrated by clinical photographs. A description of microsurgical anastomosis technique is accompanied by a video demonstrating the procedure ( ). Finally, recommendations for post-operative care, including identification and management of complications, are provided.
Clinical Issues
Radial Forearm Flap
The radial forearm free flap (RFFF) is a thin fasciocutaneous flap with a well-defined and large vascular pedicle. Common applications include head and neck reconstruction for defects involving partial tongue, buccal mucosa, maxilla, lower lip, or hypopharynx/pharynx. The radial forearm may also be designed and harvested as an osteocutaneous flap including unicortical radius, or as a fascia-only flap. The pedicled or “reverse” radial forearm flap is used for ipsilateral arm or hand reconstruction.
Anterolateral Thigh Flap
The anterolateral thigh (ALT) flap is a versatile flap that may be used for any defect in the body that requires soft tissue reconstruction with skin, fascia, and/or muscle. Common applications include head and neck reconstruction of larger cutaneous defects or of partial/total pharyngeal defects, where the flap may be tubed to restore alimentary tract continuity. The ALT is also useful for reconstruction of the upper or lower extremity, chest or abdominal wall, and pelvis/perineum. In many cases, the ALT flap has been used instead of the radial forearm flap for reconstruction because of a more favorable scar on the thigh than on the forearm. However, thigh tissues are usually thicker than those of the forearm, so the surgeon must choose which flap to use based upon tissue requirements.
Fibula Flap
The most common application of the free fibula flap is mandibular reconstruction after destruction/loss of the mandible after trauma or tumor excision. For head and neck tumors that involve bone and soft tissue, the free fibula osteocutaneous flap is ideal, where both bone and skin are used to reconstruct the defect. The flap may also be used to reconstruct bony defects of the midface, femur, tibia, humerus, or radius. For patients with peripheral vascular disease of the lower extremities, the fibula flap may be contraindicated, because it requires harvest of the peroneal artery. Careful pre-operative evaluation of the leg by clinical examination or by imaging is recommended to ensure that the patient has normal three-vessel anatomy and perfusion.
Latissimus Dorsi Flap
The latissimus dorsi (LD) flap may be designed as a total muscle flap, partial muscle flap based on either the transverse or descending branches of the thoracodorsal artery, or myocutaneous (muscle and skin) flap. This flap is useful for any defect in the body that requires coverage with a large, broad area or volume of tissue. Common applications include scalp reconstruction and reconstruction of the upper or lower extremities. Functional restoration of the upper extremity can be achieved with an innervated muscle flap. When used as a pedicled flap, the latissimus is very useful for breast reconstruction or for defects of the chest wall, back, or spine.
Rectus Abdominis Flap
The rectus abdominis (RA) flap can provide a large amount of muscle, though less than the LD flap. The muscle is rectangular in shape, but it may be designed as an RA myocutaneous flap to include a vertical (VRAM) or transverse (TRAM) skin paddle. Common applications include reconstruction of the breast; head and neck, such as midface (i.e., after maxillectomy) or tongue after glossectomy; and lower and upper extremity. The deep inferior epigastric perforator (DIEP) flap, commonly used for breast reconstruction, spares muscle but shares similar flap design and vascular pedicle with the TRAM flap.
Management
Acquired or surgically created wounds require free flap reconstruction when defects are inappropriate for coverage through primary closure, skin graft, or local/regional flaps. Often before free flap reconstruction, critical tissues are exposed, such as bone (sometimes with surgical hardware), cartilage, tendon, blood vessels, or nerves. Flaps after oncologic resections can usually be performed immediately after the resection or within a few days when the margins are confirmed to be clear. For traumatic cases, wounds should be periodically debrided until only vitalized tissue remains that is free of infection. While awaiting definitive coverage with a free flap, wounds should typically be dressed with moist dressings that are changed several times per day to keep wounds clean and to prevent desiccation of fat, bone, cartilage, tendon, vessels, or nerve.
Patients should undergo evaluation to assess whether they are appropriate surgical candidates for free flap reconstruction. They must be healthy enough to sustain a relatively long surgery (4–8 hours) and must understand the post-operative care that will be required. Free flaps are not usually done emergently, so patients should be optimized for surgery from a medical standpoint. Patients with a history of deep venous thrombosis (DVT), pulmonary embolism (PE), arterial thrombosis, or multiple miscarriages may have a hypercoagulable condition that may prohibit them from undergoing free flap reconstruction. Taking a thorough history can help identify this risk factor. Finally, smoking cessation is recommended at least 4 weeks pre- and post-operatively; however, this may not always be practical or advisable for patients who have cancer or have sustained trauma where definitive treatment should not be delayed.
Techniques
Radial Forearm Free Flap
- 1.
Allen’s test should be performed to ensure that harvest of the radial artery will not result in ischemic hand injury by removing one of two key blood vessels to the hand (the ulnar artery being the other major artery). This flap should be performed only in patients with adequate flow to the hand through the ulnar artery through an intact palmar arch.
- 2.
Design the flap so that the course of the radial artery is central. Include the cephalic vein when possible to provide an additional source of outflow ( Fig. 2.8.1 ). The distal forearm is preferred, because this area includes most septocutaneous perforators. Volar or ulnar skin is also preferred, because there is less hair.
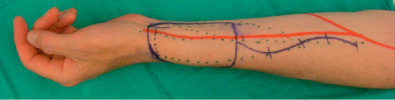
Fig. 2.8.1
Design of skin paddle for radial forearm free flap centered over the radial artery and including the cephalic vein.
- 3.
After padding the arm, inflate the biceps-level tourniquet to 250 mm Hg, with a maximum time limit of 120 minutes.
- 4.
The flap can be approached first from either the medial or lateral incision, and proceed toward the vascular pedicle of the radial artery. Dissect through subcutaneous fat and elevate skin flaps medially until the cephalic vein and lateral antebrachial cutaneous nerve (LABC) are identified. The cephalic vein and LABC course together in a plane superficial to the muscle fascia.
- 5.
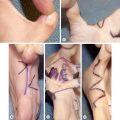
Identify the radial artery and associated venae comitantes by dissecting in the intermuscular interval between flexor carpi radialis (FCR) and brachioradialis (BR). More proximally in the forearm, the vessels lie between BR and pronator teres (PT) ( Fig. 2.8.2 ).
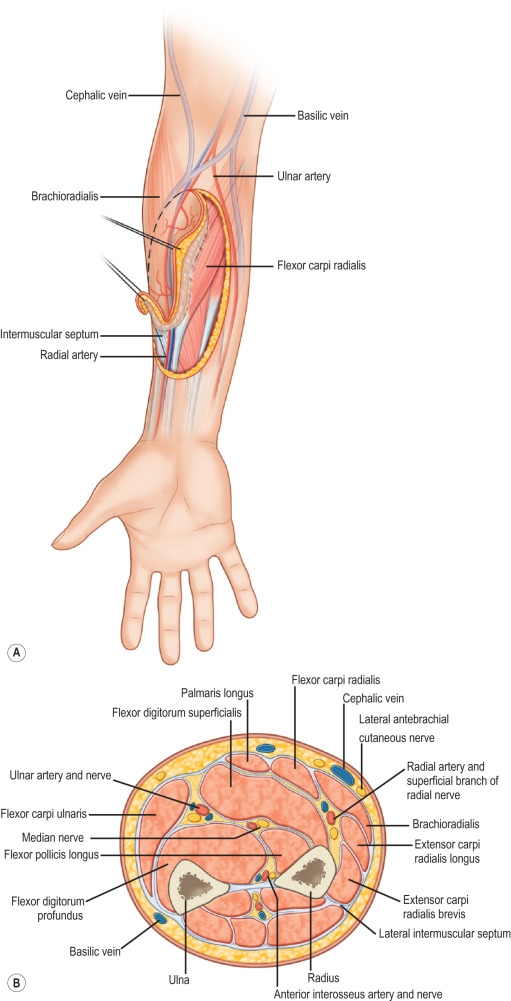
Fig. 2.8.2
(A) Radial artery course between the brachioradialis and flexor carpi radialis distally in the forearm. (B) Cross section of the forearm demonstrating the location of the radial artery.
(Reproduced from Pederson WC, Sherman R. Reconstructive surgery of the mutilated hand. In: Neligan P, Chang J, eds. Plastic Surgery , 3rd ed, vol 6. London: Elsevier Saunders; 2013.)
- 6.
The vessels can be dissected proximally to their origin off of the brachial artery. Ligate several small branches to surrounding muscle.
- 7.
The distal extent of the skin incision should end 1 to 2 cm proximal to the wrist crease.
- 8.
Dissect the distal end of the radial vessels at the wrist crease and ligate using a surgical clip or suture tie.
- 9.
Dissect in a suprafascial or subfascial plane from radial and ulnar skin incisions. Once the BR tendon (radial to vessels) and FCR tendon (ulnar to vessels) are identified, the dissection should be in a subfascial plane to avoid injury to the perforators to the overlying skin. Leave the underlying paratenon intact so that the donor site can accept a skin graft. Be sure to elevate the flap so the vascular pedicle of the radial artery and venae comitantes are left attached to the overlying fascia and skin. Elevate the flap distal to proximal.
- 10.
Once flap and pedicle (including cephalic vein and LABC nerve if desired) are dissected free from surrounding tissue, release the tourniquet to allow for a period of flap perfusion and to check for bleeding.
- 11.
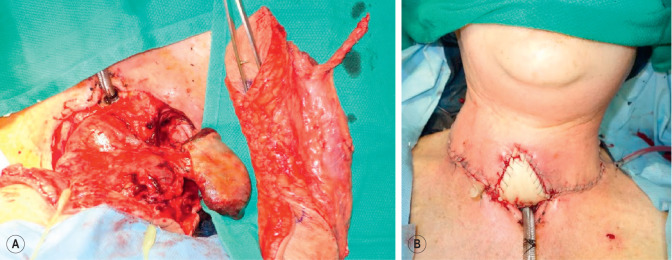
Divide the radial artery/venae, cephalic vein, and LABC proximally and transfer the flap to the recipient site ( Fig. 2.8.3 ).
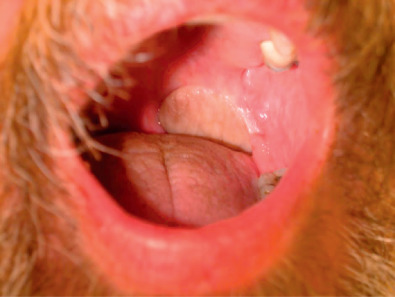
Fig. 2.8.3
Example of healed radial forearm flap used for intraoral mucosal reconstruction.
- 12.
To close the donor site, transpose muscle over any exposed tendon. Cover the defect with a split-thickness skin graft and apply a bolster dressing.
- 13.
Splint the hand/forearm in the position of safety.
- 14.
Remove the bolster in 5 days, and dress the skin graft with moist, non-adherent dressings until fully healed.
Anterolateral Thigh Flap
- 1.
With the foot neutral and with no eversion/inversion, draw a line between the anterior superior iliac spine (ASIS) and the superolateral border of the patella, and mark out the midpoint of this line. Use a Doppler to locate cutaneous perforators (90% of perforators will be within a 3-cm radius of the midpoint). Additional perforators are usually located 5 cm distal and 5 cm proximal to the midpoint, and can be heard by handheld pencil Doppler.
- 2.
Design the skin paddle centered on the perforators. Depending on the thickness of the patient’s skin, primary skin closure of the donor site can usually be achieved for flaps that are 9 cm wide or less. Larger flaps can be designed (up to 35 × 25 cm), but this will usually require the donor site to be skin grafted ( Fig. 2.8.4 ).
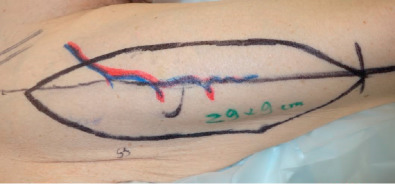
Fig. 2.8.4
Design of skin paddle for anterolateral thigh flap along the longitudinal axis between the anterior superior iliac spine and superolateral border of the patella.
- 3.
Make the medial skin incision. Dissect through subcutaneous fat to the muscle fascia.
- 4.
Incise the fascia, and dissect in a subfascial plane toward the intermuscular septum between the rectus femoris (RF) and vastus lateralis (VL) muscles. Identify skin perforators to the flap ( Fig. 2.8.5 ).
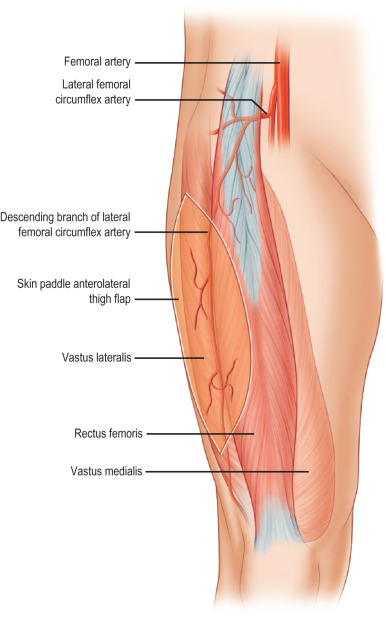
Fig. 2.8.5
The descending branch of the lateral circumflex femoral artery is the vascular pedicle to the anterolateral thigh flap. The vessel runs in the intermuscular septum between the rectus femoris and vastus lateralis.
(Reproduced from Pederson WC, Sherman R. Reconstructive surgery of the mutilated hand. In: Neligan P, Chang J, eds. Plastic Surgery , 3rd ed, vol 6. London: Elsevier Saunders; 2013.)
- 5.
Starting distally between the RF and VL, identify the descending branch of the lateral circumflex femoral artery and accompanying venae. Trace the main pedicle proximally toward the profunda femoral trunk without disrupting branches extending through the VL or septum.
- 6.
Once the perforators are confirmed, make sure the lateral skin incision is appropriately planned such that the perforators are centrally located. Make the lateral incision, and dissect medially toward the perforators.
- 7.
Starting from their entrance into the skin flap, dissect the skin perforators toward the main pedicle. For musculocutaneous perforators, a small cuff of muscle may be harvested. Avoid injury to motor branches of femoral nerve. Preserve/include lateral femoral cutaneous nerve if desired. If the defect requires more tissue bulk, the dissection may include a larger portion of the VL muscle.
- 8.
Once the perforator(s) and main pedicle are dissected, divide the pedicle proximally, and transfer the flap to the recipient site for microvascular anastomosis ( Fig. 2.8.6 ).