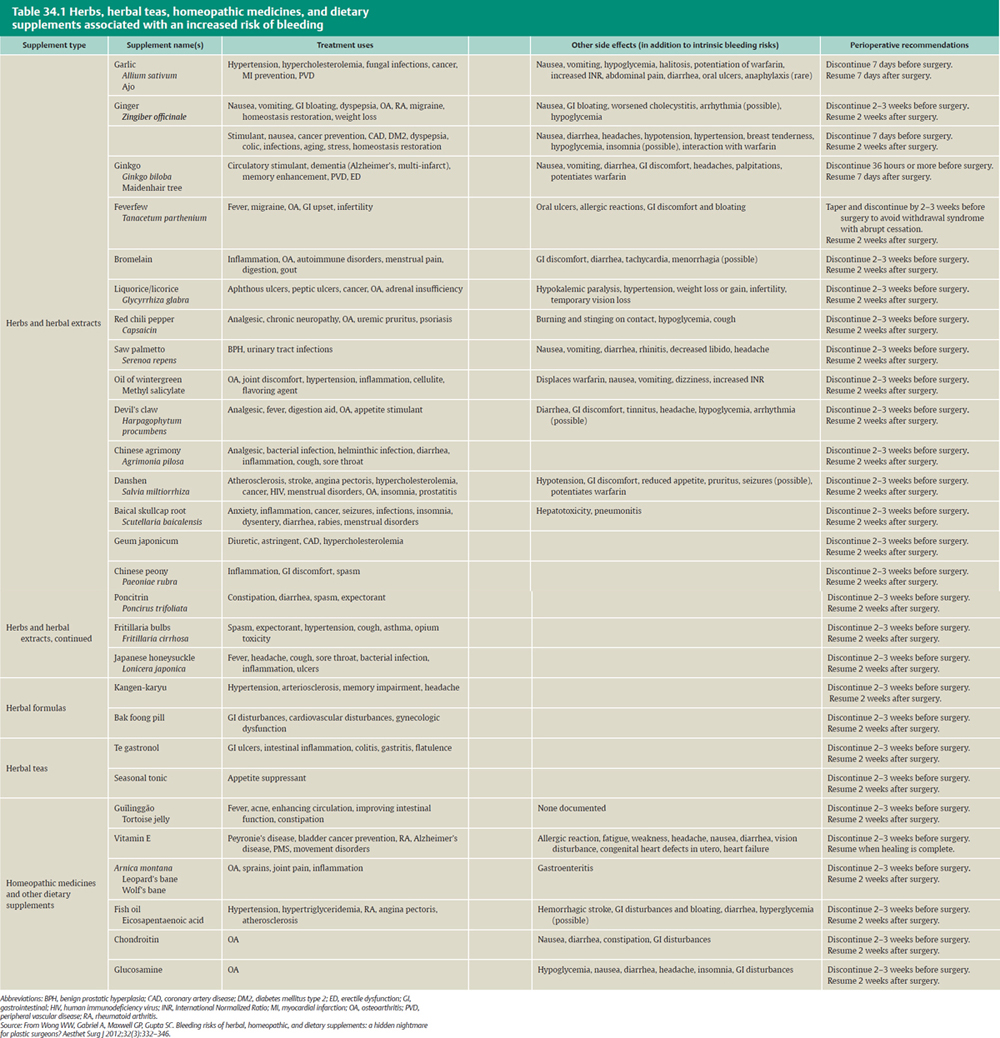
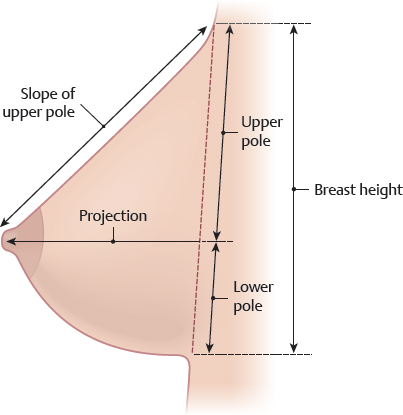
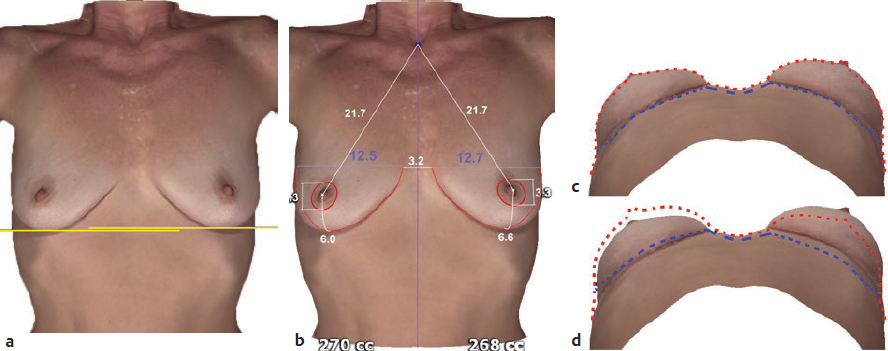
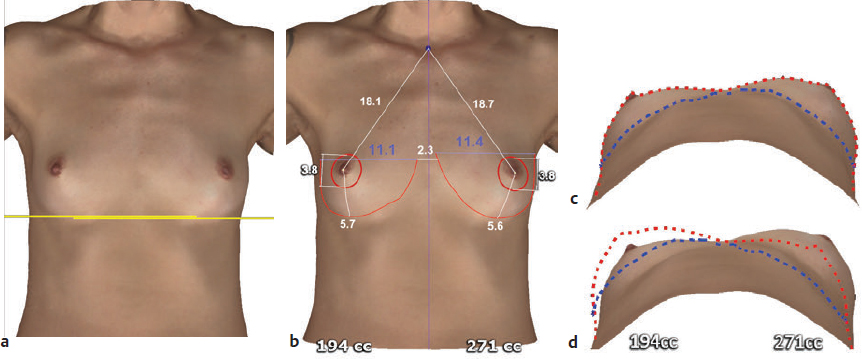
CHAPTER Glandular hypomastia may occur as a developmental or involutional process and affects a significant number of women in the United States. Developmental hypomastia is often seen as primary mammary hypoplasia or as a sequela of thoracic hypoplasia (Poland’s syndrome) or other chest wall deformity. Involutional hypomastia may develop in the postpartum setting and may be exacerbated by breast-feeding or significant weight loss. Compared with the norm, inadequate breast volume may lead to a negative body image, feelings of inadequacy, and low self-esteem.1 These disturbances may adversely affect a patient’s interpersonal relationships, sexual fulfillment, and quality of life.2 Breast augmentation is the most com mon aesthetic procedure performed in the United States and perhaps in the world.3 In preparing for a breast augmentation, one must understand each patient’s goals and expectations and see if they can be achieved. Three important variables that must be addressed before the surgery: 1. Incision length and placement (inframammary, periareolar, transaxillary, transumbilical) 2. Pocket plane (subfascial, subglandular, submuscular, subpectoral with dual plane 1, 2, and 3) 3. Implant choice (saline versus silicone, round versus anatomic, smooth versus textured) Summary Box Potential Unfavorable Results and Complications of Breast Augmentation Perioperative Complications Delayed Complications • Nipple sensitivity • Seroma • Hematoma • Postoperative wound infection • Mondor’s disease (thrombophlebitis) • Capsular contracture (grades I–IV) • Malposition and ptosis • Implant rupture • Implant deflation The initial consultation for augmentation should begin with open-ended questions about the patient’s goals and expectations for the procedure. Patients have often spent some time researching the procedure either through friends or through the Internet. The surgeon should be able to form an impression of the patient as a well-informed, psychiatrically stable person with appropriately realistic expectations for the procedure. Any concerns about the patient’s level of understanding, unrealistic expectations, or self-esteem issues should be fully explored before proceeding with surgery. A careful medical history and physical examination is essential for the assessment of risk factors and candidacy for breast augmentation. Preoperative mammography is recommended for patients older than 35 years of age or patients of any age with significant risk factors for breast cancer. The ideal size and shape of the female breast is inherently subjective and relates to both personal preference and to cultural norms. However, most surgeons will agree that there are certain shared characteristics that represent the aesthetic ideal of the female breast form4 (Fig. 34.1). These characteristics include a profile with a sloping or full upper pole and a gently curved lower pole with the nipple–areola complex at the point of maximal projection. The breast structure itself may be thought of as the breast parenchyma resting on the anterior chest wall surrounded by a soft tissue envelope made up of skin and subcutaneous adipose. Clearly, the resulting form of the breast after augmentation mammaplasty will be determined by the dynamic interaction of the breast implant, the parenchyma, and the soft tissue envelope.5 Fig. 34.1 The aesthetic breast form is composed of measurable parameters. The resultant breast form desired after surgical augmentation is determined by the dynamic interaction between the character and compliance of the soft tissue envelope; the quality, volume, and consistency of the breast parenchyma; and the dimensions, volume, and characteristics of the breast implant. This form can be attained by the careful planning and surgical performance of a breast augmentation. A thorough physical examination begins with observation and careful documentation of any signs of chest wall deformity or spinal curvature. It is imperative to document and draw attention to any asymmetry of breast size, nipple position, or inframammary fold (IMF) position. Careful palpation of all quadrants of the breast and axilla is required to rule out any dominant masses or suspicious lymph nodes. While palpating the breast, the surgeon should carefully assess the quantity and compliance of the parenchyma and soft tissue envelope. The soft tissue pinch test is a useful method of assessment in which the superior pole of the breast is gathered between the examiner’s thumb and index finger and the thickness of the intervening tissue is measured. In general, a pinch test result of less than 2 cm will often indicate a need for subpectoral placement of the implant. It is also important to characterize the amount, quality, and distribution of the breast parenchyma, because it may be necessary to reshape or redistribute the parenchyma to achieve the desired shape of the breast mound. The elasticity of the skin should also be characterized by observing its resistance to deflection and noting any signs of skin redundancy or stretch marks. Manufacturers have developed different preoperative planning systems to facilitate patient assessment and implant selection. Precise measurements must be taken using the IMF, the nipple–areola complex, and the suprasternal notch as key landmarks6 (Fig. 34.2). The surgeon should measure the breast width (BW) at its widest point, the breast height (BH), and the distance from the nipple–areola complex to the IMF (N:IMF). The distance from the suprasternal notch to the nipple–areola complex (SSN:N) and the intermammary distance (IMD) should also be documented. It is often helpful to make markings with the patient in the seated position with a permanent marker just before surgery. It is imperative to mark the original IMF, and a good idea to mark the true midline of the anterior chest. In addition to manual measurements, three-dimensional tools are available to facilitate the measurement process in addition to enhancing the patient’s overall experience by increasing physician–patient interaction in selecting the appropriate implant.7 The visual display of the implant selected increases the confidence of the patient in the results that will be achieved. Three-dimensional imaging systems can automatically measure and characterize both the soft tissue and chest wall, an important step in surgical planning. Minor chest wall or soft tissue asymmetries may be missed by manual measurement and visualization. The system (Vectra, Canfield, Inc.) captures all of the asymmetries preoperatively so that appropriate preoperative planning can be performed, and the patient is advised with an accurate informed consent.7 Fig. 34.2 Preoperative measures (taken before breast augmentation) include the suprasternal notch to nipple, nipple to inframammary fold (IMF), breast width, breast height, and intermammary distance (IMD). (Adapted from Nahai F, ed. The Art of Aesthetic Surgery. 2nd ed. New York: Thieme; 2016.) Fig. 34.3 Hard tissue asymmetry. (a) Initial image. (b) After automated biodimensional measurements and volume characterization. (c) Basal view. The red line delineates the soft tissue envelope, and the blue line the chest wall. (d) Soft tissue and chest wall outlines are superimposed as mirror images to identify chest wall asymmetry. Although the volume is identical, the presenting anatomy is very different. Fig. 34.4 Soft tissue asymmetry. (a) Initial image. (b) After automated biodimensional measurements and volume characterization. (c) Basal view. The red line delineates the soft tissue envelope, and the blue line the chest wall. (d) Soft tissue and chest wall outlines are superimposed as mirror images to identify soft tissue asymmetry. Fig. 34.5 Hard and soft tissue asymmetry. (a) Initial image. (b) After automated biodimensional measurements and volume characterization. (c) Basal view. The red line delineates the soft tissue envelope, and the blue line the chest wall. (d) Soft tissue and chest wall outlines are superimposed as mirror images to identify chest wall and soft tissue asymmetry. We use three-dimensional technology to asses both the patient’s chest wall and soft tissue abnormalities. Chest wall abnormalities, soft tissue asymmetries, and combinations of both are important to identify preoperatively (Figs. 34.3–34.5). This tool can also be used to understand the patient’s perception of the desired look by showing the outcomes of using different size and style implants. This is also then projected in the operating room for surgical planning.7 This system is based on the biodimensional principles previously described. As aesthetic surgeons continue to pursue increased patient safety and satisfaction while decreasing reoperation rates, three-dimensional imaging systems will serve as another tool in their armamentarium to achieve these goals. This serves as an excellent consultation tool to be able to better understand the patient expectations regarding the size and shape of the implant. It is incumbent on the surgeon to evaluate the patient’s emotional state, timing, and appropriateness of the desired outcome. It is the surgeon’s responsibility to listen, educate, and evaluate; this process and the communication that takes place between the patient and surgeon are documented in the medical record. Informed consent is not simply the signing of a paper or contract but refers to the entire process between the patient and physician and the physician’s staff. To be “informed,” the patient must be provided with adequate information about risks, benefits, and treatment alternatives to the proposed procedure. We recommend the use of official American Society of Plastic Surgeons (ASPS) informed consents. To “consent,” the patient must be an adult (by age), be capable of rational com munication, and be able to understand the information. The informed consent documentation must be thorough and specific to the operation and preferably the surgeon. A checklist of specifics (which must be initialed by the patient) is advisable. Before and after photographs may be shown but should be realistic. Photographs of the patient are a necessary form of documentation but require appropriate permission. Their confidentiality is essential unless permission is given for any use other than medical review documentation. A male surgeon should be accompanied by a female chaperone during all breast photography and examinations. Because of the multiple options in breast augmentation surgery, a second office visit is advisable. There must be a clear understanding (documented in the medical record) between the patient and surgeon of the specific desired outcome (in terms of size and shape), the alternative ways by which this can be achieved, and the risk-to-benefit ratio of the chosen “pathway.” Four types of incision are commonly used in breast augmentation: transaxillary, inframammary, periareolar, and transumbilical. After implant selection, the decision regarding the type of incision should be made by the patient and surgeon, with a thorough explanation of the options, risks, and benefits of each. Surgeons should offer only the techniques that they are comfortable performing. The final choice should allow the surgeon optimal control and visualization to deliver the desired outcome for the specific patient and the specific implant. Fig. 34.6 When ample soft tissue is present, implants may be placed in the subglandular (a) position or subfascial (b) position. When there is soft tissue inadequacy, the subpectoral position (c) is generally preferable. (From Nahai F, ed. The Art of Aesthetic Surgery. 2nd ed. New York: Thieme; 2016.) The inframammary incision permits complete visualization of either the subpectoral or subglandular pocket and allows precise placement of virtually all implants. The technique does leave a visible scar within the IMF. Smaller incisions (smaller than 3 cm) can be used for saline-filled implants, but silicone gel implants often require incisions up to 5 to 6 cm in length. The incision should be placed in the projected IMF rather than in the existing fold to avoid visibility and widening of the subsequent scar. A variety of techniques have been described identifying the expected IMF and are discussed elsewhere in this book. The periareolar incision is placed at the areolar–cutaneous junction and generally heals inconspicuously in light-pigmented patients. The dissection allows easy adjustment of the IMF and direct access to the lower parenchyma for scoring and release when a constricted lower pole is present. Disadvantages include limited exposure of the surgical field, transection of the parenchymal ducts (which are often colonized with Staphylococcus epidermidis), potentially increased risk of nipple sensitivity changes, and visible scarring on the breast mound. This technique should not routinely be used on patients with an areola diameter smaller than 40 mm and may not allow for the introduction of larger gel or enhanced cohesive gel implants. There have been some reports of a possibility of increased capsular contracture rates with the use of this incision. The transaxillary approach can be performed either bluntly or with the aid of an endoscope. The endoscope allows precise dissection and release of the inferior musculofascial attachments of the pectoralis major as well as direct visualization for hemostasis. This approach avoids any scarring on the breast mound and can be used with both saline and gel implants in either a subpectoral or subglandular pocket. Disadvantages include difficulty with parenchymal alterations and the probable need for a second incision on the breast mound for revision surgery. Precise implant placement can be more difficult with this incision, and enhanced cohesive gel and anatomic implants may be precluded. Transumbilical breast augmentation has the obvious advantage of a single, well-hidden, remote incision. It can be used only with saline implants, however, and precise pocket dissection requires experience. The pocket is dissected bluntly, and hemostasis can be difficult from the remote access port. As with the transaxillary approach, revisions often necessitate a second incision on the breast mound. The decision between (1) subglandular or subfascial or (2) subpectoral implant placement depends on implant selection (fill and texture) and tissue thickness6 (Fig. 34.6). In theory, the best position for a mammary implant is in the subglandular plane. This is the most anatomically correct position to maintain natural shape and form. However, we no longer use the subglandular plane and instead prefer the subfascial plane. Implants may be placed in the subpectoral plane to minimize the risk of implant visibility and palpability. The risk of capsular contracture in either plane is dependent on surgical preparation and technique and not necessarily the pocket. With sound surgical techniques and appropriate postoperative management, capsular contracture can be minimized in either pocket. We believe that the subfascial pocket is superior to the subglandular, because it provides an additional durable layer between the implant and the gland. The subfascial implant position has been advocated for augmentation mammaplasty in certain patients.8,9,10,11,12 Theoretically, placement of the implant in the subfascial position between the anterior fascia of the pectoralis major and the muscle itself may provide additional support to the overlying soft tissue envelope, causing less distortion of the breast form and decreasing mobility of the implant within the pocket. The long-term outcome studies of breast augmentation using this position are not yet available, but the procedure is gaining popularity worldwide.9 In patients with a pinch test result of more than 2 cm, the implant can safely be placed in the subfascial plane. Textured implants are the preferred implant for subfascial placement. If smooth gel implants are selected for the subfascial plane, additional measures to prevent capsular contracture must be taken. These include larger pocket dissections with displacement exercises or possible dilute steroid pocket irrigation. Anatomically shaped textured implants are placed in the appropriate pocket as determined by soft tissue thickness. Pockets for these implants are made only minimally larger than the footprint of the device to minimize displacement or malrotation. When subpectoral pockets are used, the surgeon generally divides the origin of the pectoralis major muscle just above the IMF to allow better projection in the lower pole of the augmented breast and to maintain a natural IMF6 (Fig. 34.7). This places the superior portion of the implant in a subpectoral position; the inferior portion is subglandularly located. In constricted breasts (tuberous breasts) or ptotic breasts, for which more parenchymal surgical manipulation is necessary, or when there is a greater need for the implant to fill out the lower soft tissue envelope, more dissection between the parenchyma and muscle will allow the muscle to cover less of the implant with a resultant greater subglandular implant coverage. Alternatively, the pectoral muscle can be divided at a higher level to give a similar result (see Fig. 34.7).6 These pocket manipulations have been described as dual-plane maneuvers to allow varying degrees of subpectoral-to-subglandular implant coverage.5 This dual-plane dissection allows the pectoralis muscle to retract superiorly or window-shade upward while the breast parenchyma is redraped over the inferior portion of the implant, avoiding deformity of the resulting augmented breast (see Fig. 34.7).6 In the United States, two implant materials are available: saline- and silicone-filled. The decision between a saline-filled prosthesis and a silicone gel implant is based on the patient’s preferences after the surgeon’s conveyance of information. Experience has shown the results of silicone gel implants in primary breast augmentation to be generally soft and to have a natural feel and appearance, assuming capsular contracture is not present. Although we prefer silicone gel implants, saline implants placed in the subpectoral position can produce good results with a low incidence of capsular contracture. The thicker the soft tissue under which a saline implant is placed, the better it performs. Despite our preference for silicone gel, some patients will undoubtedly continue to have concerns about silicone-filled devices, and subpectoral saline implants have proved to be a reasonable alternative. Ultimately, the patient must feel comfortable with the implant device, so the final decision rests with the patient. The addition of shaped devices has given another option for patients to choose an implant that is more natural appearing.13 The selection of the implant size is initiated during the preoperative consultation period based on both the patient’s goals and the surgeon’s assessment. In general, the critical factors in selecting a specific implant size are the dimensions of the nascent breast, the compliance and characteristics of the soft tissue envelope, and the desired volume for the resulting augmented breast. The base width of the breast is related to the width of the patient’s chest and is proportional to the overall body habitus. It is imperative that this dimension is respected during augmentation to maintain the normal anatomic landmarks such as the lateral breast fold in the anterior axillary line and the IMD. The same is true for BH, but to a lesser degree than BW. Violation of these landmarks may yield an unnatural and deformed appearance. Generally, the surgeon should select an implant that is slightly less wide than the existing breast. Implant manufacturers are now producing implants with varying degrees of projection for a given base width. In this way, the surgeon should be able to attain the desired amount of projection while preserving the normal aesthetic proportions of the breast4,6 (Fig. 34.8). The patient’s desires will largely determine the dimensions of the breast implant used. In addition to a thorough discussion with the patient regarding her desire for the resultant form and size, the three-dimensional imaging system can be used to show the patient the outcomes based on the selection of a particular implant. Fig. 34.7 Subpectoral implant placement generally involves release or division of the pectoralis major muscle, resulting in varying coverage relationships of muscles and parenchyma to implant. (a) For most routine breasts, muscle division near the inframammary fold results in muscle coverage of most of the implant. (b) For breasts with a mobile parenchyma muscle interface, muscle division (or muscle–parenchymal detachment) to the lower areolar level results in muscle coverage of the upper half of the implant. (c) For breasts with glandular ptosis or lower pole constriction, muscle division (or muscle–parenchymal detachment) to the upper areolar level results in muscle coverage of the upper third of the implant. (Adapted from Nahai F, ed. The Art of Aesthetic Surgery. 2nd ed. New York: Thieme, 2016.) Fig. 34.8 After the width of the existing breast is measured and the desired resultant breast form is formulated, an implant is selected (generally just narrower than the original breast, shown on the patient’s right) that in combination with the preoperative breast tissue will achieve the desired postoperative dimensions and form (shown on the patient’s left). (Adapted from Nahai F, ed. The Art of Aesthetic Surgery. 2nd ed. New York: Thieme; 2016.) The decision between textured and smooth-walled implants is only applicable for round implants. Anatomic implants are all textured by design to minimize malrotation. With round implants, the choice between textured and smooth-walled implants is based primarily on minimizing capsular contracture. For subpectoral augmentation, either implant can likely be used with comparable results. When the device is placed in the subfascial pocket, a textured implant is preferred to minimize capsular contracture. If a smooth-walled implant is chosen, generally the same principles are applied; we do not use displacement exercises. It is important to reiterate the principle that the shape of the natural female breast is not a semicircle or a hemisphere. Dimensional analysis of an aesthetically pleasing breast form reveals a gently sloping upper pole and a curved lower pole with the nipple–areola complex at the point of maximum projection. The typical round breast implant has its greatest projection centrally, with the remainder of the volume distributed evenly along the base of the implant. In contrast, anatomically shaped breast implants have a flatter upper pole with most of the volume and projection in the lower pole. Thus the anatomically shaped implant of a given base width and volume will produce less upper pole convexity than a round implant of the same base width and volume. This characteristic of anatomically shaped implants can be extremely useful when the patient desires a significant volume augmentation but has a relatively narrow BW.14 Preoperative markings are made with the patient in the upright position and are useful as a reference point during the actual procedure The surgeon should mark the chest midline in the frontal view from the suprasternal notch to the xiphoid process, the existing IMFs, and the likely position of the new IMFs as the proposed limits of the dissection. The patient is then asked to place her arms behind her head to visualize the displacement of the nipple and the true IMF. The “yoga”-type stretching exercises are also reviewed with the patient at this point. These light movements ensure the shoulders are not pulled anteriorly to further tighten the pectoralis major. After review of the consent and the plan, the patient is taken to the operating room. The patient is then placed in the supine position and centered on the operating table with the pelvis directly over the flexion point of the bed. The arms must be well secured to the arm boards, which are placed at 90-degree angles to the torso. These preparations are necessary so that the patient can be placed in the upright seated position as often as needed during the procedure. The sterile preparation and draping of the anterior chest must provide visualization of the patient’s shoulders as an important anatomic reference point. Triple antibiotic solution irrigation is used for all implant cases regardless of the incision type. The inframammary approach permits complete visualization of the implant pocket with either subglandular, subfascial, or subpectoral placement. The incision should be placed in the predicted location of the new IMF, which has been determined and marked preoperatively. Smaller incisions (smaller than 3 cm) may be used for inflatable saline-filled implants, but prefilled implants (silicone gel or saline) often require incisions up to 5 cm in length. The incision should be designed with most of the incision lateral to the breast midline, because this will place the resulting scar in the deepest portion of the new IMF. The incision is made along the proposed markings, and the dissection is continued with an insulated electrocautery instrument through Scarpa’s fascia. A fiberoptic headlight is worn throughout the procedure, or a variety of lighted fiberoptic retractors are available to aid illumination and direct visualization within the pocket. If the implant is to be placed in the subfascial pocket, the dissection proceeds below the pectoralis fascia but above the pectoralis major fascia. Once the fascia is identified, it will be thicker, because dissection proceeds more cephalad. Several medial intercostal perforating vessels may be encountered. These should be avoided or coagulated with insulated forceps if needed. For smooth-walled implants, a larger pocket is dissected to allow mobility of the implant. For anatomic implants, the pocket is precisely dissected to snugly accommodate the implant. Care should be taken to preserve the lateral intercostal cutaneous nerves, especially the fourth intercostal, which contains the primary sensory innervations of the nipple–areola complex. If a subpectoral pocket is chosen, the dissection is initially carried out laterally to identify the lateral border of the pectoralis major muscle. The muscle edge can be lifted by forceps to allow easy entry into the submusculofascial plane. This plane is readily identified by the wispy areolar connective tissue and ease of dissection. An extended electrocautery instrument is used to complete the dissection. The inferior origin of the pectoralis major is released from lateral to medial at the level of the IMF. Various slips of origin of the pectoralis major muscle are generally encountered and divided. Division of the pectoralis continues medially to the sternal border. Partial deep division may selectively be carried out 1 to 3 cm above the xiphoid, depending on which implant is to be used. Lateral dissection can be done bluntly with a finger to avoid injury to the lateral neurovascular bundles. The nerves can be stretched to accommodate the implant but should be preserved to minimize postoperative sensory changes. When the pectoralis major muscle is elevated, care must be taken to leave the pectoralis minor down on the chest wall. This will minimize bleeding and allow proper placement of the implant. At times, several muscle interdigitations may be present between the pectoralis minor and major, and these are carefully dissected to prepare the pocket. In addition, if a dual-plane pocket is planned preoperatively, further dissection over the muscle is carried out pending the level of the desired dual plane followed by release of the pectoralis major at the IMF. Exact implant sizers (gel or saline) are used when available to evaluate the pockets and resultant breast form. After the sizers are in place, the patient is placed in a 90-degree upright position and evaluated from various perspectives. Any asymmetry or underdissected areas are marked, and the patient is placed back in the supine position. Once adequate hemostasis is obtained and pocket dimensions are finalized, the pocket is irrigated with an antibiotic-containing solution, and the implants are carefully placed by a minimal-touch technique.15 The final results are assessed, again with the patient in a sitting position, and a multilayer closure is performed with absorbable suture. It is important to close off the implant pocket with a separate layer of suture before closing the skin. Once closure is complete, Steri-Strips (3M) are applied along the direction of the incisions. The periareolar approach for augmentation mammaplasty described by Jenny in 197216 is used widely by plastic surgeons.17 The periareolar incision is placed along the inferior portion of the areolar–cutaneous junction. The principle advantage of this incision is that the resulting scar is usually well camouflaged and quite inconspicuous. The periareolar approach allows easy adjustment of the IMF and direct access to the parenchyma for scoring and release when the lower pole of the breast is constricted. However, visualization and the dissection are typically inadequate with the periareolar incision in patients with areolas smaller than 3 cm in diameter. Other disadvantages of this approach include the potential risk of contamination if the lactiferous ducts are transected, the increased risk of changes in nipple sensitivity, and the risk of a hypopigmented scar in patients with darkly pigmented areolas. The markings for a periareolar approach are similar to those for an inframammary augmentation. The incision is marked along the junction of the areola and the breast skin. The limits of the incision are the 3 o’clock and 9 o’clock positions. The positioning of the patient is identical to that for an inframammary approach. It is imperative that the patient be able to fully flex at the waist for evaluation of the intraoperative appearance of the implants. The precise incision is made. Wound edges are elevated directly up from the chest wall with an opposing pair of small sharp retractors. An insulated electrocautery unit is used to dissect straight down through the breast parenchyma to the pectoralis major fascia. The dissection is the same as described through the inframammary incision. If the inferior pole of the breast is constricted, radial scoring of the gland in the inferior pole can allow proper redraping of the soft tissue over the implant to correct the deformity. Before final implant placement, the pocket is once again checked for hemostasis and irrigated with an antibiotic solution. The closure is particularly important with this technique. The gland must be precisely reapproximated and closed with several layers of interrupted absorbable sutures to prevent distortion of the nipple–areola complex. The skin is closed with deep everting dermal sutures and a running subcuticular absorbable monofilament. Steri-Strips are applied to the closed incision. The transaxillary approach was described by Hoehler in 197318 and popularized by Bostwick and others. This procedure can be performed either bluntly using a Montgomery dissector or using an endoscope for precise visualization and dissection of the implant pocket. The transaxillary approach avoids incisional scarring directly on the breast and places the incision in the inferior and anterior area of the axilla. The transaxillary incision usually provides adequate access when placing an inflatable round breast implant; this incision is more difficult for placement of a large prefilled implant or an anatomically shaped device but can be used. The markings for transaxillary breast augmentation are also made with the patient in the sitting or upright position. The existing and resultant IMFs are marked, as are the boundaries of the proposed dissection. To locate and mark the incision, the patient’s arm is placed in complete adduction and the most anterior aspect of the axilla is marked. The incision should not extend beyond this line. The arm is then abducted approximately 45 degrees, and a prominent axillary crease is identified. Any fold may be used, but preference is given to one high in the axilla, which aids in instrumentation during the procedure. For saline-filled implants, the incision should generally be 2.5 to 3.5 cm. Silicone implants require larger incisions. The patient is positioned supine on the operating table with her arms abducted 90 degrees and secured to arm boards that allow 10- to 15-degree variations in abduction and adduction from 90 degrees. She must be able to flex 90 degrees at the waist during the procedure. The incision is made, and small sharp retractors are used to elevate the medial aspect of the incision. Superficial subcutaneous dissection to the lateral border of the pectoralis major prevents injury to the intercostobrachial nerve. Scissor dissection is used with electrocautery and insulated forceps to control any bleeding. The fascia of the pectoralis major muscle is visualized at the lateral edge of the muscle, and the dissection is carried deep to this for a subfascial placement or deep to the muscle for subpectoral placement. The surgeon must be certain the correct plane is entered before continuing the dissection further. For an endoscopically assisted augmentation, the endoscope is passed into the transaxillary tunnel, and the subpectoral space is seen under direct vision. This allows a more controlled release of the pectoralis major origin with a long, insulated electrocautery instrument. On completion of the dissection, implant sizers are used to evaluate the pocket and identify any areas that need final adjustment. This must be done with the patient in the sitting position. The pockets are then irrigated with an antibiotic solution, and the final implants are inserted.15 Before closure, the patient is once again placed in the sitting position for a final check of the implant position. The pectoralis muscle fascia is repaired with a single absorbable suture, and the incision is closed in one or two layers. Steri-Strips are applied to the incision. The markings for transumbilical breast augmentation are similar to those for a standard IMF approach. The patient is positioned on the operating table in the same manner as for an inframammary augmentation. An additional mark is made with the patient supine: a line is drawn from the umbilicus to the medial border of the areola bilaterally. An incision is made within the umbilicus, large enough to easily accommodate an index finger. An endotube with a blunt obturator is passed just above the rectus fascia along the line from the umbilicus to the areola. Care is taken to constantly palpate the progress of the obturator with the surgeon’s other hand, always keeping the force up and away from the abdominal and thoracic cavities. The endotube is advanced over the costal margin. For subglandular implant placement, the force applied to the endotube is directed upward at the IMF to prevent the obturator from slipping beneath the pectoralis major. The tunnel ends just cephalad to the nipple. Subpectoral positioning is possible by careful technique with use of special instruments to enter the fascial plane high laterally. The obturator is then removed, and an endoscope may be used to verify correct pocket identification. Hemostasis is also ensured. Both the endotube and endoscope are removed from the tunnel, and an expander is rolled up and placed within the incision. The expander is “milked” up the tunnel by manual external pressure. The expander is filled with saline to 150% of the final volume of the implant. Pocket adjustments can be made manually during filling. When the expansion is complete, the expander is drained and removed from the pocket by traction on the fill tube. The implant is placed and filled in exactly the same manner as the expander. The endotube is then replaced, and an endoscope may be used to verify implant position, valve patency, and hemostasis. The incision is closed with a single layer of absorbable suture. An abdominal binder is used for compression on the abdominal tunnels. In the overwhelming majority of cases, augmentation mammaplasty is performed as an outpatient procedure. Patients are given prescriptions for oral analgesics and a 3-day course of prophylactic oral antibiotics. The patient is shown yoga-type stretching exercises of the chest to be performed on the day following her surgery. Patients are allowed to remove operative dressings and shower as desired starting on postoperative day one. The first follow-up visit is scheduled for 1 to 3 days after the procedure. Regardless of the texture of the implant used (nontextured versus smooth), the authors do not utilize implant mobility exercises. Patients are usually able to return to work a few days after surgery, but are not permitted to resume rigorous exercise for 4 to 6 weeks. Additional follow-up visits are scheduled at 4 to 6 weeks, 3 months, and 1 year. The importance of postoperative photo documentation and critical analysis of the operative outcomes cannot be overemphasized. It is the author’s practice to place patients on vitamin E 400 IU once a day for two years to minimize capsular contracture. Although there are no evidence-based studies in the augmentation population on the use of Vitamin E, there is encouraging evidence in the treatment of RIF (radiation-induced fibrosis) in mastectomy patients with radiation-induced morbidities related to scarring.19 Alterations of nipple sensitivity after augmentation mammaplasty may be manifested as either anesthesia or hyperesthesia and are believed to result from traction injury, bruising, or transection of the lateral intercostal cutaneous nerves. The incidence and severity of nipple sensation changes does not vary with the surgical approach used.20 Periprosthetic seroma fluid is usually resorbed by the soft tissues within the first week of surgery, and use of topical antibiotics intraoperatively has been shown to decrease the rates.21 We do not use drains for primary breast augmentation regardless of the device or texture; however, drains are used in revision cases. The development of a hematoma after breast augmentation has several deleterious effects in both the early and late postoperative period, including pain, blood loss, disfigurement, and capsular contracture.22 Preoperatively, patients should receive a list of prescription and over-the-counter medications that may contribute to excessive postoperative bleeding. It is imperative that the patient discontinue any medications and herbal supplements that impair clotting or platelet function at least 1 week prior to surgery23 (Table 34.1). If a hematoma does develop in the perioperative period, immediate evacuation of the hematoma and exploration of the pocket is recommended. Unfortunately, the source of the hematoma is only rarely identified at the time of the exploration. Patients may occasionally present with a delayed hematoma 1 to 2 weeks or even months to years after augmentation, and commonly a history of breast trauma is elicited. Expanding hematomas require exploration and drainage regardless of the length of time from the augmentation. Nonoperative management of small nonexpanding hematomas is one option but places the patient at a higher risk of subsequent periprosthetic capsular contracture. Postoperative wound infection may present with a spectrum of severity ranging from a mild cellulitis of the breast skin to a purulent periprosthetic space infection. S. epidermidis is part of the normal skin flora and is the most commonly identified pathogen in postoperative wound infections. Patients are given prophylactic antibiotics intraoperatively and postoperatively to reduce the risk of infection. Sterile technique is maintained during the procedure, and the implant pocket is irrigated with an antibiotic solution containing 50,000 units of bacitracin, 1 g of cefazolin, and 80 mg of gentamicin per 500 mL of saline.15 Further reduction of risk for bacterial contamination may be achieved by adhering to the no-touch technique, in which only the surgeon handles the implant with fresh, powder-free gloves. The implant is then inserted through a sterile sleeve to minimize contact with the patient’s skin and inflated using a sterile closed filling system. A significant number of postoperative wound infections will respond to oral or intravenous antibiotics if therapy is initiated very early in the course of the infection. If the infection persists or progresses, the implant should be removed and the wound should be allowed to heal over a drain or in severe cases by secondary intention. Once the infection has totally cleared, a secondary augmentation and scar revision should be planned in 6 to 12 months. Mondor’s disease is a superficial thrombophlebitis of the breast that may occur in up to 1 to 2% of augmentation patients.24,25 This process usually affects the veins along the inferior aspect of the breast and is most common with the inframammary approach. Fortunately, this is a self-limiting process that usually resolves with warm compresses over a period of several weeks. Based on current data, between 15 and 30% of women who have breast augmentation will have a reoperation within 5 years of their initial procedure.17,26,27 Unfortunately this rate climbs to 35% in patients with prior history of revision breast augmentation.15 Capsular contracture, malposition, and ptosis are the most common long-term complications of aesthetic breast surgery, and capsular contracture remains the primary reason for most revision surgeries.26–29 Although increasing data suggests capsular contracture can be minimized in primary augmentation by technical details, including precise, atraumatic, bloodless dissection; appropriate antibiotic breast pocket irrigation; and minimizing any points of contamination during the procedure,15,30 treatment of an established capsule remains a challenge. All surgical implants undergo some degree of encapsulation because of the natural foreign body reaction by the surrounding tissues. Clinically significant periprosthetic capsular contracture is characterized by excessive scar formation that leads to firmness, distortion, and displacement of the breast implant. Histologic examination of these contractures reveals circumferential linear fibrosis, which is especially severe when formed in response to smooth shell implants. In 1975, Baker proposed a clinical classification system of capsular contracture after augmentation that is still commonly used to describe periprosthetic contractures (Box 34.1).31 Although several factors have been identified that contribute to capsular contracture, the precise cause remains unknown. The hypertrophic, circumferential linear scar probably involves stimulation of myofibroblasts that are known to be present within the periprosthetic capsule. Irritation caused by periprosthetic hematoma, seroma, or silicone gel bleed may incite the capsular contracture. Other foreign body particles such as glove powder, lint, or dust may also contribute to the process.30 Infectious etiologies have also been studied and are believed to play a role.30 This theory describes a chronic subclinical infection located immediately adjacent to the implant shell within a microscopic biofilm that is relatively inaccessible to cellular and humoral immune function. Many strategies have been used to prevent periprosthetic capsular contracture. One strategy has been the creation of a large implant pocket and maintenance of this oversized pocket with implant displacement exercises. The use of implants with textured surfaces was described previously and has been shown to reduce the rate of capsular contracture in breast augmentation. Other efforts have focused on minimizing operative trauma to reduce the risk of seroma or hematoma formation. Seromas, hematomas, and even blood staining of the periprosthetic tissues may incite capsular contracture. Any bleeding that does occur during the dissection needs to be controlled and tissues stained with blood should be diluted with copious irrigation fluid.
34
Breast Augmentation
 Pain
Pain
 Blood loss
 Disfigurement
 Capsular contracture
 Palpability
 Rippling
 Implant extrusion
 Double bubble
 Snoopy deformity
 Symmastia
 Bottoming out
 Implant malposition
Avoiding Unfavorable Results and Complications in Breast Augmentation
Patient Selection

Informed Consent
Surgical Considerations
Incision Length and Placement

Pocket Position
Implant Selection
Filling Material
Implant Size


Implant Surface Texture
Implant Shape
Treatment and Surgical Technique
Inframammary Incision
Periareolar Incision
Transaxillary Incision
Transumbilical Approach
Postoperative Care
Managing Complications in Breast Augmentation
Perioperative Complications
Delayed Complications of Augmentation Mammaplasty
Plastic Surgery Key
Fastest Plastic Surgery & Dermatology Insight Engine