Fig. 4.1
Anatomy of a Dewar (taken from MVE): (a) lid, (b) neck tube (designed to reduce LN loss), (c) vacuum retention system, (d) external aluminum construction, (e) insulation system
It took two German glassblowers (1904) [3] to visualize the potential commercial use of the vacuumed flask for keeping drinks hot or cold. They rebaptized the flask into the “thermos,” which 60 years later became a metonym for such containers.
Modern day Dewars are structurally the same: they are still one big container contained in another with a vacuum in between. However, they have been improved in many ways:
They are available in different sizes. This gives you a whole range from which to choose, adapting it to different needs.
They have improved insulating systems that make LN last longer.
They are lighter because they are aluminum. This weight reduction has made Dewar handling simpler and more practical.
They are safer thanks to improvements in the cap/neck system.
Size is an important issue when it comes to choosing a storage Dewar. The most commonly used Dewars in dermatology range from 5 up to 50 liters (l). (Fig. 4.2). One commercial manufacturer is MVE [4], and the holding time and weights (empty and full) can be seen in Table 4.1. Small Dewars are easier to handle with the disadvantage that LN lasts a shorter period of time (they contain less), making continuous recharge necessary. They are useful in order to drain off the remaining LN from a larger Dewar that needs to be sent for refill. Larger ones (50 l) are more cumbersome but last longer. They are ideal for daily and continuous use (such as in a large dermatology department), weight being their sole drawback.
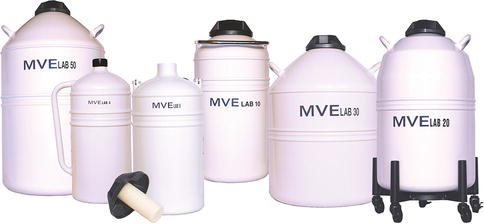
Fig. 4.2
Dewars from MVE (Courtesy of Chart Biomedical)
Table 4.1
MVE Dewars: size, static holding time, empty weight, and full weight
Size (liters, l) | Static holding time | Static evaporation rate (liters/day) | Weight empty (lb) | Weight full (lb) |
|---|---|---|---|---|
5 l | 4–5 weeks | 0.15 | 8 | 17 |
10 l | 6–8 weeks | 0.18 | 13 | 30 |
20 l | 8–12 weeks | 0.18 | 19 | 53. |
Long last 20 l | 220 days | 0.095 | 19 | 53. |
30 l | 14–16 weeks | 0.22 | 26 | 77. |
50 l | 14–17 weeks | 0.49 | 34 | 123 |
An excellent alternative is to have an intermediate-sized Dewar (20–30 l) and a small one (5 l), used to hold the little amount left in a larger Dewar that needs to be sent for refill. It might sound as an unnecessary precaution but one needs to take into account that most retails need at least 24 hours for picking up, refill and bringing back a Dewar. This spared LN in a small Dewar will allow doing cryosurgeries for a day, while waiting for LN delivery.
Dewars can be placed on a roller base, a necessary item for flasks larger than 20 l. This simplifies transferring from one place to another (for instance, for cleaning the floor) or for taking it away for refill.
LN can be withdrawn from the storage Dewar by:
1.
Simple pouring. Pouring using a funnel is the standard procedure for small Dewars (5 l). It is not recommended for large Dewars: one might end up hurting ones back or accidentally pouring LN all over the floor. Another inconvenience with single pouring is pouring residues that are sitting at the bottom of the Dewar. This increases the risk of clogging the equipment.
2.
Fixed device affix (Fig. 4.3): This is screwed at the top of the Dewar and left in place until refill is required. The fixed affix has its own pressure control and it works like a faucet. Once the LN is reduced inside the flask, so does the internal pressure, making refill necessary. This affix includes a filter that keeps the LN poured from inside the unit clean.
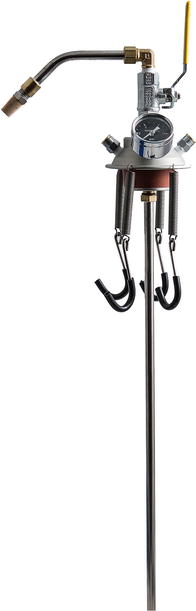
Fig. 4.3
Fixed device affix to leave on Dewar to withdraw liquid nitrogen (LN) (Courtesy of Brymill Cryogenic Systems)
3.
Removable affix (Fig. 4.4). This is placed into the opening of the Dewar once the cap is removed. Once firmly placed, instant pressurization is obtained and unit refill can be done. It must be removed after each refill, and one must remember to place the Dewar cap right back in place to avoid evaporation. If the withdrawal procedure is to be done for several units one after another, the affix can occasionally get clogged due to freezing. If this happens, one must let it thaw for several minutes and restart the charging procedure of the units.
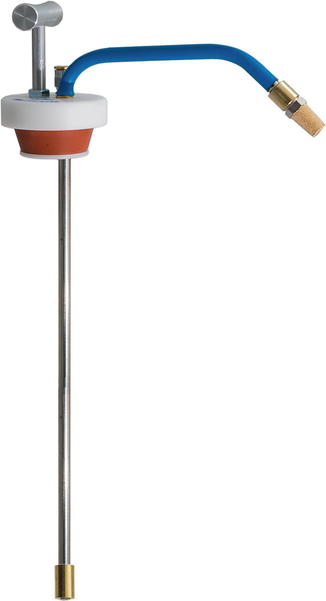
Fig. 4.4
Removable device left on Dewar to withdraw liquid nitrogen (LN). It is placed with slight pressure once the cap is removed. It is meant to be taken out of the Dewar once LN is withdrawn (Courtesy of Brymill Cryogenic Systems)
4.2.2 Other Cryogens
There are other cryogens available on the market and used for cryosurgery. Among them are argon gas (Ar, boiling point −187 ºC), nitrous oxide (N2O, −88 ºC) [5, 8], carbon dioxide gas (CO2, −78 ºC), and other compressed gases that boil on the order of −55 to −75 ºC.
Argon is mostly used in visceral cryosurgery (prostate [9], lung, bone [10, 11]). N2O and CO2 are used in dermatologic situations but should be reserved for benign lesions. Wallach [12, 13], Cryo S classic and mini by Metrum CryoFlex [14], Cryosucess by Schuco [15] and CryOmega by Premier Medical [16] are some of the options availble for carbon dioxide and nitrous oxide cryosurgery.
4.2.3 Dewar’s Maintenance
Modern Dewars need little maintenance; however, they still need to be kept clean since there is a tendency for detritus accumulation at the bottom of the flask. With sufficient time, a dusty residue accumulates at the bottom and gets sucked into the unit during the LN withdrawal. This detritus will cause malfunction in the unit. The first “symptom” of an unclean Dewar is the darkening of the central pick up tube of the cryosurgical unit. It will start losing its brightness and begins to turn grayish. Once this process begins, the LN will start getting clogged, making maintenance necessary.
Cleaning Dewars is a usually a forgotten but necessary procedure both for the maintenance of the flask and cryosurgical unit. Cleaning the Dewar is a good idea to assure its long life. The best time to do this is right before you send it for refill. Just turn the Dewar upside down and let all the residues pour out. If one thinks that it needs extra cleaning, one can proceed to wash it. MVE suggests using any household detergent or mild soap solutions for sanitizing and decontaminating their Dewars (Table 4.2). They suggest spraying the solution into the inner vessel, although agitation of the solution inside the inner vessel will suffice. Rinsing is important, and the flask has to be thoroughly dry before use; accomplish this by setting the Dewar inverted to drain and dry. If cleaning a Dewar seems a difficult chore, have the technical support from your suppliers take care of this. Basically, cryosurgeons use Dewars to store LN and not as containers for specimens (semen, embryos, bone marrow). Therefore, cleaning is simplified since there is no need to use disinfectants for maintenance.
Table 4.2
Dewar filling instructions, measuring and withdrawal of LN
Dewar filling instructions |
To avoid damage to the aluminum cryogenic vessel which may result in premature vacuum loss, it is important to follow this procedure during the addition of liquid nitrogen to a warm vessel and on subsequent additions |
1. Slowly pour liquid nitrogen into new or warm vessels with a funnel or transfer line when possible |
2. Allow liquid nitrogen to settle in vessel for 2 h to completely cool |
3. Fill the vessel to the desired level after the 2 h settling (cool down) time |
4. If filling the Dewar from a pressurized source, make sure that the source tank is at a low pressure (1.52 bar or below) |
5. If transfer hose is used for extracting liquid nitrogen from a pressurized liquid source, always use a phase separator on the end of the hose |
6. Remember to always wear proper safety attire over clothing; also use face shield, cryogenic gloves, and apron |
7. Never overfill your Dewar with liquid nitrogen. Overfilling the tank may cause pumped out components to leak, leading to immediate or premature vacuum failure to occur |
How to measure liquid nitrogen quantity |
1. Use wooden or plastic dipstick. Never use a hollow tube to measure liquid nitrogen |
2. Level will be indicated by frost line, which develops when dipstick is removed |
Liquid nitrogen withdrawal |
1. Liquid withdrawal from Dewars must be accomplished by pouring or utilizing a withdrawal device. Withdrawal device pressurizes to approximately 0.35 bar and the pressure forces liquid up the withdrawal tube out the valve |
2. Always wear proper safety attire: shield, gloves, and apron |
Another aspect to take into account is that Dewars can lose their vacuum if they are accidentally hit. Care should be taken when handling. Unfortunately, some LN dealers treat empty Dewars like suitcases. When dealing with careless LN dealers, it might be a good idea to put some external protection around the Dewar or change dealer.
4.2.4 Gloves and Apron (Fig. 4.5)
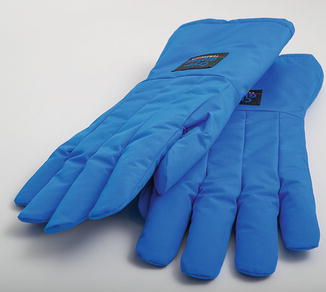
Fig. 4.5
Cryogenic gloves (Courtesy of Brymill Cryogenic Systems)
Proper safety attire is recommended when manipulating LN. A set of cryogenic gloves is a useful item to have, especially if filling is done by somebody not familiar with LN. Occasionally, LN can spatter on the dorsum of the hand and cause burning, particularly on fair skin. Glove use gives confidence. They are a good investment to maintain happy personnel and avoid lawsuits.
4.2.5 LN Producers (Fig. 4.6)
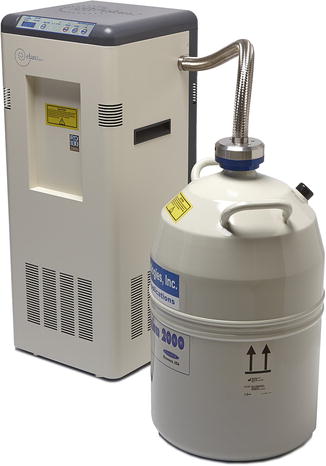
Fig. 4.6
elan2 Liquid Nitrogen Generators (Courtesy of MMR Technologies)
For those who have difficulty in accessing a reliable source of LN or live far away from the circuits of delivery, an LN generator can be the solution. This equipment looks like a water dispenser and works by taking nitrogen from the air and turning it into liquid nitrogen. Air is extracted through a particle filter and then compressed to a moderate pressure of 6–8 atmospheres. The compressed air is fed to a membrane that separates the nitrogen portion (78 %) from the air and liberates oxygen, carbon dioxide, and water vapor back into the atmosphere.
This nitrogen is later liquefied through a cryogenic system. Once full, the unit stops, and the LN is transferred by pressure into a liquefier and later forced out a transfer siphon into the Dewar or unit.
This equipment is called elan2™ Liquid Nitrogen Generators [17] and is based on MMR Technologies patented refrigeration technology. They are safe and allow for the production of liquid nitrogen in the office every time it is needed. These units are left powered on all the time. When full, they go into standby mode waiting to power back on as soon as the unit is less than full.
There are two types of units:
The office unit: it comes with an internal storage container of 0.75 L. Once full (it takes roughly 4 h to produce this amount of LN), a button is pushed and it takes roughly 60 s to transfer it to the external container.
The auto transfer unit automatically transfers from the internal Dewar to the external Dewar. It takes roughly 4 days to fill the 20 L Dewar, but you can use and take liquid nitrogen from it at any time using a provided transfer tube. Transfer from the 20 L Dewar to a handheld can take approximately 60 s.
4.3 Cryosurgical Units
Cryosurgery requires cryosurgical units. From the times when Zacarian and Adham (1960) immersed copper disks in LN, many advances have been made in this field. In 1966, Michael Bryne (Brymill Co.) developed the first commercially available handheld cryosurgical device which has been the prototype that has inspired all the equipment available in the market today. With the existence of these units, the use of cotton swabs is long gone. Cotton swabs for cryosurgical purposes should be avoided for the following reasons:
They do not allow a controlled application of LN. There is no temperature control whatsoever.
Commonly used in benign lesions, they do not permit a precise application of cold, therefore destroying areas of healthy skin that should not have to be treated. One ends up with all the undesired secondary effects of cold with little of the expected results.Related posts:

Stay updated, free articles. Join our Telegram channel

Full access? Get Clinical Tree