Fig. 2.1
The exposed femoral vessels
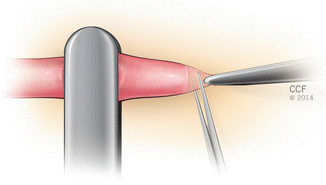
Fig. 2.2
Sharp trimming of the adventia
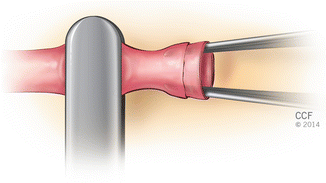
Fig. 2.3
Vessel dilation by introducing the tips of a dilator forceps within lumen
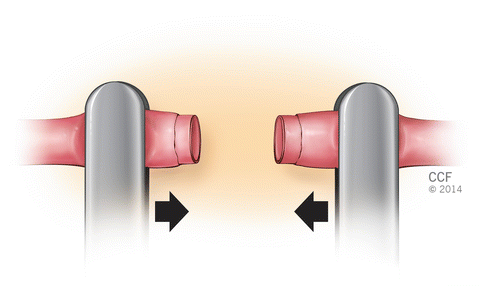
Fig. 2.4
Approximation of the vessel ends
Placement of Stay Sutures
The basic goal is symmetric placement of 6–10 stitches around the circumference of the vessel. First two sutures are placed between 120 and 180° apart. These first two or three sutures are called “stay” sutures that the remaining stitches are placed between them. In triangulation technique, the first two stitches are placed either 120° or closer to 150° apart on the circumference; following approximator clamp flipping the third stitch is placed midway between the first two stitches (Fig. 2.5). In “half estimation” technique, the first two stitches are placed 180° apart. They are placed at the superior and inferior aspects (or top-most portion and 180° apart) of the vessel circumference. The third stitch is placed 90 between the first two stitches, at the half point. The fourth and fifth stitches are placed at 45 points between the third and the first two stitches. Following approximator clamp flipping the sixth stitches positioned at the 90 point, halfway between the first two stitches. The seventh and eight stitches are placed in a same fashion with fourth and fifth stitch placements (Fig. 2.6).
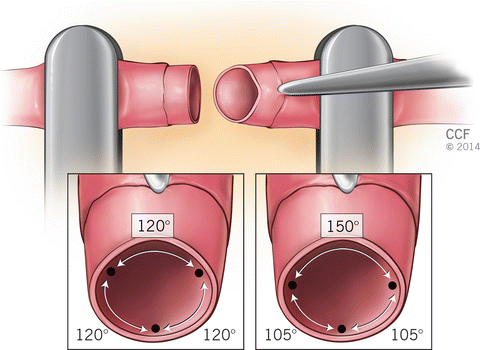
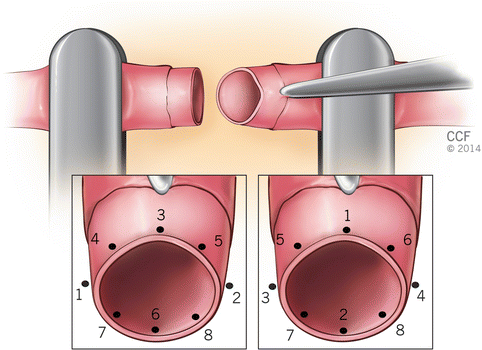

Fig. 2.5
Triangulation technique (120° or 150° apart)

Fig. 2.6
Half estimation technique. Numbers 1-8 indicate the order of placing stitches
Venous Repair
The suturing techniques are same with the arterial repair. Microvascular repair of a vein is more challenging than its arterial counterpart due to the thin medial layer of the vein wall. The wall lacks structure and collapses without blood pressure that visualization of the vessel walls and edges is harder. Following clamp application adventitia should be cleared from the intended site of transaction at this time, since trimming the adventitia after transaction is much more difficult in a rat vein. The amount of irrigation fluid left in the field is important for making anastomosis easily with clear vision of the vessel edges. Catching the back wall, causing tear in the wall due to thin structure, asymmetric stitch placement with error to estimate distances around the circumference due to more elastic structure are main challenges in venous repair.
Different Suture Techniques
Continuous Suture Technique [3–6]
Two stay suture are placed 180° apart. Just next to one stay suture, first suture is passed in outside-in fashion in one vessel end and then in-outside fashion in other vessel end in a running fashion. One end is used to finish the posterior wall after flipping the clamps. A total of two knots are tied at the end of procedure: one at the apex and one at the base (Fig. 2.7). There are several modification of this technique.
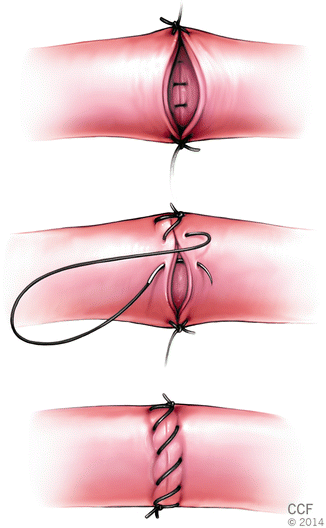

Fig. 2.7
Continuous suture technique
Continuous Locking Suture Technique [7, 8]
The continuous locking suture technique differs from the conventional continuous technique because suture is locked after each pass in order to eliminate a deleterious purse-string effect (Fig. 2.8).
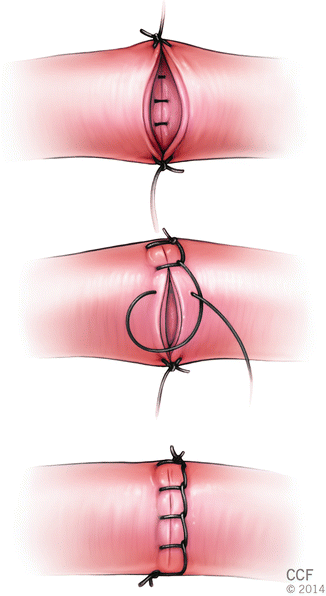

Fig. 2.8
Continuous locking suture technique
Continuous Horizontal Mattress Technique [9, 10]
The first suture placement is similar with the conventional continuous suture; however, the needle’s direction is then reversed to allow placement of a horizontal mattress fashion, which is then continued in an uninterrupted fashion around the entire suture line (Fig. 2.9).
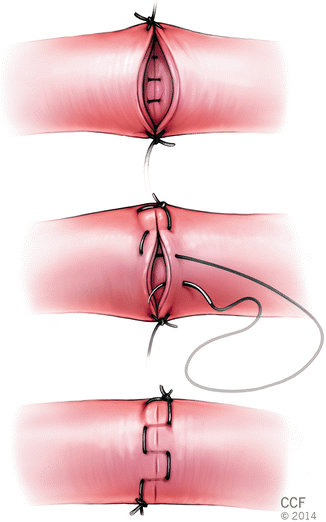

Fig. 2.9
Continuous horizontal mattress technique
Interrupted Horizontal Mattress Technique [11, 12]
Two fish mouth cuts are created at the each of the two vessel ends and the segments in between is everted. Then two ends are sutured with three or four horizontal mattress sutures. This evertion of the edges allows direct intima to intima contact (Fig. 2.10).
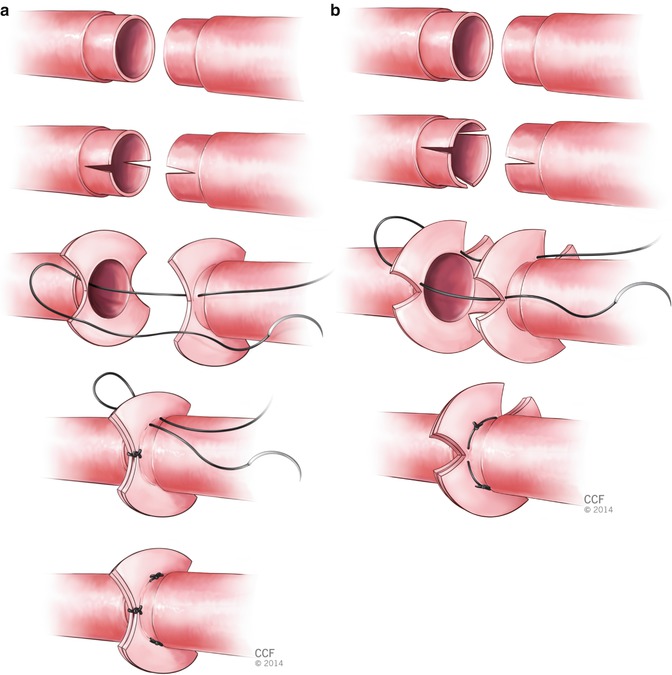

Fig. 2.10
Interrupted horizontal mattress technique (a) with three sutures (b) with four sutures
Spiral-Interrupted Technique [13]
A loose running suture is placed to form a decrescendo spiral (loops) on the surface of the anastomosis. Following tangential cuts made through the loops, this suture becomes interrupted. All suture segments are tied separately (Fig. 2.11).
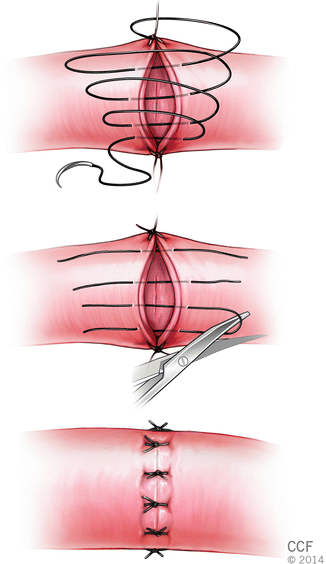

Fig. 2.11
Spiral-interrupted technique
Posterior-Wall-First Technique [14–16]
In this technique suturing starts at the posterior wall with using a simple interrupted technique. This technique is applicable to any situation where 180° flipping of the staged approximator clamp for optimal posterior wall exposure becomes technically difficult such as the case when the vessels are short and flipping of the clamps causes unwanted vessel wall tension and trauma.
Sleeve Technique [17–21]
The sleeve anastomosis has often been reported to have advantages of shorter operative time and no need for vessel flipping for posterior wall suturing. However, it can be applied only if the proximal vessel is smaller than or equal in diameter to the distal vessel. It is advantageous when there is vessel size mismatch. Although some less successful patency rates have been reported with this technique, equal patency rates to the conventional interrupted suture technique have been reported in numerous animal and clinical studies. The degree of stenosis at the anastomosis and the potential for decreased blood flow when two vessels are similar in size are main concerns with this technique.
In this technique, it starts with careful adventitial trimming and sufficient gentle dilation of the proximal (feeding) vessel end. Next partial thickness bites without entering the vessel lumen placed at a distance approximately one and half times the vessel diameter from the vessel end. Mostly two to three sutures (depending on the vessel size) are passed through the inner side of the distal vessel end in an inside-out fashion and tied. Next the proximal folded vessel is gently inserted into the lumen of the distal vessel (Fig. 2.12).
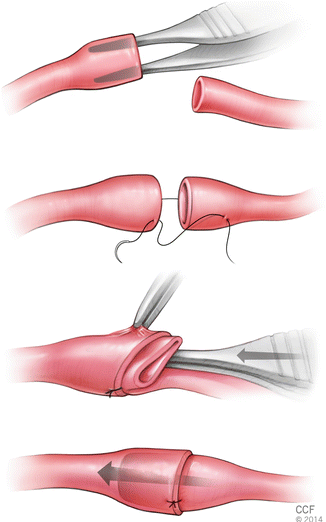

Fig. 2.12
Sleeve technique
Advantageous and Drawbacks of Different Suture Techniques
One major concern about continuous suture technique is a purse-string effect may narrow the anastomosis and lead to lumen stenosis, decreased vessel compliance, decreased pulsatility and decreased flow and/or thrombosis [22, 23]. However experimental studies showed that the continuous suture technique is as effective as the interrupted technique with equivalent patency including arterial, arteriovenous and veno-venous anastomoses [3]. However for revisions the continuous suture must be taken down and redone completely that it is a drawback of continuous technique compare to interrupted technique.
The sleeve, continuous technique, spiral interrupted may save some time in the clinical setting of multiple digital replantation.
End-to-Side Anastomosis [2]
The rat femoral vessels present good models for application of end-to-side technique. The femoral artery is prepared first placing a single clamp proximally and the very distal point of the dissected artery is ligated. Next, femoral artery is transected transversely without creating an oblique cut. The lumen is irrigated and the adventitia is trimmed. The vein is clamped on either side of the planned venotomy site and adventitia is removed from that part for receiving the artery. A relatively clean area at least 2 mm of length is obtained and a window is created in this area. Two incisions are made with sharp micro scissors at a 45 angle partway into the vessel from both side of this area. The true shape of the window should be a diamond. Ideal size for making venotomy is approximately 50 % larger in diameter than the diameter of the vessel which will be brought into the anastomosis. Creation of a too small window is better than a too large window because it is easy to enlarge it but if the window is too large either the window can be partially sewn closed at one end or the end vessel can be cut obliquely for matching it to the circumference of the venotomy.
Placement of Sutures
Approximately eight stitches are used in the repair. The first stitch should be placed at the end of the venotomy closest to the proximal origin of the artery. The needle should pass through the arterial end in outside-in fashion, then through the vein wall inside-out fashion. Following passing through the arterial wall, the needle is rearmed in the needle holder before proceeding to the vein. The second stitch goes 180 opposite the first stitch. This can be performed from artery to vein or from vein to artery. The third stitch is placed halfway between the first two stitches on one side. Following placement of third stitch the fourth and fifth stitches can be placed on the same side or the other 90 stitch can be placed on the opposite side (Fig. 2.13). When placing the between stitches, the needle should be passed perpendicular to the vessel edges and should be oriented in a radial direction which will change with each stitch.
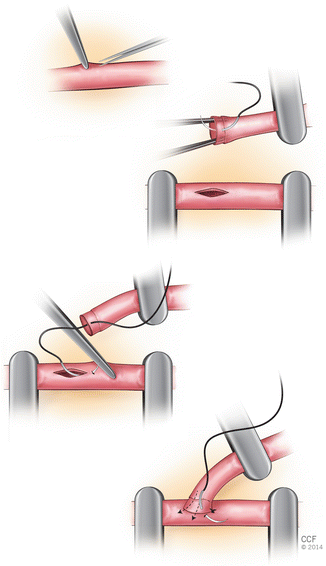

Fig. 2.13
End-to-side anastomosis technique
Patency Testing
Vessel patency may be assessed by the empty and refill test or flicker test.
Empty and Refill Test
Two jeweler’s forceps are applied with a gentle pressure to the distal side of the anastomosis. The forceps farther from the anastomosis slides over the vessel in the direction of the blood flow with emptying the vessel. With keeping this forceps closed, the other forceps is released. Instant filling of the emptied portion of the vessel proves patency of the anastomosis. Excessive repetition should be avoided not to cause injury (Fig. 2.14).
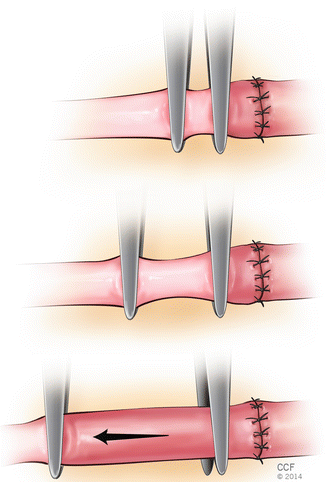

Fig. 2.14
Empty and refill test
Flicker Test
Forcing the vessel into a zigzag flow position with two jewellery forceps, a point of constriction is created distal to the anastomosis. Pulsatile flow will be apparent by a flickering at the stenotic junction. Overconstruction should be avoided not to occlude all flow (Fig. 2.15).
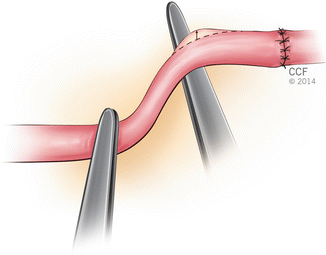

Fig. 2.15
Flicker test
Vein Grafting
In many clinical scenarios, there is an essential need for vein grafting. Interpositional vein grafting is well- established procedure in trauma condition where vessel defect is too large to perform simple anastomosis.
Although many alternative synthetic materials have been developed so far, vein graft still remains the gold standard technique for bridging vessel gap without the risk of tenseness. Vein grafts are widely used in both microvascular and macrovascular surgery. Currently, some procedures of reconstructive surgery still remain challenging and moreover impossible to carry out without utilizing vein grafting.
Although the problem of bridging the vascular defect had existed for a long time, it was in 1907 when the first well-documented procedure using interpostitional vein graft was reported. Lexer described a 8 cm long defect of the axilliary artery restored with a saphenous vein graft [24]. Later, the development of surgical techniques and recognition the vascular suture by Carrel, as well as the improvement of surgical instruments and materials have increased the effectiveness in vascular reconstructions using vein grafts [25]. An absolute breakthrough of using the autogenous vein graft was the first successful surgical bypass of the coronary artery disease [26]. Successes in macrovascular surgery opened new horizons for microsurgical applications of vein grafts. Jacobson, Chase, Fujikawa and others contributed to the improvement of microsurgical techniques [27–29].
Venous Grafts in the Experimental Rat Model
In the experimental studies and for the training purposes, rat model is widely used. Rat model offers vessels varying in diameter and length for vein grafting purposes in microsurgery. External jugular vein, iliolumabar vein, femoral vein, saphenous vein and superficial epigastric vein may be used as a vein grafts [30]. Femoral and epigastric veins are found to be the most suitable for vein grafting in rat model because of the simple surgical approach and relatively large diameter of the vessel. The diameter of external jugular vein is greater but the surgical approach is more challenging. Moreover, dissection of the neck region is time consuming and requiring retraction of the neck muscles which is associated with the risk of respiratory complications. Saphenous vein offers the longest vein graft but the caliber of the vessel is small. The use of the tail veins is restricted to its diameter and practically not utilized in the experimental studies. To find out the optimal length of the vein graft it was also tested if multiple vein grafts can be useful for microarterial reconstruction [31]. Two- and three-segment vein grafts of epigastric vein were used as an arterial substitute. Any significant reduction in vascular patency was observed comparing one-, two- and three-segment vein grafts.
The epigastric vein is a commonly utilized vein graft for both experimental studies and microsurgical training in the rat model. Usually, vein graft is interposed using conventional anastomotic technique with interrupted or continuous sutures.
Below we described the procedure of vein grafting using the epigastric vein interposed to the arterial defect of the femoral artery.
Vein Grafting Procedure Using the Epigastric Vein in the Rat Model
The epigastric vein is a well- established source of vein graft and one of the most utilized in the microsurgical practice in the rat model [2, 32].
Rat is placed in the supine position. The groin region is shaved and surgical site is cleansed with povidone iodine solution. Incision of the right inguinal fold is made. Dissection of the fat pad should be done with high precision so as not to harm the epigastric vessels. Mobilized fat pad is relocated laterally and hung out of the wound. Thus the operating field is increased as much as possible, whereas traction presence of the epigastric vein enables dissection.
The epigastric vein should be dissected from the point of draining the femoral vein to the first large branch to the fat pad. After removing the adjacent tissue covering the epigastric vessels, vascular sheath of the epigastric vein should be removed completely, otherwise it may disturb the anastomotic site and harm the vessel patency. Once the whole length of the epigastric vein is dissected, the vein graft is ready to be harvested.
Dissection of the femoral artery should be done as widely as possible. Proximally the artery should be dissected just from the inguinal ligament, whereas distally up to the origin of the epigastric artery. The muscular branch of the femoral artery should be ligated and cut to make the femoral artery entirely free.
Once both epigastric vein and femoral artery are fully dissected, single clamps can be placed on the femoral artery, proximally under the inguinal ligament and distally just in the point of the epigastric artery origin. Then a 8 mm long arterial defect is created. It is important to excise just the middle part of the artery, remaining enough long arterial ends to work on making the anastomoses (Fig. 2.16).
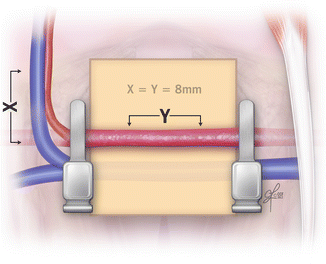

Fig. 2.16
The dissected and exposed femoral and epigastric vessels
Some considerations should be made at that point of the procedure. (1) It is essential to leave enough length of the arterial ends to apply double clamp. (2) Another consideration is to measure the arterial defect and epigastric vein graft under the natural tension, before cut them off. (3) Excised segment of the artery should include the previously ligated muscular branch thus avoiding the impediment of the anastomotic site. (4) The arterial ends and epigastric vein graft should be irrigated to remove the remaining blood and flushed out with heparinized solution. (5) Epigastric vein in rat does not poses valves, thus there is no need for interpose the vein during grafting procedure.
Following arterial defect creation, appropriate length of the epigastric vein can be harvested. The epigastric vein is ligated proximally and distally and cut off.
Double clamp is applied on proximal end of femoral artery and on the one end of the epigastric vein graft (Fig. 2.17). Two stay stitches (120° apart) are placed on the anterior site of the anastomosis. If applied double clamp is without frame, to make the procedure easier, two small incision might be made in the applied background to attach the stay stitches. Then three more stitches are placed between them on the anterior site. Once anterior site is completed, the stay sutures are released, switch over and attached once again on the opposite sites to expose the posterior site. The third stay stitch is placed in the middle of the posterior site and attached to the background facilitating the further sutures application. Thus the first proximal anastomotic site is completed (Fig. 2.18).
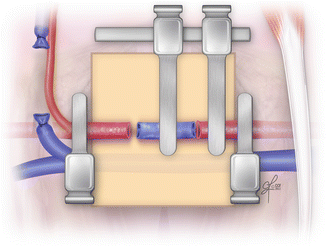
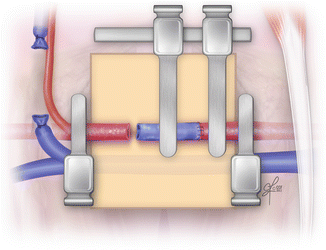

Fig. 2.17
Clamps application and approximation of the epigastric vein graft

Fig. 2.18
Completion of the proximal anastomosis
The most important stitch of the whole procedure is the first one of the second anastomosis. It is crucial to apply the first stitch in the longitudinal axis to the relation to the previously completed anastomosis (Fig. 2.19). Thus the risk of twisted vein graft is reduced. The second anastomosis is performed just in the same way as the first one. Once both anastomoses are completed, double clamp can be removed. From both single clamps, first distal one should be released. When the bleeding stops, the proximal clamp can be removed and the vein grafting procedure is completed (Fig. 2.20). For confirmation of the vein graft patency, empty-and-refill test might be performed distally to the vein graft.
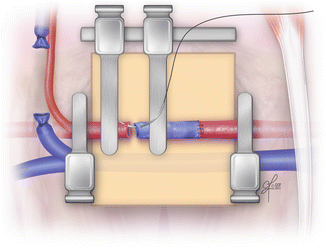
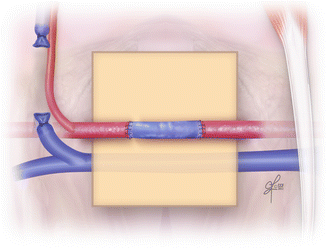

Fig. 2.19
Placing the first stich of the distal anastomosis

Fig. 2.20
Completed vein grafting procedure
Other Techniques and Devices Facilitating Vein Grafting Procedures in the Rat Model
The telescoping anastomotic technique was developed by Lauritzen and later adapted by Saitoh and Nakatschuchi to varying microvascular procedures [33–35]. They implemented also the telescoping technique for bridging an arterial defect with the epigastric vein graft. They found this technique as an alternative for conventional method of vein graft anastomosis. The high patency rate was confirmed and neither thrombosis nor stenosis were observed. Although the good outcomes were obtained, some disadvantages were found regarding this technique. This procedure required longer vein graft than in conventional method. Moreover it might be adopted only for procedures with similar diameters of anastomosed vessels.
It is essential to note that vein graft has the tendency to overdistension due to the exposure of natural arterial blood pressure [36]. It is known that turbulence blood flow in the segment of vein graft may lead to thrombus formation. Varying techniques were implemented to overcome this problem. Bekeler et al. applied absorbable collagen to diminish vein graft distension [37]. A femoral vein graft was used to bridge the femoral arterial defect. Following conventional end-to-end anastomoses with interrupted suturing technique, vein graft was wrapped with absorbable collagen adapted to the vein graft length. No distension of vein graft was observed. Moreover, decreasing the thrombosis incidence and anastomotic leakage were observed. Saitoh and Nakatsuchi used a fibrin glue to prevent overdistention of the vein graft [38


Stay updated, free articles. Join our Telegram channel

Full access? Get Clinical Tree


