3. Photography for the Aesthetic Surgeon
Standardized Clinical Photography
Photography is one of the most useful tools to plastic surgeons, but it can also be one of the most fallible tools. Quality clinical photography requires organization and adherence to a standard set of protocols. Lens magnification, lighting, patient preparation and positioning must all be consistent to ensure the accuracy of comparative photography. The following guidelines can help maintain consistency in photographic documentation.
Elements of Standardized Clinical Patient Photography
Consistent focal lengths and distances
Focal length (measured in millimeters) determines how the lens brings an object into focus.
Longer focal length = higher magnification
Shorter focal length = lower magnification
Focal distance is the distance from the camera lens to the object being photographed.
Reference the Cardiff Scales of Reproduction 4 for guidelines.
Consistent lighting
Use of dual strobe flashes in clinical setting
Standardized series (a predetermined set of photographs per procedure)
Ensures patients will have the same views photographed each time
Attention to detail
Remove jewelry, glasses, heavy makeup
Keep area clean
Use of background
Informed consent is necessary before photographs can be taken.
Focal Lengths and Distances
Note:
In traditional film photography, a 35 mm image plane was a constant. In digital photography, a variety of different sizes of sensors in cameras are available. Most sensors are smaller than the size of 35 mm film, so the standards used to determine distances and magnifications in the past need to be adjusted for a digital camera
Cardiff Scales of Reproduction 2 advocate the use of lens with a focal length equal to at least twice the diagonal of the image plane to prevent unwanted distortion of the image.
Use of Cardiff Scales controls the magnification and perspective of patient photography.
Ensures standardization between photographs taken by different physicians and/or photographers
Table 3-1 provides examples of the different-sized sensors and the recommended focal lengths to prevent distortion.
The manufacturer will supply the size of the sensor in the manual.
Disparities in focal lengths can make dramatic differences, especially in comparative views (Fig. 3-1).
Correcting for this difference to prevent unwanted distortions is essential. 4
A digital SLR (single-lens reflex) camera is recommended for clinical patient photography. These have better-quality lenses and sensors than “point-and-shoot” consumer cameras.
The magnification of focal lengths and distances provided throughout the standardized series in this chapter are intended for photographing with a high-end, digital SLR camera with a ⅖-inch charge-coupled device (CCD) sensor.
Sensor type | Width (mm) | Height (mm) | Diagonal (mm) | Lens (mm) |
1/2.7 inch | 5.270 | 3.960 | 5.270 | 10 |
½ inch | 6.400 | 4.800 | 8.000 | 20 |
⅔ inch | 8.800 | 6.600 | 11.000 | 20 |
4/3 inch | 18.000 | 13.500 | 22.500 | 50 |
35 mm film | 36.000 | 24.000 | 43.300 | 50 |
Senior Author Tip:
For an average digital SLR camera, the multiplication factor for focal length is about 1.5×; therefore I recommend a 50–60 mm lens for facial photos and a wider one for body photos
Variables to Consider in Face or Neck Series
All of the facial series in this chapter are intended to be photographed in addition to the standardized facelift and necklift series. There are, however, variables that exist in each face series depending on the surgical procedure. These variables are noted in each section. The following possible variations should be considered for standardized facelift and necklift series:
Head positioning
Oblique variables
True lateral
Head Positioning
(Fig. 3-2)
The Frankfort plane is used as a reference line for correct head positioning in radiographs.
Some physicians have used it as a standard for head alignment when photographing the face.
Horizontal plane that traverses the top of the tragus (external auditory canal) across the infraorbital rim 5
Can cause noticeable changes in jaw definition and submental soft tissue 6
Some physicians choose to use the natural horizontal facial plane for alignment. 5

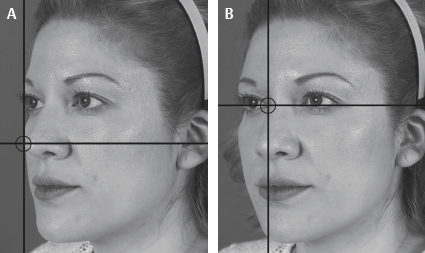
Oblique Variables
Preferences vary for photographing oblique views.
Some prefer the nasal tip to touch the opposite side of the cheek for the rhinoplasty series.
Some prefer the dorsum to visually touch the medial eye.
Both views are shown in Fig. 3-3, but one may be excluded once the preferred view is chosen.
Standard Face/Neck Series
Series is photographed with a digital camera with a ⅔-inch sensor in a vertical position at a 1 m distance with an 80 mm focal length.
Face is typically photographed with the patient in a seated position.
Tip:
Place a target on the wall for the patient to view while in the lateral position to help with standardizing the eye to radix alignment
Objectives
Basis for all cosmetic procedures
Show anatomic relationship of whole face
Show anatomic bone/muscle/skin structure
Show skin laxity around mandible and neck
Show volume loss/depletion in malar area
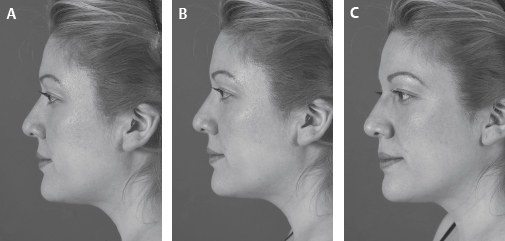
Key Points
(Fig. 3-5)
The contour of the neck can vary greatly according to the head and shoulder position.
Any degree of neck flexion or head retraction can greatly enhance the effect of submental fat/jowl line or, conversely, neck extension can improve the jowl line. 6
Make sure that the head is in the standard anatomic position and that the patient is sitting straight and not slumping.
Have patients relax and not smile.
Have patients remove distracting jewelry and/or heavily applied makeup.
Fold down turtlenecks and turn collars away from the neck.
Have patients pull hair back with neutral-colored headband.
For oblique views, line the radix of the nose to touch the medial part of the opposite eye (see Fig. 3-3, A).
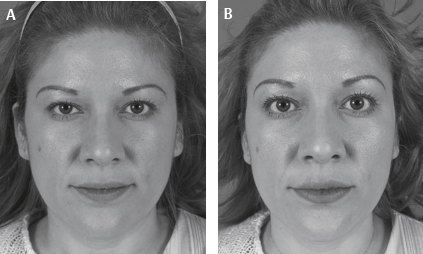
Any slight tilting of the head can sometimes distort the view. Check the earlobe symmetry from the anterior view to determine the straightness of the head before photographing. 7
Check true lateral through oral commissure alignment.
Use natural horizontal facial plane for positioning.

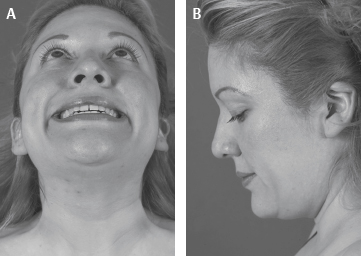
Supplemental Face /Neck Views
(fig. 3-6)
When photographing for a neck and/or face series, views can be added to show specific conditions.
Platysmal banding (teeth gritting)
Reading view (head down) which accentuates submental fat. 1
Related posts:


Stay updated, free articles. Join our Telegram channel

Full access? Get Clinical Tree


