21 Rhinoplasty
INDICATIONS
Cosmetic or functional nasal deformity
Congenital or acquired nasal deformity
Nasal valve support or repair
Nasal septal reconstruction
INTRODUCTION
Rhinoplasty is considered to be one of the most challenging operations in facial plastic and reconstructive surgery. 1 Nasal anatomy varies widely among different races and between genders. Nasal anatomy also naturally changes with age, and traumatic or surgical alterations to the nose affect this evolution. Rhinoplasty surgeons observe that the appearance of the operated nose at one week differs greatly from its appearance at one month, one year, three years, and six years after an operation. Over time, it becomes more apparent that maintaining structural support to the nose is paramount to its long-term cosmetic appearance and function.
In the sections that follow, we highlight the methods of nasal analysis, profile alignment, management of the upper two-thirds of the nose and nasal tip, and septoplasty. The approach to external rhinoplasty is outlined as well. Table 21.1 lists the equipment needed for external rhinoplasty.
NASAL ANALYSIS
Patient discussion, goals
Comprehensive preoperative analysis begins with a detailed discussion with the patient. It is imperative to understand the patient’s cosmetic and functional goals for the operation and interpret them in light of a holistic facial analysis. Changes made during rhinoplasty should remain in harmony with the rest of the face. In addition, patients should be educated about the balance required between reductive maneuvers, if desired, and the maintenance of adequate skeletal support to maintain good cosmetic and functional long-term outcomes.
Facial analysis, nasal analysis, profile alignment
Analysis of the nose must be done in the context of analysis of the rest of the face. A holistic approach should be used, taking into consideration the patient’s age, ethnicity, skin thickness, and goals for surgery.
Facial analysis begins with good photography, including frontal, oblique, lateral, and base views of the patient. 2 High-quality, consistent photography is paramount to both patient education and satisfaction in the pre- and postoperative time periods. Computer imaging can be helpful to ensure that patient and surgeon goals are in line preoperatively. Good photography also assists the surgeon in analyzing his or her results over time.
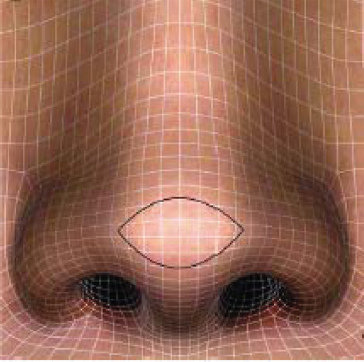
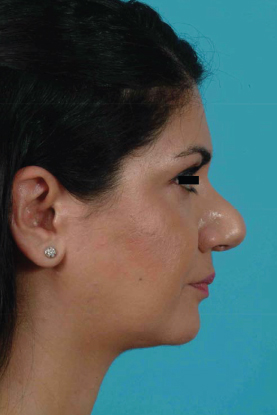
The frontal view is arguably the most important; it represents how one is seen by others and how a patient will critically analyze his or her rhinoplasty result in a mirror. 2 Assessment of overall nasal length, width, rotation, symmetry, and deviation is paramount in this view, as is assessment of the brow-tip aesthetic line. 3 The appearance of the nasal tip has much to do with shadowing and contours created by its underlying osseocartilaginous skeletal structure. 2 , 4 The ideal nasal tip has a smooth contour and is continuous laterally with the alar rims. Nasal tip pinching may be prevented by maintaining good structural support to the nasal tip, with placement of alar rim or lateral crural strut grafts (LCSG) as needed to support the smooth contour of this area 5 (Figures 21.1 and 21.2).
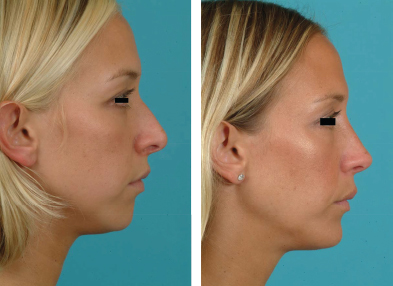
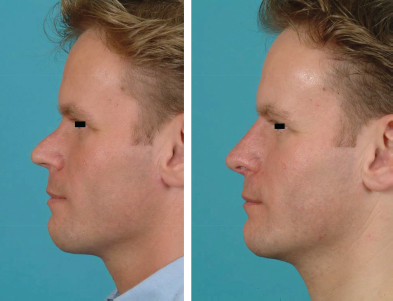
When analyzing lateral view photographs, nasal profile alignment is a central focus. Nasal projection relative to the forehead and chin is analyzed. For example, an underprojected chin makes the nose appear larger. A chin implant may complement a rhinoplasty in these patients (Figure 21.3). A lower nasofrontal angle also may make the nose appear shorter. In these cases, radix grafts may be employed to make the nose appear longer (Figure 21.4).
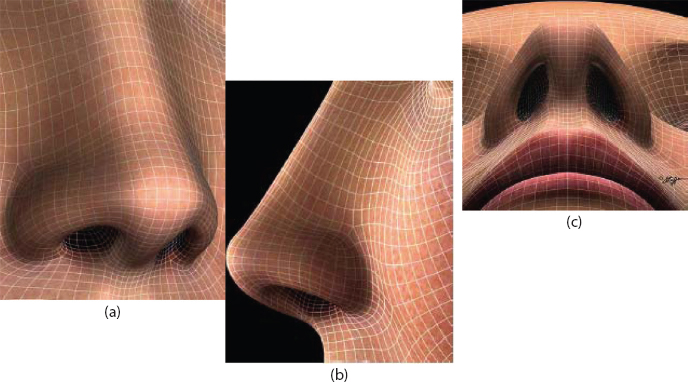
The base view allows one to analyze the nostrils for symmetry, shape, and size. The position of the caudal nasal septum is noted. The width of the nasal base is assessed. The columella-lobule ratio is noted. The medial crural footplates are assessed for shortened length or flaring. The lower lateral cartilages (LLCs) are assessed for weakness and recurvature. The degree of external nasal valve collapse is assessed on inspiration.
Skin thickness has several important implications with respect to surgical planning. Mediumthickness skin is the most ideal with respect to surgical outcomes: Thin skin will fail to mask subtle contour irregularities in the underlying nasal skeleton, and thick, sebaceous skin may prove difficult to redrape over the nasal skeleton and create a refined look.
Special care should be taken to not overreduce the nasal framework in thick-skinned patients. Failure of thick skin to favorably contract over an excessively reduced framework may result in an amorphous, “pollybeak” tip of redundant soft tissue (Figure 21.5). It is wise to counsel these patients that to make their nose appear narrower on frontal view, one may need to augment the dorsum and project the tip, leaving them with a bigger framework over which their thicker skin may be stretched and refined as it is redraped. In some cases, conservative subcutaneous tissue thinning may be performed.
Thin-skinned patients have the opposite problem. Thin-skinned individuals have a limited soft tissue cushion and therefore limited ability to conceal underlying skeletal framework irregularities or contour imperfections. Thin-skinned patients are also at risk for more progressive skin contraction over time. 1
Patients who have had prior surgery or synthetic material placed in their nose tend to have skin that is more devascularized and thinned. Extra care must be dedicated to dissection and elevation of the skin soft tissue envelope in these patients.
Nasal osseocartilaginous skeletal analysis
Analysis of the nasal framework is accomplished by photography, palpation, and endoscopic examination. The amount of nasal septal cartilage should be noted for preoperative planning purposes. Patients deficient in septal cartilage should be counseled that a secondary donor site (ear or rib) may be required to harvest cartilage for grafting.
Particular attention should be paid to the internal nasal valve, a common source of nasal obstruction. Made up by the nasal septum, the caudal border of the upper lateral cartilages (ULCs), and the head of the inferior turbinates, hypertrophy or malposition of any one of these structures may result in symptomatic narrowing and nasal obstruction. Internal nasal valve collapse may be improved by straightening the septum, reducing the inferior turbinates, strengthening the nasal sidewalls, or placing spreader grafts. The angle between the septum and nasal sidewall (ULC) should be at least 15°.
The dorsum of the nose consists of the nasal bones, the dorsal septum, and the ULCs. Longer nasal bones are advantageous to a patient undergoing rhinoplasty because they confer additional support to the middle vault. These patients are less likely to suffer from middle vault collapse after dorsal reduction and are less likely to require spreader grafts to prevent this complication. 6 Having uniform bony and cartilaginous widths is desirable as this contributes to a smooth brow-tip aesthetic line.
EXTERNAL RHINOPLASTY: INTRAOPERATIVE DETAILS
Deciding whether to perform an endonasal versus an external approach for rhinoplasty depends on the planned maneuvers of the operation.
The endonasal approach is ideal among patients whose operations will require limited grafting, as this approach does not involve a visible incision on the columella, involves less soft tissue dissection, and results in less postoperative nasal edema. A variety of endonasal incisions may be used to access the osseocartilaginous framework of the nose for reductive or grafting maneuvers. Marginal incisions may be used in these cases to place alar rim or batten grafts. Intracartilaginous incisions may be used to cephalically trim the LLCs. Marginal and inter-cartilaginous incisions may be used to deliver the LLCs for manipulation, tip suture placement, and grafting.
The external rhinoplasty approach works well in patients who require more complex cartilage grafting and those noses that demonstrate significant asymmetries or complex deformities. More advanced techniques for septal reconstruction, including caudal septal replacement grafts, may also be exercised with the wide exposure afforded by the external approach. 7 This chapter focuses primarily on the external rhinoplasty approach.
Preoperative documenting, marking, injecting
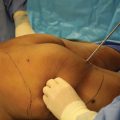
Once the detailed preoperative planning, photographic analysis, and operative planning have taken place, intraoperative photographs (frontal, lateral, and base views) are taken. Next, contour irregularities and deviations are marked, followed by injection of a local anesthetic solution containing epinephrine for hemostasis, antibiotic administration, and skin cleansing for surgery. It is helpful to trim the nasal vibrissae to allow clear visualization of the landmarks noted in making intranasal incisions.
Incision planning and execution
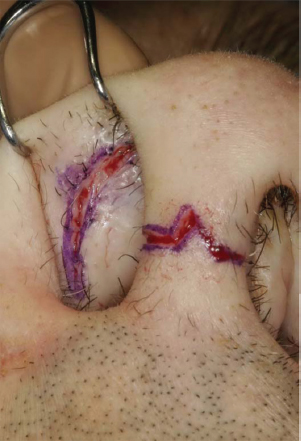
For external rhinoplasty, the operation begins with making an inverted V transcolumellar incision with a #11 blade, taking care not to violate the underlying cartilage. Placement of the incision is important, with usual placement at the mid-columella.
Elevation of skin and soft tissue envelope
The columellar incision is then connected to bilateral marginal incisions made at the caudal aspect of the LLCs. When raising the columellar flap, care must be taken not to inadvertently injure the underlying medial crura, which are positioned immediately underneath the skin at the lateral aspect of the columella (Figure 21.6).
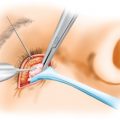
Next, the skin soft tissue envelope is elevated sharply off the LLCs using Converse scissors. Dissecting as close as possible to the cartilage itself helps to preserve the subdermal plexus of the skin soft tissue envelope. Elevation continues off the underlying ULCs and osseocartilaginous pyramid in a similar fashion. Over the bony vault, a Joseph elevator is used to create a subperiosteal tunnel. A tight pocket should be created if one plans to place a dorsal or radix graft.
Related posts:


Stay updated, free articles. Join our Telegram channel

Full access? Get Clinical Tree


