Abstract
A transposition flap is a random-pattern flap that borrows skin laxity from an adjacent area to fill a defect in an area with little or no skin laxity. If performed correctly, the result of this flap is a change of the tension vectors in the region, leading to improved cosmetic and functional outcomes over what would be an otherwise tense closure. This technique is especially valuable in preventing the distortion of free margins. The flap gains its name from the “transposition” or movement of a flap of donor tissue up and over normal/uninvolved tissue to its resting place within the surgical defect. The flap movement is often rotational in nature from its pedicle base to the surgical defect. Great care must be taken in the design of the flap as to not overrotate or put excessive tension on the flap such that the vascular pedicle is compromised. Transposition flaps are advantageous in that they can often be smaller than comparable repairs using advancement or rotational flaps, and the geometric design used eliminates long suture lines, which can otherwise distort the natural curvature and appearance of the repair region. In addition, the transposition flap adds another method by which nearby tissue matching the defect area closest in color and texture can be used in the repair. The most common transposition flaps in cutaneous surgery include rhombic flaps (single-lobed flaps), bilobed flaps, and banner flaps, such as the nasolabial flap. Knowledge of the tissue dynamics used in these three basic transposition flaps can be carried over to the planning and execution of numerous flap variations, including note flaps, trilobed flaps, and tetralobed flaps. Although sometimes technically complex in their design and execution, in the hands of a skilled surgeon, transposition flaps can produce a beautiful surgical outcome without distortion of free margins.
Keywords
transposition flaps, rhombic flap, bilobed flap, trilobed flap, banner flap
Flap Design and Considerations
A transposition flap is a random-pattern flap that borrows skin laxity from an adjacent area to fill a defect in an area with little or no skin laxity and redirects the tension vectors of the closure. This technique is especially valuable in preventing the distortion of free margins. The flap gains its name from the “transposition” or movement of a flap of donor tissue up and over normal/uninvolved tissue to its resting place within the surgical defect. The flap movement is rotational in nature from its pedicle base to the surgical defect. The flap is tethered to a pedicle and rotates into position. Care must be taken in the design of the flap as to not overrotate or put excessive tension on the flap such that the vascular pedicle is compromised.
Transposition flaps have several advantages over other types of flaps. They redistribute and redirect tension, assisting in the closure of defects that would otherwise be closed under unacceptably high tension or distort a nearby free margin, creating functional or aesthetic impairment. Transposition flaps are generally smaller than comparable repairs using advancement or rotational flaps. Because transposition flaps, like all local flaps, use adjacent tissue, they generally offer an excellent color and textural match to the recipient site. The geometric design used in transposition flaps eliminates long suture lines, which can otherwise distort the natural curvature and appearance of the repair region. The geometric broken line scar may also be thought of as a disadvantage of transposition flaps because all of the flaps’ lines cannot be placed directly in relaxed skin tension lines or cosmetic unit junctions.
The most common transposition flaps in cutaneous surgery include rhombic flaps (single-lobed flaps), bilobed and trilobed flaps, and banner flaps. Knowledge of the tissue dynamics used in these three basic transposition flaps can be carried over to the planning and execution of numerous flap variations, including note flaps, trilobed flaps, and tetralobed flaps. Although technically complex in their design and execution, in the hands of a skilled surgeon, transposition flaps can produce excellent aesthetic and functional surgical outcomes.
Rhombic and Single-Lobed Transposition Flaps
Design
The classic rhombic flap, first described by Limberg in 1963, is a single-lobed transposition flap that creates a secondary defect perpendicular to the primary defect that, when closed, provides tissue to close the primary defect and redirects the tension vector 90 degrees. This design greatly decreases the wound tension on the primary defect. Subsequent design modifications by DuFourmentel and Webster enabled more tension sharing between the primary and secondary defects by reducing the angles and sizes of the flaps’ primary lobes.
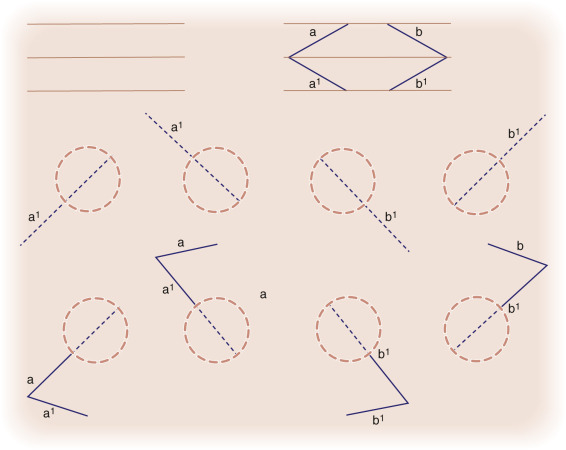
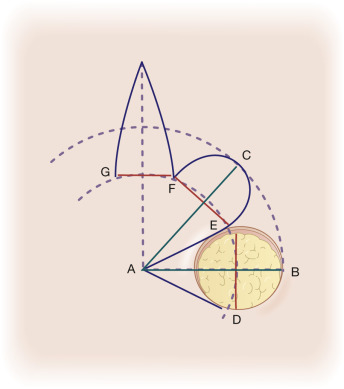
In planning a classic rhombic flap, the surgeon converts the primary defect, which in practice is usually round or oval, into a four-sided parallelogram centered on the middle of a round defect or on the midline of the short axis of an oval defect, with each side of equal length and tip angles equal to 60 and 120 degrees. ( Fig. 7.1 ). It is important to take the convexities and concavities of the face into account when making measurements. Note and banner flaps follow the same principle; however, they arise tangentially off a round or oval defect ( Fig. 7.2 ).
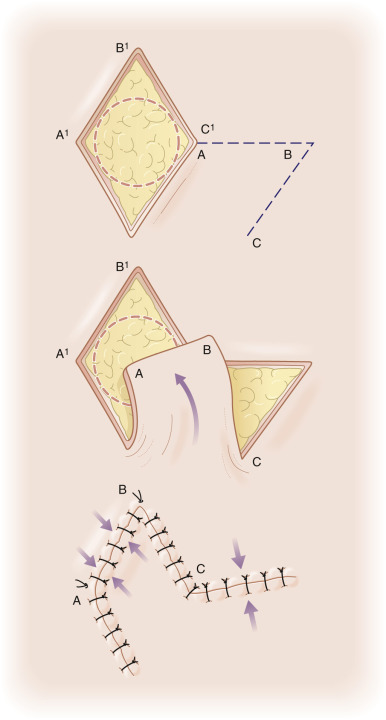
This rhombic shape forms the recipient site for the flap, as well as the template upon which the required incisions are planned. In the classic design (see Fig. 7.1 ), the flap’s incision lines are drawn by extending a line (line AB) outward from one of the obtuse tips for a length equal to that of one side of the rhombus. From the free end of the extending line (line AB), a second line (line BC) is drawn parallel to and equal in length to one of the near sides of the rhombus. The tip angle of the flap’s primary lobe in this configuration is 60 degrees. The incised flap is then lifted and transposed into place. The vector of maximal wound closure tension is thus redirected from that of closing the primary defect to that of closing the new secondary defect created in the execution of the flap. This allows for an effective 90-degree redirection of the tension vector.
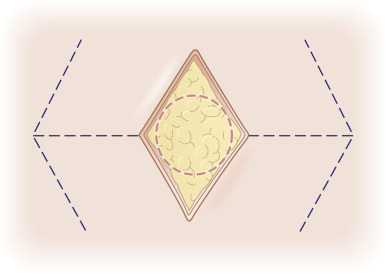
Although the classic rhombic transposition flap can be designed and executed off of the long axis of the rhombus, there are two advantages to designing it off of the short axis of the defect. First, this design keeps the flap as small as possible while filling the primary defect completely. Second, the design minimizes the arc through which the flap must rotate to reach the defect. There are four possible flap designs off of the short axis for any rhombic defect ( Fig. 7.2 ). The best choice among the four flap configurations depends on the adjacent anatomic structures, the adjacent skin type, and where the resulting scar line will be best hidden. The optimal placement of the flap’s closure lines are planned according to the adjacent relaxed skin tension and/or cosmetic unit junction lines. Because the majority of the wound closure tension is placed on the closure of the secondary defect, the secondary defect’s closure is usually designed to be aligned with the relaxed skin tension lines. The tissue redundancy at the base of the primary defect created by the rotation of the transposition flap is removed with trimming of a triangle in the area of the flap’s pivot point. This area is known as Burow triangle. As a common alternative approach the tip of the transposed tissue is rounded to fit a circular defect, or the defect may be squared off to accommodate the angular flap. This choice can be made based upon which option is likely to yield the optimal aesthetic result ( Fig. 7.3 ).
A thorough understanding of wound closure tension vectors is essential to the planning, execution, and outcome of any closure. The primary tension component of a classic rhombic flap occurs with the closure of the secondary defect. A second set of tension forces is generated at the tip of the flap when it is moved into the primary defect. These forces are due to resistance to movement at the flap pedicle and effective shortening of the length of the flap during the rotation into the recipient site. Dzubow has described these forces as pivotal restraint. The thicker/stiffer the skin and the greater the angle of rotation, the greater the pivotal restraint. Securing the flap tip to the far end of the recipient site under great tension can lead to tip ischemia and necrosis. Therefore rhombic flaps, as with all single-lobed transposition flaps, should be designed such that their angle of rotation is 90 degrees or less.
There are two modifications of flap design that can be used in certain situations to minimize the shortening of the flap and reduce the tension at the flap tip. When the leading edge and the secondary limb of the flap’s primary lobe are extended/lengthened, the flap is slightly enlarged ( Fig. 7.4 ). This lengthening can compensate for the inevitable shortening that results from pivotal restraint at the flap’s base. Lengthening the flap by this method will help to ensure the flap rests in the primary defect without undue tension at its tip. An alternate method to lengthen the flap and minimize tip tension at closure is to design the flap with a slightly more obtuse angle (greater than 120 degrees) at the flap’s origination point ( Fig. 7.5 ). This design decreases the degree of rotation necessary during flap execution and subsequently reduces pivotal restraint. Wide undermining around the flap also assists in the redistribution of tension vectors and contractile forces during the healing phase.
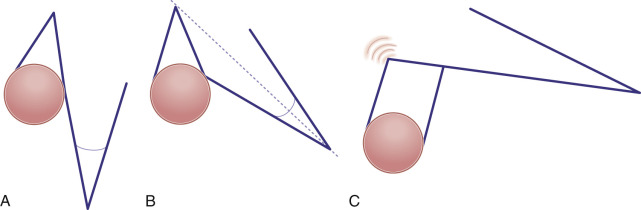
Z-Plasty Effect of Transposition Flaps
All transposition flaps have the ability to induce vertical Z-plasty-like lengthening of the repair area; this lengthening can be decreased by the addition of additional lobes. In other words, the radius of the arc of rotation is greater with fewer lobes. By going from a single lobe to bilobed repair, an additional Z-plasty is effectively added. The result of this is the central limbs of the Z-plasty and the radius (or vertical height) of the repair are shortened as compared with a single-lobe repair. Likewise, in the same fashion the trilobed further shortens the surgical repair relative to the bilobed flap with the addition of another Z-plasty. The Z-plasties are easier to visualize if one imagines the lobes of the flap as triangles. The secondary lobe width is often reduced as much as 10% to 15% because this Z-plasty–lengthening effect reduces the size of the secondary defect.
Modified Rhombic Flaps
Dufourmentel Flap
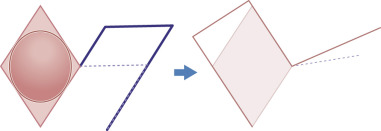
This modification of the classic rhombic transposition flap narrows the angle of the tip of the secondary defect and creates a shorter arc of rotation for the flap. This allows easier closure of the secondary defect and some sharing of the tension between the primary and secondary defects. As in the classic rhombic flap, the DuFourmentel variant of the rhombic flap is designed by extending the first line from the short axis of the rhombic defect ( Fig. 7.6 ). However, the angle at which the first line is extended from the rhombus differs from the classic rhombic flap in that it bisects the angle formed by the first line of the classic rhombic flap (which extends straight from the short axis of the rhomboid defect) and the line formed by extending one of the sides of the rhomboid from the same corner. The length of the first line is equal to that of a side length of the rhomboid. The second line originates from the free end of the first line and is drawn parallel to the long axis of the rhomboid. This second line’s orientation results in a slightly widened pedicle base, a decrease in the tip volume of the flap, a decrease in the amount of movement necessary to execute the flap, and the introduction of some degree of tissue advancement along the long axis of the rhomboid defect. In most cases a tissue redundancy at the base of the leading edge of the flap is generated; this should be removed by excising a slightly larger “dog-ear” at the base of the flap.
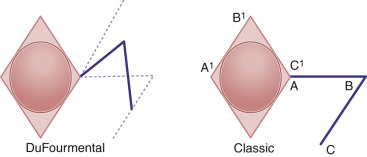
The oblique orientation of the leading edge of the DuFourmentel flap relieves some of the pivotal restraint at the flap’s base, resulting in additional lateral tip tension instead of vertical tip tension seen with the classic rhombic flap design. This allows use of the DuFourmentel flap in situations where lateral tension is more acceptable than vertical tension.
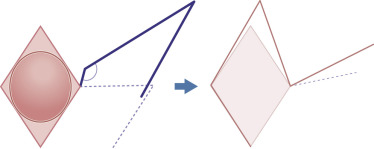
Webster 30-Degree Angle Flap
The Webster modification of the rhombic transposition flap makes the angle of the flap even more acute than the DuFourmentel variant and allows for even greater tension sharing between the primary and secondary defects. A Webster 30-degree angle flap is planned similarly to the DuFourmentel flap, with the exception that the distal tip of the flap is designed to have an angle of 30 degrees ( Fig. 7.7 ). This more acute angle produces a slimmer design and narrower pedicle. The Webster design of the rhombic flap also frequently incorporates an M-plasty in the closure of the Burow triangle excision at the flap’s base. The flap width is approximately 50% of that of the defect; thus the flap relieves only approximately half of the tension from the primary defect. Closure of the flap is therefore partially dependent upon secondary motion at the site of the surgical defect. This design modification is used in situations in which some laxity exists in the horizontal axis of the rhombus-shaped defect. Given that more tension is placed on the primary defect with this design, care must be taken not to distort adjacent anatomic structures.

Double 30-Degree Angle Flap
Another variation of the rhombic transposition flap uses two flaps to borrow laxity from either side of a defect. Essentially resembling a series of Z-plasties, the double 30-degree angle flap is planned by drawing two 30-degree angle flaps, one from each short axis of the rhombus and in opposite directions ( Fig. 7.8 ).
Rhombic Flap Execution: Flap Mobilization and Key Sutures
As with all reconstructive procedures, transposition flaps should be designed while patients are in upright (or near upright) positions. This places the forces of gravity on the face in the typical resting position, allowing more appropriate flap planning. In addition, the defect should not be overly distorted with local anesthetic before designing the flap. The tissue surrounding the defect is then manipulated with a probing hand, and a determination of the local tissue laxity and the adjacent anatomic structure mobility is made. The most appropriate flap is drawn out on the skin with a sterile surgical marker. Even the most experienced surgeons typically mark their lines of incision before reconstruction. The old carpentry adage holds true in reconstructive surgery: “measure twice, cut once.” After designing the flap, anesthetizing the area, and prepping and draping, skin incisions oriented directly perpendicular to the surface of the skin are made along the flap’s proposed lines to the depth of the subcutaneous tissue.
It is very important to make certain that all skin edges are squared off prior to closure. Leaving beveled tissue at the corners or edges places unnecessary force on the tissue edges during closure and prevents proper wound edge eversion. In most cases, it is preferable to remove the redundant Burow triangle at the pivot point of the flap before insetting the flap. Although there are certain cases in which the exact position of the redundant triangle is not as important, this triangle is usually designed to lie in a predetermined location to optimize the final aesthetic result.
The flap is raised at the desired plane with sharp dissection. The plane of dissection is based upon both the anatomic location and the depth of the primary defect. The defect, flap, and undermined tissue should all be of the same relative thickness. The proper undermining plane may vary from the superficial subcutaneous fat to just above the periosteum, depending on the anatomic location and depth of defect. The entire area surrounding the flap and the primary defect is undermined widely to fully mobilize the borrowed tissue and to dissipate contractile forces over a wider area during the healing phase. Failing to sufficiently undermine concentrates the forces of contracture during wound healing on the scar itself, and this may result in depressed wound edges and/or pin-cushioning of the flap.
After undermining, the entire defect, the adjacent undermined zone, and the underside of the flap should be visually inspected for hemorrhage. This may be facilitated with the use of a skin hook, which assists in reflecting the flap and free edges without introducing unnecessary trauma to the epidermis. To better visualize bleeding at the recesses of the undermined tissue, the surgeon should push the skin beyond the wound’s edge back toward the defect, with the fourth finger of the hand holding the skin hook. It is important to get sufficient and precise hemostasis. Postoperative bleeding and hematoma formation can often result in an unfavorable aesthetic result. Similarly, excessive use of tissue cautery, especially at the wound edges, may necrose tissue and produce widened scars. A fine Bishop-Harmon forceps may be used to grasp any visualized bleeding vessel and serve as an appropriate conductor for a very short burst of electrocautery current. This maneuver helps minimize necrosis of the surrounding area by eliminating widespread, indiscriminate use of electrocautery. Charred tissue needlessly increases healing time and may serve as a nidus for infection.
After hemostasis has been achieved, the flap is lifted and transposed over the intervening skin into the primary defect. At this point, the secondary defect can be closed by approximating the dermal edges with a tension-bearing stitch. This stitch is executed by placing a buried vertical mattress suture using a slowly dissolving suture material, such as Vicryl. Proper suturing technique cannot be stressed enough. Undyed suture material is usually selected to minimize visibility in the event that the suture is placed too superficially or is brought to the surface during the healing phase as a “spitting suture.”
Obtaining good wound eversion and wound edge approximation is absolutely critical in achieving aesthetic results. Without these, closures have little chance of being relatively imperceptible after healing has been completed. The optimal time to obtain proper wound eversion is during the placement of the subcutaneous sutures. A properly placed buried vertical mattress suture is one of the skilled reconstructive surgeon’s best tools. It everts the closure line and takes the pressure off the healing wound edge, placing it in the dermis slightly distant to the edge. This allows the wound to heal under little tension and leaves the thinnest possible scar line. After the wound has been everted and closed under minimal tension, cutaneous sutures are meticulously placed to keep the wound edges fully approximated during the initial healing phase. These cutaneous sutures may be fast-absorbing or nonabsorbable materials. If nonabsorbable suture material is used, the sutures, when used in areas of the head and neck, should be examined and removed at 5 to 7 days following the procedure.
Other Transposition Flaps
Banner-Type Flaps
Banner-type flaps are random-pattern, finger-shaped flaps that, like other transposition flaps, tap into adjacent skin to borrow laxity and cover a defect. Banner transposition flaps produce longer, linear secondary scars typically placed at the junction of two cosmetic units, allowing the surgeon to optimally camouflage a long scar.
The fundamental design of the banner flap consists of a finger-shaped flap drawn with a width equal to the width of the defect and a length equal to the distance from the pivot point to the far edge of the defect ( Fig. 7.9 ). The flap is transposed and rotated in an arc around the pivot point to fill the defect. Because the banner flap is a long random pattern flap with a narrow pedicle, the risk of vascular compromise may be high if the flap is too long or if it is harvested from an area of minimal vascularity. Unless the flap is based on a larger-caliber artery, the flap is typically designed to rotate through an angle of 60 degrees to 120 degrees instead of the originally described 180 degrees. In either scenario, a tissue redundancy is generated by the rotational motion of the flap. When removing this redundancy, the excision should be designed in a direction away from the pedicle of the flap to avoid narrowing the pedicle of the flap even further. This will minimize the risk of compromising the blood flow to the flap and maximize its viability.
Banner Transposition Flap Mobilization and Application
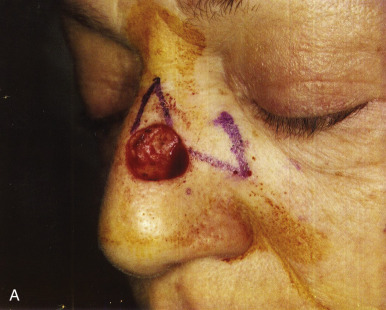
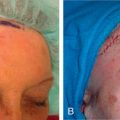
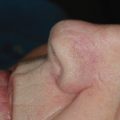
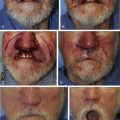
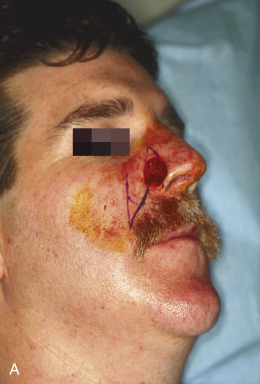
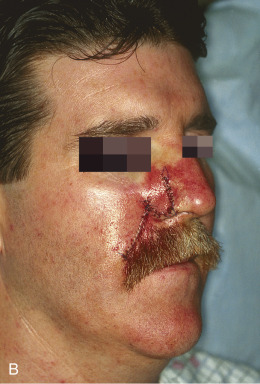
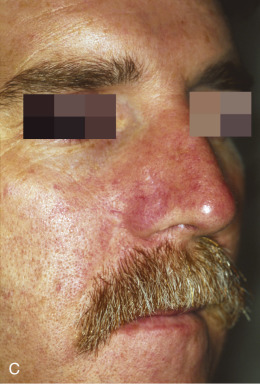
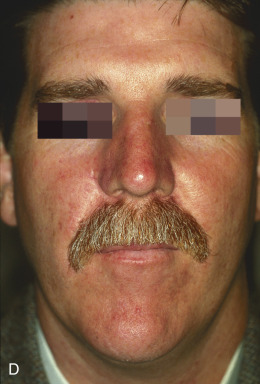
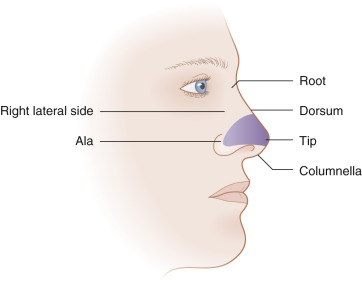
Although not commonly used, typical locations for use of the banner flap include the nasal ala, the superior helix of the ear, and the medial anterior ear. At the nasal ala and inferior lateral side wall, a classic nasolabial transposition flap, a variant of a banner flap, can be designed, with the resulting scar hidden within the nasolabial fold ( Fig. 7.10 ). Although this flap has been maligned for blunting the nasofacial groove, when used properly in the appropriate patient, it offers an excellent reconstructive option for some nasal defects. The flap should be designed so the closure of the secondary defect is hidden in the nasolabial fold but does not come too close to the inferior lateral ala, where blunting of the isthmus (the triangle of flat skin where the upper lip, ala, and nasolabial fold meet) could occur. The redundant Burow triangle superior to the primary defect should be designed to leave the resultant scar on the lateral nasal sidewall.

When the flap is raised, the cheek donor site should be widely undermined. Care should be taken not to harvest more adipose tissue than necessary. If too much adipose is taken while harvesting the flap, the nasolabial fold will be flattened, resulting in cheek asymmetry. When the flap is transposed into place, it should be anchored to the nasal sidewall with a periosteal suture. This reduces tension on the flap. In addition, a tacking suture from the underside of the flap to the area where the alar crease is located on the recipient bed helps re-create the alar groove. This is critical in achieving an aesthetic result with this flap.
The flap is then appropriately trimmed and thinned to match the defect. If this is done before the tacking sutures, it is easy to trim too much off the end, not taking into account the extra length required to re-create the alar crease. Conversely, not trimming and thinning the flap enough may lead to pin-cushioning.
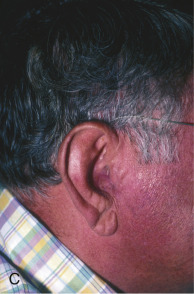
To repair defects of the superior helix, a banner flap can be taken from behind the superior aspect of the ear. The secondary defect is closed along the postauricular sulcus, and the flap is transposed into place along the helix. As with any repair of the helix, it is important to remember the convex nature of the area and to allot enough tissue to re-create this. A simple flat measurement across the defect will not give the true volume of tissue required for reconstruction. By using a slightly wider (not thicker) flap, the forces of contraction during healing will usually elevate the flap slightly in the middle and re-create the convex nature of the helix. Attaining proper wound edge eversion with well-placed buried subcutaneous mattress sutures is critical at the distal aspect of the flap where it joins the helix. If this edge is not everted properly, it will usually contract and appear as a noticeable notch on the helix.
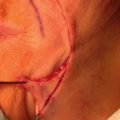
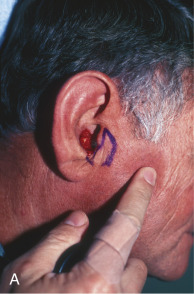
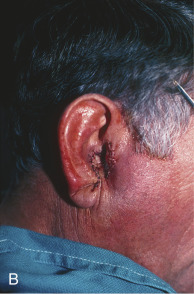
A banner flap may also be used to correct defects of the medial anterior ear, such as the concha, tragus, or crus of the helix ( Fig. 7.11 ). Tissue is harvested from the preauricular area and transposed into the defect. This donor area typically provides ample tissue laxity. Because it is a cosmetic unit junction area (like the melolabial fold and postauricular sulcus), the preauricular area offers an excellent location for placing a minimally visible linear or curvilinear scar. Defects in concha may also be allowed to heal by secondary intention with excellent results.
Multilobe Transposition Flaps
In a single-lobe transposition flap such as the rhombic flap, there is considerable tension across the tip of the flap, which creates pull on the original defect. If there is not sufficient tissue laxity to accommodate this, undesirable distortion can occur. The multiple-lobe flap that uses the lengthening dynamics of the Z-plasty preventing that pull and at the same time recruits tissue from more distant sites with greater laxity to donate to the repair. Therefore these flaps are particularly useful around free margins or critical structures, such as wounds on the alar margin, lips, eyelids, and eyebrows. The addition of multiple lobes also widens the pedicle base, decreasing the likelihood of vascular compromise.
Bilobed Flap
The bilobed flap commonly used nowadays is a highly evolved transposition flap. Its design actually consists of two transposition flaps, used in succession, which follow the same direction of rotation over intervening tissues. The flap allows the surgeon to extend the reach of the transposition flap and borrow laxity from donor sites at a greater distance from the defect. The second lobe also decreases the degree of the arc through which the pedicle moves to borrow from the distal site.
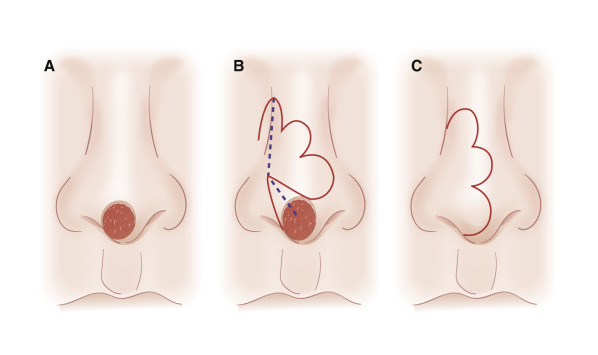
The bilobed flap was first described for use in nasal reconstruction by Esser in 1918, where he designed a flap with each lobe traveling 90 degrees, resulting in a significant dog-ear at the proximal advancing border of the primary lobe. When this type of closure is attempted in the highly sebaceous, thick zones of the lower nose, distortion of the alar rim is inevitable. The bilobed flap became a workhorse flap in nasal reconstruction only after Zitelli published several design modifications to it in 1989. His modifications corrected the original flap’s two major drawbacks; large angles of flap transposition and the production of a dog-ear deformity that typically needed an additional revision procedure. This produced an excellent reconstructive option for the very unforgiving, sebaceous terrain of the lower nose. Zitelli’s modifications are illustrated in Fig. 7.12 . Cook also contributed to modifications of the design with several reviews of the design and application.
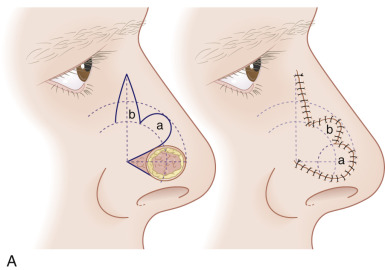

When executed, a bilobed flap resembles the motion of a rotation flap. The modified bilobed flap is designed by drawing the two lobes along a 90-degree arc off of the tip of the center of the primary defect. Unlike the original bilobed flap, the pivot point of this arc extends beyond the width of the defect, incorporating the dog-ear at one side of the circular defect. This is essential to avoid a large, tissue-distorting standing cone. With the larger radius of the arc, the individual lobes travel through fewer degrees of rotation, minimizing the amount of pivotal restraint seen in the original bilobed design. The standing cone should be oriented in an attempt to place this scar in a well-hidden location, such as the alar crease.
The modified bilobed flap calls for the primary lobe to have a width equal to the width of the primary defect ( Fig. 7.13 ). In cases in which there is some degree of laxity in the skin surrounding the primary defect, the primary lobe can be designed up to 10% narrower than the width of the primary defect. Subsequently, the second lobe can also be designed with a smaller width if there is sufficient tissue laxity in the areas of the secondary and tertiary defects. The second lobe, which creates the tertiary defect, should be designed at a 90-degree angle to the midline of the redundant Burow triangle at the pivot point of the flap. Because the majority of the tension is in the closure of the tertiary defect, it should be oriented in such a manner as to not distort any nearby free margins. For example, it is typically oriented perpendicular to the nasal ala when the bilobed flap is used in distal nasal reconstruction.
Some shortening of the lobes of the flap should still be anticipated because of the pivotal restraint through the arc of flap rotation. To compensate for this, the first lobe may be drawn to extend slightly beyond the edge of the primary defect. The angle of separation between the midline that bisects the defect and primary lobe should ideally be 45 degrees. This minimizes both the surgical effort needed to execute the flap and the tension on the edges of the flap after it is in place. A less acute takeoff angle, such as 30 degrees decreases the arc of rotation and decreases the Z-plasty advantage of the double transposition. Using a greater takeoff angle, such as 60 degrees, increases the arc of rotation but narrows the flap pedicle.
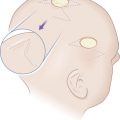
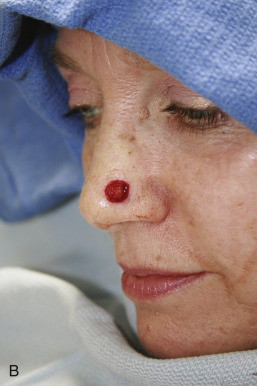
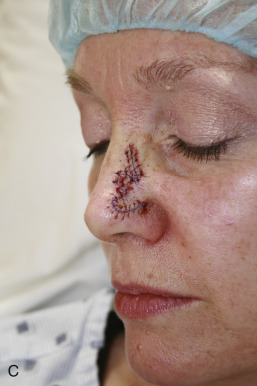
The bilobed flap may be designed in several different directions on the nose. In general, however, more medial defects are usually closed with laterally based bilobed flaps, whereas more lateral defects are closed with medially based bilobed flaps. The bilobed flap is most often selected for reconstruction of defects located over the nasal tip and supratip, the distal nasal sidewall, the medial nasal ala, the auricular helix, and the posterior ear ( Fig. 7.14 ).
These are areas with little local tissue laxity and high potential for distortion with side-to-side closure. The bilobed flap is often described as the flap of choice for repair of defects of the lower one-third of the nose. Familiarity with the bilobed flap and its modifications is essential for surgeons treating nonmelanoma skin cancers.
Bilobed Flap: Mobilization and Key Sutures
Bilobed flaps are usually incised down to the periosteum and undermined and mobilized out to the nasofacial groove in a submuscular (nasalis) plane. This maximizes both flap mobility and vascularity. Wide undermining of the entire area, including the flap and recipient bed, will help distribute the tension vectors of closure throughout the flap and surrounding tissue and minimize the risk of pin-cushioning. As with other flaps, the bilobed flap should not be oversized, and it should rest flush or slightly below the level of the surrounding tissue. The height of the flap is usually best adjusted by trimming the depth of the recipient bed rather than trimming the underside of the flap. This will minimize the chance of vascular compromise of the flap by excess thinning.
The standing cone deformity (SCD) is the center point of the arc of rotation in a bilobed flap, and therefore it is generally advisable to remove it before rotation. The angle of the SCD should be chosen with regard to effects closure tension will have on the neighboring free margins. The SCD should be designed to be 0.75 to 1.5 times the primary defect diameter. The first key suture closes the tertiary defect and pushes the flap toward the primary defect. The second key suture secures the primary lobe into the surgical defect. The exact location of the second key suture must be skillfully chosen by the surgeon such that it avoids dynamic distortion within the repair, correctly aligns the standing cone, and adequately accounts for the size of the primary lobe relative to the surgical defect. Once in place it is important to ensure the SCD preserves contour and the primary lobe is in place before doing any trimming to the flap.
Trilobed Flap
An additional lobe can be added on to a bilobed flap to create a trilobed flap. The primary advantages of the trilobed flap are the ability to recruit tissue from areas of laxity even more distant and/or to rotate tension vectors to a greater degree than possible with a single or bilobed transposition flap. For example, when repairing inferior-malar defects, bilobed flaps have a tendency to cause either ipsilateral alar elevation because of secondary tension vectors, ipsilateral alar depression because of “bulldozing” and Z-plasty lengthening, or contralateral alar elevation if tension vectors on the secondary lobe are oblique rather than vertical. The design, mechanics, and principles of trilobed flaps are essentially the same as bilobed flaps ( Fig. 7.15 ). In trilobed flaps, the third lobe extends the arc of rotation to angles of 120 degrees to 150 degrees allowing for a change in the tension vectors of the donor site as compared with a bilobed flap in the same area. As discussed previously, the addition of a third lobe adds an additional Z-plasty to the repair, which shortens the central limbs involved in the repair and the tension to transpose the flap. The primary lobe should be designed such that it is equal in size to the primary defect. Ideally, the secondary and tertiary lobes will be in progressively more flexible skin, if this holds true they can often be designed 85% to 90% and 75% to 80%, respectively, of the primary lobe diameter. This undersizing places these lobes under a small amount of tension, which helps to minimize pin-cushioning. Finally, the pedicle base is generally wider in trilobed flaps, decreasing the risk of vascular compromise associated with rotation of a narrow pedicle.
General Applications of Transposition Flaps
The most common areas where transposition flaps are used include the nasal dorsum and sidewalls, the medial and lateral canthi, the lateral forehead, temple, cheek, the perioral region, the inferior chin, and the dorsal hand ( Fig. 7.16 ). The following is a brief review of the rationale for choosing a transposition flap in these specific locations.

Dorsum of the Nose and the Nasal Sidewall ( Fig. 7.17 )
The use of surrounding skin in transposition flaps helps maintain optimal color and texture match when repairing defects of the nasal dorsum or sidewall. The nose can be divided into several zones based on color, texture, sebaceous quality, and mobility. The skin of the nasal dorsum and sidewalls is thin, loose, and nonsebaceous. This area is designated zone I. Zone II consists of the thick, sebaceous, relatively immobile, and much less forgiving skin of the nasal supratip, tip, and ala. Zone III is a small area on the distal nose, including the soft triangles, columella, and infratip lobule, whether the skin again becomes thin, loose, and nonsebaceous. The characteristics of zone I make it the best area to accommodate the added tension vectors of a transposition flap donor site. The less mobile skin of zone II often requires recruitment of tissue from the more distant, yet more mobile, skin of zone I.