Abstract
Advancement flaps are the most basic method of adjacent tissue transfer in cutaneous surgery. Their clean, simple lines and ability to displace standing cones to the most ideal location make them perfect for camouflage along relaxed skin tension lines and within cosmetic subunits. A drawback to these flaps is that they do not recruit large amounts of tissue, making them ill-advised for large wounds without surrounding laxity. Multiple variations of the basic advancement flap exist and are discussed in detail within this chapter.
Keywords
advancement flap, adjacent tissue transfer, facial reconstruction, helical rim advancement flap, Burow triangle flap, Peng flap
Flap Design and Considerations
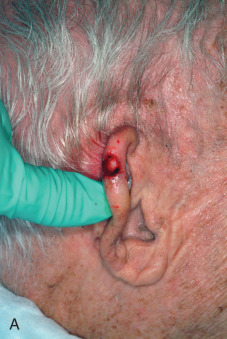
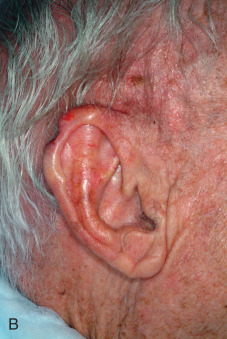
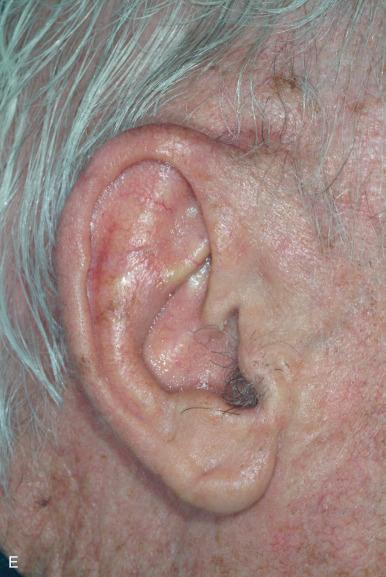
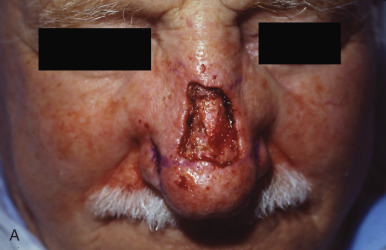
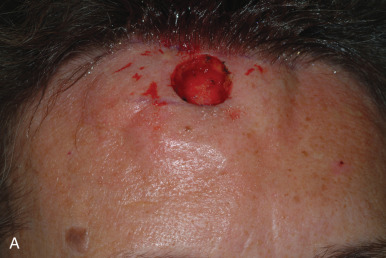
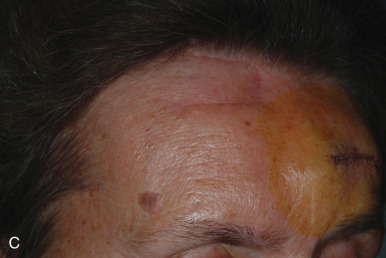
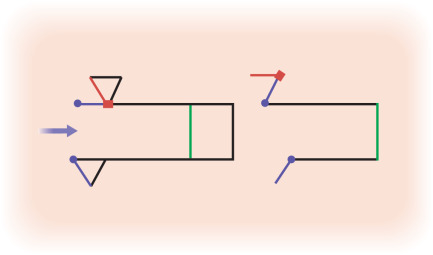
Advancement flaps are the oldest and most basic methods of adjacent tissue transfer in cutaneous surgery. They can be thought of as sliding flaps that move along a single vector directly into the surgical defect ( Figs. 4.1 and 4.2 ). After the defect is closed, the surrounding tissue provides the secondary movement or opposing force. The flap is designed by extending two parallel incisions (not necessarily of the same length) from one side of a surgical defect ( Fig. 4.3 ). Because the flap is created from adjacent skin, one edge of the defect becomes the advancing tip of the flap. This basic design has also been called a U-plasty or rectangular flap. The prominent horizontal lines make the advancement flap particularly useful in the reconstruction of the eyebrow and forehead areas. It can also be effective for reconstruction of defects on the upper lip, dorsal nose, and helical rim.

The primary advantage of an advancement flap lies in its ability to redistribute standing cones (dog-ears) to a more favorable location that is not necessarily contiguous with the defect. When a circular wound is closed with a linear side-to-side closure, standing cones develop adjacent to the apices. In both rotation and transposition flaps, a standing cone develops at the pivotal base, where it must be excised to allow for full movement of the flap. The geometry of an advancement flap allows for excision of tissue redundancy anywhere along the length of the flap. In this way the incisions can be hidden within relaxed skin tension lines (RSTLs) or cosmetic unit junction lines.
There are several factors that must be taken into account when designing an advancement flap. The most important consideration is the amount of tissue laxity available for closure of the defect. An advancement flap does not lower the tension of closure much beyond that which can be achieved with a side-to-side closure, and it is not a good choice for large defects without surrounding laxity. With experience, the surgeon can estimate the degree of tissue mobility and identify tissue reservoirs by pinching and stretching the defect and surrounding skin. The importance of physical manipulation of tissue to estimate mobility cannot be stressed enough. After the flap is incised from the surrounding tissue, it relies on the blood supply within its pedicle to maintain viability. The flap’s perfusion is determined largely by its dimensions, its thickness, the quality of the vasculature within its pedicle, and the tension placed upon it during closure. Blood flow to the tip of the flap is inversely related to the tension of wound closure, and even a wide, well-perfused flap is at risk for necrosis if placed under too much strain.
Any form of wound closure has the potential to distort a free margin, but advancement flaps, which are strictly linear, carry a significant risk if not oriented correctly. The surgeon can estimate the potential for asymmetry by pinching the defect closed in the direction of the flap’s movement. If this maneuver distorts a free margin, then the flap should be reoriented or another form of reconstruction considered. Other important considerations in flap design include determining the best location for incision lines and where to displace standing cones.
Flap Mobilization and Key Sutures
After the flap design has been determined, the proposed incision lines should be marked on the skin prior to infiltrating additional local anesthesia. This allows for more accurate placement without distortion by tumescence. To ensure symmetry, these markings should be confirmed with the patient in the upright position. After local anesthesia is achieved, the surgical defect may be undermined in all directions prior to incising the flap. This allows the surgeon to assess the degree of tissue laxity and to reconfirm the surgical plan. It is wise to approach each reconstruction with several alternatives in mind, recognizing that intraoperative adjustments in the surgical plan may be necessary. For example, there are times when unexpected laxity may allow for a less complex closure with comparable cosmesis and lower morbidity. Conversely, situations can arise in which there is less movement than expected, requiring flap modification. The potential for either scenario always exists, and it is best to have considered all potential outcomes before starting any surgical procedure. It is usually helpful to make incisions that keep the most options available first and save those that lock into a particular closure for last.
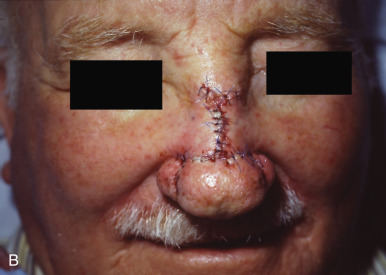
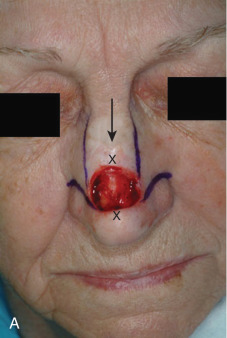
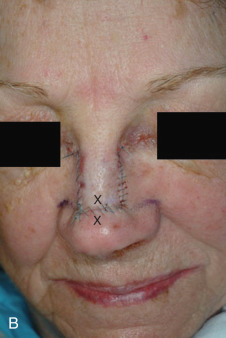
The classic advancement flap is designed for a rectangular defect, but it is not always necessary to square the edges of a circular defect prior to incising the flap. In fact, it may be prudent to wait until the flap has been mobilized to evaluate whether the recipient defect should be modified or the flap tip rounded. Because flap viability is directly related to the length and thickness of the pedicle and not the shape of the flap distal to it, the surgeon is free to choose the option that achieves the best aesthetic result. In fact, there may be times when it is deemed wise to enlarge the defect to allow the suture lines to fall within RSTLs ( Fig. 4.4 ).
In general, the maximum length for a random pattern flap on the face is limited to three to four times the width of the pedicle. The surgeon may consider making the initial incisions slightly shorter than were originally designed to accommodate unexpected laxity discovered after undermining. These incisions can always be extended if additional length is needed. The flap should be thick enough to fill the defect and include the subdermal vascular plexus with at least a portion of the upper subcutaneous fat. In the absence of vital anatomic structures, the flap should become progressively thicker as it extends towards the base of the pedicle. This allows for larger-caliber vessels to be recruited and increase the likelihood of flap survival. If there is a question of sufficient blood supply, studies have shown it may be appropriate to deepen the defect to accommodate a thicker flap with more robust perfusion.
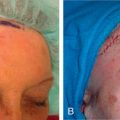
In an advancement flap, the entire flap and surrounding skin should be undermined in all directions. This increases mobility, distributes tension more evenly, and, by spreading out the forces of contracture that will occur during wound healing, may limit the development of pin-cushioning. The exact undermining depth will vary with the location of the defect. In anatomic danger zones, such as over the zygoma and mandible and within the posterior triangle of the neck, the dissection must remain in the upper subcutaneous fat and above motor nerves, or permanent functional loss may result. Small defects on the forehead can be undermined in the subcutaneous fat above the frontalis fascia. However, large forehead defects are best dissected in the subgaleal plane. In hair-bearing locations such as the eyebrow, the undermining should be well into the subcutis and deep to the hair papillae. The nose should be undermined in the submuscular plane and the ears above the perichondrium. After undermining has been performed, the flap is pulled gently into the defect to test its mobility. If this maneuver produces excessive tension, the most common cause is insufficient undermining. If tension remains despite wide undermining, the surgeon may consider lengthening the flap or converting it into a bilateral advancement flap to obtain additional tissue movement.
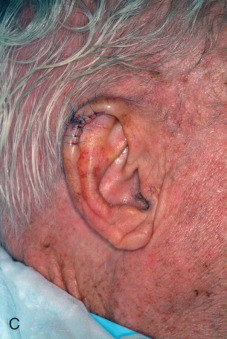
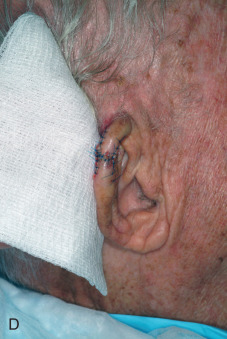
If the surgical defect is secondary to Mohs micrographic surgery, it is likely that the wound edges are beveled. Prior to insetting the flap, the beveled tissue should be excised flush with the epidermis to create a crisp 90-degree vertical edge. After the recipient site has been prepared and undermining completed, judicious hemostasis should be achieved. There is a delicate balance between inadequate hemostasis, which increases the risk for hematoma, and excessive thermal injury that induces inflammation and increases the potential for infection. Small vessels in the skin edge will tamponade with closure and usually do not require electrocoagulation. Large vessels should be clamped and individually spot-electrocoagulated or suture-ligated. After the flap is able to slide into the defect with minimal tension and hemostasis has been obtained, the key suture is placed in the advancing edge to close the wound. In an advancement flap, the key suture closes the primary defect and serves to align the flap.
By design, an advancement flap has skin edges of unequal lengths, and closure of the primary defect almost always creates tissue redundancies along the outer edges of the surrounding skin. In most cases it is best to wait until the flap has been undermined and the primary defect closed before excising the standing cones, because tissue stretch and accommodation often leave them smaller than were expected preoperatively. Not infrequently, the redundant tissue may be distributed itself by the “rule of halves” and will not require excision at all.
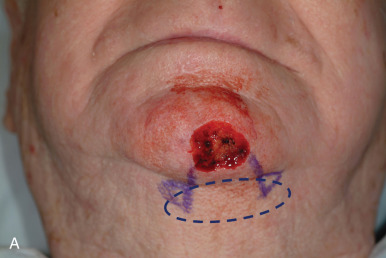
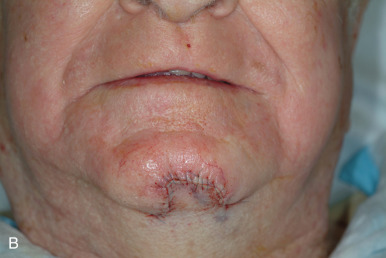
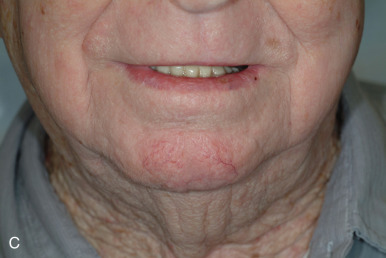
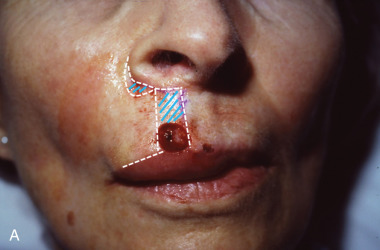
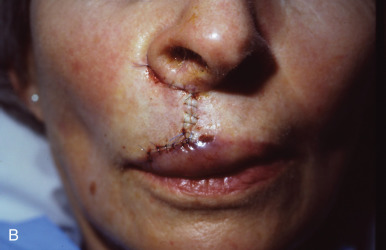
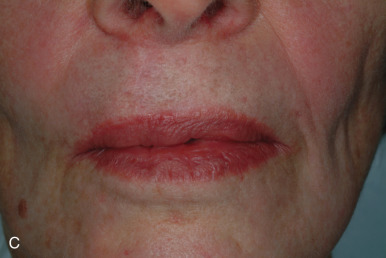
If excision is necessary, one common method is to remove the standing cones as Burow triangles. These triangular cones can be excised at the base of the flap to create a flared or “hockey stick–shaped” suture line. Alternatively, in advancement flaps, they may be placed at any point along the skin edge. The traditional Burow triangle is oriented with its base placed along the wound edge and apex pointing away from the flap, but the apex may be inverted if a zigzag suture line is desired ( Fig. 4.5 ). This maneuver lengthens the overall suture line but may decrease the extent of contraction and in certain instances be more inconspicuous than a linear scar.
Flap Modifications and Applications
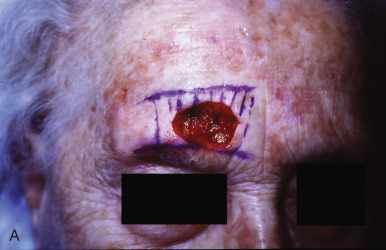
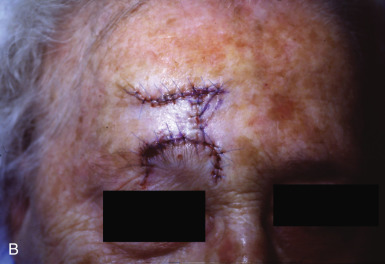
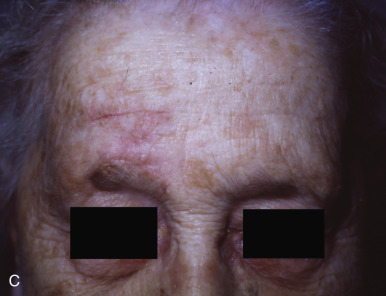
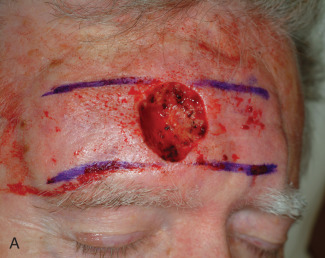
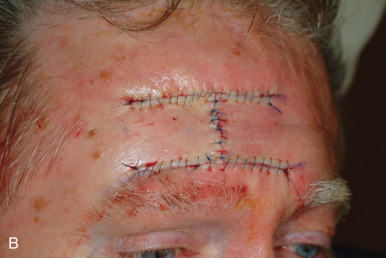
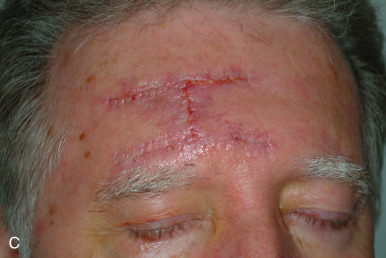
H-Plasty or Bilateral Advancement Flap
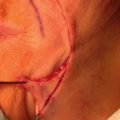
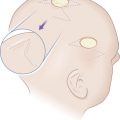
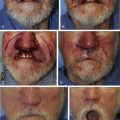
In the H-plasty or bilateral advancement flap, parallel incisions are created on opposite sides of the defect. The two limbs of the flap are then advanced centrally to form an H -shaped suture line ( Fig. 4.6 ). This flap is most useful for locations with prominent horizontal lines, such as the forehead, eyebrow, or helical rim. The incision lines do not need to be exactly parallel and may be curved to conform to RSTLs ( Fig. 4.7 ). The advantage of an H-plasty is that each flap must advance only half as far as the single flap design. It is used in situations in which a unilateral flap will not provide adequate tissue for tension-free wound closure. A significant drawback to the H-plasty is the multiple linear incisions required for its execution ( Fig. 4.8 ). Depending on the anatomic location, it may be prudent to incise and elevate one of the flaps on the least conspicuous side to see whether this achieves sufficient movement to close the defect. If there is excessive tension despite wide undermining, the second flap can be incised. However, keep in mind that both of the flaps do not need to be the same size. After hemostasis has been achieved, the key suture is placed in the advancing edges of both flaps and closes the primary defect. Similar to the single advancement flap or U-plasty, tissue redundancies will occur along the edges of each flap that will need to be excised as Burow triangles or redistributed by the rule of halves. Another drawback to the H-plasty is scar contraction. This can be much more evident when adjacent to a free margin ( Fig. 4.9 ). Placing a Z-plasty in the advancing edge of the flap can serve to widen it and offset this effect ( Fig. 4.10 ).