Transaxillary Breast Augmentation
Louis L. Strock
The transaxillary approach for breast augmentation has the appeal of allowing for a breast implant to be placed with no incisions on the breast. The approach was first reported in 1973 by Hoehler, who described the placement of an implant in a partial subpectoral pocket using mainly blunt dissection (1). While other early reports provided encouragement for this approach based on short-term results, technical limitations became readily apparent that limited its popularity (2). This led Tebbetts to describe a series of technical refinements based on anatomic studies and long-term follow-up, seeking to limit complications using this approach (3). Despite these efforts, this early approach, which depended completely on blunt technique with limited or no tissue visualization, had limited appeal because of problems with implant asymmetry and a general lack of technical control compared with the more conventional inframammary and periareolar approaches.
The addition of endoscopic assistance to the transaxillary approach, as first described by Price et al., allowed for direct visualization of the tissue layers to be released, helping to overcome the greatest limitation of the previous transaxillary approaches that were based on blunt technique with no tissue visualization (4,5). The improved visualization allowed for improved hemostasis, improved control of inframammary fold level and shape, and the ability to precisely divide specific tissue layers according to the needs of each patient. The added technical control afforded by endoscopic assistance to the transaxillary approach for breast augmentation has been reflected in multiple patient series reports (4,5,6,7,8,9,10,11,12). This combined experience with improved technical control suggests that the endoscopic approach for transaxillary breast augmentation has become the standard for implant placement using a transaxillary incision.
I am a strong advocate for the use of endoscopic assistance when the transaxillary approach is used for breast augmentation due to the added technical control afforded by visualization of the specific tissue layers to be divided. This chapter presents this approach in detail, followed by a discussion of the nonendoscopic approach, where the technique differs in the tissue release phase of the procedure.
Markings
Markings are routinely placed in the preoperative holding area with the patient in the sitting position and include breast and chest wall width, tissue thickness, inframammary fold position, inframammary fold position planned, and exact incision location (Fig. 113.1) The anatomic chest midline and midbreast meridian at the inframammary fold are marked with the patient in the sitting position and reconfirmed when the patient is supine under anesthesia on the operating table.
Positioning
The patient is placed in a supine position with the arms secured onto arm boards at 90 deg. The procedure is performed under general anesthesia with the aid of short-acting muscle relaxation. Draping is performed as with routine breast augmentation, except that the surgeon must be able to work above and below the shoulder on each side. The anesthesia machine is located at the head of the bed, also with enough space to allow for the surgeon to perform a majority of the procedure from a position above the shoulder, facing the endoscopic equipment at the foot of the bed. In addition to the endoscopic tower, all cautery and suction lines are directed toward the foot of the bed (Fig. 113.2).
Equipment
The equipment used is that described by Price et al., consisting of an endoscopic tower with monitor, endoscopic light source, recorder, and camera. The camera is mounted to a 10-mm downward-angled endoscope that slides into an Emory Breast Retractor (Cardinal Health, Dublin, OH) sheath with a grooved handle that holds the fiberoptic light cord (4,5). I prefer use of Agris-Dingman dissectors for blunt dissection (5,8,12) (Fig. 113.3A, B).
Incisions
The incisions for the procedure differ depending upon whether saline or silicone gel implants are to be used. For saline augmentation, an incision 2.5 to 3 cm in length is marked in the axillary apex, within an existing skin crease (Fig. 113.4A). Alternatively, for silicone gel augmentation, an incision 5 cm in length is used. The markings for this incision begin with a dot marked in the axillary apex. A line is then drawn anteriorly, in an existing skin crease, just short of the posterior boundary of the pectoralis major muscle. The posterior portion of the incision, beginning at the dot in the axillary apex, is marked in a posterior and slightly superior direction. There marks are carefully made to be confined within the axilla (Fig. 113.4B). These marks are usually made in the preoperative holding area with the patient in a sitting position to ensure proper incision placement behind the anterior axillary fold. While some prefer the exposure for the initial dissection provided by the longer incision, regardless of implant type to be used, I strongly prefer use of the longer incision only for silicone gel implants. In my experience, the short incision as used routinely for saline augmentation is visible for up to 6 months, as compared with 9 months for the longer incision routinely used for silicone gel augmentation (Fig. 113.5).
 Figure 113.1. Preoperative markings. |
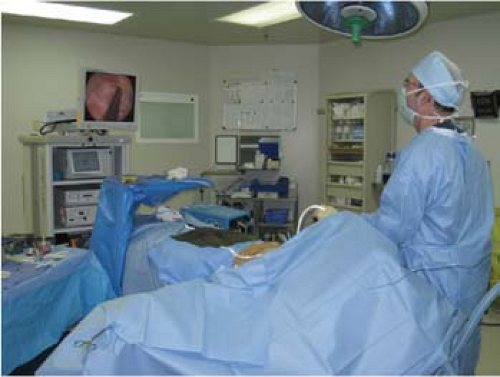 Figure 113.2. Patient is positioned with arms out, allowing room for the surgeon to perform the procedure from above the shoulder. Note the endoscopic tower at the foot of the operating room bed.
Related posts: Follow-Up After Surgery for Primary Breast Cancer: Breast-Conserving Therapy and Mastectomy Follow-Up After Surgery for Primary Breast Cancer: Breast-Conserving Therapy and Mastectomy
 Breast Implants: Materials and Manufacturing Past, Present, and Future Breast Implants: Materials and Manufacturing Past, Present, and Future
 Reconstruction of the Irradiated Breast Reconstruction of the Irradiated Breast
 Perforator Flaps in Breast Reconstruction Perforator Flaps in Breast Reconstruction
 Lipomodeling of the Reconstructed Breast Lipomodeling of the Reconstructed Breast
 The Inframammary Approach to Augmentation Mammaplasty The Inframammary Approach to Augmentation Mammaplasty
Stay updated, free articles. Join our Telegram channel
Full access? Get Clinical Tree
 Get Clinical Tree app for offline access

|