Total knee arthroplasty (TKA) is a successful surgical procedure that provides excellent and durable relief of pain and improvement in functional status for patients with degenerative joint disease (DJD) of the knee.
 Cement fixation is currently the most popular method of fixation for TKA.
ANATOMY
 The knee is a synovial hinge joint with little rotational motion.
 The stability of the joint is provided by both bony and soft tissue constraints, particularly the collateral and cruciate ligaments.
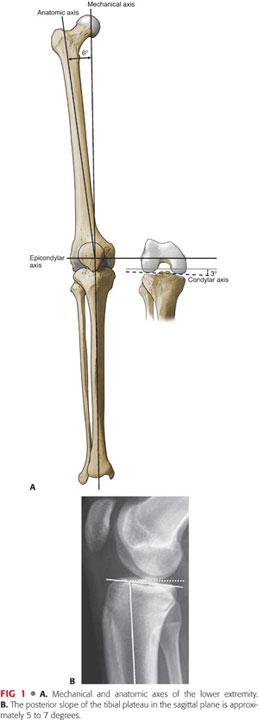
 The mechanical axis of the lower extremity is a straight line drawn from the center of the femoral head to the center of the tibiotalar joint, and constitutes the weight-bearing axis for the lower extremity.
 In the tibia, the mechanical and anatomic axes are the same, whereas in the femur, the two are different by approximately 6 degrees (FIG 1A).
The exact difference between the mechanical and anatomic axes of the femur differs slightly based on femoral neck offset and femoral length (ie, shorter femurs with higher offset will result in a greater difference).
This creates a femorotibial valgus angle with respect to the intramedullary (IM) canals of the femur and the tibia of approximately 6 degrees.
The epicondylar axis of the femur is perpendicular to the mechanical axis.
At the condylar level, there is an additional 3 degrees of tibia vara and compensatory femoral valga, resulting in a total of 9 degrees of valgus between the condylar joint line and the femoral shaft.
 The varus orientation of the joint line, combined with the offset of the hip center of rotation, results in the weight-bearing surface of the tibia being parallel to the ground during a single-leg stance.
 The asymmetry of the distal femoral condyles is also carried over to their posterior surfaces. When the normal knee is flexed, the joint remains parallel to the floor. For this relationship to be maintained on the varus tibial surface, there must be an asymmetry of the posterior dimensions of the femoral condyles. When observed in flexion, the medial femoral condyle extends more posterior than the lateral femoral condyle by approximately 3 degrees.
 The sagittal alignment of the tibial articular surface is also important. In the sagittal plane, the tibia is sloped posteriorly about 5 to 7 degrees (FIG 1B). In the normal knee, the asymmetry of the bony anatomy maintains the alignment of the joint and ligamentous tension.2
PATHOGENESIS
 Arthritis of the knee can be generally divided in osteoarthritis (OA) and inflammatory arthritis (RA):
OA, the most common type of DJD, can be subdivided into two major categories:
• Primary OA: articular degeneration without any apparent underlying reason
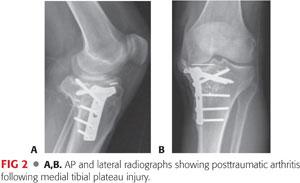
• Secondary OA: articular degeneration resulting from another primary etiology (eg, posttraumatic arthritis) (FIG 2)
• In primary OA, the medial compartment is most often affected, whereas lateral compartment disease is thought to arise from trauma or aberrant anatomy, frequently hypoplasia of the lateral femoral condyle.
RA is a systemic inflammatory condition that commonly affects multiple joints earlier on in life.
NATURAL HISTORY
 The natural history of DJD is typically a progression of disease leading to increasing pain and disability. Although the intensity of clinical symptoms may vary, they usually become more severe, frequent, and debilitating over time. The rate of progression varies from patient to patient.
 Whereas medications can help control the progression of RA and other inflammatory conditions, no proven disease-modifying agents for the treatment of knee OA currently exist.
PATIENT HISTORY AND PHYSICAL FINDINGS
 Historical findings of DJD typically include the following:
Pain that is typically better with rest and worse with increased activities
Stiffness
Swelling
Subjective instability or giving way of the knee
Night pain and rest pain can be indicative of more severe disease
History of prior knee injury or surgery
Progressive bowing of the knees or “knock knees”
 Physical examination findings typically include the following:
Varus or valgus knee deformities, particularly with weight bearing
Limp
Muscle atrophy
Effusion
Joint line or patellofemoral tenderness to palpation
Painful, limited range of motion (ROM)
Crepitus
 When considering knee replacement surgery, it is also important to observe for the following:
Skin condition, including old scars or psoriatic lesions
Ligamentous stability
Active and passive ROM
Varus or valgus deformities
Muscle strength
Neurovascular status
 Specific tests for examining the osteoarthritic knee before arthroplasty include the following:
A Q-angle of more than 15 degrees is often the cause of patellar subluxation/dislocation or patellofemoral pain and arthritis.
Anterior drawer test: Increased anterior translation of the tibia compared to the other side plus an indefinite end point indicates anterior cruciate ligament (ACL) deficiency.
Posterior drawer test: Translation of the tibia more than 10 mm posterior to the femoral condyle is highly suggestive of multiligamentous knee injury and deficiency of the posterior cruciate ligament (PCL).
Varus and valgus stress test: Instability at 30 degrees of flexion suggests isolated collateral ligament injury. Instability at both 0 and 30 degrees is suggestive of a multiligamentous injury.
Patellar apprehension test: A patient with a history of patellar instability may report a sensation that his or her patella feels as if it is about to dislocate.
Patellar tilt test: More than 15 degrees of lateral tilt is suggestive of laxity. Lack of patellar tilt is suggestive of a tight lateral constraint.
The patellar grind test reveals pain or crepitus.
Quadriceps active test: Forward translation of the tibia after attempted knee extension is positive for PCL insufficiency (reduction of posterior tibial sag).
 It is critical to evaluate both the ipsilateral hip and lumbar spine to rule out hip or spine pathology as a major contributor to knee pain. Evidence of possible hip or spine pathology includes the following:
Poorly localized knee pain or thigh pain
Radiation of symptoms into the leg or foot
Worsening pain with prolonged sitting or lying down
Concomitant numbness or tingling
Trendelenburg gait pattern (ie, leaning over the affected extremity during the stance phase)
Reproduction of knee pain with hip ROM or passive straight-leg raise testing
Lack of knee swelling or tenderness to palpation on examination
Absent or diminished reflexes
Pain out of proportion to radiographic examination findings
IMAGING AND OTHER DIAGNOSTIC STUDIES
 Standard radiographs include the following:
Standing anteroposterior (AP), which reveals joint space narrowing and dynamic instability, presence or absence of marginal osteophytes, subchondral sclerosis, and angular deformities
Standing posteroanterior (PA), typically taken in 30 to 45 degrees of flexion, which reveals chondral wear in the functional zones of the femoral condyles as well as occult deformity not seen on the AP view
Standing lateral in extension to reveal patella, posterior tibial and posterior femoral condyle osteophytes, native tibial slope, and patellar height
Merchant view, which demonstrates patellar position, patellofemoral joint space and osteophytes, and evidence of trochlear hypoplasia
 Additional radiographs that may be necessary include the following:
Full-length standing films, particularly in cases of prior long bone injury or deformity
Hip and spine films if suspicion exists for referred pain
 Advanced imaging studies such as computed tomography, magnetic resonance imaging, and bone scan are typically not necessary, unless history and physical examination findings are strongly suggestive of pathology with negative plain films.
DIFFERENTIAL DIAGNOSIS
 Any potential cause of local or diffuse knee pain should be considered in the differential diagnosis of knee OA, including the following:
Hip arthritis
Low back pain/spinal stenosis
Patellofemoral syndrome
Meniscal tear
Bursitis
Infectious arthritis
Gout or pseudogout
Iliotibial band syndrome
Collateral or cruciate ligament injury
NONOPERATIVE MANAGEMENT
 A wide range of nonoperative modalities are available for treatment of knee OA. These interventions do not alter the underlying disease process but may substantially diminish pain and disability.
Health and behavior modifications, including patient education, physical therapy, weight loss, and knee braces
Pharmacotherapy includes acetaminophen, nonsteroidal anti-inflammatory drugs, and glucosamine and/or chondroitin sulfate.
 Intra-articular injections
Corticosteroid injections in knees with considerable inflammation (eg, swelling) are useful.
Hyaluronic acid (viscosupplementation)
SURGICAL MANAGEMENT
 Osteotomy may be indicated for unicompartmental knee OA associated with malalignment or for correction of symptomatic posttraumatic malunions about the knee.
 Arthroscopic débridement and lavage has a minimal role in the treatment of knee OA, except in cases where mechanical symptoms (eg, locking and catching) constitute the vast majority of symptoms.
 Arthroplasty: partial or total knee arthroplasty
Indications
 TKA is a valuable intervention for patients who have severe daily pain along with radiographic evidence of arthritis.
 TKA is typically reserved for those patients who have failed several methods of nonsurgical treatment.
Contraindications
 Absolute
Active or latent (<1 year) knee sepsis
Presence of active infection elsewhere in the body
Incompetent quadriceps muscle or extensor mechanism
 Relative
Neuropathic arthropathy (eg, Charcot arthropathy)
Poor soft tissue coverage or skin conditions such as uncontrolled psoriatic lesions in the vicinity of the incision
Well-functioning and painless knee ankylosed in a good position
Morbid obesity (body mass index >40 kg/m2)
Noncompliance due to major psychiatric disorders, including dementia, hostile personality, or alcohol or drug abuse
Insufficient bone stock for reconstruction
Poor health or presence of comorbidities that make the patient an unsuitable candidate for major surgery and anesthesia
The patient has poor motivation or unrealistic expectations.
Severe peripheral vascular disease
Preoperative Planning
 A comprehensive medical and drug history is mandatory to confirm that the patient is an appropriate candidate for major surgery and anesthesia.
 Good-quality radiographs must be obtained, as described earlier.
 Template overlay is used to estimate component size and bone defects as well as the potential need for augmentation.
Positioning
 The skin around the knee is shaved using clippers shortly before the procedure in a holding area outside the room where the procedure will be performed. Shaving should be performed in such a manner that skin integrity is preserved.
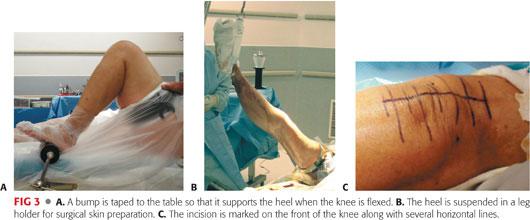
 The patient is positioned supine on the operating table. The upper torso is secured with a protective belt to allow tilting of the table as needed. A roller or a bump is securely taped to the table so that it supports the heel when the patient’s knee is flexed and frees the assistant’s hands (FIG 3A).
 A lateral post and/or a sacral bump may be used to prevent intraoperative hip abduction or external rotation.
 A tourniquet is applied snugly and as far proximally as feasible to the upper thigh. In obese or short-limbed patients, it may be necessary to use a sterile tourniquet to ensure adequate access to the surgical field.
 The heel is suspended in a leg holder (FIG 3B).
 An adhesive drape is put in place distal to the tourniquet to prevent antimicrobial solutions from dripping under the tourniquet.
 Preoperative antibiotics are administered 30 to 60 minutes before the skin incision is made and 5 to 10 minutes before the tourniquet is inflated. Typically, these include first-generation cephalosporins. Alternatives such as vancomycin or clindamycin are sometimes used, particularly in patients with beta-lactam allergies.
 Surgical skin preparation is begun using a broad-spectrum germicidal agent.
 A meticulous and secure draping technique is important to reduce the risk of infection. Bulky drapes obscure the palpable bony landmarks, such as malleoli or metatarsal bones, which are routinely used for accurate bone cuts, rotation, and alignment in knee arthroplasty.
 The incision is marked on the front of the knee along with several horizontal lines that will be used to align the skin properly during closure (FIG 3C).
Classically, an anterior longitudinal midline incision is used for TKA. This incision may sacrifice the infrapatellar branch of the saphenous nerve, causing an area of lateral numbness; the patient should be warned about this possibility before the surgery.
Principles of incisions for TKA include the following:
• Blood is primarily supplied to the skin of the anterior aspect of the knee from the medial side.
• Prior scars should be taken into consideration to preserve skin vascularity.
• Preexisting anterior longitudinal scars should be incorporated when possible.
• When parallel anterior longitudinal scars are present, the most lateral one should be used if possible.
• If it is not possible to use a prior incision, a wide bridge of intact skin at least 8 cm should be allowed between the new incision and the previous scar.
• Horizontal scars can be crossed at right angles, and short oblique scars may be ignored.
• Avoid acute angles of intersection.
TECHNIQUES
 Initial Exposure
If using a tourniquet, the lower extremity is exsanguinated and the tourniquet inflated.
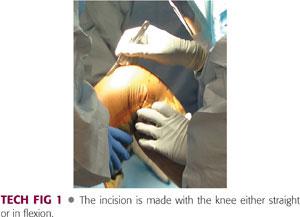
The incision is classically made from the superior edge of the quadriceps tendon proximally (one handbreadth above the superior pole of the patella) to the inferomedial aspect of the tibial tuberosity (TECH FIG 1).
The skin, fat, and fascia are incised directly down to the extensor mechanism, and the medial and lateral flaps are reflected only as far as necessary to have adequate exposure while preserving their blood supply.
Full-thickness skin flaps are created to minimize risks of skin necrosis.
Once the deep fascia is opened, the prepatellar bursa is incised and retracted medially and laterally. The paratenon of the patellar tendon should be exposed and protected.
 Arthrotomy
The arthrotomy can be performed using the medial parapatellar, subvastus (Southern), or midvastus approaches (TECH FIG 2).
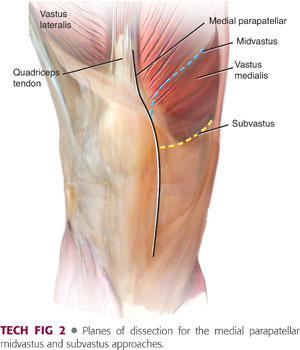
The most current data indicates that the results following TKA using any of these three approaches are similar.3,16
Medial Parapatellar Approach
The quadriceps tendon is cut longitudinally from proximal to distal along its medial border, leaving a cuff of tendon approximately 5 to 10 mm wide. Then the incision is carried further, skirting along the medial border of the patella and patellar tendon.
The arthrotomy incision is made through the medial retinaculum, capsule, and synovium, leaving a 5-mm cuff of retinaculum attached to the patella to facilitate repair at the end of the procedure. Distally, the incision should stop at the inferior aspect of the patellar tendon insertion, proximal to the insertion of the pes anserine tendons on the superomedial tibia.
Subvastus (Southern) Approach
Blunt dissection is carried from the medial intermuscular septum. Care should be taken to avoid damaging the intermuscular septal branch or the articular branch of the descending genicular artery. This can be accomplished by limiting proximal dissection to 10 cm or less.
A transverse incision is made at the midpatella through the medial retinaculum and inferior to the vastus medialis.
This incision is stopped once the patellar tendon is reached, and a second incision is made along the medial border of the patellar tendon approximately 1 cm along the medial border to the tibial tubercle.
Midvastus Approach
Blunt finger dissection is begun at the superomedial pole of the patella in the midsubstance and through the full thickness of the vastus medialis muscle, and is extended parallel to its fiber, to a maximum of 4 cm proximal medial to this starting point. By doing this, the incision does not extend far enough medially to violate the saphenous nerve to the vastus medialis obliquus. The medial superior genicular artery and the muscular branches of the descending genicular artery are similarly preserved.
 Knee Joint Exposure
The soft tissue sleeve is dissected from the proximal medial tibial metaphysis (TECH FIG 3A) by taking the amount of varus or valgus deformity into account.
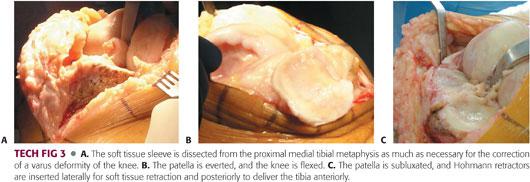
More extensive dissection is performed for knees with varus deformity and limited or no dissection for knees with valgus deformity.
With sharp dissection or cautery, a subperiosteal layer that includes the deep medial collateral ligament (MCL) is raised carefully from the medial tibial flare to the sagittal midline of the tibia. The dissection must not be extended more than 2 to 3 cm distal to the medial joint line.
A portion of the anterior synovium over the supracondylar area is excised to facilitate visualization of the anterior femoral cortex and permit appropriate sizing on the femoral component.
A portion of the retropatellar fat pad is excised to permit full exposure of the lateral tibial plateau.
The patella is either everted or subluxated laterally into the lateral gutter (TECH FIG 3B,C), and the knee is flexed.
Current data do not support any difference in outcomes with respect to patellar eversion during TKA.13,23
The medial flap of the quadriceps must be reflected medially off the face of the femur. There should be no undue tension at the patellar tendon insertion. Placing one smooth pin in the tibial tuberosity may provide some protection against tendon avulsion in very tight knees but is typically not necessary in primary TKA.
Release of a portion of the medial portion of the patellar tendon and elevation of a small cuff of periosteum immediately adjacent to the patellar tendon insertion can be helpful.
A retractor is inserted lateral to the lateral meniscus.
A second retractor is placed along the medial joint line for medial exposure.
 Preparation of the Tibia
The ACL is excised, allowing further anterior translation of the tibia.
The PCL can be preserved (in cruciate-retaining TKA) or excised (in cruciate-substituting TKA).
This choice depends on surgeon’s preference, degree of deformity, and status of the PCL.
Advantages to PCL-substituting TKA include ease of exposure (increased anterior tibial translation), more predictable “rollback” of the femur, and fewer ligamentous structures involved in TKA balancing.
Advantages to PCL-retaining TKA include preservation of femoral bone stock (no need for a box cut), preservation of native anatomy, and avoidance of the “patellar clunk” phenomenon.
However, data comparing PCL-substituting and PCL-retaining knee do not indicate the superiority of one versus the other.9,24
Complete anterior subluxation of the tibia from beneath the femur is accomplished with hyperflexion and external rotation of the tibia, providing complete exposure of the tibial plateau and posterior horn attachments of the menisci.
This maneuver may be blocked by osteophytes or incomplete release of medial capsular structures.
A retractor is placed posteriorly to aid in anterior dislocation of the tibial plateau and to protect the popliteal fossa during the proximal tibial osteotomy.
With the tibia completely subluxated anteriorly, the medial and lateral menisci are excised and the PCL exposed, released, or excised, as the surgeon prefers. The popliteus tendon is protected during all soft tissue and bone resection.
If adequate exposure of the tibia cannot be obtained, the femoral cuts can be made first, allowing easier access to the back of the joint.
 Bone Cuts
The five standard bone cuts for any TKA are as follows:
Transverse proximal tibial resection
Distal femoral condylar resection
Anterior and posterior condylar resections
Anterior and posterior chamfer resections from the distal femur
Retropatellar cut (in patellar resurfacing)
The sixth step of the intercondylar box or box cut is performed only for posterior stabilized designs.
Either the femoral or the tibial cut is performed first, depending on surgeon preference and technique.
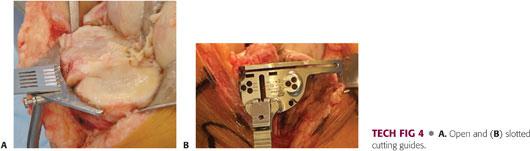
Bone cuts can be made using open or slotted cutting guides (TECH FIG 4).
Classically, bone cuts are made to align the implanted knee joint perpendicular to the mechanical axis of the lower extremity, thereby distributing weight-bearing forces evenly between the medial and lateral compartments.
This technique uses both native bony anatomy or computer assistance and cutting guides to properly align the knee.
The clinical success and survivorship of TKA using this technique has been linked to correct orientation of the components with respect to the mechanical axis.
Greater than 3 degrees of malalignment in the coronal plane has been associated with an increased failure rate.
More recently, some surgeons have advocated bone cuts made relative to a three-dimensional kinematic axis of the knee.
This technique seeks to restore the native tibia vara and femoral valga as opposed to referencing the mechanical axis of the lower extremity.
Bony preparation in these cases often uses preoperative advanced imaging and creation of patient-specific cutting guides.
Although the short-term results of TKA using this technology demonstrate feasibility, long-term data regarding survivorship are currently lacking.8
The following paragraphs describe bone cuts made using the classic mechanical alignment technique, which is the authors’ current preferred method.
Proximal Tibial Cut
The goal of the proximal tibial resection is to create a flat surface perpendicular to the mechanical axis of the tibia.
Because the mechanical axis typically parallels the anatomic axis of the tibia, either an IM or extramedullary (EM) alignment rod can be used to help align this resection, provided that there is no deformity, bowing, offset to the tibial shaft, or blockage in the medullary canal.
EM rods are advantageous because they limit fat emboli and can be used even in the presence of significant tibial bowing or obstruction.
IM rods can be particularly useful when external bony landmarks are difficult to palpate such as in obese patients.
When using an EM guide
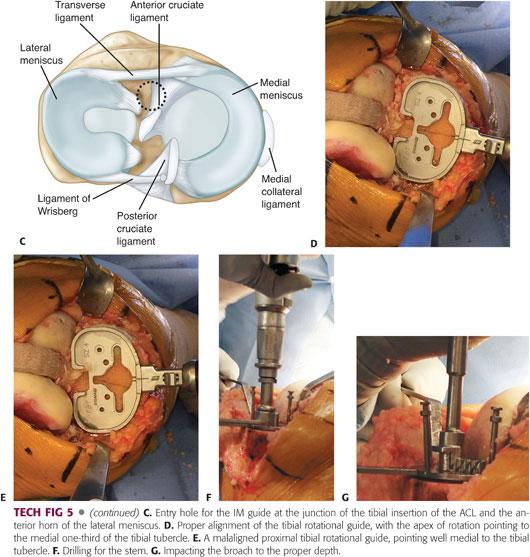
Attach the strap of the distal end of the alignment guide above the ankle and pin the proximal end to the upper tibial metaphysis. Adjust the alignment guide to sit on the medial third of the tibial tubercle proximally and parallel the tibial crest, which serves as a landmark for the mechanical axis of the tibia (TECH FIG 5A).
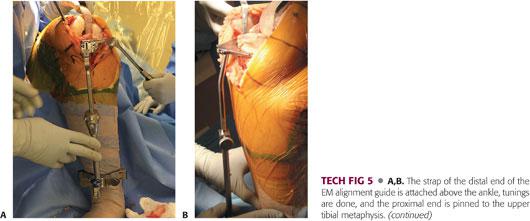
Set the proximal part to obtain 3 to 5 degrees of posterior slope in the sagittal plane (TECH FIG 5B).
When sufficient anatomic landmarks exist, an “angel wing” placed along the proximal medial tibial plateau can be used to set the slope to match the patients native slope.
• Particularly with PCL-substituting TKA, it is important to avoid excessive tibial slope, as too much slope can cause flexion instability and impingement of the femoral box on the post in extension.
Fit the proximal cutting block snugly up against the tibial cortex to improve the accuracy of the resection.
Remove an appropriate amount of cartilage and bone from the tibial plateau.
The bone resected should have approximately the same thickness as the final tibial component, including the metal base plate and polyethylene liner.
When judging depth of the resection, it is often useful to reference the least involved portion of the tibial plateau, as this provides a more constant reference point.
When using an IM guide
Accurately choose the pilot hole that is at the junction of the tibial insertion of the ACL and the anterior horn of the lateral meniscus (TECH FIG 5C).
• Irrigation and aspiration of the canal; insertion of a fluted, hollow rod; and drilling a hole slightly larger than the size of the IM rod to allow egress of material can reduce the risk of fat embolization.
Insert the IM rod and fix the cutting block in the desired position, then remove the rod together with its outrigger.
Carefully protect the MCL and lateral collateral ligament (LCL) through proper insertion of retractors.
Use an oscillating saw to cut the bone. To protect the posterior neurovascular bundle, stop cutting the last few millimeters of bone by saw and crack the rest afterward by levering or using an osteotome.
Remove the osteotomized bone along with the remnants of menisci. Establish the anatomic boundary of the tibial metaphysis by removing the osteophytes.
Proximal tibial osteophytes can often resemble true articular surfaces, but all osteophytes must be removed to facilitate proper balancing of the knee.
The proximal tibia is then sized appropriately, and the rotation is set by aligning the tibial axis with the junction of the medial and middle third of the tibial tubercle (TECH FIG 5D).
Alternatively, tibial rotation may be achieved by “floating” the tibial component during the trial phase and allowing the fixed femoral component articulation to set the rotation of the tibial component.
No matter how rotation is set, it is important to avoid internal rotation of the tibial component, as this can result in significant patellar tracking problems (TECH FIG 5E).
If necessary, place the appropriately sized stem drill guide on the sizing tray and drill for the stem (TECH FIG 5F).
Assemble the proper size of tibial broach on the broach impactor. Seat the impactor on the tray and impact the broach to the proper depth (TECH FIG 5G). Impact the stemmed tibial trial to ensure proper fit before implanting the final prosthesis.
Distal Femur Cuts
Because of a lack of reliable palpable external landmarks, the IM alignment guide is superior to the EM guide for preparation of the femur, except in cases of excessive femoral bowing, previous fracture, Paget disease, or an ipsilateral long-stemmed total hip replacement.
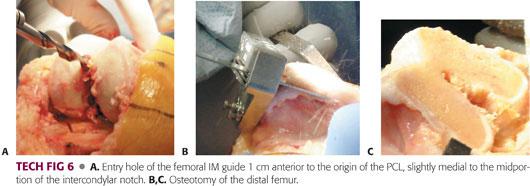
Drill an entry hole 1 cm anterior to the origin of the PCL, slightly medial to the midportion of the intercondylar notch (TECH FIG 6A). Touching the anterior surface of the femoral shaft with the other hand can be a good guide to the direction of drilling.
As with IM tibial rods insertion, slight overdrilling using a fluted IM guide and aspiration of the marrow contents before insertion of the guide are recommended to decompress the femoral canal and to subsequently reduce the risk of fat emboli.
Insert the IM guide and pass it directly into the center of the canal without making any contact with the femoral cortices; otherwise, the angle of resection will be changed. Attach the cutting block to the IM rod, adjust it to the desired amount of valgus (typically 5 to 6 degrees), and then fix it in place.
The amount of valgus imparted to the distal femoral cut is based on the difference between the mechanical and anatomic axes of the femur.
Remove the IM rod and cut the bone. It is crucial to prevent the saw blade from bending or going forward in an undesired direction while proceeding through the osteotomy line, particularly during resection of hard and sclerotic bone.
The amount of bone to be resected should be precisely equivalent to the thickness of the final femoral component. In the sagittal plane, the distal femur should be cut at 90 degrees to the femoral mechanical axis and, after soft tissue balancing, should be parallel to the resected surface of the proximal tibia with the knee in extension (TECH FIG 6B,C).
Anterior and Posterior Femoral Condylar Cuts
Making accurate cuts is essential to obtain proper size and rotation of the final femoral component.
This step is critical with respect to balancing the flexion gap and achieving appropriate patellar tracking.
There are four basic techniques to setting femoral rotation, three of which use femoral anatomic landmarks:
Using the posterior condyles as a reference, align the AP cutting block in 3 degrees of external rotation relative to the posterior condylar axis.
• This accounts for the asymmetry of the native posterior condyles.
• Increased external rotation may be necessary, particularly in valgus knees with hypoplasia of the lateral femoral condyle.
Align the AP cutting block parallel to the epicondylar axis of the femur.
Align the cutting block perpendicular to Whiteside line, which is a line drawn from the top of the intercondylar notch to the deepest part of the femoral trochlea.
These are known as measured resection techniques for achieving appropriate femoral rotation.
The advantages of these procedures include technical ease and the ability to use either a tibia first or a femur first work flow.
Their disadvantages include inconsistency of anatomic landmarks.
The fourth technique is known as a gap balancing technique, is independent of femoral anatomic landmarks, and uses the flat proximal tibial resection and ligament balance to set femoral rotation.
Once the proximal tibia and distal femoral cuts are made, the knee is balanced in extension by performing appropriate resection of osteophytes and any necessary ligament releases.
The knee is flexed, the collateral ligaments are tensioned using a spacer block, and the femur is allowed to freely rotate.
The femoral AP cutting block is then situated parallel with the flat tibial surface.
The advantages of this technique include no reliance on possibly inconsistent femoral anatomy and insurance of a congruent flexion gap.
The disadvantages of this technique include technical difficulty in achieving both a balanced extension and flexion gap prior to making posterior femoral cuts and dependence on a perfectly flat proximal tibial resection.
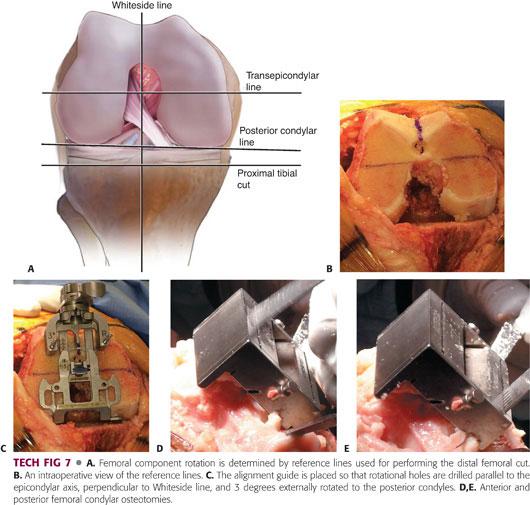
Using a combination of all four techniques and multiple reference points (ie, appreciating that the posterior cut should be parallel to the transepicondylar line, perpendicular to the Whiteside line, and parallel to the upper tibial cut) can help the surgeon reduce any error in the rotation of the femoral component (TECH FIG 7A–C).
Adjust the stylus that indicates where the anterior cut exits the femur to size the knee.
Sizing of the femoral component can be done in one of two ways:
In an anterior referencing technique (top down), the anterior position of the femoral component is set to be flush with the anterior femoral cortex and held constant, and upsizing or downsizing of the component changes the flexion gap.
• The main advantage of this technique is avoidance of femoral notching.
• The main disadvantage of this technique is the potential to create an asymmetric flexion gap.
In a posterior referencing technique (bottom up), the posterior position of the femoral component is set and held constant, and upsizing or downsizing the component changes the position of the component relative to the anterior cortex of the femur.
• The main advantage of this technique is the ability to set and hold constant a predetermined flexion gap.
• The main disadvantage to this technique is the potential for anterior femoral notching or overstuffing the patellofemoral joint if the component is not sized appropriately.
Maximally flex the knee to reduce the chance of injury to the posterior neurovascular bundle during posterior sawing and use a saw to make the guided cuts (TECH FIG 7D,E).
Anterior and Posterior Chamfer Cuts
Anterior and posterior chamfer cuts are essential for the prosthesis to fit over the distal femur.
A chamfer guide is placed on the distal femur. In some systems, this step is integrated into the same block as that used for the anterior and posterior femoral cuts (TECH FIG 8A,B).
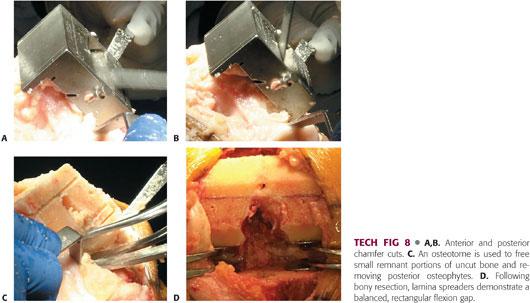
When the sawing is complete, use an osteotome to free small remnant portions of uncut bone (TECH FIG 8C).
Once the bony cuts are made, it is important to open up the flexion gap with lamina spreaders and remove any remaining osteophytes, loose bodies, or unresected meniscus and bone from the back of the knee.
In a properly balanced knee, the tension on the lamina spreaders will be equal medially and laterally and the flexion gap will be rectangular (TECH FIG 8D).
If necessary, a release of the posterior capsule may be done at this time, taking great care to avoid injury to the popliteal neurovascular structures.
To accommodate the post–cam mechanism in a posterior stabilized prosthesis, place the finishing guide onto the distal femur to make the intercondylar box cut. Center the guide mediolaterally and secure it firmly by pin or screw.
Use a reciprocating saw to resect the bone from the notch. Complete the resection with a chisel or osteotome.
Lateralization of the femoral component can help to optimize patellar tracking.
Patellar Preparation
Patellar resurfacing is often, but not always, performed during TKA.
Patellar preparation can be done at any point in the procedure, but is typically done either following both tibial and femoral preparation, or immediately following the initial approach in an effort to facilitate exposure.
Remove the osteophytes, synovial insertions, and fat to demarcate the anatomic margins of the patella.
Use a caliper (TECH FIG 9A) to assess the patellar thickness before the cut and after the patella is resurfaced to ensure that the patellar thickness is equal to the original thickness and that at least 12 mm of bone stock remains.20
To obtain an exact measurement of the patellar thickness, the prepatellar bursa should be dissected to completely expose the anterior surface of the patella.
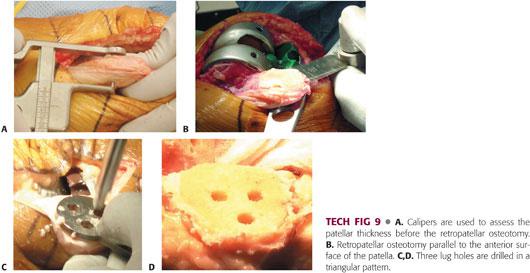
Use a patellar cutting jig, mill, or freehand technique. Pass the patellar cut parallel to the anterior surface of the patella through the chondro-osseous junction, completely resecting both facets (TECH FIG 9B). Proximally, the cut passes just superficial to the quadriceps insertion; distally, it passes through the nose of the patella, superficial to the patellar tendon.
Make a flat cut, removing any remnants of cartilage.
Center and firmly hold the appropriate drill guide and drill lug holes to facilitate patellar fixation (TECH FIG 9C,D).
Placing the patellar button superiorly and medially can help achieve optimal patellar tracking within the femoral trochlea.
 Soft Tissue and Ligament Balancing
Soft tissue and ligament balancing is a vital portion of the surgical procedure.11,21
To achieve proper ligament balance, it is critical to first remove all marginal osteophytes from both the tibial and femoral margins.
In knees with minimal deformity, balance can often be achieved by performing a minimal soft tissue release, making the bone cuts, and checking the knee through insertion of trial components.
However, in knees with complex or severe deformity, cautious stepwise release is necessary.
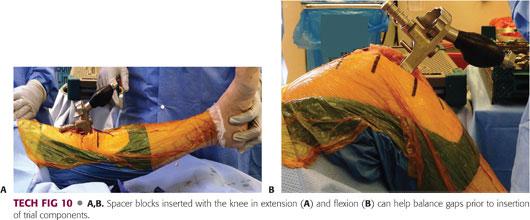
Spacer blocks can be used after creation of each gap to check balance in both flexion and extension (TECH FIG 10A,B).
If no release is necessary, proceed to the next step.
Once both the flexion and extension gaps are created and balanced, make sure the gaps are equal in size.
If the gaps are asymmetric, augmentation may be necessary (see in the following text).
When the deformity is severe and leads to loss of the integrity of the collateral ligaments, a constrained prosthesis may be necessary.
Correction of Preoperative Flexion Contracture
Preoperative flexion contractures can result from various different sources, often in combination.
Posterior femoral or tibial osteophytes
Soft tissue contraction
Posterior capsular scarring
Neuromuscular comorbidities (eg, Parkinson disease)
A stepwise approach to correcting these deformities includes the following:
With the knee in flexion, use a curved osteotome to release and remove osteophytes from the posterior femoral condyles.
Upon delivering the tibia anteriorly, observe the posterior margin of the tibia and remove any osteophytes.
Make sure to remove any notch osteophytes and all loose bodies, particularly those that become lodged behind the PCL in cruciate-retaining knees.
Carefully strip any capsular adhesions from the posterior aspect of the femur. PCL recession may be necessary to fully release posterior capsular adhesions.
If there is still a persistent flexion contracture at this point, additional distal femur can be resected.
• This step should be done only if the preceding steps do not resolve the contracture, as resecting more distal femur can potentially raise the joint line and cause varying degrees of patella baja, impingement, and midflexion instability.
• Spacer blocks can also be inserted following these maneuvers to ensure no flexion contracture remains prior to insertion of trial and definitive components.
In knees with severe preoperative flexion contractures, it may be necessary to cut the posterior capsule transversely and release the tendinous origins of the gastrocnemius.
Correction of Varus Deformity
The medial capsulotomy, along with the subperiosteal medial release included in the initial approach and exposure, can correct minimal varus deformities.
If the knee remains tight medially, balancing it involves the following steps:
Make certain that all osteophytes have been removed.
• Marginal femoral osteophytes can become trapped under the MCL.
• Marginal tibial osteophytes can resemble articular surface.
Extend the medial subperiosteal release for an additional 2 to 3 cm.
If the medial knee is tight in flexion only, release the anterior portion of the superficial MCL.
If the medial knee is tight in extension only
• Make sure that the hamstrings have been adequately released from the posterior margin of the tibia.
• Release the posterior oblique fibers of the superficial MCL.
It may be necessary to check the proximal tibial cut to make sure the cut is not in valgus.
If the knee is still tight medially, the MCL can be “pie crusted” or released entirely.
If this step is performed, it is often necessary to use a constrained component.
Correction of Valgus Deformity
It is unusual for the lateral side of the knee to be tight with valgus arthritis.
If this situation occurs, the tibial cut should first be checked to make sure the proximal tibia is not in varus.
When addressing valgus knees that are tight laterally, balancing involves the following:
Sequential release of the iliotibial band, popliteal tendon, LCL, and finally the posterior capsule
If the lateral knee is tight in extension, release the iliotibial band and then the popliteus.
If the lateral knee is tight in flexion, release first the popliteus and then the LCL subperiosteally from the femoral condyle.
If the knee remains significantly tight laterally, the biceps femoris tendon may be released if necessary.
Correction of Valgus Knee with Incompetent Medial Collateral Ligament
A valgus knee with an incompetent MCL occurs in knees with severe, long-standing valgus deformity.
This situation should be identified preoperatively with an appropriate physical examination.
Treatment strategies include the following:
Use of a constrained articulation
MCL advancement
MCL reconstruction
 Component Insertion and Trial Reduction
Insert provisional tibial, femoral, and patellar components of the correct size (see TECH FIG 9A).
Avoid overhang of the components.
If this is not possible, allow overhang to occur laterally, as medial overhang often results in soft tissue impingement and postoperative pain.
Insert a spacer of the proper height and reduce the joint. Check the ROM and ligament stability. Apply varus and valgus stresses in flexion, midflexion (approximately 40 degrees), and extension to determine the stability of the knee and the appropriate thickness of the tibial insert.
It is essential at this point, if not done with spacer blocks earlier in the procedure, to ensure gap symmetry (TECH FIG 11).
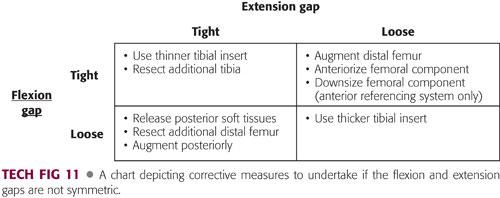
If both gaps are equal, no further adjustments need to be made.
If both gaps are loose, a thicker polyethylene insert is necessary.
If both gaps are tight, a thinner tibial insert should be used, or more tibial bone should be resected.
If the extension gap is tight and the flexion gap is appropriate, correct the flexion contracture with the steps listed earlier.
If the extension gap is appropriate, but the flexion gap is tight (often indicated by lifting of the tibial insert in flexion), it may be necessary to either augment the distal femur and use a thinner polyethylene component or anteriorize or downsize the femoral component to achieve gap symmetry.
 Patellar Tracking
The patella should track centrally in the trochlear groove without lateral subluxation or lateral tilt in full flexion (TECH FIG 12).
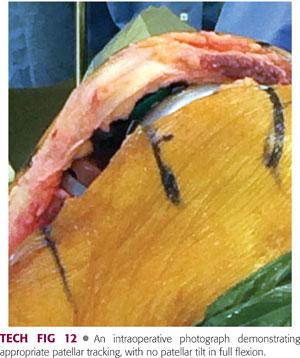
Perform the no-thumbs test by reducing the patella and taking the knee through the full flexion arc without closing the medial arthrotomy and without applying any medially directed force with the thumb to keep the patella in position.
If there is patellar tilting or slight subluxation with the no-thumbs test, reapproximate the medial retinaculum at the superior pole of the patella with a single suture. If the suture does not break through full flexion of the knee, a lateral release is likely not necessary and should not be performed at this point in the procedure.
The accuracy of evaluations of extensor mechanism balance can be improved by deflating the tourniquet, which can bind the extensor mechanism and result in perceived patellofemoral maltracking.5
Tracking may be improved by the following:
Appropriate femoral and tibial rotation
Lateralization of the femoral component
Medialization and superiorization of the patellar component
Persistent lift-off or subluxation after tourniquet deflation may require a lateral release.
 Component Fixation
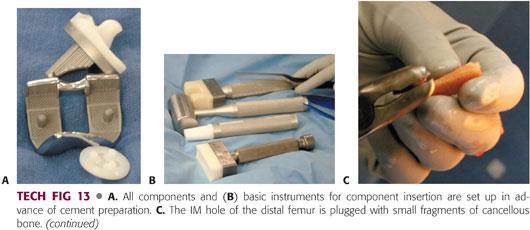
The setup of all components and basic instruments for component insertion should be done before the cement is prepared (TECH FIG 13A,B).
With a small (1/8 inch) drill bit, drill the sclerotic areas of the tibial plateau (1 to 2 mm deep) to achieve adequate anchorage of the tibial component.
Plug the IM hole of the distal femur with small pieces of cancellous bone (TECH FIG 13C).
Use pulsatile lavage to thoroughly irrigate the cut surfaces with normal saline in order to remove all debris and increase the depth of cement penetration into the trabecular bone. Dry the bone completely with suction and dry gauze.
Polymethylmethacrylate is used for fixation of the components in a cemented knee arthroplasty.
Vacuum mixing systems are typically used to remove any air bubbles that can impede biomechanical strength of the cement and ensure thorough mixing of cement powder and monomer.
When the cement is in a doughy state, apply it to the tibial plateau (TECH FIG 13D). At this point, finger packing may improve the cement mantle. Add a thin layer of cement and impact the tibial component and polyethylene liner into place (TECH FIG 13E).
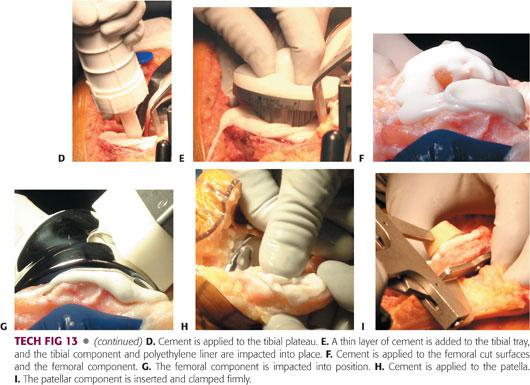
Trim and remove the excess cement as it extrudes from under the plateau.
Apply cement to the femoral cut surfaces (TECH FIG 13F).
It can be difficult to place cement on the posterior femoral condyles, so cement is often applied directly to the component prior to impaction.
Impact the femoral component into position and remove the excess cement from around the prosthesis (TECH FIG 13G).
Reduce the knee and bring it to full extension. It may be useful to place a small bump under the ankle to ensure full extension of the knee at this stage.
With the knee extended, apply cement to the patella (TECH FIG 13H). Insert the patellar component and clamp it firmly in place (TECH FIG 13I). Trim and remove the excess cement.
Keep the knee in full extension until the cement is fully cured. Inspect all the corners of the joint, especially the posterior parts, to make certain that no extra cement or loose pieces of bone or cement remain.
Irrigate the knee thoroughly. For the last time before closing the joint, check the ROM, knee stability, and patellar tracking.
 Closure
Copiously irrigate the knee to ensure that no bone or cement particles remain.
Identify the formerly placed markings. Close the arthrotomy to produce a watertight seal.
Place the knee through a full ROM to make sure that the closure is strong enough not to rupture during physical therapy and confirm that the patella is tracking normally.
Close subcutaneous tissue and superficial fascia with interrupted no. 2 Vicryl stitches or its equivalent in a single layer. (Use a double layer if the patient is obese.)
Close the skin with a quickly absorbing suture or skin clips.
PEARLS AND PITFALLS | |
The tibial cutting guide should be aligned with the tibial crest, and distally, it should fall slightly medial to the midpoint of the malleoli. |
|
The tibial cutting guide should be oriented to produce 3–7 degrees of posterior slope. |
|
The tibial component should be placed against the lateral margin of the tibial plateau. |
|
The starting point for the femoral IM rod insertion is approximately 1 cm anterior to the PCL insertion. |
|
The femoral component should be sized appropriately, and the consequences of a bottom-up or top-down technique should be realized to help avoid complications. |
|
Pay close attention to the distal femoral cut in the sagittal plane to avoid flexion or extension. |
|
The distal femoral cut in the coronal plane should not exceed 7 degrees of valgus. |
|
Use a combination of references for assessing femoral rotation. |
|
If using the posterior condylar line as a reference, add an extra degree or two to the external rotation prior to making cuts in valgus knees. |
|
Lateralization of the femoral component can help patellar tracking. |
|
The goal of patellar resection is to remove the same thickness that will be replaced by the component. |
|
At least 12–14 mm of bone should be left in all cases. |
|
Medialization and superior positioning of the patellar component can help tracking. |
|


POSTOPERATIVE CARE
 At the conclusion of the operation, a gently compressive bandage may be applied.
 Current analgesic strategies employ a multimodal approach to pain management:
Pre- and perioperative use of anti-inflammatories and nerve modulator therapy
Intraoperative local analgesic injections or placement of intra-articular pain pumps
Postoperative use of intravenous cyclooxygenase (COX) inhibitors and acetaminophen
Narcotic and nonnarcotic oral pain medications
 Antibiotics are typically administered for one to two doses postoperatively.
 Initiate appropriate thromboprophylaxis.
 Postoperative rehabilitation protocols vary but typically include the following:
Early mobilization and initiation of weight-bearing activities
Early ROM
Appropriate pain management
Allowing sufficient periods of rest to help limit excessive swelling and inflammation.
Weaning off assistive devices as tolerated.
 Common therapeutic exercises include the following:
Active, active-assisted, and passive ROM exercises
Quadriceps sets
Straight-leg raises
Occupational therapy (eg, transfer training, stair climbing)
 Patients typically are discharged 1 to 3 days after surgery, either to home or to an inpatient rehabilitation facility.
 Early office follow-up concentrates on wound healing and progression of strength and ROM.
Early wound complication needs to be followed closely.
Early stiffness must be monitored, with manipulation under anesthesia considered at 6 to 8 weeks following surgery if stiffness persists.
 Once strength, mobility, and balance are regained, patients can resume low-impact sport activities (eg, cycling, swimming, gentle aerobic-style exercises, walking, hiking, golf, or bowling).
 Higher impact activities such as basketball, soccer, and football are generally discouraged, but current data do not suggest an absolute contraindication.
OUTCOMES
 TKA is a reliable and predictable surgery, with recently reported survival rates above 95% at 10 years and above 85% up to 23 years of follow-up. Favorable gains for pain and functionality following TKA are well reported and recognized.10,14
 For the vast majority of patients, overall satisfaction with the outcome of the surgery is good to excellent.
 Patients who tend to have lower satisfaction rates and therefore deserve special consideration and counseling prior to surgery include the following12,19:
Younger patients (age younger than 50 years) with knee arthritis
Morbidly obese patients (body mass index >40 kg/m2)
Patients with prior reconstructive knee surgery (eg, osteotomy, patellar realignment)
Patients receiving worker’s compensation
COMPLICATIONS
 The overall mortality rate following TKA is very low, and this procedure does not considerably reduce the life expectancy in patients with OA.
Infection
 Infection should be considered in any persistently painful TKA or with the acute onset of pain in a previously well-functioning TKA.
 Workup for infection should include at the very least15
Appropriate history and physical examination
Radiographs
Lab work, including erythrocyte sedimentation rate (ESR) and C-reactive protein (CRP)
Aspirate sent for cell count, gram stain, and culture
 Physical examination findings consistent with infection include the following:
Progressive or persistent erythema
Persistent drainage, particularly beyond 7 days postoperatively
Purulent drainage from the incision
 Radiographic evidence of infection includes the following:
Progressive radiolucent lines or periprosthetic lysis
Progressive loosening or subsidence
 Lab work studies can be variable but typically demonstrate the following:
Elevated CRP and ESR
Normal to elevated serum white blood cell count
Gram stain and culture can be helpful but have a high false-negative rate.26
Elevated synovial cell white blood cell count and neutrophil percentage1,6
• In the acute setting (up to 6 weeks postoperatively), a synovial fluid white blood cell count of greater than 20,000 and a neutrophil percentage greater than 89% is highly suspicious for infection.
• In the chronic setting, a synovial fluid white blood cell count of greater than 1500 and a neutrophil percentage greater than 65% is highly suspicious for infection.
Presence of leukocyte esterase in the synovial fluid18
 Superficial incisional infection, characterized by erythema, dry wound, nonpurulence, and neither loculation nor induration, may be treated with systemic antibiotics with the understanding that once antibiotic therapy is initiated, the opportunity to accurately diagnose a deep infection may be lost.
Drainage for up to 1 week may be observed with local wound care and immobilization, but drainage beyond a week warrants open débridement.
 In contrast, a wound with either drainage or skin necrosis usually benefits from prompt surgical débridement, at which time, reliable culture material may be obtained if antibiotic therapy has not been initiated.25
Instability
 Instability after TKA is the cause of failure in 10% to 20% of all failures. Successful outcomes are obtained in many of these cases, but without identifying the cause of instability, the surgeon risks repeating the mistakes that led to the instability after the initial TKA.17
 Three types of instability may occur after a TKA:
Extension instability
Flexion instability
Genu recurvatum
 Surgical treatment is generally indicated and is largely aimed at restoring balanced flexion and extension gaps at the time of revision TKA. Selective use of constrained and rotating hinge TKA designs is appropriate for subgroups of patients with instability.17
Osteolysis
 The most significant cause for late revision TKA is osteolysis, which occurs as the result of a foreign body response to particulate wear debris from the prosthetic joint, ultimately resulting in loosening of the components.
 Osteolysis is often asymptomatic.
 Symptomatic osteolysis typically indicates a fairly progressed process and presents with the following7:
Pain, which is often worse at the initiation of gait (start-up pain)
Swelling
Instability
Crepitus
 Depending on the clinical situation, asymptomatic osteolysis can be followed with serial radiographs, whereas symptomatic osteolysis usually necessitates revision surgery.
Vascular Injury
 Popliteal artery injury during TKA is rare but potentially catastrophic.
 The injury may have acute or delayed presentation.
 Causes include the following:
Arterial thrombosis due to tourniquet application
Arterial kinking during knee manipulation
Direct injury to the artery
 Direct, sharp arterial injury is believed to have a better prognosis than arterial thrombosis.
 Prompt recognition of injury by the orthopaedic surgeon and treatment by an experienced vascular surgeon are necessary to achieve a good outcome.4
Nerve Injury
 Both the tibial and peroneal nerves may be injured during TKA.
 Preoperative flexion contracture, particularly in the setting of a concomitant valgus deformity, is a risk factor for postoperative nerve palsy.
 Postoperative hematoma also increases the risk of peroneal nerve injury.
 Initial therapy once nerve palsy is recognized includes the following:
Knee and hip flexion to 20 to 45 degrees and immediate release of constrictive dressings.
 Surgical exploration of the non-neurolytic nerve can be employed if no functional recovery is noted after 3 months from the onset of the injury.22
REFERENCES
1. Bedair H, Ting N, Jacovides C, et al. The Mark Coventry Award: diagnosis of early postoperative TKA infection using synovial fluid analysis. Clin Orthop Relat Res 2011;469(1):34–40.
2. Benjamin J. Component alignment in total knee arthroplasty. Instr Course Lect 2006;55:405–412.
3. Bonutti PM, Zywiel MG, Ulrich SD, et al. A comparison of subvastus and midvastus approaches in minimally invasive total knee arthroplasty. J Bone Joint Surg Am 2010;92(3):575–582.
4. Da Silva MS, Sobel M. Popliteal vascular injury during total knee arthroplasty. J Surg Res 2003;109:170–174.
5. Eisenhuth SA, Saleh KJ, Cui Q, et al. Patellofemoral instability after total knee arthroplasty. Clin Orthop Relat Res 2006;446:149–160.
6. Ghanem E, Parvizi J, Burnett RS, et al. Cell count and differential of aspirated fluid in diagnosis of infection at the site of total knee arthroplasty. J Bone Joint Surg Am 2008;90(8):1637–1643.
7. Gupta SK, Chu A, Ranawat AS, et al. Osteolysis after total knee arthroplasty. J Arthroplasty 2007;22:787–799.
8. Howell SM, Howell SJ, Kuznik KT, et al. Does a kinematically aligned total knee arthroplasty restore function without failure regardless of alignment category? Clin Orthop Relat Res 2013;471(3):1000–1007.
9. Kim YH, Choi Y, Kwon OR, et al. Functional outcome and range of motion of high-flexion posterior cruciate-retaining and high-flexion posterior cruciate-substituting total knee prostheses. A prospective, randomized study. J Bone Joint Surg Am 2009;91(4):753–760.
10. Kim YH, Kim JS, Choe JW, et al. Long-term comparison of fixed-bearing and mobile-bearing total knee replacements in patients younger than fifty-one years of age with osteoarthritis. J Bone Joint Surg Am 2012;94(10):866–873.
11. Lombardi AV Jr, Berend KR. Posterior cruciate ligament-retaining, posterior stabilized, and varus/valgus posterior stabilized constrained articulations in total knee arthroplasty. Instr Course Lect 2006;55:419–427.
12. McElroy MJ, Pivec R, Issa K, et al. The effects of obesity and morbid obesity on outcomes in TKA. J Knee Surg 2013;26(2):83–88.
13. McPherson EJ. Patellar tracking in primary total knee arthroplasty. Instr Course Lect 2006;55:439–448.
14. Meftah M, Ranawat AS, Ranawat CS. Ten-year follow-up of a rotating-platform, posterior-stabilized total knee arthroplasty. J Bone Joint Surg Am 2012;94(5):426–432.
15. Mihalko WM, Manaswi A, Cui Q, et al. Diagnosis and treatment of the infected primary total knee arthroplasty. Instr Course Lect 2008;57:327–339.
16. Nestor BJ, Toulson CE, Backus SI, et al. Mini-midvastus vs standard medial parapatellar approach: a prospective, randomized, double-blinded study in patients undergoing bilateral total knee arthroplasty. J Arthroplasty 2010;25(6 suppl):5–11.
17. Parratte S, Pagnano MW. Instability after total knee arthroplasty. J Bone Joint Surg Am 2008;90:184–194.
18. Parvizi J, Jacovides C, Antoci V, et al. Diagnosis of periprosthetic joint infection: the utility of a simple yet unappreciated enzyme. J Bone Joint Surg Am 2011;93(24):2242–2248.
19. Parvizi J, Nunley RM, Berend KR, et al. High level of residual symptoms in young after total knee arthroplasty. Clin Orthop Relat Res 2014;472(1):133–137.
20. Patel J, Ries MD, Bozic KJ. Extensor mechanism complications after total knee arthroplasty. Instr Course Lect 2008;57:283–294.
21. Peters CL. Soft-tissue balancing in primary total knee arthroplasty. Instr Course Lect 2006;55:413–417.
22. Schinsky MF, Macaulay W, Parks ML, et al. Nerve injury after primary total knee arthroplasty. J Arthroplasty 2001;16:1048–1054.
23. Umrani SP, Cho KY, Kim KI. Patellar eversion does not adversely affect quadriceps recovery following total knee arthroplasty. J Arthroplasty 2013;28(4):591–594.
24. Verra WC, van den Boom LG, Jacobs W, et al. Retention versus sacrifice of the posterior cruciate ligament in total knee arthroplasty for treating osteoarthritis. Cochrane Database Syst Rev 2013;10:CD004803.
25. Vince K, Chivas D, Droll KP. Wound complications after total knee arthroplasty. J Arthroplasty 2007;22(4 suppl 1):39–44.
26. Zywiel MG, Stroh DA, Johnson AJ, et al. Gram stains have limited application in the diagnosis of infected total knee arthroplasty. Int J Infect Dis 2011;15(10):e702–705.
< div class='tao-gold-member'>


